element14 Community
element14 Community
    Register Log In
  • Site
  • Search
  • Log In Register
  • About Us
  • Community Hub
    Community Hub
    • What's New on element14
    • Feedback and Support
    • Benefits of Membership
    • Personal Blogs
    • Members Area
    • Achievement Levels
  • Learn
    Learn
    • Ask an Expert
    • eBooks
    • element14 presents
    • Learning Center
    • Tech Spotlight
    • STEM Academy
    • Webinars, Training and Events
    • Learning Groups
  • Technologies
    Technologies
    • 3D Printing
    • FPGA
    • Industrial Automation
    • Internet of Things
    • Power & Energy
    • Sensors
    • Technology Groups
  • Challenges & Projects
    Challenges & Projects
    • Design Challenges
    • element14 presents Projects
    • Project14
    • Arduino Projects
    • Raspberry Pi Projects
    • Project Groups
  • Products
    Products
    • Arduino
    • Avnet Boards Community
    • Dev Tools
    • Manufacturers
    • Multicomp Pro
    • Product Groups
    • Raspberry Pi
    • RoadTests & Reviews
  • Store
    Store
    • Visit Your Store
    • Choose another store...
      • Europe
      •  Austria (German)
      •  Belgium (Dutch, French)
      •  Bulgaria (Bulgarian)
      •  Czech Republic (Czech)
      •  Denmark (Danish)
      •  Estonia (Estonian)
      •  Finland (Finnish)
      •  France (French)
      •  Germany (German)
      •  Hungary (Hungarian)
      •  Ireland
      •  Israel
      •  Italy (Italian)
      •  Latvia (Latvian)
      •  
      •  Lithuania (Lithuanian)
      •  Netherlands (Dutch)
      •  Norway (Norwegian)
      •  Poland (Polish)
      •  Portugal (Portuguese)
      •  Romania (Romanian)
      •  Russia (Russian)
      •  Slovakia (Slovak)
      •  Slovenia (Slovenian)
      •  Spain (Spanish)
      •  Sweden (Swedish)
      •  Switzerland(German, French)
      •  Turkey (Turkish)
      •  United Kingdom
      • Asia Pacific
      •  Australia
      •  China
      •  Hong Kong
      •  India
      •  Korea (Korean)
      •  Malaysia
      •  New Zealand
      •  Philippines
      •  Singapore
      •  Taiwan
      •  Thailand (Thai)
      • Americas
      •  Brazil (Portuguese)
      •  Canada
      •  Mexico (Spanish)
      •  United States
      Can't find the country/region you're looking for? Visit our export site or find a local distributor.
  • Translate
  • Profile
  • Settings
Sci-Pi Design Challenge
  • Challenges & Projects
  • Design Challenges
  • Sci-Pi Design Challenge
  • More
  • Cancel
Sci-Pi Design Challenge
Blog Any Measurement to Pi - Blog #4: Preparing Raspberry Pi for Image Recognition & OCR
  • Blog
  • Forum
  • Documents
  • Leaderboard
  • Polls
  • Files
  • Members
  • Mentions
  • Sub-Groups
  • Tags
  • More
  • Cancel
  • New
Join Sci-Pi Design Challenge to participate - click to join for free!
  • Share
  • More
  • Cancel
Group Actions
  • Group RSS
  • More
  • Cancel
Engagement
  • Author Author: taifur
  • Date Created: 13 Jun 2023 3:27 AM Date Created
  • Views 10981 views
  • Likes 8 likes
  • Comments 10 comments
  • image processing
  • open cv
  • python
  • Raspberry Pi Camera
  • machine learning
  • raspberry pi 4 b
  • sci-pi design challenge
Related
Recommended

Any Measurement to Pi - Blog #4: Preparing Raspberry Pi for Image Recognition & OCR

taifur
taifur
13 Jun 2023
Any Measurement to Pi - Blog #4: Preparing Raspberry Pi for Image Recognition & OCR

If you already read my previous blogs you know I am going to make a device using Raspberry Pi that will read the measurement from any digital display and convert it to text and number. That will be then used to integrate the measuring device like blood pressure meter or digital weight machine to any IoT device. In this way any consumer device that has no option to interface with any digital or microcontroller based system can be added to another system for further analyzing, cloud storing or remote monitoring. After successfully reading the display I will also apply it to any IoT system. For reading the text and number from any display Optical character recognition (OCR) technology will be applied. So, I will use Raspberry Pi, Raspberry Pi Camera Module & Python language for the OCR. In previous blog I discussed how I configured the Raspberry Pi for take and image using Raspberry Pi Camera Module and Python Program. In this blog I will show how I configured my Raspberry Pi for OCR. 

How to OCR?

Optical character recognition (OCR) refers to the process of electronically extracting text from images (printed or handwritten) or documents in PDF form. This process is also known as text recognition. I will use Google Tesseract-OCR Engine along with python and OpenCV to identity characters from pictures with a Raspberry Pi. To perform Optical Character Recognition on Raspberry Pi, we have to install the Tesseract OCR engine on Pi.

What is Tesseract?

Tesseract is a tool originally developed by Hewlett Packard between 1985 and 1994, with some changes made in 1996 to port to Windows, and some C++izing in 1998. Tesseract became open-source by HP in 2005, and Google has been further developing it since 2006. Tesseract recognizes and reads the text present in images. It can read all image types  —  png, jpeg, gif, tiff, bmp, etc. It is also widely used to process everything from scanned documents. Tesseract has unicode (UTF-8) support and can recognize more than 100 languages out of the box. In order to integrate Tesseract into C++ or Python code, we have to use Tesseract’s API.

How to Install Tesseract on a Raspberry Pi?

First, you need to make sure your Raspberry Pi is up-to-date by typing the following commands:

sudo apt-get update
sudo apt-get upgrade

These commands will update the installed packages on your Raspberry Pi to the latest versions. Then we can proceed with installing the Tesseract OCR (Optical Character Recognition) using the apt-get option. The command for the same is given below.

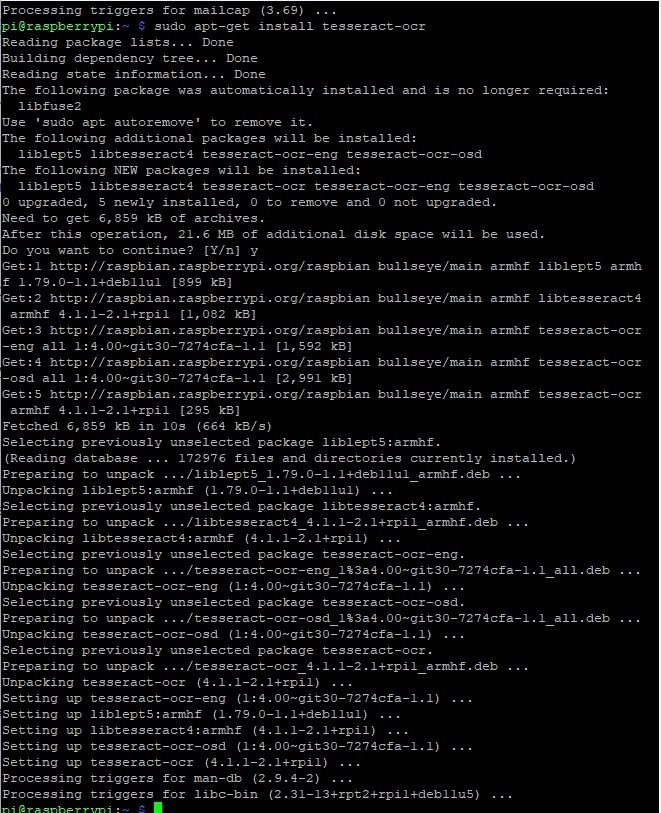
sudo apt-get install tesseract-ocr

Your terminal window will look something like below, it will take around 5-10 minutes for the installation to complete.

image

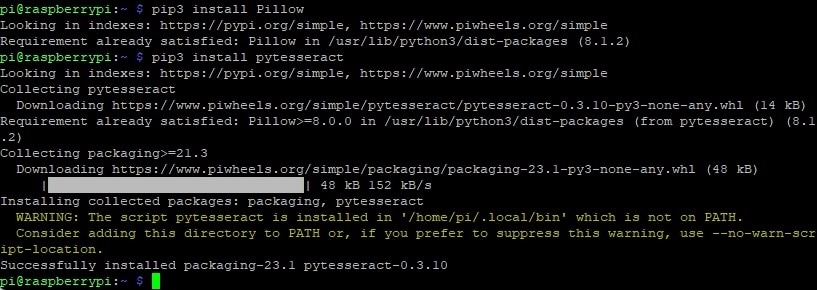
Now that we have the Tesseract OCR installed we have to install the PyTesseract package using the pip install package. Pytesseract is a python wrapper around the tesseract OCR engine, which helps us to use tesseract with python. But before installing pytesseract we need to install pillow if it already is not installed. Use the following command to install pillow:

pip3 install Pillow

Now, follow the below command to install pytesseract on python.

pip3 install pytesseract

Once the pytesseract installation is complete you window will look something like this:

image

Since we want to use the whole thing in a Python script, we require some libraries like OpenCV and Imutils.

Installing OpenCV to Raspberry Pi 4

OpenCV is a very extensive and incredibly powerful open-source library for (real-time) computer vision, including object detection, motion tracking, and camera calibration and ML (Machine Learning). When used together with libraries such as Numpy, it is capable of processing the OpenCV array structure. That enables identifying image patterns and features where we use vector space and mathematical operations.

I found OpenCV installation a bit complicated and long process.

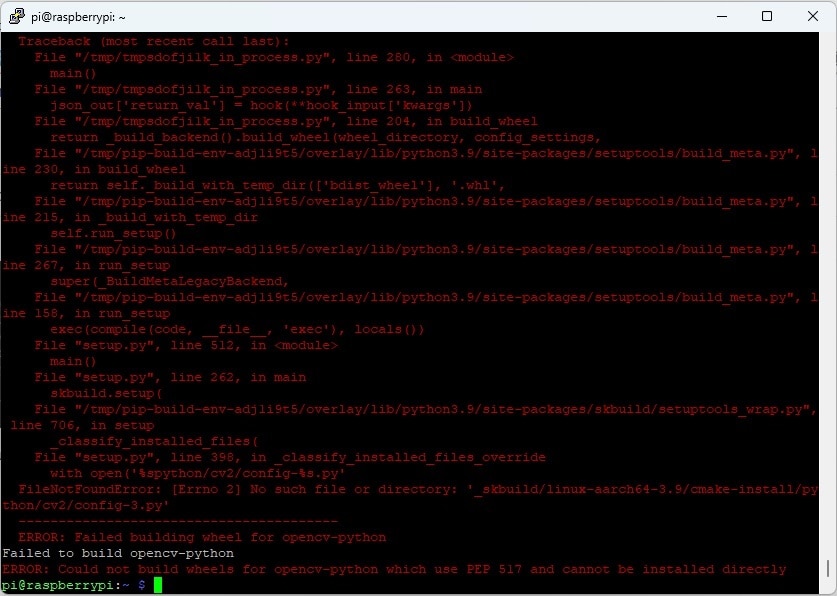
For installing OpenCV the most common command I found is as follows. I typed the following command in the terminal to install the required packages for OpenCV on my Raspberry Pi:

pip3 install opencv-python imutils numpy

After running the above command I got the following error after few minutes.

image

I was looking for the solution for this error an I found some suggestions in the Internet. According to those suggestions I run the following command from the terminal.

pip3 install --upgrade pip setuptools wheel

The result is shown in the terminal.

image

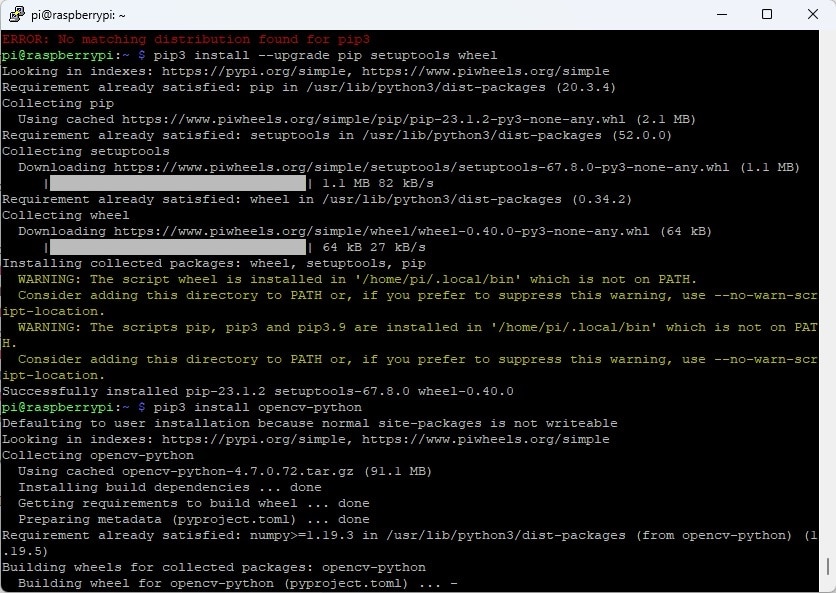
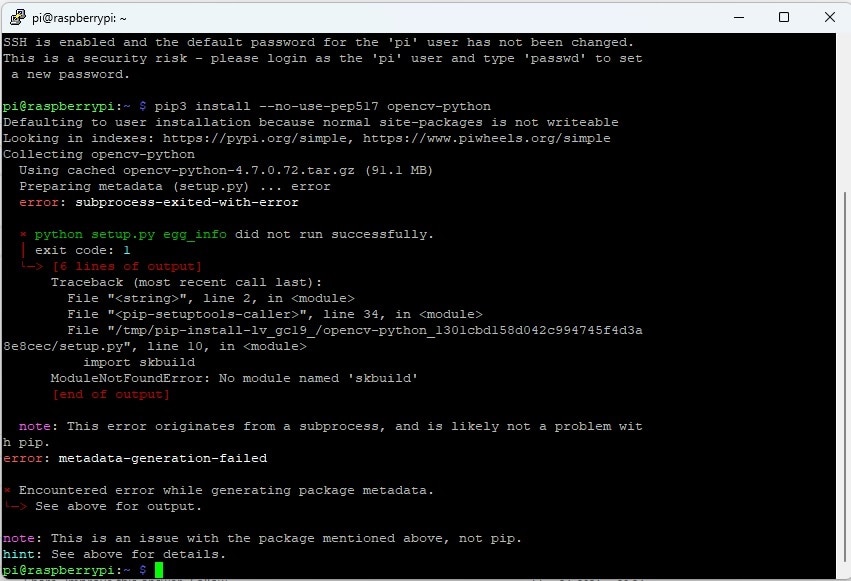
After upgrading setuptools I again run the pip3 install opencv-python but after waiting a long time I found the same error.So, I run the command by specifying the --no-use-pep517 flag for disabling the use of PEP 517 (which is used for building packages). This time I get a different error.

pip3 install --no-use-pep517 opencv-python

image

Then, I installed the following dependencies for CMake before further try to install OpenCV.

sudo apt-get install build-essential cmake unzip pkg-config libjpeg-dev libpng-dev libtiff-dev libavcodec-dev libavformat-dev libswscale-dev libv4l-dev libxvidcore-dev libx264-dev libgtk-3-dev libatlas-base-dev gfortran

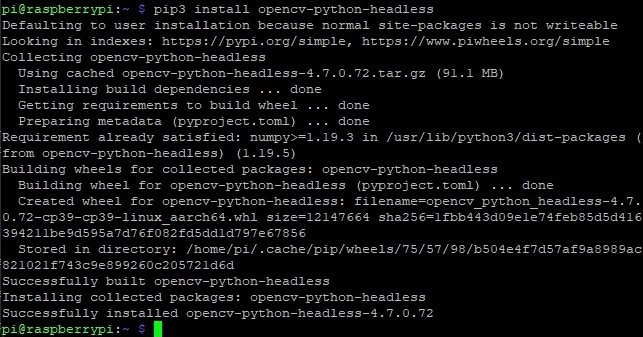
This time I was able to successfully install the OpenCV to my Raspberry Pi by the following command.

pip3 install opencv-python-headless

image

If you still face any difficulties on installing the library you can try to follow this OpenCV setup guide on Raspberry Pi 4. I finally installed the imutils using the following command:

pip3 install imutils

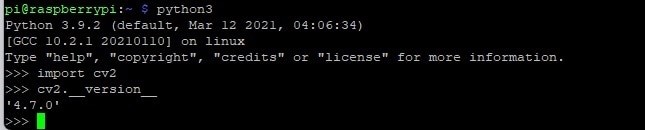
Lets check the version of the OpenCV we just installed:

import cv2
cv2.__version__

image

We successfully installed all the library for OCR using Raspberry Pi. In my next blog I will do some practical OCR experiment and show the result.

  • Sign in to reply
  • taifur
    taifur over 2 years ago in reply to mitchind

    Oh, you are right. It says 32

    • Cancel
    • Vote Up 0 Vote Down
    • Sign in to reply
    • More
    • Cancel
  • mitchind
    mitchind over 2 years ago in reply to taifur

    Ah okay - will keep reading - thanks for the work!

    If you're still using raspistill, it must be an older version of bullseye - I think they discontinued ay references to the raspicam interface unless using 32 bit.

    If you type in "getconf LONG_BIT" does it say 32 or 64?

    • Cancel
    • Vote Up 0 Vote Down
    • Sign in to reply
    • More
    • Cancel
  • taifur
    taifur over 2 years ago in reply to mitchind

    Picamera works without any problems but as I am not using any monitor or display I used rpistill command finally. If you read my next blogs you will notice that.

    • Cancel
    • Vote Up 0 Vote Down
    • Sign in to reply
    • More
    • Cancel
  • mitchind
    mitchind over 2 years ago in reply to taifur

    Thanks - it looks like you got the latest - but I thought your direct reading from pi camera was still using legacy stack (with picamera).

    You didn't have to change that to Picamera2 to use libcamera?

    • Cancel
    • Vote Up 0 Vote Down
    • Sign in to reply
    • More
    • Cancel
  • taifur
    taifur over 2 years ago in reply to mitchind

    This is the answer

    image

    OS: Bullseye 64 bit

    Raspberry Pi 4, 4 GB RAM

    • Cancel
    • Vote Up 0 Vote Down
    • Sign in to reply
    • More
    • Cancel
>
element14 Community

element14 is the first online community specifically for engineers. Connect with your peers and get expert answers to your questions.

  • Members
  • Learn
  • Technologies
  • Challenges & Projects
  • Products
  • Store
  • About Us
  • Feedback & Support
  • FAQs
  • Terms of Use
  • Privacy Policy
  • Legal and Copyright Notices
  • Sitemap
  • Cookies

An Avnet Company © 2025 Premier Farnell Limited. All Rights Reserved.

Premier Farnell Ltd, registered in England and Wales (no 00876412), registered office: Farnell House, Forge Lane, Leeds LS12 2NE.

ICP 备案号 10220084.

Follow element14

  • X
  • Facebook
  • linkedin
  • YouTube