


In my previous blog I shown in step by step how we can take and preprocess an image for successful OCR using Raspberry Pi. I explained every step with example code, input and the output of the step. At the end of the last blog I added the source code to performing all the step together. In this blog I am going to demonstrate my hardware setup and the final result. All the required software packages are already installed in the raspberry pi and demonstrated in previous blogs.
Hardware & Connection
As I am using two OCR engines (ssocr & tesseract) based on the display type I added two buttons. One button is for ssocr and if someone press that button Raspberry Pi will take an image from the camera and preprocesses it and feed it to ssocr for final result. Another button is for tesseract and if a user press this button raspberry pi will capture the display image, preprocess it and feed it to tesseract for final result.
I made a simple frame for the edge of taking the image of a display. I used 5mm PVC sheet for making the frame. Camera is placed at the top of the box. As the camera is placed inside the frame it may required some external light for taking a clear image specially at night. For this reason I added a LED light source inside the box. The connections of the Raspberry Pi with the buttons and the LED lamp is shown in the figure below:

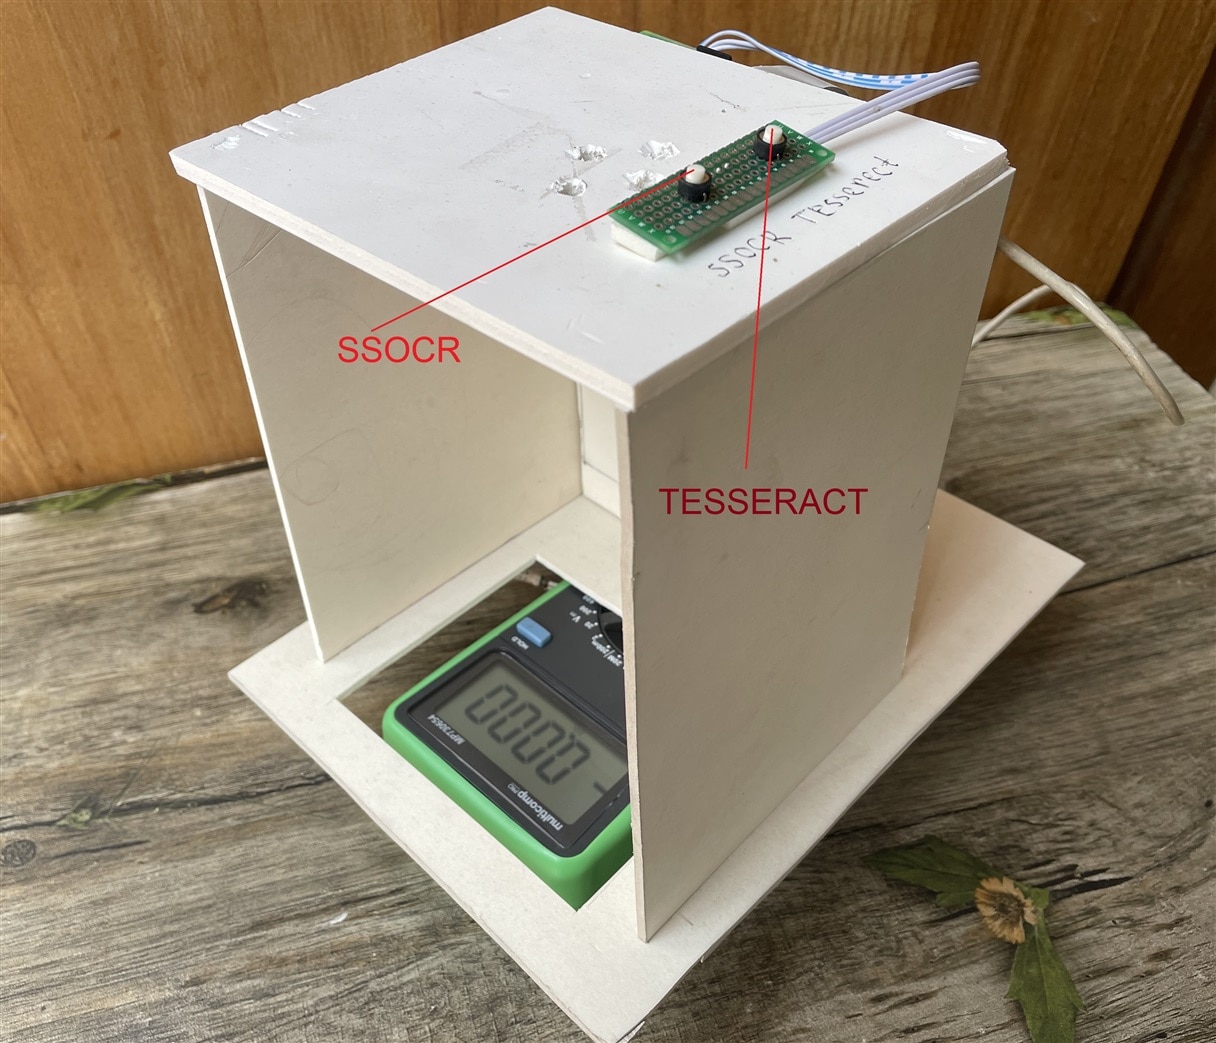
The connection of the camera is not shown here. It is obvious that camera will be connected to the camera connector of the pi. The box without raspberry pi and camera looks like as bellow:

The window of the bottom is for making the display visible to camera. For reading a meter this box will be placed at the top of the meter keeping the display visible through the window. I soldered two buttons on a piece of perfboard and added 20cm long jumper wires with female header at the terminal. See the image below:

This two buttons will be connected to the GPIO 2 and 3 of the raspberry pi and will be used for choosing the OCR engine and perform the OCR operation. Following image shows the connection of the buttons with raspberry pi and the placement on the frame.

Camera is placed at the upper plate of the frame and the whole frame will be placed on the measuring device shown in the image below.
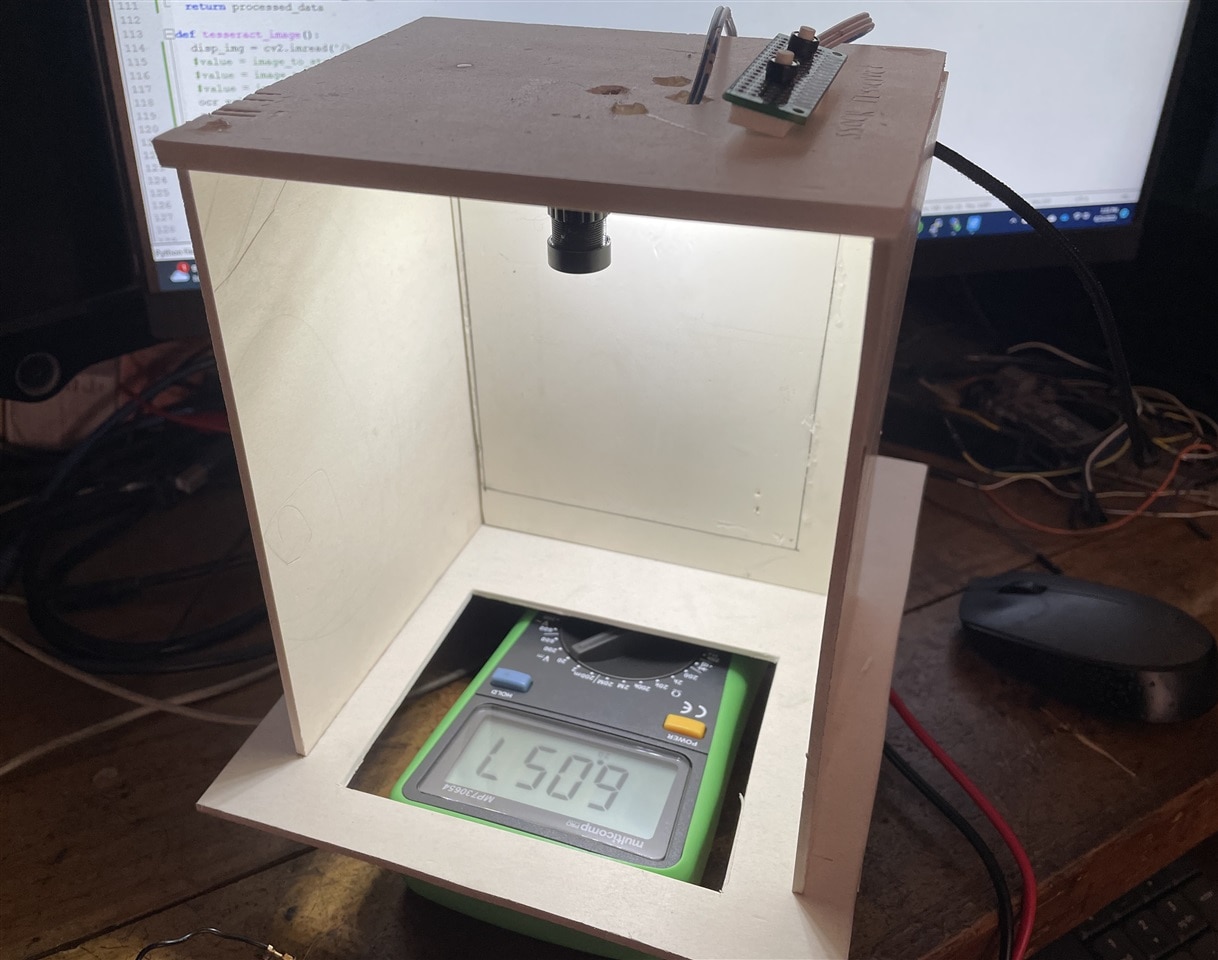
Two buttons are place on the upper part of the frame. The left button is for ssocr and the right one is tesseract. On a button press the camera captures the image of the meter placed below the frame. The display should be clearly visible through the window cut for successful ocr.
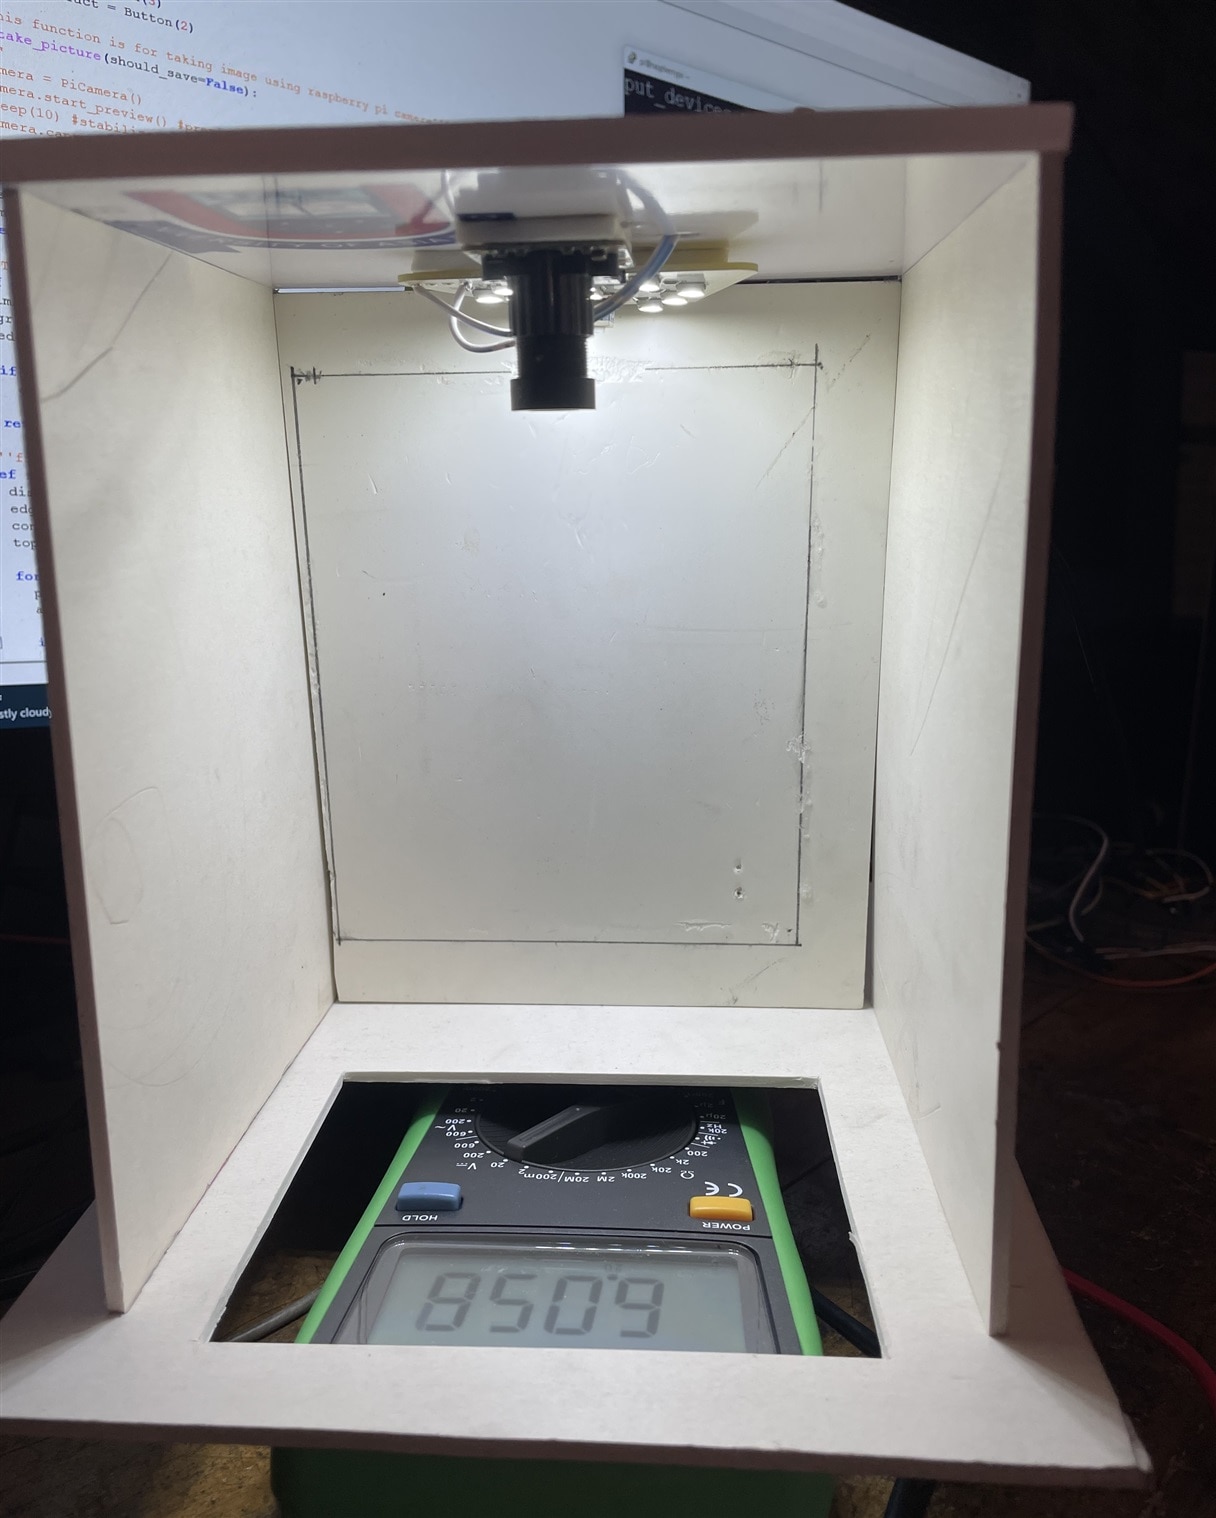
After connecting LED lamp it looks as follows:

LED light is connected to raspberry pi through USB port for taking power from the pi.
Software & Code
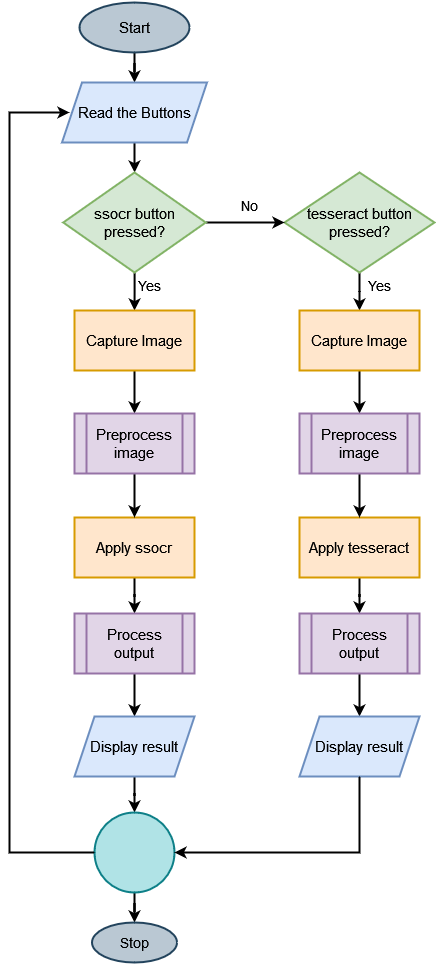
Before going to the code I want to illustrate the flowchart of the code that will help to understand the code well. The following figure represents the flow chart of the system.
The code for performing the basic operations are explained in previous blog. Here I will add some extra features with the previous code. The first step of the operation is taking the image using raspberry pi camera. As no display and monitor will be connected with the raspberry pi camera.capture() will not work. So I am using following line of code for capturing the image.
os.system("raspistill -o /home/pi/image.jpg")
The above line will capture and image and saved as image.jpg in the home/pi directory. You can integrate lots of configuration option in the command. To learn the commands please visit https://roboticsbackend.com/raspberry-pi-camera-take-picture/. You can check default configuration by raspistill -v command from the terminal.
Another new function I added is for post-processing OCR data. The OCR output may have some unexpected character or symbol. So, we need to extract the value only by removing those unexpected symbols. The following function does the job.
def process_ocr_data(ocr_output):
  value = re.findall("\d+\.\d+", ocr_output) #value is float
  if len(value) == 0:
    value = re.findall("\d+", ocr_output) #if value is integer
    return value[0]
  else:
    return value[0]
This is the infinite loop for detecting the button press and performing the OCR operation repeatedly. Two button object is define at the beginning of the code.
while True:
  if button_ssocr.is_pressed:
    img = take_picture()
    crop_display_image(img)
    ocr_value = ssocr_image()
    processed_data = process_ocr_data(ocr_value)
    print('The Result: ', processed_data)
    #print("Ssocr button is pressed")
    sleep(0.25)
  elif button_tesseract.is_pressed:
    img = take_picture()
    crop_display_image(img)
    ocr_value = tesseract_image()
    processed_data = process_ocr_data(ocr_value)
    print('The Result: ', processed_data)
    print("Tssseract button pressed")
    sleep(0.25)
The complete source that detect button press, capture image, preprocess the image, perform OCR and post-process the OCR output and finally print the result is given below:
import os
import re
import cv2
import PIL
import imutils
import numpy as np
from time import sleep
from skimage import exposure
from picamera import PiCamera
from pytesseract import image_to_string

from gpiozero import Button
button_ssocr = Button(3)
button_tesseract = Button(2)

'''this function is for taking image using raspberry pi camera'''
def take_picture(should_save=False):
  '''
  camera = PiCamera()
  camera.start_preview() #preview function only works when monitor connected
  sleep(10) #stabilize camera
  camera.capture('/home/pi/image.jpg')
  camera.stop_preview()
  '''
  sleep(1)
  os.system("raspistill -o /home/pi/image.jpg -w 400 -h 300")
  img = cv2.imread('/home/pi/image.jpg')
  return img

'''This function conver an image to grayscale, blur the image and detect edge'''
def cnvt_edged_image(img_arr, should_save=True):
  image = imutils.resize(img_arr,height=300)
  gray_image = cv2.bilateralFilter(cv2.cvtColor(image, cv2.COLOR_BGR2GRAY),11, 13, 15) #may need to adjust the value
  edged_image = cv2.Canny(gray_image, 30, 200)

  if should_save:
    cv2.imwrite('/home/pi/edge_image.jpg', edged_image)

  return edged_image

'''find display contour, image passed in must be ran through the cnv_edge_image first'''
def find_display_contour(edge_img_arr):
  display_contour = None
  edge_copy = edge_img_arr.copy()
  contours,hierarchy = cv2.findContours(edge_copy, cv2.RETR_TREE, cv2.CHAIN_APPROX_SIMPLE)
  top_cntrs = sorted(contours, key = cv2.contourArea, reverse = True)[:10] #short 10 bigest contour

  for cntr in top_cntrs:
    peri = cv2.arcLength(cntr,True)
    approx = cv2.approxPolyDP(cntr, 0.04 * peri, True)

    if len(approx) == 4:
      display_contour = approx
      break

  return display_contour

'''crop the display contour from the image'''
def crop_display(image_arr):
  edge_image = cnvt_edged_image(image_arr)
  display_contour = find_display_contour(edge_image)
  cntr_pts = display_contour.reshape(4,2)
  return cntr_pts


def normalize_contrs(img,cntr_pts):
  ratio = img.shape[0] / 300.0
  norm_pts = np.zeros((4,2), dtype="float32")

  s = cntr_pts.sum(axis=1)
  norm_pts[0] = cntr_pts[np.argmin(s)]
  norm_pts[2] = cntr_pts[np.argmax(s)]

  d = np.diff(cntr_pts,axis=1)
  norm_pts[1] = cntr_pts[np.argmin(d)]
  norm_pts[3] = cntr_pts[np.argmax(d)]

  norm_pts *= ratio

  (top_left, top_right, bottom_right, bottom_left) = norm_pts

  width1 = np.sqrt(((bottom_right[0] - bottom_left[0]) ** 2) + ((bottom_right[1] - bottom_left[1]) ** 2))
  width2 = np.sqrt(((top_right[0] - top_left[0]) ** 2) + ((top_right[1] - top_left[1]) ** 2))
  height1 = np.sqrt(((top_right[0] - bottom_right[0]) ** 2) + ((top_right[1] - bottom_right[1]) ** 2))
  height2 = np.sqrt(((top_left[0] - bottom_left[0]) ** 2) + ((top_left[1] - bottom_left[1]) ** 2))

  max_width = max(int(width1), int(width2))
  max_height = max(int(height1), int(height2))

  dst = np.array([[0,0], [max_width -1, 0],[max_width -1, max_height -1],[0, max_height-1]], dtype="float32")
  persp_matrix = cv2.getPerspectiveTransform(norm_pts,dst)
  return cv2.warpPerspective(img,persp_matrix,(max_width,max_height))

def crop_display_image(orig_image_arr):
  ratio = orig_image_arr.shape[0] / 300.0

  display_image_arr = normalize_contrs(orig_image_arr,crop_display(orig_image_arr))
  #display image is now segmented.
  gry_disp_arr = cv2.cvtColor(display_image_arr, cv2.COLOR_BGR2GRAY)
  gry_disp_arr = exposure.rescale_intensity(gry_disp_arr, out_range= (0,255))

  #thresholding
  ret, thresh = cv2.threshold(gry_disp_arr,127,255,cv2.THRESH_BINARY) #may need to adjust the value
  cv2.imwrite('/home/pi/disp_only.jpg', thresh)
  return thresh

def ssocr_image():
  import subprocess
  ocr_value = subprocess.getoutput("/home/pi/ssocr/ssocr -T -d -1 /home/pi/disp_only.jpg")
  value = str(ocr_value)
  processed_data = process_ocr_data(value)
  return processed_data

def tesseract_image():
  disp_img = cv2.imread('/home/pi/disp_only.jpg')
  #value = image_to_string(disp_img, lang="7seg") #pretrained seven segment model
  #value = image_to_string(disp_img, lang="ssd")
  #value = image_to_string(disp_img, lang="letsgodigital")
  ocr_value = image_to_string(disp_img)
  value = str(ocr_value)
  processed_data = process_ocr_data(value)
  return processed_data

'''remove any unexpected character if has with the value'''
def process_ocr_data(ocr_output):
  try:
    value = re.findall("\d+\.\d+", ocr_output) #value is float
    if len(value) == 0:
      value = re.findall("\d+", ocr_output) #if value is integer
      return value[0]
    else:
      return value[0]
  except:
    print("Error on reading value:")
    return 0


while True:
  if button_ssocr.is_pressed:
    print("Ssocr button is pressed")
    img = take_picture()
    crop_display_image(img)
    ocr_value = ssocr_image()
    print('The Result: ', ocr_value)
    sleep(0.25)
  elif button_tesseract.is_pressed:
    print("Tssseract button pressed")
    img = take_picture()
    crop_display_image(img)
    ocr_value = tesseract_image()
    print('The Result: ', ocr_value)
    sleep(0.25)
You can directly copy the code from here and save it to a file with .py extension. Then you can transfer the file to raspberry pi using WinSCP and run the code from the raspberry pi terminal. My file name is ocr_code.py and I used the following command to run the code.
python3 ocr_code.py
Final Output & Result
After running the python program in raspberry pi the following image was taken though raspberry pi camera on a button press:
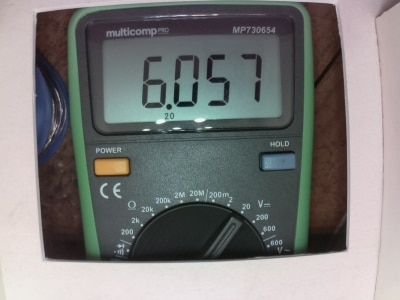
The output image after edge detection was given below. You see the display edge was perfectly detected. I needed to change some value for bilateral filter function for getting the full edge of the display.
The OCR output I got on the serial terminal is shown in the image below:

The value in the multimeter display was 6.057 but I got 6.0571 from the ssocr which is very accurate. I have no answer from where the last 1 came from. Anyway it is good enough. But the output from the tesseract is directly zero.
Here I added a short demo video of the OCR test in Raspberry Pi.
In my next blog I will show how we can upload this OCR value directly to the cloud.
-

DAB
-
Cancel
-
Vote Up
0
Vote Down
-
-
Sign in to reply
-
More
-
Cancel
-

taifur
in reply to DAB
-
Cancel
-
Vote Up
0
Vote Down
-
-
Sign in to reply
-
More
-
Cancel
-

ggabe
in reply to taifur
-
Cancel
-
Vote Up
0
Vote Down
-
-
Sign in to reply
-
More
-
Cancel
-

taifur
in reply to ggabe
-
Cancel
-
Vote Up
0
Vote Down
-
-
Sign in to reply
-
More
-
Cancel
-

ggabe
in reply to taifur
-
Cancel
-
Vote Up
0
Vote Down
-
-
Sign in to reply
-
More
-
Cancel
-

taifur
in reply to ggabe
-
Cancel
-
Vote Up
0
Vote Down
-
-
Sign in to reply
-
More
-
Cancel
Comment-

taifur
in reply to ggabe
-
Cancel
-
Vote Up
0
Vote Down
-
-
Sign in to reply
-
More
-
Cancel
Children