Building the Graphical User Interface
The most important aspect of the sensors we connected in the previous blog is the data they provide. Therefore, it is important to display this data in an organized and understandable manner for all scientists who wish to observe the environmental conditions of their experiment.
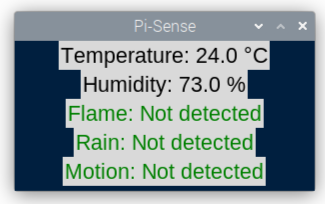
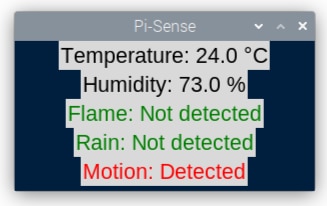
Pi-Sense Interface v1
The initial version of the interface is very simple: you can see the real-time temperature and humidity, and there are three indicators to show if there is motion, nearby fire, or rain.
Here is the code explained line by line to make it easier to understand.
import Adafruit_DHT  # Import the Adafruit_DHT module for temperature and humidity sensor
import tkinter as tk  # Import the tkinter module for GUI
from RPi_GPIO_i2c_LCD import lcd  # Import the lcd module for controlling the LCD
from gpiozero import Button, MotionSensor, Buzzer  # Import the Button, MotionSensor, and Buzzer modules from gpiozero
from time import sleep  # Import the sleep function from the time module

LCD = lcd.HD44780(0x27)  # Initialize the LCD object with the I2C address 0x27
sensor = Adafruit_DHT.DHT11  # Set the sensor type to DHT11
rain = Button(18)  # Initialize a Button object for rain detection on GPIO 18
flame = Button(12)  # Initialize a Button object for flame detection on GPIO 12
pir = MotionSensor(21)  # Initialize a MotionSensor object for motion detection on GPIO 21
zumb = Buzzer(20)  # Initialize a Buzzer object for sound on GPIO 20
zumb.off()  # Turn off the buzzer

class SensorGUI:
    def __init__(self, root):
        self.root = root
        self.root.title("Pi-Sense")  # Set the title of the GUI window

        self.temperature_label = tk.Label(self.root, text="Temperature: ", font=("Arial", 16))
        self.temperature_label.pack()

        self.humidity_label = tk.Label(self.root, text="Humidity: ", font=("Arial", 16))
        self.humidity_label.pack()

        self.flame_label = tk.Label(self.root, text="Flame: ", font=("Arial", 16))
        self.flame_label.pack()

        self.rain_label = tk.Label(self.root, text="Rain: ", font=("Arial", 16))
        self.rain_label.pack()

        self.motion_label = tk.Label(self.root, text="Motion: ", font=("Arial", 16))
        self.motion_label.pack()

        self.root.configure(bg="#F0F0F0")  # Set the background color of the GUI window

    def update_sensor_values(self):
        humidity, temperature = Adafruit_DHT.read_retry(sensor, 23)  # Read temperature and humidity values from the sensor
        self.temperature_label.config(text="Temperature: {} °C".format(temperature))  # Update the temperature label
        self.humidity_label.config(text="Humidity: {} %".format(humidity))  # Update the humidity label

        if rain.is_pressed:  # Check if the rain button is pressed
            self.rain_label.config(text="Rain: Detected", fg="red")  # Update the rain label (detected)
            zumb.on()  # Turn on the buzzer
        else:
            self.rain_label.config(text="Rain: Not detected", fg="green")  # Update the rain label (not detected)
            zumb.off()  # Turn off the buzzer

        if flame.is_pressed:  # Check if the flame button is pressed
            self.flame_label.config(text="Flame: Not detected", fg="green")  # Update the flame label (not detected)
            zumb.off()  # Turn off the buzzer
        else:
            self.flame_label.config(text="Flame: Detected", fg="red")  # Update the flame label (detected)
            zumb.on()  # Turn on the buzzer

        if pir.motion_detected:  # Check if motion is detected
            self.motion_label.config(text="Motion: Detected", fg="red")  # Update the motion label (detected)
            zumb.on()  # Turn on the buzzer
        else:
            self.motion_label.config(text="Motion: Not detected", fg="green")  # Update the motion label (not detected)
            zumb.off()  # Turn off the buzzer

        LCD.set("  Temp: " + str(temperature) + chr(223) + "C  ", 1)  # Display temperature on the LCD
        LCD.set("Humidity: " + str(humidity) + " %", 2)  # Display humidity on the LCD

        self.root.after(1500, self.update_sensor_values)  # Schedule the next update after 1500 milliseconds

root = tk.Tk()  # Create the main window
gui = SensorGUI(root)  # Create an instance of SensorGUI

# Customize the main window
root.geometry("300x150")  # Set the window size
root.resizable(False, False)  # Disable window resizing
root.configure(bg="#001f3f")  # Set the background color of the main window

gui.update_sensor_values()  # Update the sensor values
root.mainloop()  # Start the main GUI loop
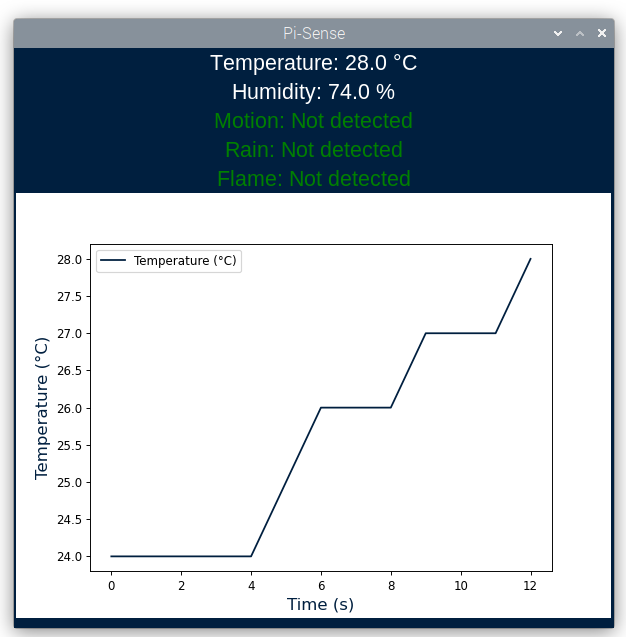
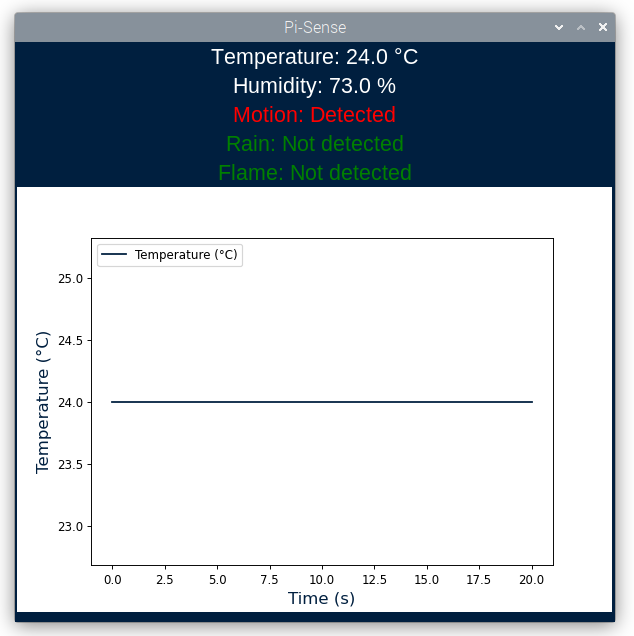
Pi-Sense Interface v2
Just as it is important to have real-time data, it is also valuable to have access to the historical data collected by the sensors. Therefore, I have added a graph that displays the temperature evolution (in Celsius) over time (in seconds).
Similarly, I present the code explained line by line.
import matplotlib.pyplot as plt  # Import the matplotlib library for plotting
import Adafruit_DHT  # Import the Adafruit_DHT module for temperature and humidity sensor
import tkinter as tk  # Import the tkinter module for GUI
import time  # Import the time module for time-related functions
from matplotlib.backends.backend_tkagg import FigureCanvasTkAgg  # Import the FigureCanvasTkAgg module for embedding matplotlib figures in Tkinter
from gpiozero import Button, MotionSensor, Buzzer  # Import the Button, MotionSensor, and Buzzer modules from gpiozero
from RPi_GPIO_i2c_LCD import lcd  # Import the lcd module for controlling the LCD

LCD = lcd.HD44780(0x27)  # Initialize the LCD object with the I2C address 0x27
sensor = Adafruit_DHT.DHT11  # Set the sensor type to DHT11
rain = Button(18)  # Initialize a Button object for rain detection on GPIO 18
flame = Button(12)  # Initialize a Button object for flame detection on GPIO 12
pir = MotionSensor(21)  # Initialize a MotionSensor object for motion detection on GPIO 21
zumb = Buzzer(20)  # Initialize a Buzzer object for sound on GPIO 20
zumb.off()  # Turn off the buzzer

class SensorGUI:
    def __init__(self, root):
        self.root = root
        self.root.title("Pi-Sense")  # Set the title of the GUI window

        self.temperature_label = tk.Label(self.root, text="Temperature: ", font=("Arial", 16), bg="#001f3f", fg="white")
        self.temperature_label.pack()

        self.humidity_label = tk.Label(self.root, text="Humidity: ", font=("Arial", 16), bg="#001f3f", fg="white")
        self.humidity_label.pack()

        self.motion_label = tk.Label(self.root, text="Motion: ", font=("Arial", 16), bg="#001f3f")
        self.motion_label.pack()

        self.rain_label = tk.Label(self.root, text="Rain: ", font=("Arial", 16), bg="#001f3f")
        self.rain_label.pack()

        self.flame_label = tk.Label(self.root, text="Flame: ", font=("Arial", 16), bg="#001f3f")
        self.flame_label.pack()

        self.figure = plt.figure(figsize=(7, 5), dpi=85)  # Create a figure for plotting
        self.ax = self.figure.add_subplot(111)  # Add a subplot to the figure
        self.ax.set_ylabel('Temperature (°C)', color='#001f3f', fontsize=14)  # Set the y-axis label
        self.ax.set_xlabel('Time (s)', color='#001f3f', fontsize=14)  # Set the x-axis label
        self.line, = self.ax.plot([], [], "#001f3f", label='Temperature (°C)')  # Create a line plot
        self.ax.legend(loc='upper left')  # Add a legend to the plot

        self.canvas = FigureCanvasTkAgg(self.figure, master=self.root)  # Create a Tkinter canvas for embedding the figure
        self.canvas.draw()
        self.canvas.get_tk_widget().pack()

        self.root.configure(bg="#001f3f")  # Set the background color of the GUI window

        self.temperature_history = []  # Initialize an empty list to store temperature history

    def update_graph(self):
        temp_values = [item[0] for item in self.temperature_history]  # Extract temperature values from history
        temp_times = list(range(len(self.temperature_history)))  # Create a list of time points
        self.line.set_data(temp_times, temp_values)  # Update the line plot with new data
        self.ax.relim()  # Recalculate the limits of the plot
        self.ax.autoscale_view()  # Autoscale the plot view
        self.canvas.draw()  # Redraw the canvas with updated plot

    def update_sensor_values(self):
        humidity, temperature = Adafruit_DHT.read_retry(sensor, 23)  # Read temperature and humidity values from the sensor
        self.temperature_label.config(text="Temperature: {} °C".format(temperature))  # Update the temperature label
        self.humidity_label.config(text="Humidity: {} %".format(humidity))  # Update the humidity label

        if rain.is_pressed:  # Check if rain is detected
            self.rain_label.config(text="Rain: Detected", fg="red")  # Update the rain label (detected)
            zumb.on()  # Turn on the buzzer
        else:
            self.rain_label.config(text="Rain: Not detected", fg="green")  # Update the rain label (not detected)
            zumb.off()  # Turn off the buzzer

        if flame.is_pressed:  # Check if flame is detected
            self.flame_label.config(text="Flame: Not detected", fg="green")  # Update the flame label (not detected)
            zumb.off()  # Turn off the buzzer
        else:
            self.flame_label.config(text="Flame: Detected", fg="red")  # Update the flame label (detected)
            zumb.on()  # Turn on the buzzer

        if pir.motion_detected:  # Check if motion is detected
            self.motion_label.config(text="Motion: Detected", fg="red")  # Update the motion label (detected)
            zumb.on()  # Turn on the buzzer
        else:
            self.motion_label.config(text="Motion: Not detected", fg="green")  # Update the motion label (not detected)
            zumb.off()  # Turn off the buzzer

        LCD.set("  Temp: " + str(temperature) + chr(223) + "C  ", 1)  # Display temperature on the LCD
        LCD.set("Humidity: " + str(humidity) + " %", 2)  # Display humidity on the LCD

        self.temperature_history.append((temperature, time.time()))  # Add temperature and timestamp to the history
        self.update_graph()  # Update the temperature graph

        self.root.after(1500, self.update_sensor_values)  # Schedule the next update after 1500 milliseconds

root = tk.Tk()  # Create the main window
gui = SensorGUI(root)  # Create an instance of SensorGUI

# Customize the main window
root.geometry("600x580")  # Set the window size
root.resizable(False, False)  # Disable window resizing
root.configure(bg="#001f3f")  # Set the background color of the main window

gui.update_sensor_values()  # Update the sensor values
root.mainloop()  # Start the main GUI loop
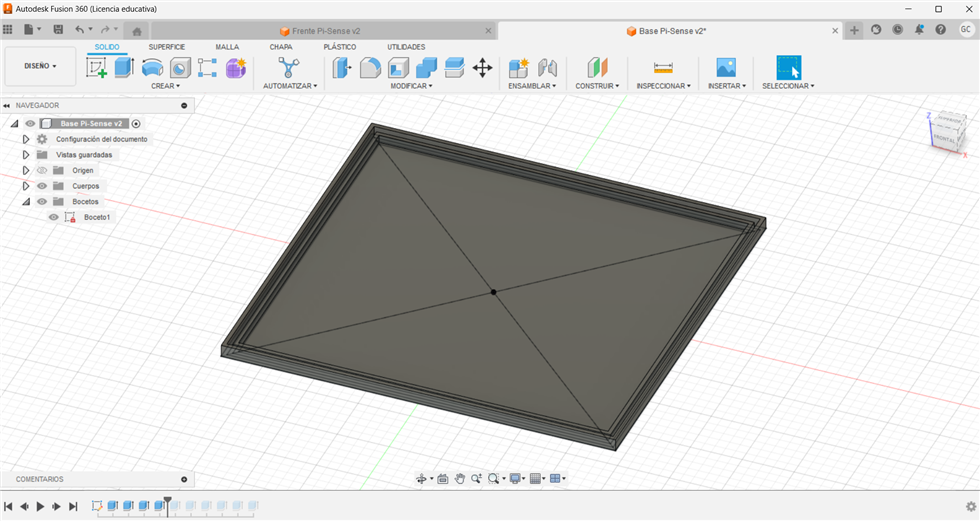
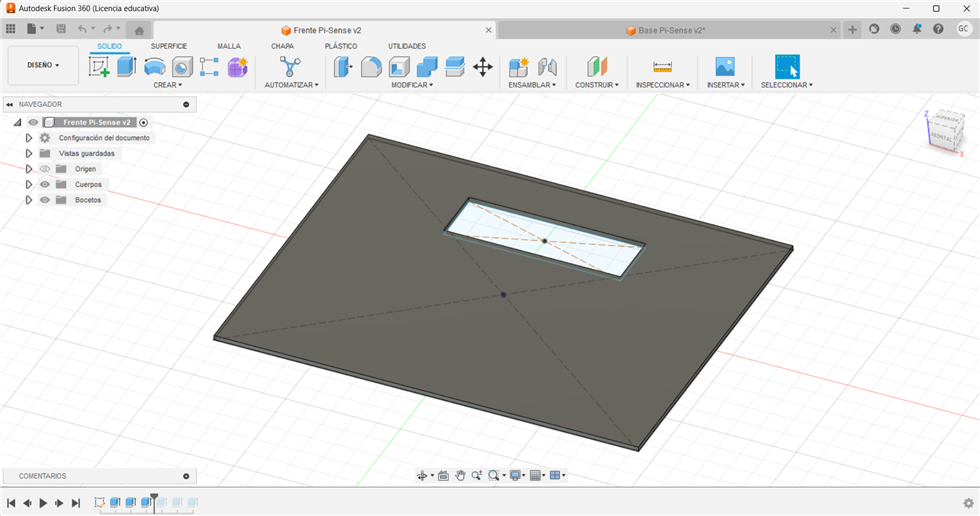
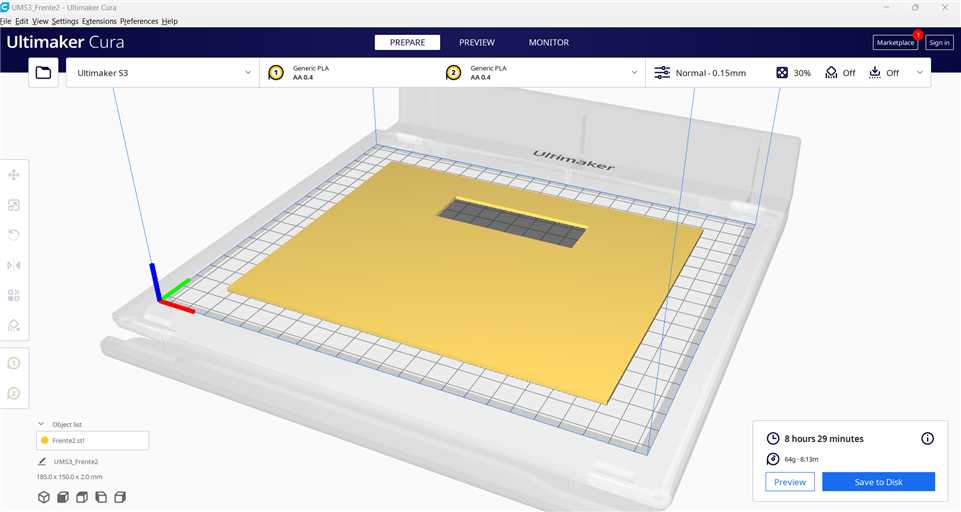
Designing the case
The beauty of Pi-Sense is that it can be placed in an open environment or in a closed box. I decided to design a kind of "box" in Autodesk Fusion 360 to hold the LCD screen and give the project a more professional look. I designed the base and the front panel, and then printed it using a 3D printer, specifically an Ultimaker S3.