


The network layer is what separates NetSentinel from a standalone gadget. The Raspberry Pi at the core of the system does not sit on a flat home network — it lives in a properly segmented DMZ, receives syslog from real enterprise firewall and routing equipment, and distributes processed alerts to the field and desktop nodes. This blog covers the full network architecture, the OSPF routing configuration, the firewall policies, and the Flask application running on the Raspberry Pi.
Topology Overview
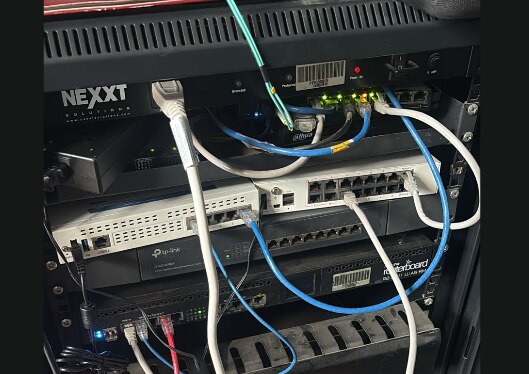
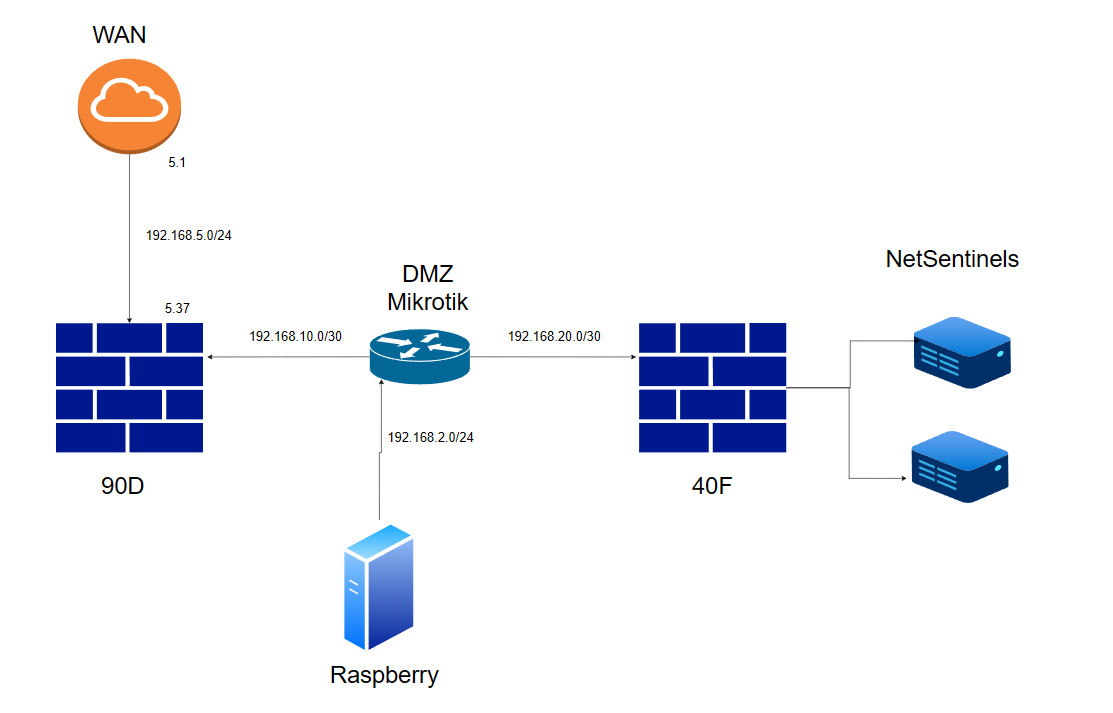
The network was built on infrastructure originally designed for an MSc Cybersecurity lab at Universidad Galileo. Three devices form the routing and security backbone.
The FortiGate 90D is the exterior firewall. It connects to the simulated internet upstream and provides the first security boundary. Its internal interface connects to the MikroTik RB3011 on a /30 transit link.
The MikroTik RB3011 is the central routing node. It has three relevant interfaces: ether1 connecting upstream to the FG-90D, ether4 hosting the DMZ segment where the Raspberry Pi lives, and ether2 connecting downstream to the FG-40F.
The FortiGate 40F is the interior firewall protecting the LAN where both MAX nodes reside.
OSPF Configuration — Area 0
Dynamic routing runs OSPF Area 0 across all three devices. No static routes were used — every segment is reachable through OSPF redistribution.
FortiGate 90D:
config router ospf
  set router-id 10.20.30.1
  set default-information-originate enable
  config area
    edit 0.0.0.0
    next
  end
  config network
    edit 1
      set prefix 192.168.10.0 255.255.255.252
    next
  end
  config redistribute "connected"
    set status enable
  end
end
MikroTik RB3011:
/routing ospf instance
add name=default router-id=10.20.30.0

/routing ospf network
add network=192.168.10.0/30 area=backbone
add network=192.168.20.0/30 area=backbone
add network=192.168.2.0/24  area=backbone
FortiGate 40F:
config router ospf
  set router-id 10.20.30.3
  config area
    edit 0.0.0.0
    next
  end
  config network
    edit 1
      set prefix 192.168.20.0 255.255.255.252
    next
    edit 2
      set prefix 192.168.4.0 255.255.255.0
    next
  end
  config redistribute "connected"
    set status enable
  end
end
Firewall Policies
The policies follow least-privilege: only explicitly required traffic is permitted. The DMZ design principle holds — the Raspberry Pi can receive connections from all segments but cannot initiate connections toward the LAN.
FortiGate 90D — Internet to DMZ (syslog and management):
config firewall policy
  edit 1
    set name "internet-to-dmz"
    set srcintf "wan1"
    set dstintf "internal10"
    set srcaddr "all"
    set dstaddr "RPi-DMZ"
    set action accept
    set service "HTTPS" "SSH"
    set schedule "always"
    set logtraffic all
  next
  edit 2
    set name "dmz-to-internet"
    set srcintf "internal10"
    set dstintf "wan1"
    set srcaddr "DMZ-Net"
    set dstaddr "all"
    set action accept
    set nat enable
    set schedule "always"
    set logtraffic all
  next
end
FortiGate 40F — LAN to DMZ (MAX nodes reaching RPi):
config firewall policy
  edit 1
    set name "lan-to-dmz"
    set srcintf "lan"
    set dstintf "wan1"
    set srcaddr "LAN-Net"
    set dstaddr "RPi-DMZ"
    set action accept
    set service "HTTP" "UDP-514"
    set schedule "always"
    set logtraffic all
  next
  edit 2
    set name "dmz-to-lan-block"
    set srcintf "wan1"
    set dstintf "lan"
    set srcaddr "DMZ-Net"
    set dstaddr "LAN-Net"
    set action deny
    set logtraffic all
  next
end
Syslog forwarding — FortiGate 90D and 40F:
config log syslogd setting
  set status enable
  set server "192.168.2.200"
  set port 514
  set facility local7
  set format default
end

config log syslogd filter
  set severity information
  set forward-traffic enable
  set local-traffic enable
  set sniffer-traffic disable
  set anomaly enable
end
MikroTik RB3011 syslog
/system logging action
set remote address=192.168.2.200 remote-port=514 \
    name=netsentinel src-address=0.0.0.0 target=remote

/system logging
add action=netsentinel topics=info
add action=netsentinel topics=warning
add action=netsentinel topics=error
:
Raspberry Pi — Flask Application
The Flask app on the Raspberry Pi runs two services simultaneously: a UDP syslog listener on port 514 and an HTTP Flask server on port 5000. When a syslog message arrives from the FortiGates or MikroTik, it is parsed, cleaned, and forwarded as an alert to MAX Node 1 over HTTP. When a motion event arrives from the field, the same pipeline triggers the alert display and sends the sweep command to MAX Node 2.
from flask import Flask, request, jsonify
from datetime import datetime
import requests
import socketserver
import threading
import logging

# ─── Configuration ────────────────────────────────────────
MAX_ALERT_IP   = "192.168.4.XX"   # MAX Node 1 — desktop alert panel
MAX_TURRET_IP  = "192.168.4.YY"   # MAX Node 2 — field turret
MAX_PORT       = 8080
SYSLOG_PORT    = 514

app = Flask(__name__)
logging.getLogger('werkzeug').setLevel(logging.ERROR)

# ─── Push alert to MAX Node 1 (desktop panel) ─────────────
def push_to_max(message):
    try:
        r = requests.post(
            f"http://{MAX_ALERT_IP}:{MAX_PORT}/alert",
            json={"message": message},
            timeout=3
        )
        print(f"[{datetime.now().strftime('%H:%M:%S')}] Push OK → {message}")
    except Exception as e:
        print(f"[{datetime.now().strftime('%H:%M:%S')}] Push error: {e}")

# ─── Send sweep trigger to MAX Node 2 (turret) ────────────
def trigger_sweep():
    try:
        requests.post(
            f"http://{MAX_TURRET_IP}:{MAX_PORT}/sweep",
            json={"command": "SCAN_TRIGGER"},
            timeout=3
        )
        print(f"[{datetime.now().strftime('%H:%M:%S')}] Sweep triggered")
    except Exception as e:
        print(f"[{datetime.now().strftime('%H:%M:%S')}] Sweep error: {e}")

# ─── UDP Syslog listener ───────────────────────────────────
class SyslogHandler(socketserver.BaseRequestHandler):
    def handle(self):
        data = self.request[0].strip()
        try:
            message = data.decode('utf-8', errors='ignore')
        except:
            return
        print(f"[SYSLOG] {message}")
        # Strip syslog priority header <PRI>
        clean = message
        if clean.startswith('<'):
            end = clean.find('>')
            if end != -1:
                clean = clean[end+1:].strip()
        parts = clean.split()
        if len(parts) > 4:
            clean = ' '.join(parts[3:])
        # Forward cleaned message to alert panel
        push_to_max(clean[:60])

# ─── Flask endpoints ───────────────────────────────────────
@app.route('/alert', methods=['POST'])
def receive_alert():
    data = request.get_json()
    message = data.get('message', '')
    print(f"[{datetime.now().strftime('%H:%M:%S')}] Alert received: {message}")
    push_to_max(message)
    trigger_sweep()
    return jsonify({"status": "ok"}), 200

@app.route('/motion', methods=['POST'])
def receive_motion():
    print(f"[{datetime.now().strftime('%H:%M:%S')}] Motion event from field")
    push_to_max("MOTION DETECTED")
    trigger_sweep()
    return jsonify({"status": "ok"}), 200

@app.route('/status', methods=['GET'])
def status():
    return jsonify({"status": "NetSentinel online"}), 200

# ─── Startup ───────────────────────────────────────────────
if __name__ == '__main__':
    syslog_server = socketserver.UDPServer(
        ('0.0.0.0', SYSLOG_PORT), SyslogHandler
    )
    syslog_thread = threading.Thread(
        target=syslog_server.serve_forever
    )
    syslog_thread.daemon = True
    syslog_thread.start()
    print(f"[{datetime.now().strftime('%H:%M:%S')}] Syslog UDP listening on port {SYSLOG_PORT}")
    print(f"[{datetime.now().strftime('%H:%M:%S')}] Flask HTTP on port 5000")
    app.run(host='0.0.0.0', port=5000, debug=False)
Running the application:
cd ~/netsentinel
source venv/bin/activate
sudo python3 app.py
Sudo is required for binding to port 514 which is a privileged port below 1024.
Event Flow Summary
When a FortiGate detects a threat or a link state changes, it sends a syslog UDP packet to 192.168.2.200 port 514. The SyslogHandler parses the message, strips the priority header, and calls push_to_max() which sends an HTTP POST to MAX Node 1. The CharlieWing lights up the alert pattern on the operator's desk.
When the PIR fires in the field, the ESP32-CAM sends an HTTP POST to the /motion endpoint. The RPi simultaneously calls push_to_max() to alert the operator and trigger_sweep() to start the NEMA 17 pan sequence on MAX Node 2.
Two completely independent threat vectors — network events and physical intrusion — converging at a single processing node and producing coordinated responses at two physical endpoints.
What Comes Next
The next blog covers the detection pipeline in detail — the PIR sensor, the ESP32-CAM, and how photographic evidence is captured and logged the moment motion is detected.