


Table of Contents
First Impressions
The boards are of really good quality. Offering much processing power, expandable headers, these boards could be used as a drop-in replacement for Arduino Uno boards (We will talk about library support later). Each board comes with its own USB C cable to power up the boards, hopefully we will be able to drive more power using USB C connection.
FRDM A153 board
A153 board operating at a modest 96mhz is packs more peripheral compared to similar priced microcontrollers. But most of the peripherals are not exposed to keep the Arduino form factor.
FRDM N236 board
N236 board operates at 150mhz, supports CAN transceiver, audio inputs (Audio Jacks are not soldered by default), LCD connector. Among the two boards, this is the bigger one with whole lot of peripherals and a huge add on flash memory.
Software and SDK
MCUXpresso
MCUXpresso is the dedicated IDE for MCUX series of microcontrollers from NXP. Like every other IDEs this is also a clone of Eclipse IDE. MCUXpresso looks like a rebranded LPCXpresso and comes prepacked with SDK for LPC microcontrollers. To be honest I lost track of all the IDEs NXP has for its broad range of microcontrollers and microprocessors (Kinestis, DS).
Creating a new project
- We have an opening page where we select which controller or board we want to program.
- One thing different compared to other mainstream MCU IDE, we will have to select our library for the peripherals before even selecting the pins.
- NXP not only provides SDK, they also provide a HAL layer, device specific adapter, FREERTOS and CMSIS library as well.
- The basic template has lots of drivers and libraries enabled by default which might feel a bit bloated, for example GPIO and UART adapter and a debug library are enabled by default.
- Give the project a name and select finish to create the project.
- Now comes the pin selection. You can select “Pins” tab and select the required pins or select pins which are grouped to a specific peripheral.
- Once the pins are selected, we need to enable the clock for the peripheral. The peripherals are neatly organised and placed one after another. There is also a search option to look for the specific peripheral in case it’s hard to locate a peripheral among the lot. Enable the required peripheral.
- Switch to “Component” view. From here we can select the driver for our required peripheral, if we have selected CMSIS from the welcome page, we can see it listed here as well. Select the required one and click generate code.
-
Component page offers a variety of ways to configure a peripheral when device specific component is selected and the SDK components can be modified anytime.
- Polling – Standard blocking way of sending/receiving data
- Interrupt – Standard interrupts set by using interrupt flags.
- Transfer – Provides blocking as well as non blocking API with support for interrupts
- DMA – for transferring huge amount of data faster, supports interrupts.
-
When CMSIS is selected, we see only two options mostly
- Interrupt
- DMA
-
Note on Arduino support
Unlike other mainstream controllers which has support for Arduino Core, MCX series doesn’t have Arduino support. The board has Arduino form factor headers, and Arduino compatible pins, but libraries available for Arduino needs to be ported.
If you are comfortable working with Zephyr, MCXN has a rich and steady support for Zephyr, I would say like Nordic Semiconductors they are also actively pushing for Zephyr + West build. (NXP is one of the six founding member of The Zephyr Project). Since setting up Zephyr and west on a windows laptop is a migraine inducing feat that stresses both my laptop’s storage and my patience, I decided not to go there unless I am left with no other option.
Test Projects
Since I am new to MCXA/MCXN NXP family of microcontrollers, I started by exploring the GPIOs and UART first.
LED Blink
MCXA153 board comes with a RBG LED and 3 push buttons (labelled as switches). We will see how to set/clear a GPIO as well as read input using polling mechanism.
We can see how NXP tried their best not to look like a copy of ST’s HAL library as well.
APIs to initialize a GPIO pin, perform set and clear operations on a GPIO Pin for ST range of MCU
void HAL_GPIO_Init(GPIO_TypeDef  *GPIOx, GPIO_InitTypeDef *GPIO_Init)
HAL_GPIO_WritePin(GPIO_TypeDef *GPIOx, uint16_t GPIO_Pin, GPIO_PinState PinState)
APIs to initialize a GPIO pin, perform set and clear operations on a GPIO Pin for NXP MCXN/MCXA
void GPIO_PinInit(GPIO_Type *base, uint32_t pin, const gpio_pin_config_t *config)
static inline void GPIO_PinWrite(GPIO_Type *base, uint32_t pin, uint8_t output)
Maybe I am used to ST’s version, using “GPIOx” makes more sense than “base”.
I have created a brief tutorial on how to use the GPIOs.
Hello World
In this video I cover how to enable the pins for LPUART0 and how to send/receive message using polling mechanism.
While we can use the blocking send function to send a message, using blocking receive is practically not at all useful as we won’t know exactly when we will receive a message. We will cover non-blocking receive in upcoming posts.
Timing and Delay
No Embedded project will be complete without using delays, be it either blocking or non blocking. MCX series provides us with Sysclock using which we can trigger an interrupt on nano second level.
Since we won't need that much accuracy and millisecond level timing is enough for most tasks, we will configure the sysclock to generate an interrupt every milli second.
Copy the callback function and place it in main file.SysTick_Config(96000000);static uint32_t ms = 0; void SysTick_Handler(void) { ms++; } uint32_t getMillis() { return ms; }
Since we shouldn’t hog the interrupt call back function, we will just increment a variable by 1 which will act as our timer, something similar toMillis()on Arduino orgetMillis()on ST family.
For blocking delay, we will use the below function. You can refer the below code to see how to use the counter as both blocking and non-blocking delay.
void delay( uint32_t delayInMs)
{
    uint32_t currentTimeInMs = ms;
    while( ( ms - currentTimeInMs ) <= delayInMs )
    {
        ;
    }
}

void someFunc()
{
    static uint32_t prevTimer = 0;
    if( ( ms - prevTimer ) > 1000 )
    {
        prevTimer = ms;

        // Do something
    }
}
Thumbs up for
- MCXN236 board provides a lot of power and several 5v/3.3v options. Meaning we can power our sensors, output devices directly from it.
- If we select the board option in project create page, we can see the Arduino/MicroE interface showing up as an option to select the pins. Which helps us in narrowing the required pin as we know where it is located.
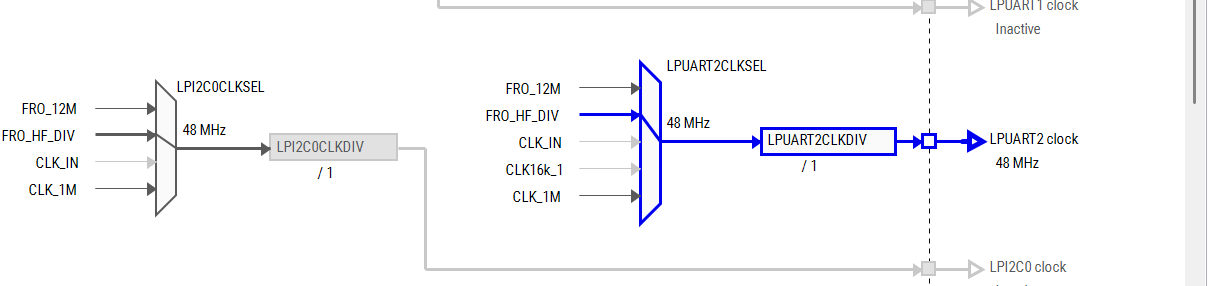
- The Clock configuration is really smooth. Compared to some other Microcontroller IDEs which does some calculation based on user input, and sometimes not at all work properly, leaving new users confused (cough, STM32 cough), MCUXpresso lists preconfigured clocks that works well and selecting it is quite easy.
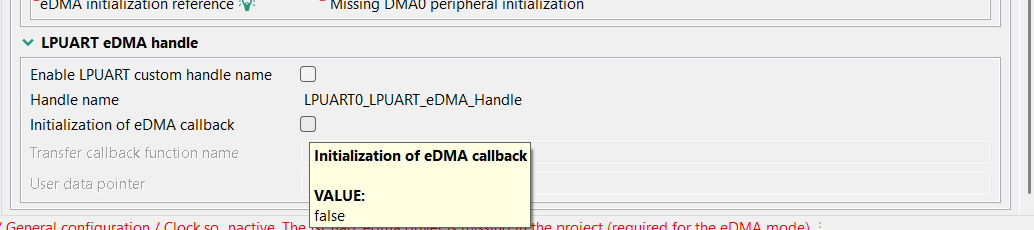
- Whether to use a callback when some interrupt happens is entirely up to you. During the peripheral selection, we have the option to enable or not use callback.
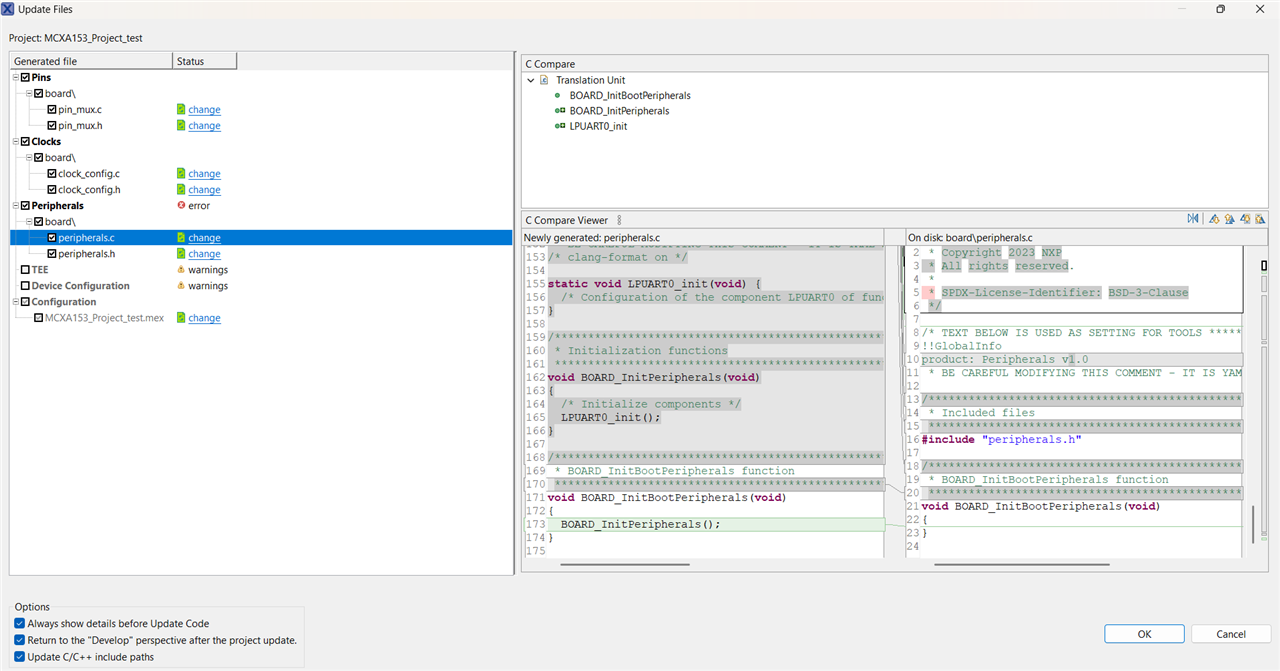
- Let's say, we need to make some changes in a peripheral, now before generating the code we have an option to compare our existing code with the newly configured code. This is a really good option that allows us to verify whether we are adding some feature unnecessarily or removing a required one.
- Support for CMSIS library is really good as well, especially for some peripherals you just need a high-level library, and interrupts to know the job is done. Which is much better than combing through several implementations for the same peripherals.
Thumbs down for
There are some bugs that needs to be fixed in the IDE and mistakes in schematic. Below are the few I encountered.
- There is no mild way for putting this nicely, if you select the default template to generate application, it will be bloated. Either you need to include everything from adapter, peripheral, common library to build an application that just blinks for a sec, or you will have to use their single header that has all the register you need to build from scratch. There is no in-between.
- Let’s say, we are planning to create a new project with new board, if we open the configuration page for the new board while keeping the previous project open, it will throw an error saying “Microcontroller Not found”. We will have to close every other project and select the configuration page.
- If you have previously configured the project to use CMSIS or Freertos, now want to remove or replace that component, after removing the previously selected components from Component page, if you try to build, it will throw error. Because the library files are still present in the components folder and needs to be manually removed.
- Even though the peripheral tab should list all the pins that can be used for that particular peripheral, CAN1 TX/RX pins are not showing up here. But if we select the Pins tab and select the pins manually, we can see CAN1 TX/RX showing up there.
- If you connect both boards at same time, it doesn’t automatically detect which one to flash. It will try to flash the first device it finds in LinkServer application.
- There are some times when debugging straight up fails or the values are not getting updated properly.
- These are all not a deal breaker in anyway, but this gets annoying when you have two boards and switching from one project to other or importing example projects to explore the peripherals.
Quick links
| MCXA153 | MCXN236 | |
|---|---|---|
| Product Page | MCXA153 | MCXN256 |
| Schematic | MCXA153 | MCXN256 |
| Datasheet | MCXA153 | MCXN256 |
| Reference Manual | MCXA153 | MCXN256 |
| SDK reference | MCXA153 | MCXN256 |
Conclusion
All in all, these boards are really worth for that price point. The MCXA153 is quickly becoming my favourite dev kit and I am excited to start interfacing all the modules together to finish my project.


