element14 Community
element14 Community
    Register Log In
  • Site
  • Search
  • Log In Register
  • Community Hub
    Community Hub
    • What's New on element14
    • Feedback and Support
    • Benefits of Membership
    • Personal Blogs
    • Members Area
    • Achievement Levels
  • Learn
    Learn
    • Ask an Expert
    • eBooks
    • element14 presents
    • Learning Center
    • Tech Spotlight
    • STEM Academy
    • Webinars, Training and Events
    • Learning Groups
  • Technologies
    Technologies
    • 3D Printing
    • FPGA
    • Industrial Automation
    • Internet of Things
    • Power & Energy
    • Sensors
    • Technology Groups
  • Challenges & Projects
    Challenges & Projects
    • Design Challenges
    • element14 presents Projects
    • Project14
    • Arduino Projects
    • Raspberry Pi Projects
    • Project Groups
  • Products
    Products
    • Arduino
    • Avnet & Tria Boards Community
    • Dev Tools
    • Manufacturers
    • Multicomp Pro
    • Product Groups
    • Raspberry Pi
    • RoadTests & Reviews
  • About Us
  • Store
    Store
    • Visit Your Store
    • Choose another store...
      • Europe
      •  Austria (German)
      •  Belgium (Dutch, French)
      •  Bulgaria (Bulgarian)
      •  Czech Republic (Czech)
      •  Denmark (Danish)
      •  Estonia (Estonian)
      •  Finland (Finnish)
      •  France (French)
      •  Germany (German)
      •  Hungary (Hungarian)
      •  Ireland
      •  Israel
      •  Italy (Italian)
      •  Latvia (Latvian)
      •  
      •  Lithuania (Lithuanian)
      •  Netherlands (Dutch)
      •  Norway (Norwegian)
      •  Poland (Polish)
      •  Portugal (Portuguese)
      •  Romania (Romanian)
      •  Russia (Russian)
      •  Slovakia (Slovak)
      •  Slovenia (Slovenian)
      •  Spain (Spanish)
      •  Sweden (Swedish)
      •  Switzerland(German, French)
      •  Turkey (Turkish)
      •  United Kingdom
      • Asia Pacific
      •  Australia
      •  China
      •  Hong Kong
      •  India
      • Japan
      •  Korea (Korean)
      •  Malaysia
      •  New Zealand
      •  Philippines
      •  Singapore
      •  Taiwan
      •  Thailand (Thai)
      • Vietnam
      • Americas
      •  Brazil (Portuguese)
      •  Canada
      •  Mexico (Spanish)
      •  United States
      Can't find the country/region you're looking for? Visit our export site or find a local distributor.
  • Translate
  • Profile
  • Settings
Smarter Life
  • Challenges & Projects
  • Design Challenges
  • Smarter Life
  • More
  • Cancel
Smarter Life
Blog A Very Compact Christmas Display - Part 017
  • Blog
  • Forum
  • Documents
  • Files
  • Events
  • Mentions
  • Sub-Groups
  • Tags
  • More
  • Cancel
  • New
  • Share
  • More
  • Cancel
Group Actions
  • Group RSS
  • More
  • Cancel
Engagement
  • Author Author: COMPACT
  • Date Created: 18 Nov 2013 9:21 PM Date Created
  • Views 838 views
  • Likes 0 likes
  • Comments 5 comments
  • psoc4
  • psoc_4
  • smarter_life_challenge
  • psoc_4200
  • compact_xmas_display
  • smarter_life
  • psoc
Related
Recommended

A Very Compact Christmas Display - Part 017

COMPACT
COMPACT
18 Nov 2013

An Old Timer

You don't have permission to edit metadata of this video.
Edit media
x
image
Upload Preview
image
image

This is a self contained project that demonstrates how to use the Timer component to measure the duration of a button push.

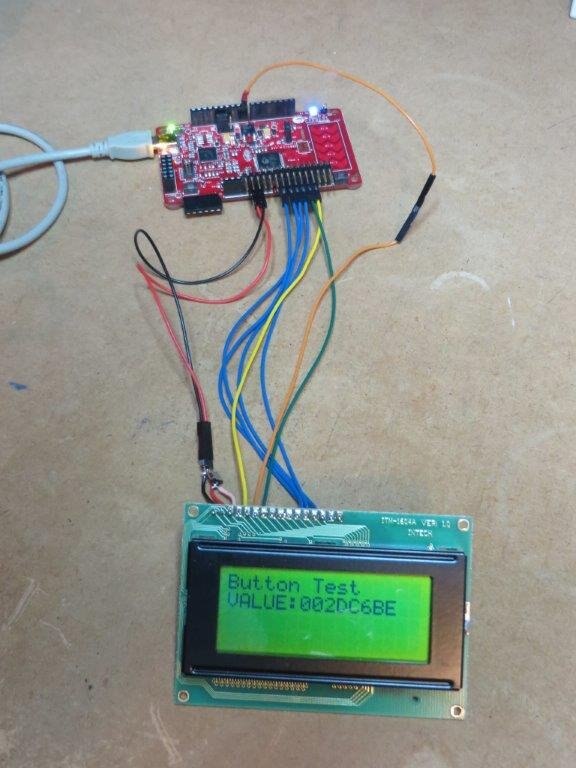
It is one of my tests of the Timer (2.5) component.

This picture may look simple but there's a bit going on here:

     The Timer (2.5) component is configured as a resettable One Shot Timer with trigger and capture

     The Timer is triggered upon the depression of the push button

     The capture is performed upon the release of the push button

     The timer is rearmed on demand

     I'm using a 4x16 LCD Character Display.

image

The Character LCD Component is used but according to its datasheet it is only designed to operate with a 16 x 2 line LCD display.

To make it work with the particular 16 x 4 display some adjustments are required:

  1. 5x7 font.
  2. 4 lines

My adjustments have been engineered not to require any changes to the component's source code. They are;


1. Font selection -  The appropriate configuration bit requires adjustment.

The initialisation requires the following to be added immediately after the LCD_Char_Start() API.

     LCD_Char_WriteControl(LCD_Char_DISPLAY_2_LINES_5x10 & ~(0x04));

(Note: Ideally, the 0x04 numeric constant should be replaced with a suitable symbolic constant).


2. Cursor positioning - The additional two lines reside in the memory space of the first two lines.

This is a rather simple adjustment using a wrapper function.

     void MC_LCD_Char_Position(uint8 x, uint8 y) {

          if ((x >= 2) && (x <=3)) {

               LCD_Char_Position(x - 2, y + 16);

          } else {

               LCD_Char_Position(x, y);

          }

     }


There is a limitation to the use of the  Character LCD component. All of the interface pins must reside on consecutive pins on the same port.

If you look at the photo above you will notice that I have connect the LCD component to Port 2[6:0]. Pin 2.6 is on the far side of the PCB relative to its sibling pins so it is connected with an extension lead.

During my research I spotted an error in the component datasheet so I hope someone from Cypress will revise it with the correction.

That is the description of Constant LCD_Char_DISPLAY_2_LINES_5x10 in the table.

What reads as;

    "Set display to be 2 lines 10 characters"

should read as;

    “Set display to be 4-bit interface, 2 lines of 5x10 pixel characters.”


Enjoy the short video!


  • Sign in to reply

Top Comments

  • COMPACT
    COMPACT over 12 years ago in reply to cy.gul +1
    Gagan, I used the debounce component in the project. Cheers Very Comapct
  • cy.gul
    cy.gul over 12 years ago in reply to COMPACT

    oops, i should read the schematic before I jump to the comments section! image

    • Cancel
    • Vote Up 0 Vote Down
    • Sign in to reply
    • More
    • Cancel
  • COMPACT
    COMPACT over 12 years ago in reply to cy.gul

    Gagan,

    I used the debounce component in the project. image


    Cheers

    Very Comapct

    • Cancel
    • Vote Up +1 Vote Down
    • Sign in to reply
    • More
    • Cancel
  • cy.gul
    cy.gul over 12 years ago in reply to COMPACT

    Or you could use the "Debounce" Component in PSoC Creator to do this for you! =)

    http://www.cypress.com/?rID=69780

    • Cancel
    • Vote Up 0 Vote Down
    • Sign in to reply
    • More
    • Cancel
  • COMPACT
    COMPACT over 12 years ago in reply to DAB

    Hi Don,

    Yes it still works but for this test I've used the default 24MHz source clock for the Timer. This is able to detect very short intervals including key bounce.

    I haven't tried reducing the source clock frequency for the timer to see if I can remove the debouncer.


    The good ol' method of a RC network could also be used to remove key debounce but that would add a component or two.


    Cheers

    Very Compact

    • Cancel
    • Vote Up 0 Vote Down
    • Sign in to reply
    • More
    • Cancel
  • DAB
    DAB over 12 years ago

    Hi Monte,


    I wondered if you need a switch debounce circuit.

    Have you run your timer test without it to see how noisy the switch change is?


    Good update,

    DAB


    • Cancel
    • Vote Up 0 Vote Down
    • Sign in to reply
    • More
    • Cancel
element14 Community

element14 is the first online community specifically for engineers. Connect with your peers and get expert answers to your questions.

  • Members
  • Learn
  • Technologies
  • Challenges & Projects
  • Products
  • Store
  • About Us
  • Feedback & Support
  • FAQs
  • Terms of Use
  • Privacy Policy
  • Legal and Copyright Notices
  • Sitemap
  • Cookies

An Avnet Company © 2025 Premier Farnell Limited. All Rights Reserved.

Premier Farnell Ltd, registered in England and Wales (no 00876412), registered office: Farnell House, Forge Lane, Leeds LS12 2NE.

ICP 备案号 10220084.

Follow element14

  • X
  • Facebook
  • linkedin
  • YouTube