element14 Community
element14 Community
    Register Log In
  • Site
  • Search
  • Log In Register
  • Community Hub
    Community Hub
    • What's New on element14
    • Feedback and Support
    • Benefits of Membership
    • Personal Blogs
    • Members Area
    • Achievement Levels
  • Learn
    Learn
    • Ask an Expert
    • eBooks
    • element14 presents
    • Learning Center
    • Tech Spotlight
    • STEM Academy
    • Webinars, Training and Events
    • Learning Groups
  • Technologies
    Technologies
    • 3D Printing
    • FPGA
    • Industrial Automation
    • Internet of Things
    • Power & Energy
    • Sensors
    • Technology Groups
  • Challenges & Projects
    Challenges & Projects
    • Design Challenges
    • element14 presents Projects
    • Project14
    • Arduino Projects
    • Raspberry Pi Projects
    • Project Groups
  • Products
    Products
    • Arduino
    • Avnet & Tria Boards Community
    • Dev Tools
    • Manufacturers
    • Multicomp Pro
    • Product Groups
    • Raspberry Pi
    • RoadTests & Reviews
  • About Us
  • Store
    Store
    • Visit Your Store
    • Choose another store...
      • Europe
      •  Austria (German)
      •  Belgium (Dutch, French)
      •  Bulgaria (Bulgarian)
      •  Czech Republic (Czech)
      •  Denmark (Danish)
      •  Estonia (Estonian)
      •  Finland (Finnish)
      •  France (French)
      •  Germany (German)
      •  Hungary (Hungarian)
      •  Ireland
      •  Israel
      •  Italy (Italian)
      •  Latvia (Latvian)
      •  
      •  Lithuania (Lithuanian)
      •  Netherlands (Dutch)
      •  Norway (Norwegian)
      •  Poland (Polish)
      •  Portugal (Portuguese)
      •  Romania (Romanian)
      •  Russia (Russian)
      •  Slovakia (Slovak)
      •  Slovenia (Slovenian)
      •  Spain (Spanish)
      •  Sweden (Swedish)
      •  Switzerland(German, French)
      •  Turkey (Turkish)
      •  United Kingdom
      • Asia Pacific
      •  Australia
      •  China
      •  Hong Kong
      •  India
      • Japan
      •  Korea (Korean)
      •  Malaysia
      •  New Zealand
      •  Philippines
      •  Singapore
      •  Taiwan
      •  Thailand (Thai)
      • Vietnam
      • Americas
      •  Brazil (Portuguese)
      •  Canada
      •  Mexico (Spanish)
      •  United States
      Can't find the country/region you're looking for? Visit our export site or find a local distributor.
  • Translate
  • Profile
  • Settings
Smarter Life
  • Challenges & Projects
  • Design Challenges
  • Smarter Life
  • More
  • Cancel
Smarter Life
Blog Moisture sensor board design  PSoC4 smarter life challenge
  • Blog
  • Forum
  • Documents
  • Files
  • Events
  • Mentions
  • Sub-Groups
  • Tags
  • More
  • Cancel
  • New
  • Share
  • More
  • Cancel
Group Actions
  • Group RSS
  • More
  • Cancel
Engagement
  • Author Author: wireb
  • Date Created: 19 Nov 2013 11:49 PM Date Created
  • Views 677 views
  • Likes 0 likes
  • Comments 2 comments
  • psoc4
  • smarter_life_challenge
  • soil_moisture_sensor
  • diy
  • smarter_life
  • sensor
  • moisture
Related
Recommended

Moisture sensor board design  PSoC4 smarter life challenge

wireb
wireb
19 Nov 2013

Got some work done on the sensor boards today.

Here is the logic diagram:

image

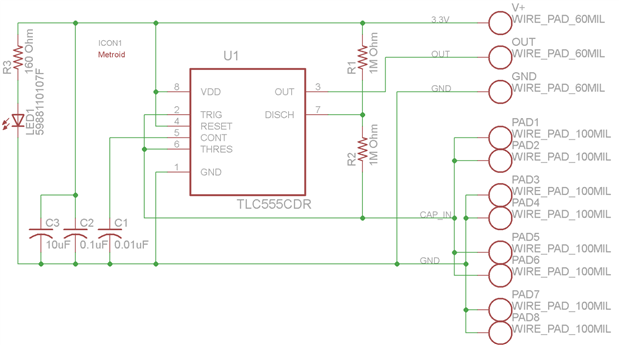
As you can see the Moisture sensor end of the design is very simple. Just a CMOS 555 timer set up in astable mode. Resistor values of R1 and R2 were chosen experimentally in my last post to result in a 10kHz to 20kHz output from a 5" probe. Other than that just a LED power indicator and some decoupling caps. I am intentionally trying to make the probe as small and cheap as possible. This will be in direct / indirect contact with moist soil and is the most prone to damage / corrosion.


imageimage

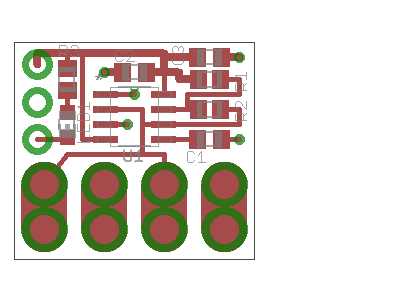
The PCB layout is relatively straight forward. I chose to go with SMT components to keep the PCB size and therefore cost down. Used 0805 desecrates and could have saved a little space with 0603 / 0402 but not enough to make it worth the pain of placing them.


The 8 holes along the bottom are for the probes. I am set up to support either a single probe using the center 4 holes or dual probes using the left and right quads. I added the extra probe set for short pots that cannot take a full length probe. Instead I can use 2 probes at half the length and get the similar response as a single probe. The dual holes on each pad is so I can wrap the copper wire up though the card and back down for mechanical strength. If supporting the probe by other means only one hole would have been plenty.    


As for the input/output connector I decided to go with direct attach wires. Just did not seem to be a good idea to have a open connector that close to the soil and moisture. My current plan is to use standard 3.5mm headphone patch cables. Will cut them in half and solder the shield to ground, middle ring to out, and tip to V+. Some of the bonuses of using headphone cables is they are normally shielded and they are cheap.


Finishing up a parts and raw card order right now. So hope to have the prototypes back next week. Until I get those back I am going to start working on the PSoC4 end of things. First off is getting the software installed and my first hello world (ie blinking led) program working on this platform.

  • Sign in to reply

Top Comments

  • COMPACT
    COMPACT over 12 years ago +1
    Nice board! I built one of these in the 70's. It was aptly named a Water Warbler. I used coat hanger wire for the probes and the 555 was configured to vary its "warble" according to the soil moisture content…
Parents
  • COMPACT
    COMPACT over 12 years ago

    Nice board!

    I built one of these in the 70's. It was aptly named a Water Warbler.

    I used coat hanger wire for the probes and the 555 was configured to vary its "warble" according to the soil moisture content.

    Back then we didn't have CMOS versions of the 555.

    Nice to see it updated using CMOS and SMT.


    • Cancel
    • Vote Up +1 Vote Down
    • Sign in to reply
    • More
    • Cancel
Comment
  • COMPACT
    COMPACT over 12 years ago

    Nice board!

    I built one of these in the 70's. It was aptly named a Water Warbler.

    I used coat hanger wire for the probes and the 555 was configured to vary its "warble" according to the soil moisture content.

    Back then we didn't have CMOS versions of the 555.

    Nice to see it updated using CMOS and SMT.


    • Cancel
    • Vote Up +1 Vote Down
    • Sign in to reply
    • More
    • Cancel
Children
No Data
element14 Community

element14 is the first online community specifically for engineers. Connect with your peers and get expert answers to your questions.

  • Members
  • Learn
  • Technologies
  • Challenges & Projects
  • Products
  • Store
  • About Us
  • Feedback & Support
  • FAQs
  • Terms of Use
  • Privacy Policy
  • Legal and Copyright Notices
  • Sitemap
  • Cookies

An Avnet Company © 2025 Premier Farnell Limited. All Rights Reserved.

Premier Farnell Ltd, registered in England and Wales (no 00876412), registered office: Farnell House, Forge Lane, Leeds LS12 2NE.

ICP 备案号 10220084.

Follow element14

  • X
  • Facebook
  • linkedin
  • YouTube