


The first step in programming this innovation is determining the variables to be measured. Here I focus on measuring rainfall and temperature, with a fire and landslide protection system. In this programming process I used Arduino Ide, with supporting libraries for each sensor.
| Sensor | Status |
| Humidity 20 | PASS |
| Hall Effect | PASS |
| Flame | PASS |
| Accelerometer | PASS |
| IR Temperature | PASS |
Here, I calibrate the infrared temperature sensor, using a comparison of thermocouple-based temperature measuring devices, because I only have a thermocouple temperature measuring device :)
| PIN CONFIGURATION | |
| GND | GND |
| VCC | 5V |
| OBJ | A0 |
| SUR | A1 |
float measureSurTemp()
{
	unsigned char i=0;
	float current_temp1=0;
	int signal=0;
	tempValue=0;

	for(i=0;i<10;i++)
	{
		tempValue+= analogRead(SUR_TEMP_PIN);
		delay(10);
	}
	tempValue=tempValue/10;
	temp = tempValue*5/1023;	  //Calibration results
	R=2000000*temp/(2.50-temp);
	signal=binSearch(R);
	current_temp=signal-1+temp_calibration+(res[signal-1]-R)/(res[signal-1]-res[signal]);
	Serial.println("Surrounding temperature:");
	Serial.println(current_temp);
	return current_temp;
}
The code above is the result of the calibration that I did because I used 5V to supply the sensor, the sensor reading result is multiplied by 5V divided by the analog value, namely 1023, with the analog reference AR_DEFAULT. with the use of surrounding temperature, after comparing the infrared temperature sensor and thermocouple was only a 1-2 °C difference.

In my plan, I would combine the data from the infrared temperature sensor with the DHT20, but when combined the data didn't appear and the microcontroller often restarted. therefore I decided to use DHT20.
| PIN CONFIGURATION | |
| GND | GND |
| VCC | VCC |
| SCL | SCL (0x38) |
| SDA | SDA (0x38) |
    if (!dht.readTempAndHumidity(temp_hum_val)) {
        lcd.print("             ");
        lcd.print("Hum: ");
        //Serial1.print("Hum: ");
        lcd.print(temp_hum_val[0]);
        //Serial1.print(temp_hum_val[0]);
        lcd.print("%");
        lcd.print("             ");
        //Serial1.println("%");


        lcd.setCursor(0,1);
        lcd.print("Temp: ");
        Serial1.print("Temp: ");
        lcd.print(temp_hum_val[1] ); //display data temperature
        Serial1.print(temp_hum_val[1] ); //send data to LoRa
        lcd.print("*C");
        Serial1.println("*C");
        lcd.print("    ");

    } else {
        Serial.println("Failed to get temprature and humidity value.");
    }
In the code above temperature value is displayed on LCD and sent to LoRa, after that humidity is displayed on the LCD only. After that DHT20 will be installed in the case below.

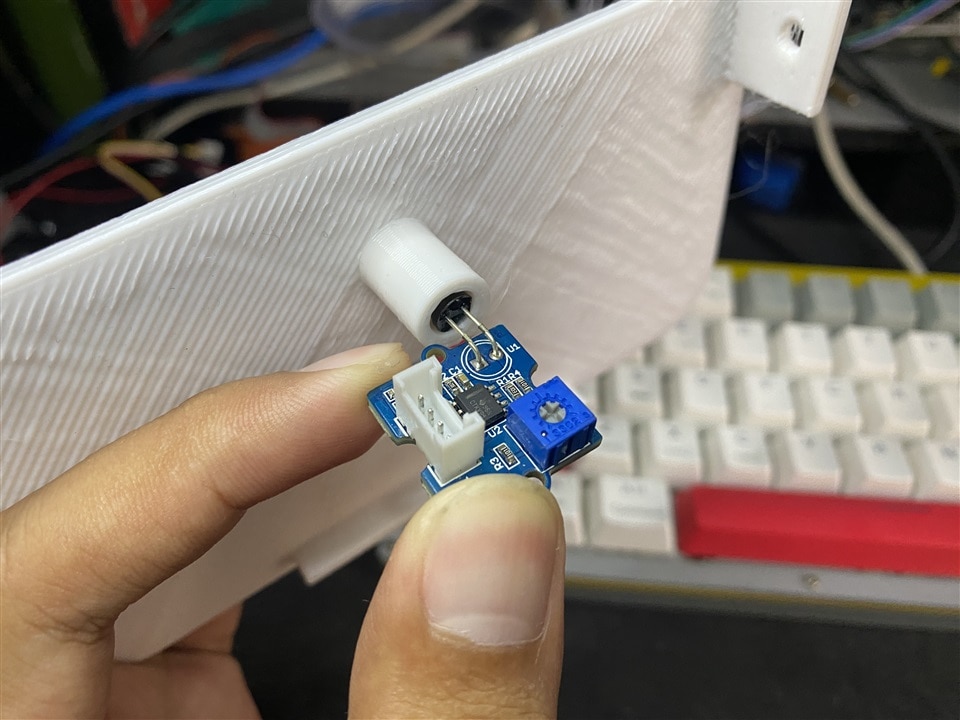
Second stage, I programmed the rainfall readings using a hall effect sensor. The rain gauge uses a Hall Effect sensor to detect magnetic movements produced by a full rain reservoir. When rain falls, the water droplets trigger magnetic movement, which is then detected by the Hall Effect sensor. This movement data is calculated to measure rainfall.
| PIN CONFIGURATION | |
| GND | GND |
| VCC | 5V |
| OUT | D3 |
    sensor = digitalRead(3); //Use Pin DIgital 3

    if (sensor != predictionsensor) {
      mmTotal = mmTotal + mmPerPulse; //collected water is added with digital pulse
    }

    delay(500);

    predictionsensor = sensor;


    Serial1.print("Rain:");
    Serial1.print(mmTotal); //Data To Lora
    Serial1.println("mm");
The code above works when the tank is full, the sensor will have a HIGH value, and the milli liter storage data is multiplied by digital pulse from sensor, here I use pin D3.

Next is protection features, the first is the landslide detection system, in this system sensor will detect the slope of the ground, if a shift occurs. As a warning system, a buzzer will light up when the ground shifts.
| PIN CONFIGURATION | |
| GND | GND |
| VCC | 5V |
| SCL | SCL (0x4C) |
| SDA | SDA (0x4C) |
    acc.getXYZ(&x,&y,&z); //get data from sensor
    acc.getAcceleration(&ax,&ay,&az);
    lcd.setCursor(0,3);
    lcd.print("Shift=");
    Serial1.print("Shift=");
    lcd.print(ay); //Send Data To LCD
    Serial1.print(ay); //Send data To Lora
    lcd.print("   ");
    Serial1.print("           ");
In the code above, here I use the y-axis to make it easier to detect when a ground shift occurs, with units of g or gravity.
     if (y >= 70){
       lcd.clear();
       lcd.setCursor(0,0);
       lcd.print("Shift");
       lcd.setCursor(0,1);
       lcd.print("Land: ");
       lcd.print(ay);
       lcd.print("g");

     }
Apart from that, in the code above, I added code to indicate if there is a shift in the ground.

Second protection system is a fire warning system, using a flame sensor. The sensor is placed on the inside of the main case. by providing holes that are about 2cm apart, to avoid noise from the sun's UV rays, which can interfere with sensor readings.
| PIN CONFIGURATION | |
| GND | GND |
| VCC | VCC |
| OUT | D2 |
    int apix = digitalRead(api); //read flame status
      if (apix == HIGH){
       lcd.setCursor(0,2);
       Serial1.println("No Fire");// sand data to lora
       lcd.print("No Fire");
       lcd.print("    ");
     }else{
       lcd.setCursor(0,2);
       lcd.print("Fire!!!"); //display on LCD
       Serial1.println("Fire!!!");
       lcd.print("      ");
     }
The code above starts by reading the digital pulse value on the fire sensor, then goes into conditioning using if, if the sensor is HIGH then fire is detected, and if the sensor is LOW then no fire.
The following are reading results from all sensors, the main node displays humidity, temperature, fire status, and ground shifting status.
| PIN CONFIGURATION | |
| GND | GND |
| VCC | 5V |
| SCL | SCL(0x27) |
| SDA | SDA (0x27) |

In second node here receives data from the main node, then the data is displayed on the Oled LCD and sent to the web server, so that it can be accessed on smartphones and laptops.

The first code is to read data from Lora using Serial1, and if the data is found, will displayed on the Oled LCD.
| PIN CONFIGURATION | |
| GND | GND |
| VCC | 3.3V |
| SCL | SCL (0X3D) |
| SDA | SDA (0X3D) |
  if (Serial.available()) {
    String input = Serial.readString(); //Read Data From LoRa
    Serial1.println(input);

    // Menampilkan input Serial ke layar OLED
    display.clearDisplay();
    display.setTextSize(1);
    display.setTextColor(SSD1306_WHITE);
    display.setCursor(0, 0);
    display.println(input); //Display Data
    display.display();

    inputa = input;
  }
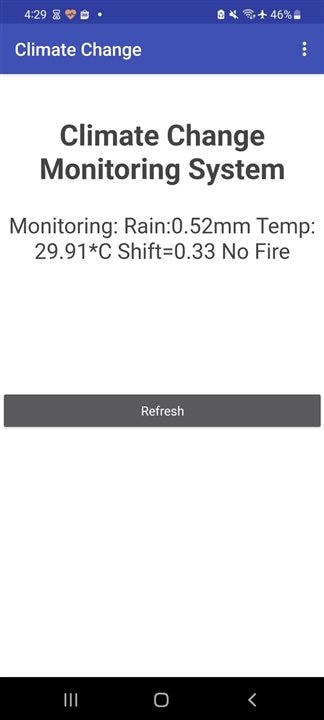
Next is to send data from Lora to the web server, using the HTTP protocol, The User only needs to access the IP used.
| PIN CONFIGURATION | |
| GND | GND |
| VCC | 3.3V |
| RX | TX |
| TX | RX |
  server.handleClient(); // Handle client
}

void handle_OnConnect() {

    server.send(200, "text/html", SendHTML(inputa)); // Send data lora to webserver

}

void handle_NotFound(){
  server.send(404, "text/plain", "Not found");
}


String SendHTML(String inputa){ // like index html but simple web
  String ptr = "<!DOCTYPE html> <html>\n";
  ptr +="<head><meta name=\"viewport\" content=\"width=device-width, initial-scale=1.0, user-scalable=no\">\n";
  ptr +="<title>ESP8266 Weather Report</title>\n";
  ptr +="<style>html { font-family: Helvetica; display: inline-block; margin: 0px auto; text-align: center;}\n";
  ptr +="body{margin-top: 50px;} h1 {color: #444444;margin: 50px auto 30px;}\n";
  ptr +="p {font-size: 24px;color: #444444;margin-bottom: 10px;}\n";
  ptr +="</style>\n";
  ptr +="</head>\n";
  ptr +="<body>\n";
  ptr +="<div id=\"webpage\">\n";
  ptr +="<h1>Climate Change Monitoring System</h1>\n";

  ptr +="<p>Monitoring: ";
  ptr += inputa;
  ptr +="</p>";

  ptr +="</div>\n";
  ptr +="</body>\n";
  ptr +="</html>\n";
  return ptr;
}
Finally, the data is displayed in application that has been created, with simple components, namely webview and refresh features.
Thank you for reading the article I wrote, sorry if there are many shortcomings in the explanation, next I will share my experience of the assembly process for this innovation.

