


Summer of Green Tech ......Recycled e-Scoote
##2 The Development Kits
Table of Contents
1 Introduction
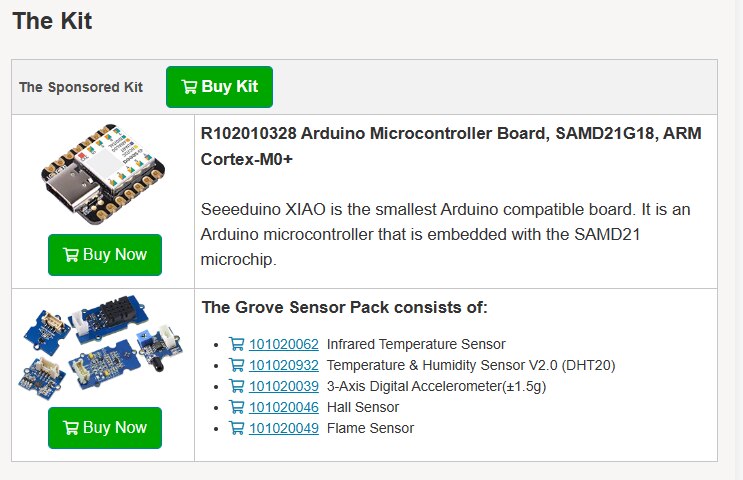
Glad to have received the development kit for this project.
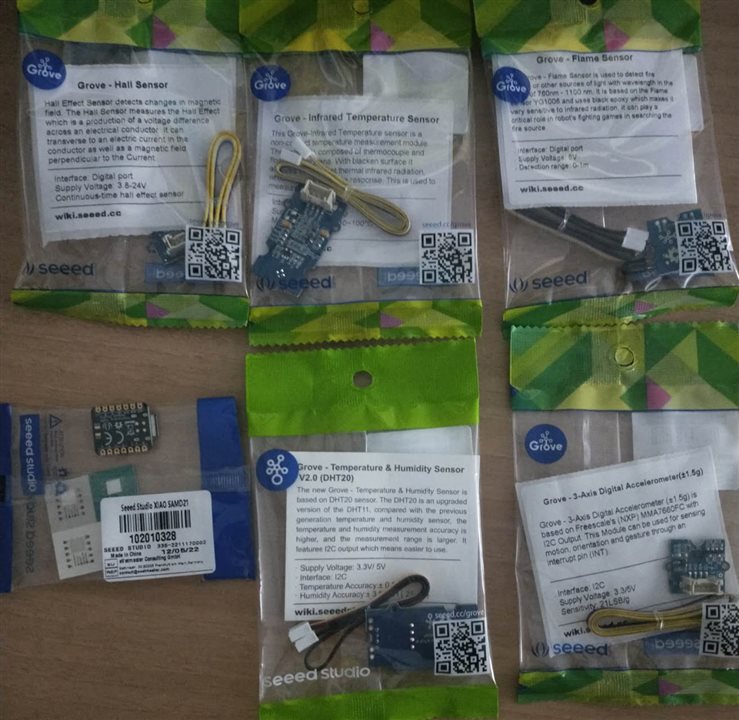
As per the list
2 The Seeeduino XIao
2.1 The Design Kits, Seeeduino XIAO
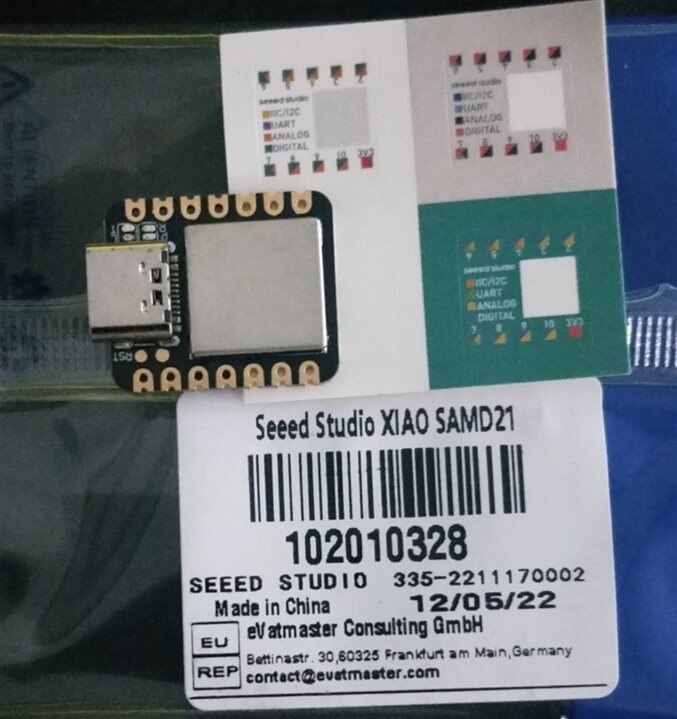
Refer to Getting Started | Seeed Studio Wiki for technical specs.
Seeed Studio XIAO SAMD21 has 14 PINs, which can be used for
- 11 digital interfaces, 11 mock interfaces, 10 PWM interfaces (d1-d10),
- 1 DAC output pin D0,
- 1 SWD pad interface,
- 1 I2C interface,
- 1 SPI interface,
- 1 UART interface, Serial communication indicator (T/R),
- Blink light (L) through pin multiplexing.The colors of LEDs(Power,L,RX,TX) are green, yellow, blue and blue.
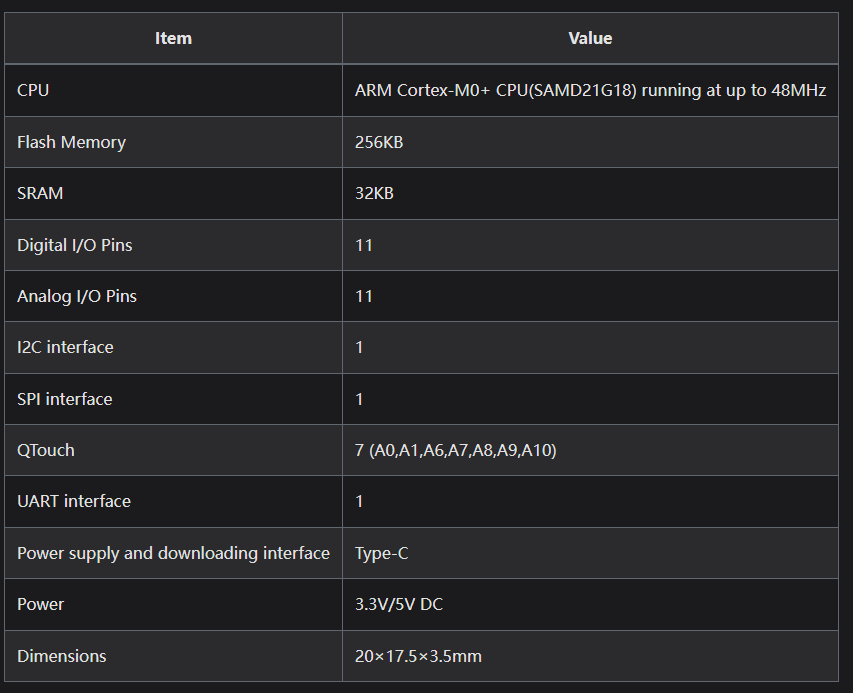
Seeed Studio XIAO SAMD21 has a Type-C interface which can supply power and download code.
Moreover, there are two reset buttons, you can short connect them to reset the board. To reduce the BOM size, the two reset pins is only copper pad near the type C socket for manual short-circuited,

- To Enter Bootloader Mode; Use tweezers or short lines to short the RST pins in the diagram twice. The orange LED lights flicker on and light up
- To Enter Reset Mode: Use tweezers or short lines to short the RST pins only once, The orange LED lights flicker on and light up.
Pin map is,

Arduino IDE is perfect for this design, but experienced programmer can try CircuitPython or MicroPython.
Tiny as it is, Tiny Machine Learning is still valid choice with Edge Impulse Application,
3 Grove Sensor Pack
3.1 Infrared Temperature Sensor
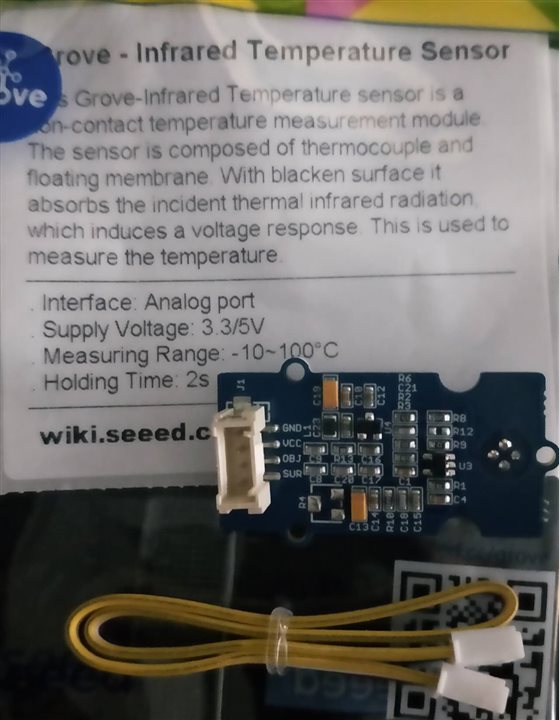
Grove - Infrared Temperature Sensor | Seeed Studio Wiki
The sensor's nominal measure distance is 9CM, and pins A0 A1 for analogue reading, convert to temperature with array search
Demo code is attached as
/****************************************************************************/
//	Function: Measure the measure the Surrounding temperature around the sensor
//			  and the temperature of the target which is in front of the sensor.
//			  And print the result on the serial monitor.
//	Hardware: Grove - Infrared Temperature Sensor
//	Arduino IDE: Arduino-1.0
//	Author:	 Bruce.Qin
//	Date: 	 Nov 28,2011
//	Version: v1.0 modified by FrankieChu at Jan 24,2013
//	by www.seeedstudio.com
//
//  This library is free software; you can redistribute it and/or
//  modify it under the terms of the GNU Lesser General Public
//  License as published by the Free Software Foundation; either
//  version 2.1 of the License, or (at your option) any later version.
//
//  This library is distributed in the hope that it will be useful,
//  but WITHOUT ANY WARRANTY; without even the implied warranty of
//  MERCHANTABILITY or FITNESS FOR A PARTICULAR PURPOSE.  See the GNU
//  Lesser General Public License for more details.
//
//  You should have received a copy of the GNU Lesser General Public
//  License along with this library; if not, write to the Free Software
//  Foundation, Inc., 51 Franklin St, Fifth Floor, Boston, MA 02110-1301 USA
//
/******************************************************************************/

#include <math.h>

#define SUR_TEMP_PIN A0 // Analog input pin connect to temperature sensor SUR pin
#define OBJ_TEMP_PIN A1 // Analog input pin connect to temperature sensor OBJ pin
float temp_calibration=0;       //this parameter was used to calibrate the temperature
//float objt_calibration=0.000; //this parameter was used to calibrate the object temperature
float temperature_range=10;    //we make a map of temperature-voltage according to sensor datasheet. 10 is the temperature step when sensor and
                               //object distance is 9CM.
float offset_vol=0.014;        //this parameter was used to set the mid level voltage,when put the sensor in normal environment after 10 min,
                               //the sensor output 0.For example,the surrounding temperature is 29℃,but the result is 27℃ via the sensor,
                               //you should set the reerence to 0.520 or more,according to your sensor to change.
                               //the unit is V
float tempValue = 0;
float objtValue= 0;
float current_temp=0;
float temp=0;
float temp1=0;
float temp2=0;
unsigned int temp3=0;
const float reference_vol=0.500;
unsigned char clear_num=0;//when use lcd to display
float R=0;
float voltage=0;


long res[100]={
                 318300,302903,288329,274533,261471,249100,237381,226276,215750,205768,
                 196300,187316,178788,170691,163002,155700,148766,142183,135936,130012,
                 124400,119038,113928,109059,104420,100000,95788,91775,87950,84305,
                 80830,77517,74357,71342,68466,65720,63098,60595,58202,55916,
                 53730,51645,49652,47746,45924,44180,42511,40912,39380,37910,
                 36500,35155,33866,32631,31446,30311,29222,28177,27175,26213,
                 25290,24403,23554,22738,21955,21202,20479,19783,19115,18472,
                 17260,16688,16138,15608,15098,14608,14135,13680,13242,12819,
                 12412,12020,11642,11278,10926,10587,10260,9945,9641,9347,
                 9063,8789,8525,8270,8023,7785,7555,7333,7118,6911};

float obj [13][12]={
/*0*/             { 0,-0.274,-0.58,-0.922,-1.301,-1.721,-2.183,-2.691,-3.247,-3.854,-4.516,-5.236}, //
/*1*/             { 0.271,0,-0.303,-0.642,-1.018,-1.434,-1.894,-2.398,-2.951,-3.556,-4.215,-4.931},  //→surrounding temperature,from -10,0,10,...100
/*2*/             { 0.567,0.3,0,-0.335,-0.708,-1.121,-1.577,-2.078,-2.628,-3.229,-3.884,-4.597},   //↓object temperature,from -10,0,10,...110
/*3*/             { 0.891,0.628,0.331,0,-0.369,-0.778,-1.23,-1.728,-2.274,-2.871,-3.523,-4.232},
/*4*/             { 1.244,0.985,0.692,0.365,0,-0.405,-0.853,-1.347,-1.889,-2.482,-3.13,-3.835},
/*5*/             { 1.628,1.372,1.084,0.761,0.401,0,-0.444,-0.933,-1.47,-2.059,-2.702,-3.403},
/*6*/             { 2.043,1.792,1.509,1.191,0.835,0.439,0,-0.484,-1.017,-1.601,-2.24,-2.936},
/*7*/             { 2.491,2.246,1.968,1.655,1.304,0.913,0.479,0,-0.528,-1.107,-1.74,-2.431},
/*8*/             { 2.975,2.735,2.462,2.155,1.809,1.424,0.996,0.522,0,-0.573,-1.201,-1.887},
/*9*/             { 3.495,3.261,2.994,2.692,2.353,1.974,1.552,1.084,0.568,0,-0.622,-1.301},
/*10*/            { 4.053,3.825,3.565,3.27,2.937,2.564,2.148,1.687,1.177,0.616,0,-0.673},
/*11*/            { 4.651,4.43,4.177,3.888,3.562,3.196,2.787,2.332,1.829,1.275,0.666,0},
/*12*/            { 5.29,5.076,4.83,4.549,4.231,3.872,3.47,3.023,2.527,1.98,1.379,0.72}
};

void setup()
{
	Serial.begin(9600); // initialize serial communications at 9600 bps
	analogReference(INTERNAL);//set the refenrence voltage 1.1V,the distinguishability can up to 1mV.
	//analogReference(INTERNAL1V1);//(mega only)set the refenrence voltage 1.1V,the distinguishability can up to 1mV.
}
void loop()
{
	measureSurTemp();//measure the Surrounding temperature around the sensor
	measureObjectTemp();
}

float binSearch(long x)// this function used for measure the surrounding temperature
{
	int low,mid,high;
	low=0;
	//mid=0;
	high=100;
	while (low<=high)
	{
		mid=(low+high)/2;
		if(x<res[mid])
			low= mid+1;
		else//(x>res[mid])
			high=mid-1;
	}
	return mid;
}

float arraysearch(float x,float y)//x is the surrounding temperature,y is the object temperature
{
	int i=0;
	float tem_coefficient=100;//Magnification of 100 times
	i=(x/10)+1;//Ambient temperature
	voltage=(float)y/tem_coefficient;//the original voltage
	//Serial.print("sensor voltage:\t");
	//Serial.print(voltage,5);
	//Serial.print("V");
	for(temp3=0;temp3<13;temp3++)
	{
		if((voltage>obj[temp3][i])&&(voltage<obj[temp3+1][i]))
		{
			return temp3;
		}
	}
}
float measureSurTemp()
{
	unsigned char i=0;
	float current_temp1=0;
	int signal=0;
	tempValue=0;

	for(i=0;i<10;i++)       //
	{
		tempValue+= analogRead(SUR_TEMP_PIN);
		delay(10);
	}
	tempValue=tempValue/10;
	temp = tempValue*1.1/1023;
	R=2000000*temp/(2.50-temp);
	signal=binSearch(R);
	current_temp=signal-1+temp_calibration+(res[signal-1]-R)/(res[signal-1]-res[signal]);
	Serial.print("Surrounding temperature:");
	Serial.print(current_temp);
	return current_temp;
}

float measureObjectTemp()
{
	unsigned char i=0;
	unsigned char j=0;
	float sur_temp=0;
	unsigned int array_temp=0;
	float temp1,temp2;
	float final_temp=0;
	objtValue=0;
	for(i=0;i<10;i++)
	{
		objtValue+= analogRead(OBJ_TEMP_PIN);
		delay(10);
    }
	objtValue=objtValue/10;//Averaging processing
	temp1=objtValue*1.1/1023;//+objt_calibration;
	sur_temp=temp1-(reference_vol+offset_vol);
	Serial.print("\t Sensor voltage:");
	Serial.print(sur_temp,3);
	Serial.print("V");
	array_temp=arraysearch(current_temp,sur_temp*1000);
	temp2=current_temp;
	temp1=(temperature_range*voltage)/(obj[array_temp+1][(int)(temp2/10)+1]-obj[array_temp][(int)(temp2/10)+1]);
	final_temp=temp2+temp1;
	if((final_temp>100)||(final_temp<=-10))
		{
		Serial.println ("\t out of range!");
		}
	else
		{
			Serial.print("\t object temperature:");
			Serial.println(final_temp,2);
			}
}
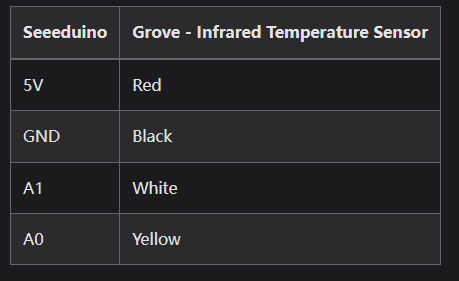
3.2 Temperature & Humidity Sensor V2.0 (DHT20)
Grove - Temperature&Humidity Sensor(DHT20) | Seeed Studio Wiki
This sensor still need analogue reading pin for conversion with DHT library to be imported.
#include "Wire.h"
#include "DHT.h"
#define DHTTYPE DHT20   // DHT 20
/*Notice: The DHT10 and DHT20 is different from other DHT* sensor ,it uses i2c interface rather than one wire*/
/*So it doesn't require a pin.*/
DHT dht(DHTTYPE);         //   DHT10 DHT20 don't need to define Pin

#if defined(ARDUINO_ARCH_AVR)
    #define debug  Serial

#elif defined(ARDUINO_ARCH_SAMD) ||  defined(ARDUINO_ARCH_SAM)
    #define debug  SerialUSB
#else
    #define debug  Serial
#endif

void setup() {

    debug.begin(115200);
    debug.println("DHTxx test!");
    Wire.begin();

    /*if using WIO link,must pull up the power pin.*/
    // pinMode(PIN_GROVE_POWER, OUTPUT);
    // digitalWrite(PIN_GROVE_POWER, 1);

    dht.begin();
}

void loop() {
    float temp_hum_val[2] = {0};
    // Reading temperature or humidity takes about 250 milliseconds!
    // Sensor readings may also be up to 2 seconds 'old' (its a very slow sensor)


    if (!dht.readTempAndHumidity(temp_hum_val)) {
        debug.print("Humidity: ");
        debug.print(temp_hum_val[0]);
        debug.print(" %\t");
        debug.print("Temperature: ");
        debug.print(temp_hum_val[1]);
        debug.println(" *C");
    } else {
        debug.println("Failed to get temprature and humidity value.");
    }

    delay(1500);
}
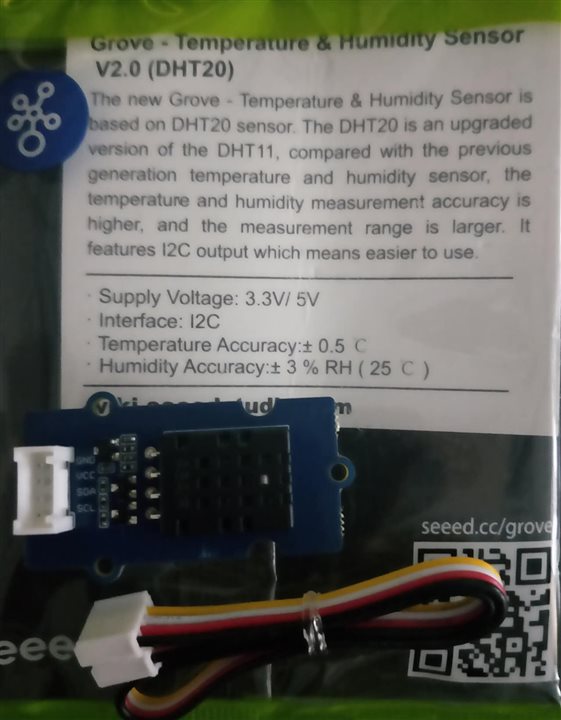
3.3 3-Axis Digital Accelerometer(±1.5g)
Grove - 3-Axis Digital Accelerometer (LIS3DHTR) | Seeed Studio Wiki
Get data with I2C port
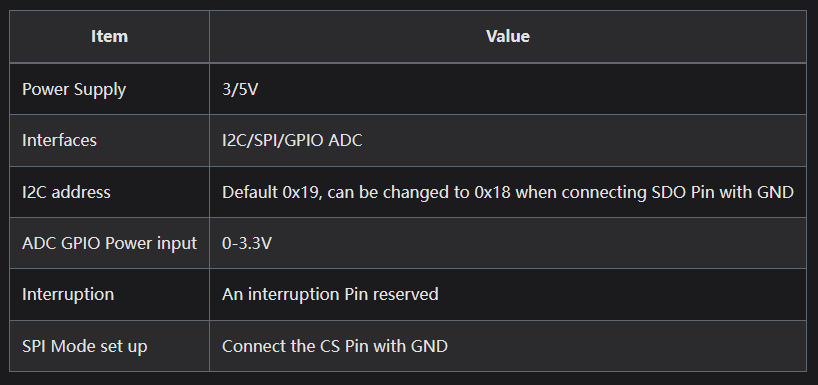
Import the "LIS3DHTR.h" library first,
// This example use I2C.
#include "LIS3DHTR.h"
#include <Wire.h>
LIS3DHTR<TwoWire> LIS; //IIC
#define WIRE Wire

void setup()
{
  Serial.begin(115200);
  while (!Serial)
  {
  };
  LIS.begin(WIRE,0x19); //IIC init
  //LIS.begin(0x19);
  LIS.openTemp();  //If ADC3 is used, the temperature detection needs to be turned off.
  //  LIS.closeTemp();//default
  delay(100);
    LIS.setFullScaleRange(LIS3DHTR_RANGE_2G);
  //  LIS.setFullScaleRange(LIS3DHTR_RANGE_4G);
  //  LIS.setFullScaleRange(LIS3DHTR_RANGE_8G);
  //  LIS.setFullScaleRange(LIS3DHTR_RANGE_16G);
  //  LIS.setOutputDataRate(LIS3DHTR_DATARATE_1HZ);
  //  LIS.setOutputDataRate(LIS3DHTR_DATARATE_10HZ);
  //  LIS.setOutputDataRate(LIS3DHTR_DATARATE_25HZ);
  LIS.setOutputDataRate(LIS3DHTR_DATARATE_50HZ);
  //  LIS.setOutputDataRate(LIS3DHTR_DATARATE_100HZ);
  //  LIS.setOutputDataRate(LIS3DHTR_DATARATE_200HZ);
  //  LIS.setOutputDataRate(LIS3DHTR_DATARATE_1_6KHZ);
  //  LIS.setOutputDataRate(LIS3DHTR_DATARATE_5KHZ);
}
void loop()
{
  if (!LIS)
  {
    Serial.println("LIS3DHTR didn't connect.");
    while (1)
      ;
    return;
  }
  //3 axis
    Serial.print("x:"); Serial.print(LIS.getAccelerationX()); Serial.print("  ");
    Serial.print("y:"); Serial.print(LIS.getAccelerationY()); Serial.print("  ");
    Serial.print("z:"); Serial.println(LIS.getAccelerationZ());
  //ADC
  //    Serial.print("adc1:"); Serial.println(LIS.readbitADC1());
  //    Serial.print("adc2:"); Serial.println(LIS.readbitADC2());
  //    Serial.print("adc3:"); Serial.println(LIS.readbitADC3());

  //temperature
  Serial.print("temp:");
  Serial.println(LIS.getTemperature());
  delay(500);
}
3.4 Hall Sensor
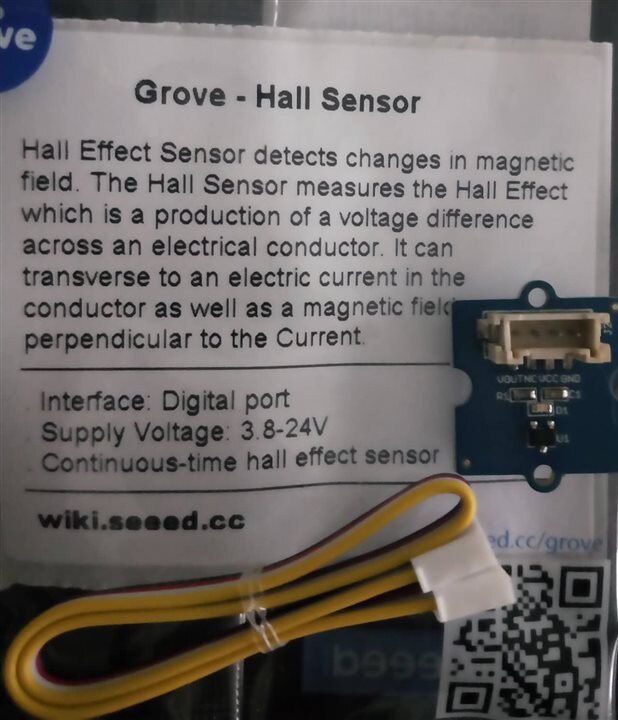
Grove - Hall Sensor | Seeed Studio Wiki
Hall sensor use pin to yellow line only, with digital reading pin
#define HALL_SENSOR 2
#define LED 4//the Grove - LED is connected to D4 of Arduino

void setup()
{
  pinsInit();
}

void loop()
{
 if(isNearMagnet())//if the hall sensor is near the magnet?
 {
  turnOnLED();
 }
 else
 {
  turnOffLED();
 }
}
void pinsInit()
{
 pinMode(HALL_SENSOR, INPUT);
 pinMode(LED,OUTPUT);
}

/*If the hall sensor is near the magnet whose south pole is facing up, */
/*it will return ture, otherwise it will return false.    */
boolean isNearMagnet()
{
 int sensorValue = digitalRead(HALL_SENSOR);
 if(sensorValue == LOW)//if the sensor value is LOW?
 {
  return true;//yes,return ture
 }
 else
 {
  return false;//no,return false
 }
}
void turnOnLED()
{
 digitalWrite(LED,HIGH);
}
void turnOffLED()
{
 digitalWrite(LED,LOW);
}
3.5 Flame Sensor
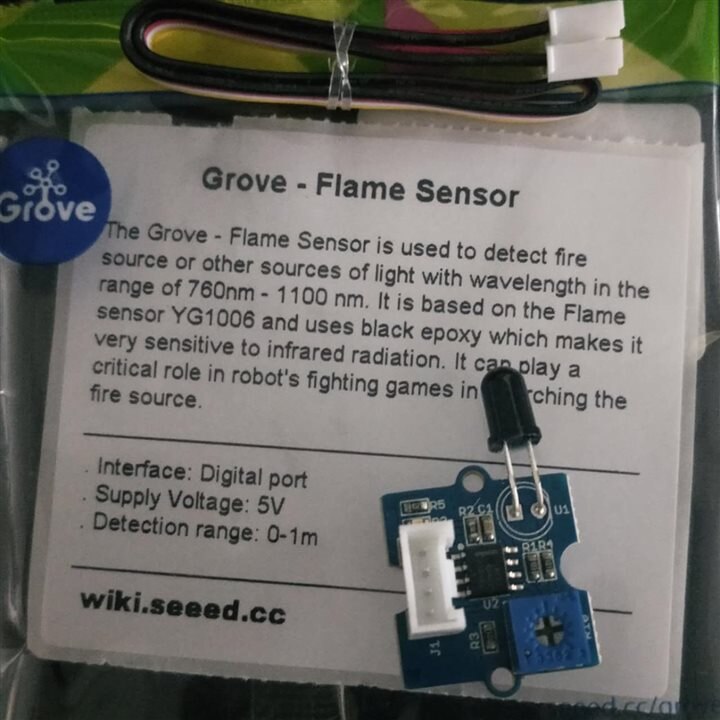
Grove - Flame Sensor | Seeed Studio Wiki for specification
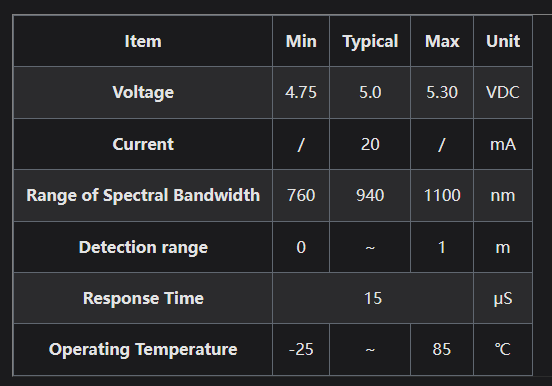
with digital reading as well
#define FLAME_SENSOR 2 //connect SENSOR to digital pin2
#define LED 3 //connect Grove - LED to pin3

void setup()
{
    pinsInit();
}
void loop()
{
    if(isFlameDetected())
    turnOnLED();
    else turnOffLED();
}
    /********************************/
void pinsInit()
{
    pinMode(FLAME_SENSOR, INPUT);
    pinMode(LED,OUTPUT);
    digitalWrite(LED,LOW);
}
void turnOnLED()
{
    digitalWrite(LED,HIGH);
}
void turnOffLED()
{
    digitalWrite(LED,LOW);
}
boolean isFlameDetected()
{
    if(digitalRead(FLAME_SENSOR))
    return false;
    else return true;
}
4 Summary
For all these sensors, arduino IDE can provide full library support with ease, this make software development easy.
