

Hello everyone!
At the beginning of this series of blogs, with the kit from Mikroeletronika, I proposed the creation of an application for monitoring medical parameters both locally, on an LCD display, and remotely, on a phone/PC device connected to the Internet, using the Node Red application for to do all this, as well as for the fact that it allows us to create a graphic interface quite easily, without knowing programming at too high a level.
Node-RED is a flow-based programming tool, originally developed by a team from the well-known IBM Emerging Technology Services company, now this tool is part of the OpenJS Foundation. Node-RED is a flow-based programming tool, originally developed by a team from the well-known IBM Emerging Technology Services company, now this tool is part of the OpenJS Foundation.
Invented by J. Paul Morrison in the 1970s, flow-based programming is a way of describing the behavior of an application as a network of black boxes (black boxes), or nodes, as they are called in Node-RED. Each node has a well-defined purpose, is assigned some data, processes it, and then passes that data on. The network is responsible for the flow of data between nodes. It is a model that lends itself very well to a visual representation and makes it more accessible to a wider range of users. If one can break down a problem into steps, one can look at a flow of nodes and understand what it is doing without having to understand every line of code in every node.
In a web browser, the application is created in a simple way, bringing the desired nodes from the palette menu to the workspace (drag-drop method), and then interconnecting them. With a single click, the application is deployed in the runtime and is run. The node palette can be easily expanded by installing new nodes created by other users in the community, and the created streams can be easily shared as *json extension files.
The process of creating the interface through Node Red is described as follows:
- the first step is to install Node Red instrumentally on the platform we work on, access the link https://nodered.org/docs/getting-started/local, following the steps presented;
- to run the application, access the Command Prompt terminal (I use Windows OS) and execute the "node-red" command and Node Red will launch automatically;
- to access the Node Red editor, open a web browser and access the link http://localhost:1880. A web page opens like the one in the figure below (I have already linked the nodes):
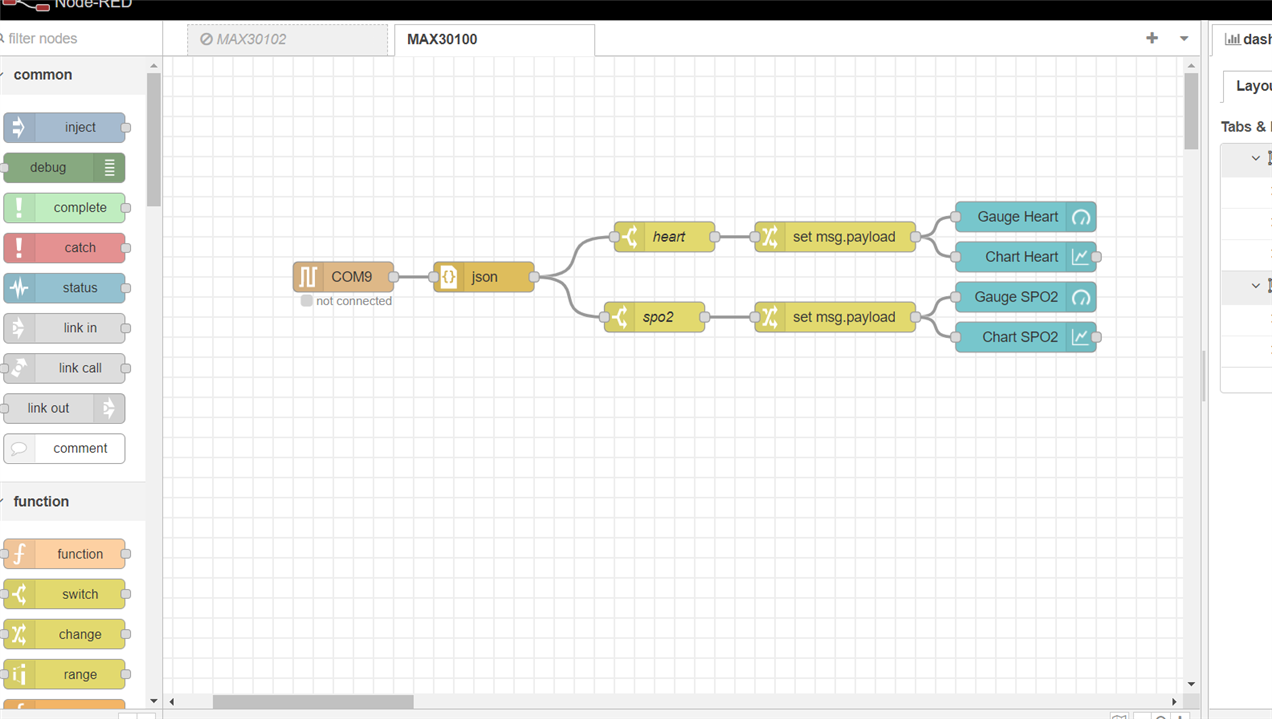
- in the palette menu on the left of the page, the nodes can be found, positioned on the workspace and their interconnection can be started.
The flows network created for this application includes the following nodes:
- COMx is connected and receives the data from the serial port of the PC/laptop platform, it can be found in the network – serial in submenu;
- json converts from a JSON data string to a Java object representation, in both directions, found in the parser – json submenu;
- voltage is a node whose function is to filter information according to a specified property, it is found in the function - switch submenu;
- set msg.payload takes the data in the form of a message according to the set properties and directs it to the display objects, it is found in the function - change submenu;
- voltage clock is a node that adds an indicator clock widget, it can be found in the dashboard – gauge submenu;
- voltage graph forms a graph based on the input values, it can be found in the dashboard – chart submenu.
To run the application, press the red Deploy button on the top right of the web page, and from the submenu access Dashboard, which will open a new web page and the created graphic interface will appear on the screen, like the figures below.
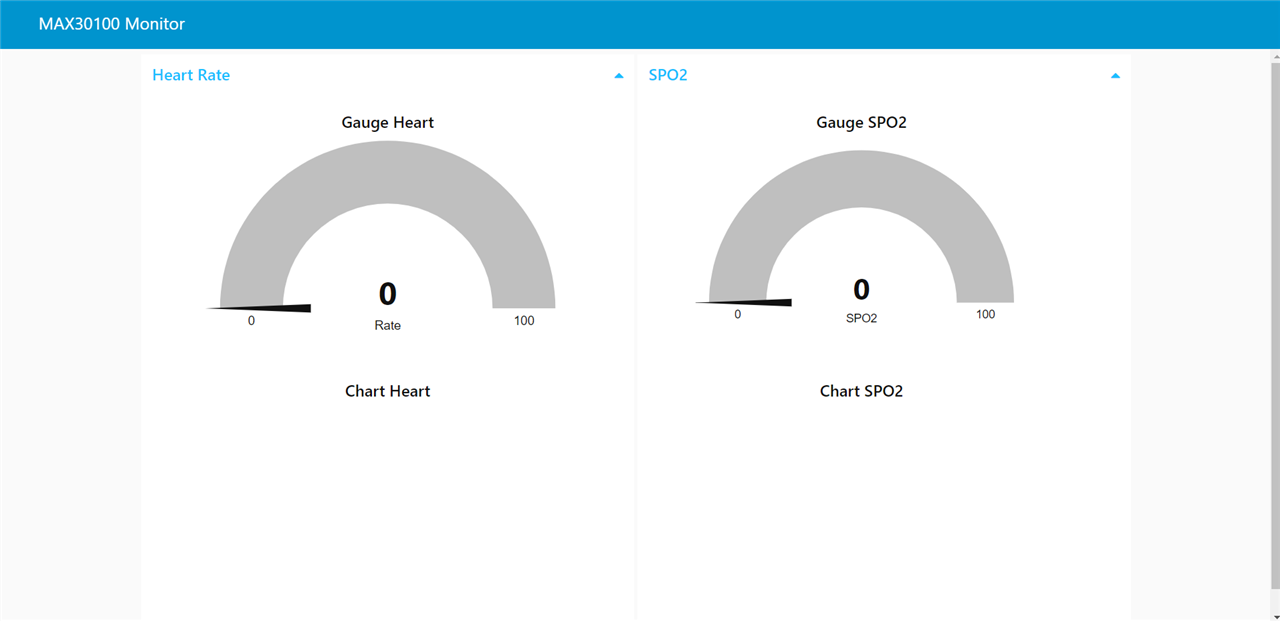
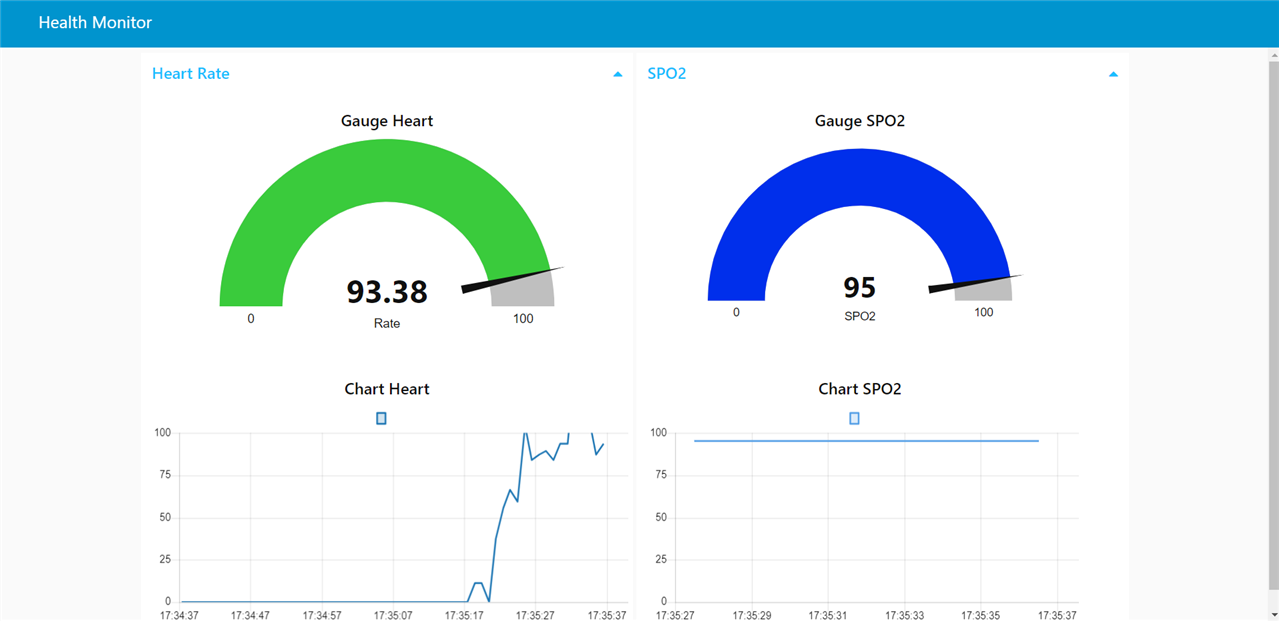
This graphical interface includes a tab named "MAX30100 Monitor", two groups named successively Heart Rate and SPO2, each group contains two instruments for displaying blood parameters, a clock indicator and a graph. The measurement thresholds are set by the user, but in this one where I use the MAX30100, we are interested in a value for SPO2 between 95-100%, and for BPM 60-100. Of course, we have to display the lower values as well.
The graphical interface can also be accessed from another device, PC/laptop/mobile phone, since it is a web page, obviously an internet connection is required, and the IP address where the host, PC/laptop, is running at the time Node Red application, all you have to do is access the address http://IP_Host:1880 . It should be noted that the Arduino platform must be connected to a laptop/PC with an Internet connection, because the Node Red application receives data from the MAX30100 sensor through the serial port.
This blog rather presents the creation of the graphical interface and the access to it. The electronic scheme is the same as the one presented in the previous blog, or in short, the MAX30100 module is connected via 4 wires to the Arduino -- VCC, GND, SDA, SCL. We don't need any other hardware. At the same time, it is necessary that the Arduino is permanently connected to the PC because the data read by the MAX30100 is transferred to Node Red through the serial connection between the Arduino and the PC. Node Red offers many advantages in creating a graphical interface, having an interactive way to achieve this. Let's not forget the well-known source of information today, YouTube.
That was about it. Next, I will put the MAX30102 module into operation, install the software library, test sketches, create the graphic interface.
Web references:
https://nodered.org/docs/getting-started/local#prerequisites
Also YouTube videos. 
See you next time.
Top Comments