element14 Community
element14 Community
    Register Log In
  • Site
  • Search
  • Log In Register
  • Community Hub
    Community Hub
    • What's New on element14
    • Feedback and Support
    • Benefits of Membership
    • Personal Blogs
    • Members Area
    • Achievement Levels
  • Learn
    Learn
    • Ask an Expert
    • eBooks
    • element14 presents
    • Learning Center
    • Tech Spotlight
    • STEM Academy
    • Webinars, Training and Events
    • Learning Groups
  • Technologies
    Technologies
    • 3D Printing
    • FPGA
    • Industrial Automation
    • Internet of Things
    • Power & Energy
    • Sensors
    • Technology Groups
  • Challenges & Projects
    Challenges & Projects
    • Design Challenges
    • element14 presents Projects
    • Project14
    • Arduino Projects
    • Raspberry Pi Projects
    • Project Groups
  • Products
    Products
    • Arduino
    • Avnet & Tria Boards Community
    • Dev Tools
    • Manufacturers
    • Multicomp Pro
    • Product Groups
    • Raspberry Pi
    • RoadTests & Reviews
  • About Us
  • Store
    Store
    • Visit Your Store
    • Choose another store...
      • Europe
      •  Austria (German)
      •  Belgium (Dutch, French)
      •  Bulgaria (Bulgarian)
      •  Czech Republic (Czech)
      •  Denmark (Danish)
      •  Estonia (Estonian)
      •  Finland (Finnish)
      •  France (French)
      •  Germany (German)
      •  Hungary (Hungarian)
      •  Ireland
      •  Israel
      •  Italy (Italian)
      •  Latvia (Latvian)
      •  
      •  Lithuania (Lithuanian)
      •  Netherlands (Dutch)
      •  Norway (Norwegian)
      •  Poland (Polish)
      •  Portugal (Portuguese)
      •  Romania (Romanian)
      •  Russia (Russian)
      •  Slovakia (Slovak)
      •  Slovenia (Slovenian)
      •  Spain (Spanish)
      •  Sweden (Swedish)
      •  Switzerland(German, French)
      •  Turkey (Turkish)
      •  United Kingdom
      • Asia Pacific
      •  Australia
      •  China
      •  Hong Kong
      •  India
      • Japan
      •  Korea (Korean)
      •  Malaysia
      •  New Zealand
      •  Philippines
      •  Singapore
      •  Taiwan
      •  Thailand (Thai)
      • Vietnam
      • Americas
      •  Brazil (Portuguese)
      •  Canada
      •  Mexico (Spanish)
      •  United States
      Can't find the country/region you're looking for? Visit our export site or find a local distributor.
  • Translate
  • Profile
  • Settings
Sustain The World - Design Challenge
  • Challenges & Projects
  • Design Challenges
  • Sustain The World - Design Challenge
  • More
  • Cancel
Sustain The World - Design Challenge
Blog Blog #6 - Designing a Carrier Board for the XMC4700 Relax Kit
  • Blog
  • Forum
  • Documents
  • Polls
  • Files
  • Events
  • Mentions
  • Sub-Groups
  • Tags
  • More
  • Cancel
  • New
  • Share
  • More
  • Cancel
Group Actions
  • Group RSS
  • More
  • Cancel
Engagement
  • Author Author: dang74
  • Date Created: 22 Sep 2020 2:31 AM Date Created
  • Views 516 views
  • Likes 2 likes
  • Comments 1 comment
Related
Recommended

Blog #6 - Designing a Carrier Board for the XMC4700 Relax Kit

dang74
dang74
22 Sep 2020

As summer ends and I transition to the XMC4700 Relax Kit I can't help but think back to the opening scene of Grease.  I had a wonderful time these last few weeks working with the XMC4200 Platform2Go board.  Not only did this development board serve as my introduction to the world of ARM Cortex it also afforded me the opportunity to brush up on my programming skills.  So as I say good bye to the Platform2Go it is bittersweet.


With that said, I am excited to start working with the XMC4700 Relax Kit.  It is the more compact of the two boards, and it's well suited to be integrated into systems as a daughter board.  However, the Relax Kit doesn't have any dedicated Shield 2Go sites.  To compensate I decided to design a simple carrier board.  This approach should result in a nice clean platform by reducing the number of cables.


Top Side


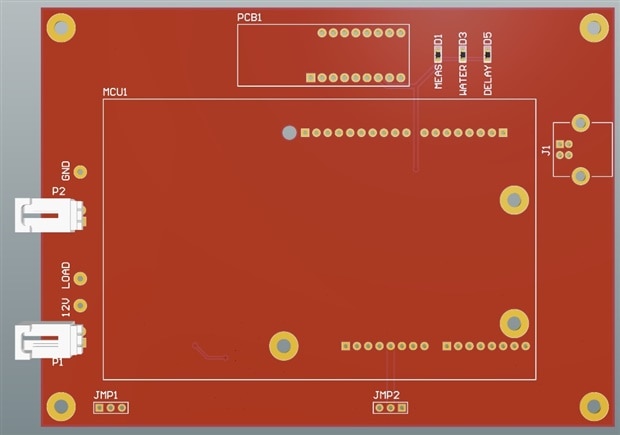
The top side of the carrier board is shown below.  The Relax Kit is installed onto the carrier using a set of Arduino compatible connectors.  The site for the Shield 2Go module is situated towards the top of the board.  This is where I will install the DPS368 Pressure Shield2Go module.


image


Bottom Side


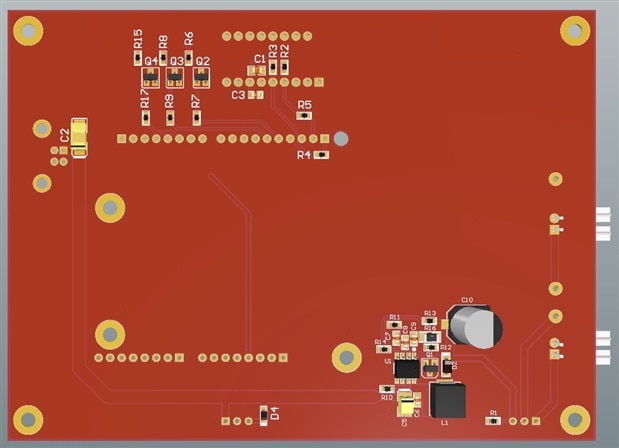
The bottom side of the board is shown below.  The lower right hand side of the board features a switching regulator that will convert the +5V DC input to +12V.  Generating the +12V onboard in this manner will save me from buying a wall wart power supply to produce this rail.


image


At one time spinning a board for the sake of cable management would have been cost prohibitive.  However, in recent years many overseas options for inexpensive PCB fabrication have emerged.  The cost for ordering  5 pieces of this PCB design is $20 and that's only because I requested red solder mask.  Had I chosen green, white or black solder mask, the cost would have been a mere $13.


Designing the carrier board was a fun little diversion, but now it's time to get back to coding.

  • Sign in to reply
  • dang74
    dang74 over 5 years ago

    My apologies.  Initially the title of this blog referred to the XMC4200 Relax Kit.  This is of course incorrect, as the product is called the XMC4700 Relax Kit.  Sorry for the confusion. 

    • Cancel
    • Vote Up 0 Vote Down
    • Sign in to reply
    • More
    • Cancel
element14 Community

element14 is the first online community specifically for engineers. Connect with your peers and get expert answers to your questions.

  • Members
  • Learn
  • Technologies
  • Challenges & Projects
  • Products
  • Store
  • About Us
  • Feedback & Support
  • FAQs
  • Terms of Use
  • Privacy Policy
  • Legal and Copyright Notices
  • Sitemap
  • Cookies

An Avnet Company © 2026 Premier Farnell Limited. All Rights Reserved.

Premier Farnell Ltd, registered in England and Wales (no 00876412), registered office: Farnell House, Forge Lane, Leeds LS12 2NE.

ICP 备案号 10220084.

Follow element14

  • X
  • Facebook
  • linkedin
  • YouTube