


Measuring the temperature and pressure around the coastal water is necessary in order to understand the effects of climate change that affect are coral reef. The DPS368 offers a low power consumption solution to monitoring the coastal areas in a long term operational life span of the device.
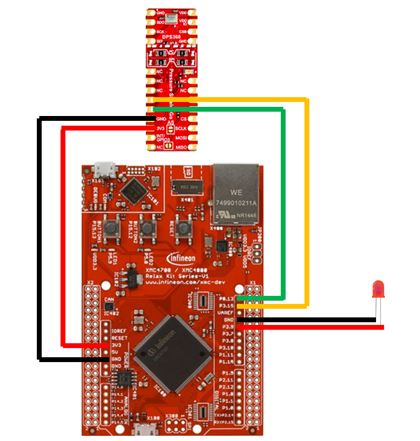
testing setup
for reference:
https://github.com/Infineon/XMC-for-Arduino/wiki/XMC4700-Relax-Kit
https://github.com/Infineon/DPS368-Library-Arduino
The xmc4700 is the perfect microcontroller alternative to the arduino uno to communicate with the DPS368.
I used the i2c protocol for the data communication. It gives an accurate reading compared to the SPI channel.
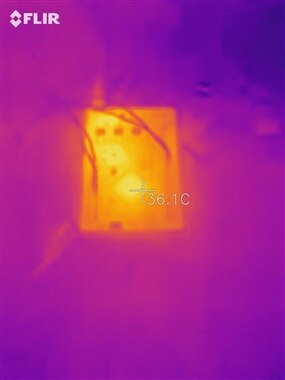
I tested the DPS368's temperature reading by pinching the sensor softly to see changes in data.
NOTE: Please don't pinch the sensor to much as this will disrupt the i2c communication.
To test things further, i used a gas lamp for the sensor to read the data.


NOTE: Please don't put the sensor too close to the flame.
I've compared the reading with my thermal camera and the DPS368.

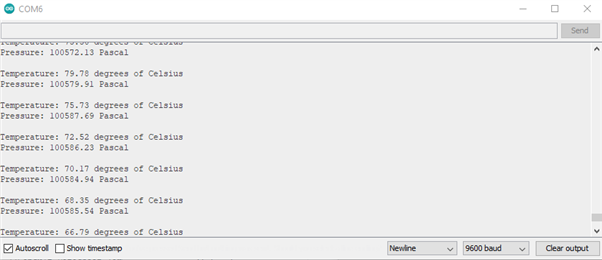
The test concluded that the DPS368 has an accurate temperature reading. This will help the platform get an accurate reading of the temperature in the coast above or under water. We can now code the XMC4700 to give a signal whenever a certain temperature threshold is reached. In this blog that example would be a LED turning on when the temperature reaches 30 degrees Celsius.
~~~~~~~~~~~~~~~~~~~~
code was taken from examples of DPS368 with slight modification by adding LED to turn on when temperature threshold is reached
#include // Dps368 Object
Dps368 Dps368PressureSensor = Dps368();

void setup()
{
  Serial.begin(9600);
  while (!Serial);
  //Call begin to initialize Dps368PressureSensor
  //The parameter 0x76 is the bus address. The default address is 0x77 and does not need to be given.
  //Dps368PressureSensor.begin(Wire, 0x76);
  //Use the commented line below instead of the one above to use the default I2C address.
  //if you are using the Pressure 3 click Board, you need 0x76
  Dps368PressureSensor.begin(Wire);
  Serial.println("Init complete!");
  pinMode(13, OUTPUT)
}
void loop()
{
  float temperature;
  float pressure;
  uint8_t oversampling = 7;
  int16_t ret;
  Serial.println();

  //lets the Dps368 perform a Single temperature measurement with the last (or standard) configuration
  //The result will be written to the parameter temperature
  //ret = Dps368PressureSensor.measureTempOnce(temperature);
  //the commented line below does exactly the same as the one above, but you can also config the precision
  //oversampling can be a value from 0 to 7
  //the Dps 368 will perform 2^oversampling internal temperature measurements and combine them to one result with higher precision
  //measurements with higher precision take more time, consult datasheet for more information
  ret = Dps368PressureSensor.measureTempOnce(temperature, oversampling);

  if (ret != 0)
  {
    //Something went wrong.
    //Look at the library code for more information about return codes
    Serial.print("FAIL! ret = ");
    Serial.println(ret);
  }
  else
  {
    Serial.print("Temperature: ");
    Serial.print(temperature);

  }

  //code to run when threshold is reached
  if (temperature >= 30)
  {
    digitalWrite(13, HIGH);
  }

  //Pressure measurement behaves like temperature measurement
  //ret = Dps368PressureSensor.measurePressureOnce(pressure);
  ret = Dps368PressureSensor.measurePressureOnce(pressure, oversampling);
  if (ret != 0)
  {
    //Something went wrong.
    //Look at the library code for more information about return codes
    Serial.print("FAIL! ret = ");
    Serial.println(ret);
  }
  else
  {
    Serial.print(pressure);
    Serial.println(" Pascal");
  }

  //Wait some time
  delay(500);
}

~~~~~~~~~~~~~~~~~~~~
Next step is to choose which temperature threshold is suited for the platform to monitor
Further details about this can be learned here: https://oceanservice.noaa.gov/facts/coralwaters.html