element14 Community
element14 Community
    Register Log In
  • Site
  • Search
  • Log In Register
  • Community Hub
    Community Hub
    • What's New on element14
    • Feedback and Support
    • Benefits of Membership
    • Personal Blogs
    • Members Area
    • Achievement Levels
  • Learn
    Learn
    • Ask an Expert
    • eBooks
    • element14 presents
    • Learning Center
    • Tech Spotlight
    • STEM Academy
    • Webinars, Training and Events
    • Learning Groups
  • Technologies
    Technologies
    • 3D Printing
    • FPGA
    • Industrial Automation
    • Internet of Things
    • Power & Energy
    • Sensors
    • Technology Groups
  • Challenges & Projects
    Challenges & Projects
    • Design Challenges
    • element14 presents Projects
    • Project14
    • Arduino Projects
    • Raspberry Pi Projects
    • Project Groups
  • Products
    Products
    • Arduino
    • Avnet & Tria Boards Community
    • Dev Tools
    • Manufacturers
    • Multicomp Pro
    • Product Groups
    • Raspberry Pi
    • RoadTests & Reviews
  • About Us
  • Store
    Store
    • Visit Your Store
    • Choose another store...
      • Europe
      •  Austria (German)
      •  Belgium (Dutch, French)
      •  Bulgaria (Bulgarian)
      •  Czech Republic (Czech)
      •  Denmark (Danish)
      •  Estonia (Estonian)
      •  Finland (Finnish)
      •  France (French)
      •  Germany (German)
      •  Hungary (Hungarian)
      •  Ireland
      •  Israel
      •  Italy (Italian)
      •  Latvia (Latvian)
      •  
      •  Lithuania (Lithuanian)
      •  Netherlands (Dutch)
      •  Norway (Norwegian)
      •  Poland (Polish)
      •  Portugal (Portuguese)
      •  Romania (Romanian)
      •  Russia (Russian)
      •  Slovakia (Slovak)
      •  Slovenia (Slovenian)
      •  Spain (Spanish)
      •  Sweden (Swedish)
      •  Switzerland(German, French)
      •  Turkey (Turkish)
      •  United Kingdom
      • Asia Pacific
      •  Australia
      •  China
      •  Hong Kong
      •  India
      • Japan
      •  Korea (Korean)
      •  Malaysia
      •  New Zealand
      •  Philippines
      •  Singapore
      •  Taiwan
      •  Thailand (Thai)
      • Vietnam
      • Americas
      •  Brazil (Portuguese)
      •  Canada
      •  Mexico (Spanish)
      •  United States
      Can't find the country/region you're looking for? Visit our export site or find a local distributor.
  • Translate
  • Profile
  • Settings
Sustain The World - Design Challenge
  • Challenges & Projects
  • Design Challenges
  • Sustain The World - Design Challenge
  • More
  • Cancel
Sustain The World - Design Challenge
Blog coastal monitoring platform #3 understanding the PROFET +2 shield
  • Blog
  • Forum
  • Documents
  • Polls
  • Files
  • Events
  • Mentions
  • Sub-Groups
  • Tags
  • More
  • Cancel
  • New
  • Share
  • More
  • Cancel
Group Actions
  • Group RSS
  • More
  • Cancel
Engagement
  • Author Author: cyberwizard
  • Date Created: 23 Sep 2020 12:17 PM Date Created
  • Views 539 views
  • Likes 1 like
  • Comments 0 comments
Related
Recommended

coastal monitoring platform #3 understanding the PROFET +2 shield

cyberwizard
cyberwizard
23 Sep 2020

PROFET shield allows the use of high current electronics in conjunction with the Arduino.

In this blog post, we will use the PROFET to power a 12v dc motor fan stacked with an Arduino


image


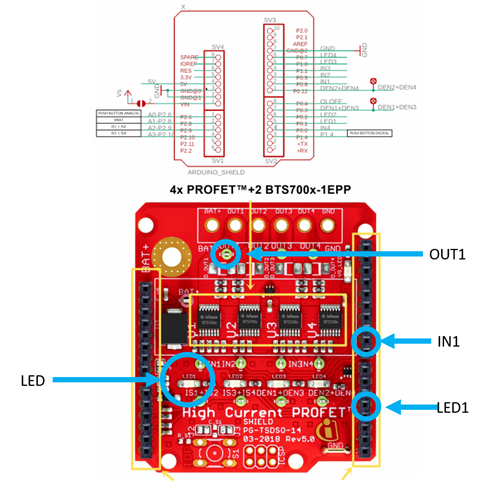
*Connect your 12v battery’s positive wire to BAT+ and your negative wire to GND as shown in the figure above

*Connect the dc fan’s positive wire to OUT1 and the negative wire to GND


Note: although the PROFET shield is stacked with my Arduino, it appears that the PROFET is not supplying electricity to the Arduino itself. It’s understandable if Infineon designed it this way to protect the Arduino from over voltage. Would be nice if Infineon would expand on this issue since some makers would like their shield to supply the Arduino like some motor shields do that convert 12v to 5v for the Arduino.


For this simplified example on how to run the fan motor, we will use the following pins: IN1 and LED1

IN1 – input1 corresponds to the OUT1 of your shield, supplying power to this pin signals the OUT1 to output power to the component it is connected to.

LED1 – this corresponds to the LED1 in your shield. It is ideal to program this along with the corresponding IN pins for better user feedback.


image


The corresponding code is pretty simple. Explanations are in the code’s comments

void setup() {
  pinMode(4, OUTPUT);//LED1 pin
  pinMode(9, OUTPUT);//IN1 pin
}

void loop() {
  digitalWrite(4, HIGH);//LED1 on
  digitalWrite(9, HIGH);//OUT1 on

  //if you want to run a blink example
  //delay(5000)//wait for 5 seconds
  //digitalWrite(4, LOW);//LED1 off
  //digitalWrite(9, LOW);//OUT1 off
  //delay(5000)//wait for 5 seconds
}

Relation to the project

     Temperatures in the coastline can be pretty extreme. Components might overheat. A cooling system is handy in case the situation arises. The 12V DC fan that I’m using is a PC cooling fan. It will turn on if programmed in conjunction with the DPS368 sensor.

  • Sign in to reply
element14 Community

element14 is the first online community specifically for engineers. Connect with your peers and get expert answers to your questions.

  • Members
  • Learn
  • Technologies
  • Challenges & Projects
  • Products
  • Store
  • About Us
  • Feedback & Support
  • FAQs
  • Terms of Use
  • Privacy Policy
  • Legal and Copyright Notices
  • Sitemap
  • Cookies

An Avnet Company © 2025 Premier Farnell Limited. All Rights Reserved.

Premier Farnell Ltd, registered in England and Wales (no 00876412), registered office: Farnell House, Forge Lane, Leeds LS12 2NE.

ICP 备案号 10220084.

Follow element14

  • X
  • Facebook
  • linkedin
  • YouTube