1. Description of Motor Controller TLE94112 for Arduino
The DC motor control shield for Arduino is equipped with the TLE94112EL, a twelve-fold half-bridge driver with integrated power stages.
Key rating ,
- Brushed DC Motor Control up to 0.9 A peak, 5.5 – 18 V normal operating input voltage, 18 – 20 V extended operating input voltage and Maximum input voltage up to 40V (absolute max. rating)
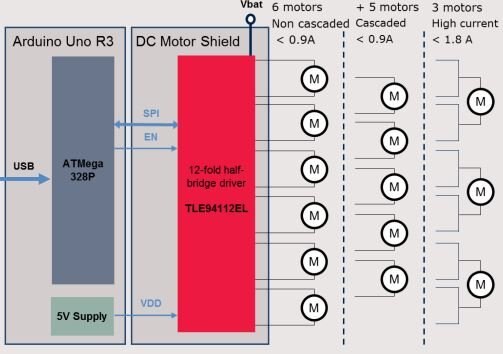
- Control of: Six independent bidirectional DC motors or Eleven cascaded bidirectional DC motors
- Motor speed control by PWM, Three independent PWM generators, with PWM frequency: 80 Hz, 100 Hz or 200 Hz, 8-bit resolution, 0.5% duty cycle steps,
- SPI interface for high configurability and detailed diagnosis
- And protetion of Overtemperature, Overcurrent, Undervoltage, Overvoltage
Typical application can be,
Stacked two shield shall be configurated with following steps,
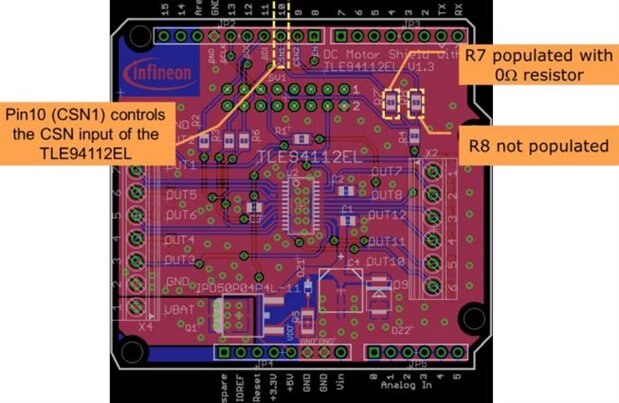
- The Pin 10 of the Arduino Uno is used by default to control CSN (Negated Chip Select) input of the TLE94112EL, the pin 9 of the Arduino Uno can be used instead to stack two shields . In this case, the resistor R7 must be desoldered (Figure 9) and a 0 resistormust be soldered on the footprint of R8.
- The CSN input of each TLE94112EL must be controlled individually by different microcontroller GPIOs: - The TLE94112EL of one DC Motor shield is controlled by the pin 10 (default setting), The TLE94112EL of the other DC Motor shield is controlled by the pin 9.
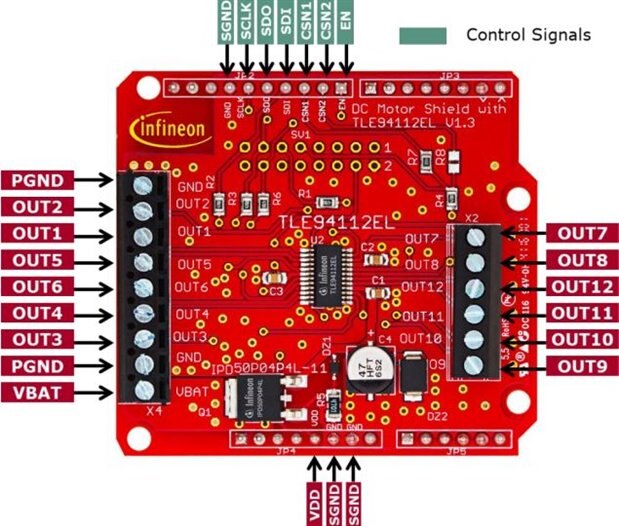
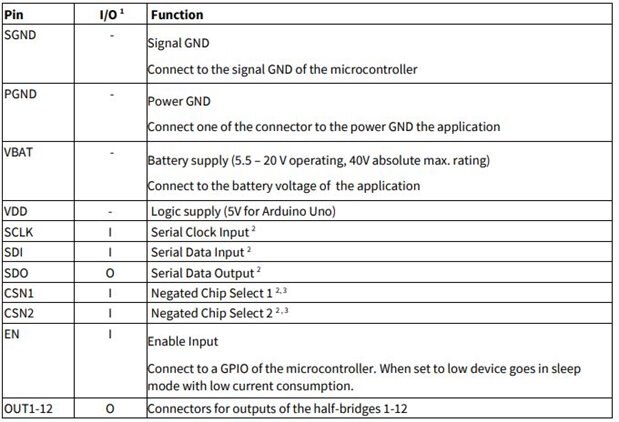
With pin definition,
2. Understand TLE94112EL
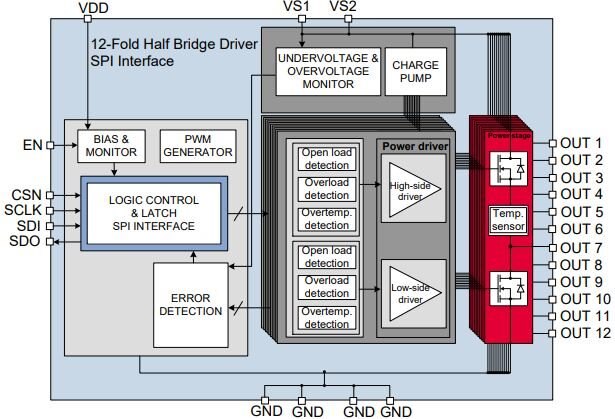
The TLE94112EL is a protected twelve-fold half-bridge driver designed especially for automotive motion control applications such as heating, ventilation and air conditioning (HVAC) flap DC motor control.
With the block diagram
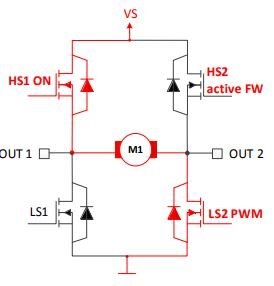
Demo control of DC motor with OUT1 and OUT2,
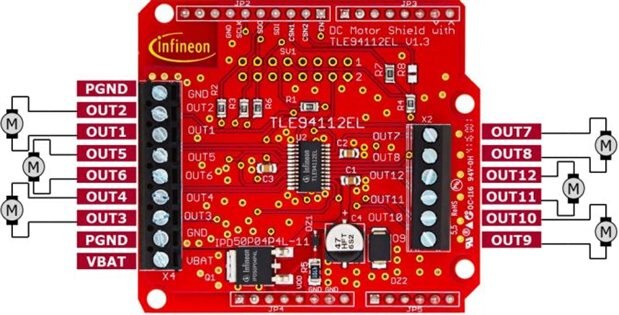
As in board ,
3. Control with Arduino
Same as Smart Switch of previous blog, import the lib first, and open the sample sketch,
/*!
 * \name        basicTest
 * \author      Infineon Technologies AG
 * \copyright   2019 Infineon Technologies AG
 * \version     2.0.0
 * \brief       This example runs a basic controller test with one attached motor on the TLE94112 shield
 * \details
 * It will run the motor in forward and backward direction if the motor
 * is able to run in both directions. Otherwise it will only run in on direction.
 * Take this example as a first test when starting with this shield.
 *
 * SPDX-License-Identifier: MIT
 *
 */


#include <TLE94112-ino.hpp>
#include <TLE94112Motor-ino.hpp>
#include "SPI.h"


// Tle94112 Object on Shield 1
Tle94112Ino controller = Tle94112Ino();


// Tle94112Motor Objects on controller
Tle94112Motor motor(controller);


void setup()
{
  // Switch on communications
  Serial.begin(115200);
  while (!Serial)
  {};


  // Enable MotorController on all Shields and Motors
  // Note: Required to be done before starting to configure the motor
  // controller is set to default CS1 pin
  controller.begin();


  // Connect a motor to HB1/HB2 highside and HB3/HB4 lowside
  // With two combined halfbridges the motor can have up to 1.8 A
  // IMPORTANT connect PWM to Lowside as higside is active Free wheeling
  motor.initConnector(motor.HIGHSIDE, controller.TLE_NOPWM, controller.TLE_HB1, controller.TLE_HB2, controller.TLE_NOHB, controller.TLE_NOHB);
  motor.initConnector(motor.LOWSIDE,  controller.TLE_PWM1,  controller.TLE_HB3, controller.TLE_HB4, controller.TLE_NOHB, controller.TLE_NOHB);


  // start the motor controller
  motor.begin();


  // end the setup function
  Serial.println("Init ready");
}


void loop()
{
  // coast the motor
  motor.coast();
  delay(1000);


  // max forward/backward
  Serial.println("max forward/backward");
  motor.start(255);
  delay(1000);
  motor.coast();
  delay(1000);
  motor.start(-255);
  delay(1000);
  motor.coast();
  delay(1000);


  // ramp ripple forward/backward
  Serial.println("ramp ripple forward/backward");
  motor.start(255); // start max forward
  delay(1000);
  motor.rampSpeed(0, 5000); // ramp down to 0
  delay(1000);
  motor.start(-255); // start max backward
  delay(1000);
  motor.rampSpeed(0, 5000); // ramp down to 0
  delay(1000);


  // ramp up/down forward
  Serial.println("ramp up/down forward");
  motor.start(50); // start above 0 to allow motor to start
  motor.rampSpeed(255, 5000); // ramp up to max
  delay(1000);
  motor.rampSpeed(100, 5000); // ramp down
  delay(1000);
  motor.rampSpeed(255, 5000); // ramp up to max
  delay(1000);
  motor.rampSpeed(0, 5000); // ramp down to 0


  // ramp up/down backward
  Serial.println("ramp up/down backward");
  motor.start(50); // start above 0 to allow motor to start
  motor.rampSpeed(-255, 5000); // ramp up to min
  delay(1000);
  motor.rampSpeed(-100, 5000); // ramp up
  delay(1000);
  motor.rampSpeed(-255, 5000); // ramp up to min
  delay(1000);
  motor.rampSpeed(0, 5000); // ramp up to 0


  // ramp transient with a change in rotation direction
  Serial.println("ramp transient");
  motor.rampSpeed(-255, 1000); // ramp down to min
  delay(1000);
  motor.rampSpeed(255, 1000); // ramp up to max
  delay(1000);
  motor.rampSpeed(-255, 1000); // ramp down to min
  delay(1000);
  motor.rampSpeed(0, 1000); // ramp up to 0
  delay(1000);


  // stop and coast
  Serial.println("stop and coast");
  motor.stop(255); // stop and hold with max force
  delay(1000);
  motor.coast();
  delay(1000);
}
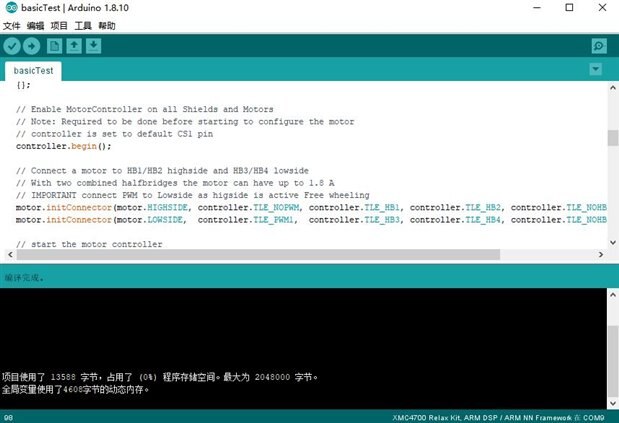
Build on arduino,
With arduino, the conrol of motor is easy, just init the motor , select pin configuration and pin control , the command sent by SPI to control DC motor on the shield . This is simple control of one motor, if more be connected, just import the lib can control it.
4. Next Step
These library can be used well, but how to use two arduino shield at the same time. That shall be further invested.

