element14 Community
element14 Community
    Register Log In
  • Site
  • Search
  • Log In Register
  • Community Hub
    Community Hub
    • What's New on element14
    • Feedback and Support
    • Benefits of Membership
    • Personal Blogs
    • Members Area
    • Achievement Levels
  • Learn
    Learn
    • Ask an Expert
    • eBooks
    • element14 presents
    • Learning Center
    • Tech Spotlight
    • STEM Academy
    • Webinars, Training and Events
    • Learning Groups
  • Technologies
    Technologies
    • 3D Printing
    • FPGA
    • Industrial Automation
    • Internet of Things
    • Power & Energy
    • Sensors
    • Technology Groups
  • Challenges & Projects
    Challenges & Projects
    • Design Challenges
    • element14 presents Projects
    • Project14
    • Arduino Projects
    • Raspberry Pi Projects
    • Project Groups
  • Products
    Products
    • Arduino
    • Avnet Boards Community
    • Dev Tools
    • Manufacturers
    • Multicomp Pro
    • Product Groups
    • Raspberry Pi
    • RoadTests & Reviews
  • Store
    Store
    • Visit Your Store
    • Choose another store...
      • Europe
      •  Austria (German)
      •  Belgium (Dutch, French)
      •  Bulgaria (Bulgarian)
      •  Czech Republic (Czech)
      •  Denmark (Danish)
      •  Estonia (Estonian)
      •  Finland (Finnish)
      •  France (French)
      •  Germany (German)
      •  Hungary (Hungarian)
      •  Ireland
      •  Israel
      •  Italy (Italian)
      •  Latvia (Latvian)
      •  
      •  Lithuania (Lithuanian)
      •  Netherlands (Dutch)
      •  Norway (Norwegian)
      •  Poland (Polish)
      •  Portugal (Portuguese)
      •  Romania (Romanian)
      •  Russia (Russian)
      •  Slovakia (Slovak)
      •  Slovenia (Slovenian)
      •  Spain (Spanish)
      •  Sweden (Swedish)
      •  Switzerland(German, French)
      •  Turkey (Turkish)
      •  United Kingdom
      • Asia Pacific
      •  Australia
      •  China
      •  Hong Kong
      •  India
      •  Korea (Korean)
      •  Malaysia
      •  New Zealand
      •  Philippines
      •  Singapore
      •  Taiwan
      •  Thailand (Thai)
      • Americas
      •  Brazil (Portuguese)
      •  Canada
      •  Mexico (Spanish)
      •  United States
      Can't find the country/region you're looking for? Visit our export site or find a local distributor.
  • Translate
  • Profile
  • Settings
Safe and Sound
  • Challenges & Projects
  • Design Challenges
  • Safe and Sound
  • More
  • Cancel
Safe and Sound
Blog WiFi with MSP432 and SimpleLink CC3100: Basic Setup
  • Blog
  • Forum
  • Documents
  • Polls
  • Files
  • Events
  • Mentions
  • Sub-Groups
  • Tags
  • More
  • Cancel
  • New
  • Share
  • More
  • Cancel
Group Actions
  • Group RSS
  • More
  • Cancel
Engagement
  • Author Author: Jan Cumps
  • Date Created: 29 Nov 2016 3:09 PM Date Created
  • Views 2350 views
  • Likes 7 likes
  • Comments 7 comments
  • wifi
  • safe and sound
  • computer security day
  • boosterpack
  • msp432
  • simplelink
  • cc3100
  • feature_tutorial
Related
Recommended

WiFi with MSP432 and SimpleLink CC3100: Basic Setup

Jan Cumps
Jan Cumps
29 Nov 2016

You can connect the MSP432 LaunchPad to WiFi with a SimpleLink CC3100 BoosterPack.


You don't have permission to edit metadata of this video.
Edit media
x
image
Upload Preview
image

This blog walks trough a project that will pair the two. It connects the LaunchPad to your home WiFi point.

When you complete this example, you have the base setup for a wireless home device.


What you need:

  • MSP432 LaunchPad
  • SimpleLink CC3100  BoosterPack
  • 2 micro-USB cables
  • a home WiFI access point and the credentials
  • Code Composer Studio
  • MSP432Ware
  • TI-RTOS for MSP43X


The Project

This is a fairly simple project. We'll make the MSP432 talk to the SimpleLink Boosterpack.

We'll learn the BoosterPack how to connect to your home WiFi access point.

Then we'll do a wireless communication test from your development computer over WiFi to the MSP432.


Software Preparation

Install the latest Code Composer Studio. It's available for free (like all software we use in this project) from TI.

When you have it up and running, install the following packages via the Resource Explorer (View -> Resource Explorer)

  • MSP432Ware
  • TI-RTOS for MSP43x

image


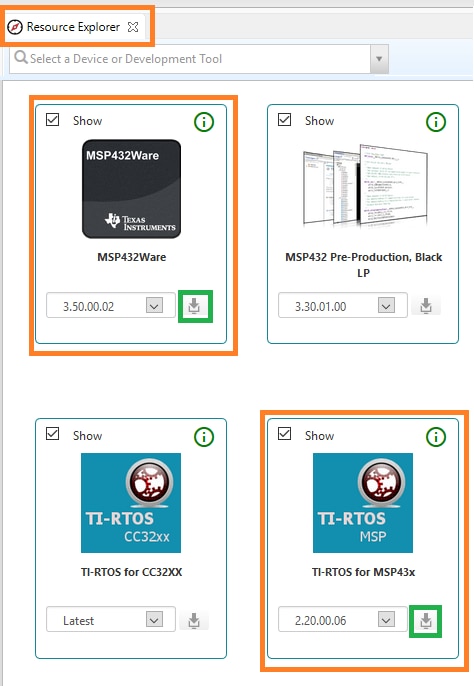
This takes a while and you may need to restart CCS when asked. It is good to have some coffee at hand when doing the installs.

When finished, you get a wealth of examples for the MSP432, bare metal and RTOS based.


Many of these examples are prepared for the LaunchPad with a selected BoosterPack. These work out of the box.

In this exercise we'll run one of those LaunchPad + BoosterPack combination examples.


Hardware Preparation

  • Mount the BoosterPack on the LaunchPad. There's a mark on both PCBs that help you with the right way of mounting.

On the LaunchPad, the 3V3 pin of J1 is marked with a white arrow.

On the BoosterPack, position 1 of P1 also has a white arrow next to it.

When you put the BoosterPack on top of the LaunchPad, these two have to match.


image


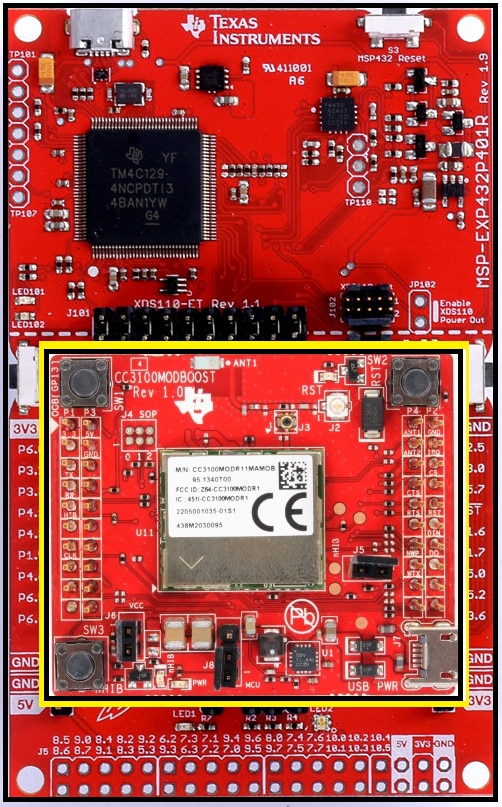
  • Now power the BoosterPack with a USB cable.

You can plug it into your PC or any other USB power device. There's no data going over this one.

The MSP432 LaunchPad power supply isn't sufficient for this BoosterPack. That's why it needs additional power via a separate cable.


  • Then connect the MSP432 LaunchPad to your development computer.

If you've installed CCS and the two additional packages as described in previous section, your computer should happily accept it.


Build the Project Firmware

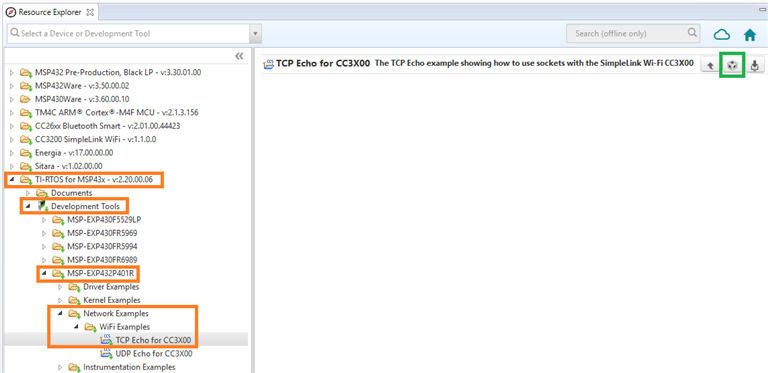
We're going to run the MSP432/CC3X00 TCP test from TI-RTOS.

You can import that into the IDE via the same Resource Explorer you used to download the packages.

On the left side of the screen, you see a tree with (at least) the two components you installed.

  • Navigate to TI-RTOS for MSP43X -> Development Tools ->  MSP-EXP432X -> Network Examples -> WiFi Examples
  • Select TCP Echo for CC3X00
  • On the right side of the screen, click on the CCS icon to import the project into the IDE.

image


You now have the source code for the project on your computer, fully configured for the MSP432 and CC3100.

In the Project Explorer on the left side of CCS, you can find that project.

It's good to expand the project and double-click on README.html. The instructions that we followhere will be displayed in the IDE.

  • Select it (its name should now be bold) and build it by pressing the hammer button on the toolbar (or Project -> Build Project)


Load and WiFi config

You can now load the firmware to the LaunchPad and start the debugger.

  • Press the Bug button (or Run -> Debug)

The debugger halts the execution on the first line of the main() function

  • Press Resume (or Run -> Resume)


You should now see this text in the IDE console:

[CORTEX_M4_0] Starting the TCP Echo example for the CC3X00 
System provider is set to SysMin. Halt the target to view any SysMin content in ROV.


If you also see an IP address in the console, you have used the CC3100 BoosterPack before and you can skip the configuration and go directly to then Test WiFi section.

Else follow these steps (read them first and then perform the actions):

  • Hold the LaunchPad firmly in the right hand, its USB cable pointing away from you.
  • With the middle finger of your left hand, press BoosterPack button SW1 (left upper) and keep it pressed.
  • With your index finger of the left hand, press and release BoosterPack button SW3 (left lower).
  • One second later, release SW1.
  • Put the LaunchPad back on the table, but leave it running.


You have now put the BoosterPack in Access Point mode.

  • When you check for available WiFi points, a new one starting with mysimplelink will appear.
    Before selecting it, take care that you have all your Internet dependent applications closed.
    You will very likely loose your internet connection at this point.
    Alternatively, you can do this exercise from your smartphone, tablet or another computer.


image


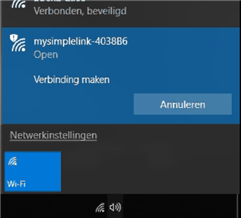
  • Connect to the new WiFi provider. No password is required.
  • Then, open a browser and surf to 192.168.1.1

image

Enjoy this moment. It's your first interaction with the WiFi BoosterPack.

  • Now navigate to the profiles tab, and enter the following info from your home WiFi access point
    • SSID
    • Security Type (let's hope you have WPA by now)
    • The security key of your home access point
    • A priority. Not important when you register a single profile.

image


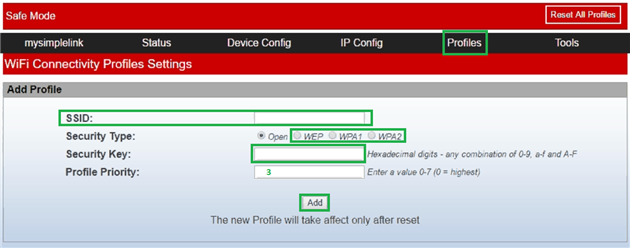
The profile will be listed as first profile in the table at the buttom of the screen.

  • Now switch back to CCS and stop the debugger (Run -> Terminate)
  • Press the LaunchPad's Reset button (a bit tricky. It's under the BoosterPack's SW1).
  • Start a new Debug session in CCS.
  • Press Resume, and check the Console.


Your computer will now have lost access to the mysimplelink WiFi provider.

If not done automatically, you may want to connect the PC to your home access point again.


The CC3100 only plays the Access Point role once, when we're setting it up.

From then on, it stops being an access point for ever*.

It will be a WiFi station just like all other devices that connect to your home WiFi.

*Small print applies - read the documentation for other operation modes.


You should now see:

[CORTEX_M4_0] Starting the TCP Echo example for the CC3X00 
System provider is set to SysMin. Halt the target to view any SysMin content in ROV.
CC3X00 has connected to an AP and acquired an IP address.
IP Address: 192.168.1.6

(your IP address may be different)


If you want, you can enter this listed IP address in your browser.

You will then see on the home page that the Device Mode changed to Station.


Test WiFi

We'll now test the WiFi connection with a command line utility.

You'll find it in the location where you installed TI-RTOS.

If you don't know where that is, then right-click on the project name in the Project Explorer and select Properties.

The location is shown under Resource -> Linked Resources : COM_TI_RTSC_TIRTOSMSP430_INSTALL_DIR

image

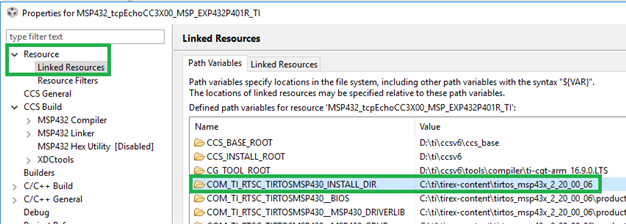
  • open a command prompt on your PC.
  • navigate to the TI-RTOS install folder (on my pc: C:\ti\tirex-content\tirtos_msp43x_2_20_00_06)
  • Then navigate to packages\examples\tools

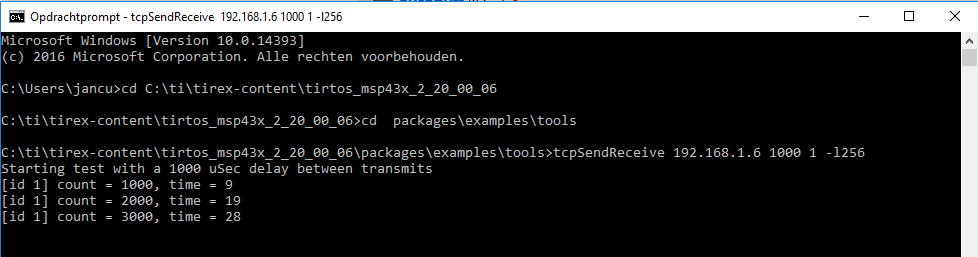
Enter the following command - replace the IP address with the one that is logged in the CCS console:

  • tcpSendReceive 192.168.1.6 1000 1 -l256


Enjoy the result:

image


You now have an excellent base to start from.

A good subject to investigate next would be "safe internet communications for wireless devices".

The CC3100 supports:

  • TLS and SSL Sockets
  • [...] Crypto Engine for [...] Secure Wi-Fi and Internet Connections with 256-Bit AES
  • Encryption for TLS and SSL Connections
    [...]
  • WPA2 Personal and Enterprise Security

Good luck.

  • Sign in to reply

Top Comments

  • jwatson
    jwatson over 8 years ago +2
    Brilliant Jan! Most helpful. Many thanks. Jane
  • DAB
    DAB over 8 years ago +1
    Great post Jan, I am curious, does the MSP432 get you any additional data throughput verses the MSP430? I am wondering if the CC3100 is the limiting communication element or the driving processor. DAB
  • Jan Cumps
    Jan Cumps over 8 years ago in reply to DAB +1
    DAB wrote: ..., I am curious, does the MSP432 get you any additional data throughput verses the MSP430? ... It's a 32 bits ARM. The 430 is a proprietary TI controller. Different beasts playing in the low…
  • Jrod2k3
    Jrod2k3 over 1 year ago in reply to Jan Cumps

    Ah I see. Do you have any recommendations by the way for enabling loT communcication for a MSP432 onto a Keil program? 

    • Cancel
    • Vote Up 0 Vote Down
    • Sign in to reply
    • More
    • Cancel
  • Jan Cumps
    Jan Cumps over 1 year ago in reply to Jrod2k3

    I have never used Keil. The ARM toolchain will be able to compile the sources, if you have all settings correct, and added all TI libraries manually.
    No clue how to do that though - it's going to be more difficult to set up the custom software stack than to develop an application.

    • Cancel
    • Vote Up +1 Vote Down
    • Sign in to reply
    • More
    • Cancel
  • Jrod2k3
    Jrod2k3 over 1 year ago

    Thanks for this post Jan,

    I am trying to use this example for a similar project but instead of using code composer studio would it be possible to implement this example on keil? I am new to IoT and trying to figure this all out

    • Cancel
    • Vote Up 0 Vote Down
    • Sign in to reply
    • More
    • Cancel
  • Jan Cumps
    Jan Cumps over 6 years ago

    video link fixed

    • Cancel
    • Vote Up +1 Vote Down
    • Sign in to reply
    • More
    • Cancel
  • Jan Cumps
    Jan Cumps over 8 years ago in reply to DAB

    DAB wrote:


    ...,


    I am curious, does the MSP432 get you any additional data throughput verses the MSP430?


    ...


    It's a 32 bits ARM. The 430 is a proprietary TI controller. Different beasts playing in the low power arena.
    The 430 still wins in price and in power consumption in some applications. The 432 is a natural step-up when the calculation power will not do.

    The peripherals are the same in both.


    I'm a absolute beginner with the MSP430 (I only programmed that one in Energia) and just did a few projects with 432, so take this info with a grain of salt...


    DAB wrote:


    ...,


    I am wondering if the CC3100 is the limiting communication element or the driving processor.


    The CC3100 plays a radio role only. It doesn't process anything else than the data it exchanges with the MSP432, over SPI.

    The 3100 is sized for that particular job.


    If WiFi and processor power is needed in one solution, there's the CC3200. That one is a single chip with a good ARM controller and WiFi on board.

    • Cancel
    • Vote Up +1 Vote Down
    • Sign in to reply
    • More
    • Cancel
>
element14 Community

element14 is the first online community specifically for engineers. Connect with your peers and get expert answers to your questions.

  • Members
  • Learn
  • Technologies
  • Challenges & Projects
  • Products
  • Store
  • About Us
  • Feedback & Support
  • FAQs
  • Terms of Use
  • Privacy Policy
  • Legal and Copyright Notices
  • Sitemap
  • Cookies

An Avnet Company © 2025 Premier Farnell Limited. All Rights Reserved.

Premier Farnell Ltd, registered in England and Wales (no 00876412), registered office: Farnell House, Forge Lane, Leeds LS12 2NE.

ICP 备案号 10220084.

Follow element14

  • X
  • Facebook
  • linkedin
  • YouTube