element14 Community
element14 Community
    Register Log In
  • Site
  • Search
  • Log In Register
  • Community Hub
    Community Hub
    • What's New on element14
    • Feedback and Support
    • Benefits of Membership
    • Personal Blogs
    • Members Area
    • Achievement Levels
  • Learn
    Learn
    • Ask an Expert
    • eBooks
    • element14 presents
    • Learning Center
    • Tech Spotlight
    • STEM Academy
    • Webinars, Training and Events
    • Learning Groups
  • Technologies
    Technologies
    • 3D Printing
    • FPGA
    • Industrial Automation
    • Internet of Things
    • Power & Energy
    • Sensors
    • Technology Groups
  • Challenges & Projects
    Challenges & Projects
    • Design Challenges
    • element14 presents Projects
    • Project14
    • Arduino Projects
    • Raspberry Pi Projects
    • Project Groups
  • Products
    Products
    • Arduino
    • Avnet & Tria Boards Community
    • Dev Tools
    • Manufacturers
    • Multicomp Pro
    • Product Groups
    • Raspberry Pi
    • RoadTests & Reviews
  • About Us
    About the element14 Community
  • Store
    Store
    • Visit Your Store
    • Choose another store...
      • Europe
      •  Austria (German)
      •  Belgium (Dutch, French)
      •  Bulgaria (Bulgarian)
      •  Czech Republic (Czech)
      •  Denmark (Danish)
      •  Estonia (Estonian)
      •  Finland (Finnish)
      •  France (French)
      •  Germany (German)
      •  Hungary (Hungarian)
      •  Ireland
      •  Israel
      •  Italy (Italian)
      •  Latvia (Latvian)
      •  
      •  Lithuania (Lithuanian)
      •  Netherlands (Dutch)
      •  Norway (Norwegian)
      •  Poland (Polish)
      •  Portugal (Portuguese)
      •  Romania (Romanian)
      •  Russia (Russian)
      •  Slovakia (Slovak)
      •  Slovenia (Slovenian)
      •  Spain (Spanish)
      •  Sweden (Swedish)
      •  Switzerland(German, French)
      •  Turkey (Turkish)
      •  United Kingdom
      • Asia Pacific
      •  Australia
      •  China
      •  Hong Kong
      •  India
      •  Japan
      •  Korea (Korean)
      •  Malaysia
      •  New Zealand
      •  Philippines
      •  Singapore
      •  Taiwan
      •  Thailand (Thai)
      •  Vietnam
      • Americas
      •  Brazil (Portuguese)
      •  Canada
      •  Mexico (Spanish)
      •  United States
      Can't find the country/region you're looking for? Visit our export site or find a local distributor.
  • Translate
  • Profile
  • Settings
Think ON Design Challenge
  • Challenges & Projects
  • Design Challenges
  • Think ON Design Challenge
  • More
  • Cancel
Think ON Design Challenge
Documents Think ON Design Challenge with ON Semiconductor
  • Blog
  • Forum
  • Documents
  • Polls
  • Files
  • Events
  • Mentions
  • Sub-Groups
  • Tags
  • More
  • Cancel
  • New
Actions
  • Share
  • More
  • Cancel
Engagement
  • Author Author: e14phil
  • Date Created: 13 Aug 2019 1:17 PM Date Created
  • Last Updated Last Updated: 6 Apr 2020 3:35 PM
  • Views 7937 views
  • Likes 20 likes
  • Comments 114 comments
Related
Recommended

Think ON Design Challenge with ON Semiconductor

image
Think ON Design Challenge

About this Challenge | Dates | The Kit | The Prizes | Resources | Example Application | Terms & Conditions


image


Transform Your Thinking

ON Semiconductor is challenging the element14 Community to design the most creative solution utilizing their Bluetooth low energy multi-sensor development kit. ON Semiconductor wants the element14 Community to design solutions to everyday problems using the ultra low power consumption BLE on the RSL10-SENSE-GEVK. You can use the sensors provided on the board, or add your own sensors and actuators to be controlled by the RSL10 Sense and Control app.


image

The Challenge


Challengers are invited to use the ON Semiconductor RSL10-SENSE-GEVKRSL10-SENSE-GEVK  to monitor their world and Transform Your Thinking.


50 successful applicants will get a RSL10-SENSE-GEVKRSL10-SENSE-GEVK free of charge to build and blog their project with.  They can take advantage of the ON Semiconductor RSL10-Sense-GEVK’s ultra-low-power consumption modes, Ultra Low energy Bluetooth 5.0, or the environmental or geomagnetic sensors.  For a chance to win one of the prizes below you must blog your build process and the final outcome of your RSL10-Sense-GEVK projects within the Think ON Design Challenge space. You can also join the challenge as a non-sponsored challenger, but you must include the RSL10-SENSE-GEVK in your project and adhere to all other parts of the terms and conditions.


Example applications could include:

• Wearable Monitoring for workers in Dangerous spaces such as in foundries.

• A Monitor system sewn into Train drivers jackets

• Monitoring the elderly (Eg. see if they are calling for help or have fallen)

• A system to monitor delicate packages within a shipping facility

• A system Monitor delicate fruits and foods between processing areas

• Used to monitor Organ Transplant Shipments

• A System to Monitor Pets in Transit


The KitThe Specs

image

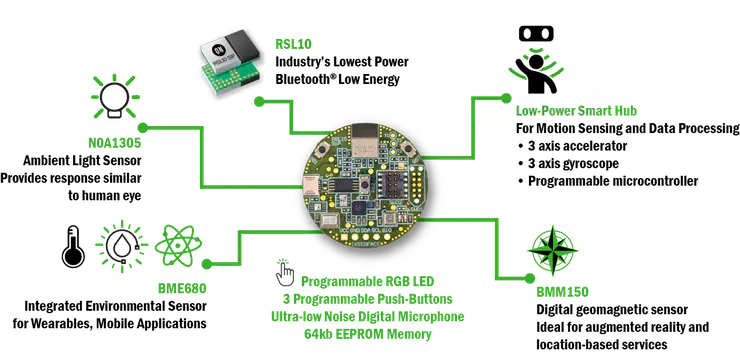
1 x RSL10-SENSE-GEVK from
ON Semiconductor


RSL10-Sense-GEVKRSL10-Sense-GEVK

Key Specs

• Industry's lowest power consumption in Deep Sleep Mode
        (62.5 nW) and Rx in Receive Mode (7 mW)

• Fully-integrated antenna

• Powered by a coin cell

• Tiny Footprint

• All passive components

• Advanced Multi-Protocol Wireless Functionality

• Supports Bluetooth Low Energy and 2.4 GHz proprietary/custom protocols

• Rx Sensitivity: -93 dBm

• Transmitting Power: -17 to 0 dBm

• Supports Firmware Over The Air(FOTA)

• Built-in power management

• Advanced dual-core architecture to 3.3 Voltage Supply Range

• 384 kB Flash, 76 kB ProgramMemory, 88 kB Data Memory

• IP protection feature to secureflash contents

• Configurable analog and digital sensor interfaces (GPIOs, LSADs, I2C,SPI, PCM)


FrontBackNFC Antenna
imageimageimage

image

Resources:

EN Data Sheet PDF - Download Here

On Semiconductor - Technical Details Page


Smart Phone Apps

image


The kit is supported by the RSL10 Sense and Control app (IoS Registered, AndroidTm) for cloud connectivity. Using this app, you can select multiple sensors to monitor and send to a cloud service you can connect. You can also add your own sensors and actuators to be controlled through the app using the plus button on the bottom right of the sensor selector screen.


There are 2 modes to the RSL10 Sense and Control app, Send and Receive mode. Receive Mode is for viewing the data from the sensors controlling any actuators you have connected through BLE or the cloud. Broadcast Mode is for sending the sensor data from BLE to a connected cloud service. These settings can be changed by pressing the cog wheel in the top right of the main page.


RSL10 Sense and Control - Apple iOS App

RSL10 Sense and Control - Android App


The Dates


Project PhasesDates
Applications Open       16th Sept 2019
Applications Close (1 Month)
1st Nov 2019
Challengers Announced
Dec 2019
Projects Due
20th March 2020
Winners Announced
14th April 2020
Prizes Shipped
April 2020


The Prizes


Prize       Prize Category
image

Overall Best Project

Lulzbot Mini 2 Desktop 3D Printer*

Value at $1480

image

Wearable or Healthcare

HTC VIVE Pro Virtual Reality System*

Value at $1050

image

Safety or Asset Monitoring

Apple iPad Pro (12.9-inch, Wi-Fi, 64GB) - Space Gray (Latest Model) - MTEL2LL/A*

Value at $849

image

Smart Home

Apple iPad Pro (12.9-inch, Wi-Fi, 64GB) - Space Gray (Latest Model) - MTEL2LL/A*

Value at $849

*Or local equivalent


The Terms

50 Applicants will be chosen to receive The Kit above.  They will be our sponsored challengers, who must use the RSL10-Sense-GEVK within their project and post a minimum of one blog on their progress and final project before 20th March 2020. Non-sponsored challengers may also join the competition, as long as their project is based around the RSL10-SENSE-GEVK and they adhere to all terms and conditions of the challenge.

Posts which are media rich with Photos, videos and code samples will be viewed more favorably in the judging process.


Read the attached full Terms and Conditions


Ready? Then Apply Here

Attachments:
imageThinkON Terms and Conditions Dec 11 2019.pdf
  • thinkon
  • bluetooth
  • competition
  • on semi
  • think_on
  • nfc
  • on semiconductor
  • Share
  • History
  • More
  • Cancel
  • Sign in to reply

Top Comments

  • luislabmo
    luislabmo over 6 years ago +9
    What a great piece of hardware. Trying really hard to come up with a nice idea for this challenge Luis
  • e14phil
    e14phil over 6 years ago +6
    Hello Challengers I am checking in with the shipping team, they were supposed to have already been dispatched by now. My sincere apologies! The challenge will be extended to an appropriate time when challengers…
  • e14phil
    e14phil over 6 years ago +6
    Hello All I am just back in the office after being out for the Holidays. I am looking into the outstanding Invoices and boards. Including and not limited to dwinhold ankur608 Free free to PM me as I am…
  • newbie101
    newbie101 over 6 years ago in reply to mahmood.hassan

    I tested the code without adding it to the BLE project and it ran as expected.

    I found out that the BLE code runs and the "Sense and Control" app will display the lux values if I comment out the "NOA1305_ALS_EnableInterrupt(APP_ALS_THRESHOLD_LEVEL_LUX);"  line.

    I think it may be two interrupts firing at the same time. It may be a "race condition" causing the program to fail.

    Is it possible to stop and restart the BLE interrupts in the read callback function?

    • Cancel
    • Vote Up 0 Vote Down
    • Sign in to reply
    • More
    • Cancel
  • Jan Cumps
    Jan Cumps over 6 years ago in reply to clem57

    ¯\_(ツ)_/¯


    3.1. EachApplicantmustfullycompleteandsubmitaRegistrationFormbytheApplicationClose.


    • Cancel
    • Vote Up +3 Vote Down
    • Sign in to reply
    • More
    • Cancel
  • clem57
    clem57 over 6 years ago in reply to Jan Cumps

    Jan Cumps Really? That is a change from the past.

    • Cancel
    • Vote Up +1 Vote Down
    • Sign in to reply
    • More
    • Cancel
  • Jan Cumps
    Jan Cumps over 6 years ago in reply to taifur

    I just checked the terms&conditions. For this one it requires that you filled in an application and it has to be approved.

    • Cancel
    • Vote Up +3 Vote Down
    • Sign in to reply
    • More
    • Cancel
  • taifur
    taifur over 6 years ago

    Is anyone without an official challenger allowed to participate is the challenge?

    • Cancel
    • Vote Up +4 Vote Down
    • Sign in to reply
    • More
    • Cancel
  • mahmood.hassan
    mahmood.hassan over 6 years ago in reply to newbie101

    First test the code without BLE part. If everything works then add BLE code.

    • Cancel
    • Vote Up +2 Vote Down
    • Sign in to reply
    • More
    • Cancel
  • newbie101
    newbie101 over 6 years ago in reply to mahmood.hassan

    Mahmood,

    I have tried to use the ALS interrupt and I can't seem to get it to work. I added the threshold values and intervals to the main.h file and modified a copy of the "sense_ics_firmware" project.

    The interrupt does not execute when the lux threshold is exceeded. Can you show me what I am missing?


    Code in main.h


    #ifndef MAIN_H_

    #define MAIN_H_

    #define APP_ALS_PERIODIC_INTERVAL_MS    (2000)

    #define APP_ALS_THRESHOLD_LEVEL_LUX     (600)

    #define APP_ALS_LOOP_INTERVAL_MS        (5000)

    void ALS_ReadCallback(uint32_t lux, bool is_interrupt);

    #endif /* MAIN_H_ */


    Code in main.c

    #include <stdio.h>


    #include <BDK.h>

    #include <BSP_Components.h>

    #include <BLE_Components.h>


    #include <ics/CS.h>

    #include <ics/CS_Nodes.h>

    #include <CSN_PB.h> // PushButton custom node creation example


    // ************** Added for ALS constants ******************************

    // ****** main.h was changed to add Intervals and Threshold ************

    #include "main.h"

    // *********************************************************************


    int main(void)

    {

        /* Initialize required components */

    BDK_Initialize();


        // ************** Added for Spare Output ***************************

        LED_Initialize(PIN_GIO_SPARE);

        // *****************************************************************


        // ************** Initialize on-board LEDs *************************

        LED_Initialize(LED_RED);

        LED_Initialize(LED_GREEN);

        LED_Initialize(LED_BLUE);

        // *****************************************************************


        // ********* Test LEDS with 1 1/2 second delays on startup**********

        LED_On(LED_RED);

        HAL_Delay(1500);

        LED_Off(LED_RED);


        LED_On(LED_GREEN);

        HAL_Delay(1500);

        LED_Off(LED_GREEN);


        LED_On(LED_BLUE);

        HAL_Delay(1500);

        LED_Off(LED_BLUE);

        // *****************************************************************


        // ************** Initialize on board Button 0**********************

        BTN_Initialize(BTN0);


        // *****************************************************************

        printf("\r\nPipe_Break3 Project\r\n");


        NOA1305_ALS_Initialize();


        NOA1305_ALS_StartContinuous(APP_ALS_PERIODIC_INTERVAL_MS,

                &ALS_ReadCallback);


        NOA1305_ALS_EnableInterrupt(APP_ALS_THRESHOLD_LEVEL_LUX);


        printf("Threshold = %d\r\n\n", APP_ALS_THRESHOLD_LEVEL_LUX);

        // *****************************************************************

        // *****************************************************************


        /* Initialize CS protocol, start Peripheral Server, Add Custom Service

         * Profile to it.

         */

        CS_Init();


        /* Optionally set advertising interval to be 200 to 250 ms long. */

        BDK_BLE_SetAdvertisementInterval(320, 400);


        /* Optionally set custom device name.

         * The name needs to contain one of 'IDK', 'BDK', 'RSL10' or 'BLE_Terminal'

         * patterns to be recognized by RSL10 Sense & control mobile application.

         * Default: 'HB_BLE_Terminal'

         */

         BDK_BLE_SetLocalName("HB_BLE_Terminal");


        /* Also add battery service if its RTE component is enabled. */

    #if defined (RTE_BDK_BLE_PERIPHERAL_SERVER_BASS)

        BLE_BASS_Initialize(1000, 16);

        BLE_BASS_SetVoltageRange(CALC_VBAT_MEASURED(2.4f), CALC_VBAT_MEASURED(3.0f));

        // BLE_BASS_SetBattLevelInd(BattLevelChangeCallback);

    #endif /* RTE_BDK_BLE_BASS_PRESENT */


        // Change default bus speed to 400kHz

        HAL_I2C_SetBusSpeed(HAL_I2C_BUS_SPEED_FAST);


        /* Add all enabled Custom Service Nodes. */

        ASSERT_ALWAYS(CSN_ALS_CheckAvailability() == true);

        ASSERT_ALWAYS(CS_RegisterNode(CSN_ALS_Create()) == CS_OK);


        ASSERT_ALWAYS(CSN_ENV_CheckAvailability() == true);

        ASSERT_ALWAYS(CS_RegisterNode(CSN_ENV_Create()) == CS_OK);


        ASSERT_ALWAYS(CSN_AO_CheckAvailability() == true);

        ASSERT_ALWAYS(CS_RegisterNode(CSN_AO_Create()) == CS_OK);


        ASSERT_ALWAYS(CS_RegisterNode(CSN_PB_Create()) == CS_OK);


        /* Indication - Initialization complete. */

        LED_Off(LED_BLUE);

        LED_On(LED_GREEN);

        HAL_Delay(250);

        LED_Off(LED_GREEN);


        CS_SYS_Info("Entering main loop.");

        printf("Entering main loop.\r\n");


        while (1)

        {

            /* Execute any events that have occurred and refresh Watchdog. */

            BDK_Schedule();


            /* Enter sleep mode until an interrupt occurs. */

            SYS_WAIT_FOR_INTERRUPT;

        }

        return 0;

    }


    // ******** Added interrupt callback function for Light Sensor******

    // *****************************************************************

    void ALS_ReadCallback(uint32_t lux, bool is_interrupt)

    {

        if (is_interrupt == true)

        {

        if (lux >= APP_ALS_THRESHOLD_LEVEL_LUX)

            {

            printf("ALS: LUX value passed threshold.\r\n");

        // Print this line if callback was called in response to lux value

            // passing above / below threshold value.


            // ********** Read Push Button 0 state. **********************************

            bool button0_pressed = BTN_Read(BTN0);

            // ********* Toggle Spare Output if the button 0 is activated *************

        if (button0_pressed == 1)

    {

        printf("Button 0 Is Pressed.\r\n");

        LED_On(PIN_GIO_SPARE);

        HAL_Delay(5000);

        LED_Off(PIN_GIO_SPARE);

                printf("GPIO SPARE toggled.\r\n");

    }

                printf("Interrupt LUX = %lu\r\n\n", lux);

             }

        }

        printf("LUX = %lu\r\n\n", lux);

    }


    • Cancel
    • Vote Up +2 Vote Down
    • Sign in to reply
    • More
    • Cancel
  • mahmood.hassan
    mahmood.hassan over 6 years ago in reply to newbie101

    First of all initialize the ALS in continuous mode and assign the interrupt callback function using this function

    NOA1305_ALS_StartContinuous(mSec_interval, &ALS_ReadCallback);


    This function will initialize the ALS in continuous mode and call the "ALS_ReadCallback" function every "mSec_interval". After calling this function you can enable the interrupt using above function.

    NOA1305_ALS_EnableInterrupt(APP_ALS_THRESHOLD_LEVEL_LUX);


    In call back function "void ALS_ReadCallback(uint32_t lux, bool is_interrupt)" the variable "is_interrupt" variable is set and function is called even if earlier set "mSec_interval" is completed or not.


    Interrupt will triggered/called this function only ONCE when lux value will cross the threshold value (low to high only). If lux value will remain over earlier set threshold value "APP_ALS_THRESHOLD_LEVEL_LUX" then this interrupt will not be triggered.

    • Cancel
    • Vote Up +2 Vote Down
    • Sign in to reply
    • More
    • Cancel
  • newbie101
    newbie101 over 6 years ago

    How can I add an interrupt like "NOA1305_ALS_EnableInterrupt(APP_ALS_THRESHOLD_LEVEL_LUX);" to the "sense_ics_firmware" project?

    I copied the "void ALS_ReadCallback(uint32_t lux, bool is_interrupt)" subroutine to the main.c and defined the threshold.

    The project compiles and runs but the interrupt doesn't run when the LUX value is above the threshold.

    • Cancel
    • Vote Up +2 Vote Down
    • Sign in to reply
    • More
    • Cancel
  • danzima
    danzima over 6 years ago in reply to dwinhold

    e14phil hey Phil, any word on the shipments for Dale and others above?


    dwinhold if you don't receive the kit, then you certainly won't be penalized for not finishing a project! Those who are in danger of being ineligible for Design Challenge, RoadTest, et al equipment all get multiple nagging emails and messages from me, Phil, and Randy Scasny, so you would certainly know if you were ever in that position.


    • Cancel
    • Vote Up +1 Vote Down
    • Sign in to reply
    • More
    • Cancel
<>
element14 Community

element14 is the first online community specifically for engineers. Connect with your peers and get expert answers to your questions.

  • Members
  • Learn
  • Technologies
  • Challenges & Projects
  • Products
  • Store
  • About Us
  • Feedback & Support
  • FAQs
  • Terms of Use
  • Privacy Policy
  • Legal and Copyright Notices
  • Sitemap
  • Cookies

An Avnet Company © 2026 Premier Farnell Limited. All Rights Reserved.

Premier Farnell Ltd, registered in England and Wales (no 00876412), registered office: Farnell House, Forge Lane, Leeds LS12 2NE.

ICP 备案号 10220084.

Follow element14

  • X
  • Facebook
  • linkedin
  • YouTube