Well, I don't know quite where to start, so I'll just take a deep breath and start rattling; maybe some structure will emerge!
Events so far
I first received a license file from CadSoft, so now I'm running Eagle 6.3 on my (Linux) machine. I had a bit of trouble installing as the Linux distribution had some dependencies missing, and then I found out that installing Wine on my new x64 machine was a pain, but after ploughing through a lot of fora I was able to get this working. I've been using Eagle in the past for private projects, but only the freeware version. I already used two features of the professional license I received (thanks CadSoft!), as I can now place components outside of my board which is prohibited in the freeware version but comes in extremely handy during initial component placement. The other feature I can use now is using more than 2 layers. When browsing through the board files, I found that the transmitter board is a 4-layer PCB whereas the receiver is a 2-sided PCB. The freeware version does not support 4-layer boards, so I'm very glad I can now use this board as a starting point for my design.
On the hardware side of things, I received the demo boards. Powering up is as easy as shown in the video's, I simply hooked up my power supply to the transmitter, laid the receiver down with the coil on the transmitter, I heard 'beep' and the transmitter LED was blinking while the receiver LED was shining happily! My multimeter showed a nice and stable 5V output. Hooray, I'm good to go.....
Product design
O.K., so I got all my goodies, time to start thinking about applications! Actually, a friend of mine was thinking about adding an inductive charging system to his LEGO train set just a few weeks before this RoadTest started. He already gutted a wireless charging WiiMote clone, but got no usable results. When I saw the RoadTest I thought it would be fun to make a Qi-train!
Too many problems
When thinking about this setup I realized that the LEGO train is only 6 knobs wide (check this magnificent site on LEGO measurements: http://www.robertcailliau.eu/Lego/Dimensions/zMeasurements-en.xhtml), and the space between the tracks is also quite small, and since the vertical distance between the coils should be very small I doubted whether I would be able to transfer the power efficiently.
On tuesdays I'm tinkering away at Tkkrlab, the local makerspace, where I also met the owner of the LEGO train. I expressed my concerns and got a very reassuring answer: If it's not possible through the rails, we'll do it through the roof, we'd like the train to stop for charging at the railway station anyway.... Wow, that opened up possibilities! Also, he mentioned that the LEGO NXT brick (the 'brain' of the Mindstorms set) could be a nice 'chargeable' item, and I thought about a lot of toys my son is using where charging the batteries is ill-organized so my hopes for a good solution were up again!
Too many solutions
So many ways exist to try and design something useful; I wanted to make something that can be used to charge a device taking 6 AA cells, which could be the NXT brick or a LEGO train, or LEGO Power Functions, or the robot my son is playing with. My thoughts started swarming in many directions: what batteries to use? Will it fit? What charging systems can I use? How do I make this as generic as possible? And, most and all: how do I (sort of) finish this in 2 months?
These are the choices I made, I'll explain them a bit:
- I'll use NiMH AAA's instead of the AA's in the original
- Yes, that means sacrificing battery capacity. Why not use rechargeable AA's? I need the space for the Qi receiving electronics + coil. The other alternative I thought about was LiPo batteries, but I wasn't able to find a good combination of size and capacity that would fit in a housing meant for AA's. Safety (these are toys, and I'm not going to certify my home-brewn electronics!) was another issue.
- I'll have to design some switching converters
- The output of the Qi receiver is a regulated 5V supply. The original battery pack gave 9V when fully charged. Even when using NiMH (6x 1.2V), you still need a voltage higher than 7.2V to charge. When using Lithium rechargeable cells, I'd have to think of a battery balancing option as well, further complicating things. Another reason to use NiMH cells
- To keep the charging efficiency high, the charging system will probably also be a switching regulator, although I still have to browse around for parts to be used.
- The train design will be possible!
- According to inernet:
- rail gauge is 37.8mm
- The Wuerth pickup coil is 37mm wide
- Placing the transmitter coil under the tracks-> bingo.
- I'll have to figure out how to align the train and the charging coil for efficiency. A few millimeters off means no charging!
- According to inernet:
- I asked my girlfriend to think of a charging pad / charging 'thing' which is cool for kids to use. She's better at those things than I am!
Learning Qi
The past few days I dived into the documentation of the Texas Instruments IC's. I must admit I found it quite daunting at first, all these parasitics, and options taken into account in the design... The topology of Qi charging is very interesting, in the fact that the coils aren't transmitting energy when not needed (thus preventing unnecessary power usage), metal objects that cannot be charged are detected (clever!), and the receiving side can make the transmitting side shift in switching frequency thus regulating the power (clever again!). I always tend to try and understand the complete design concept when making a design, I guess I'll just have to skip that a bit for this RoadTest Challenge in order to finish this project in time (next to having a full time job and a family). Maybe I'll have to do a bit of TaiQi to keep my inner peace!
Images
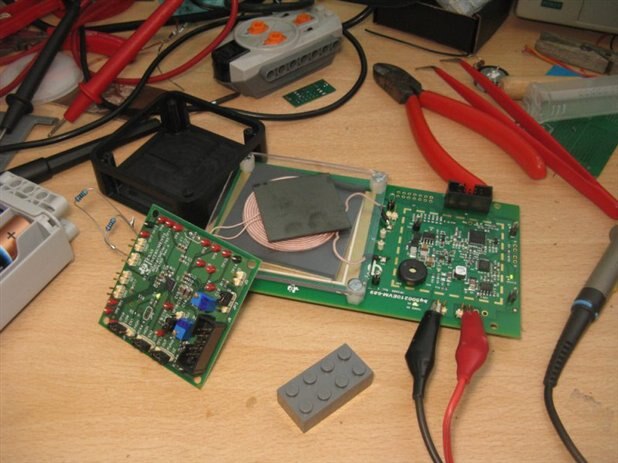
Sorry engineers at TI; I immediately took the receiver coil out of your well-designed enclosure; It's quite nice and small. I attached some resistors to the output to do a bit of load testing, everything has been nice and steady so far.
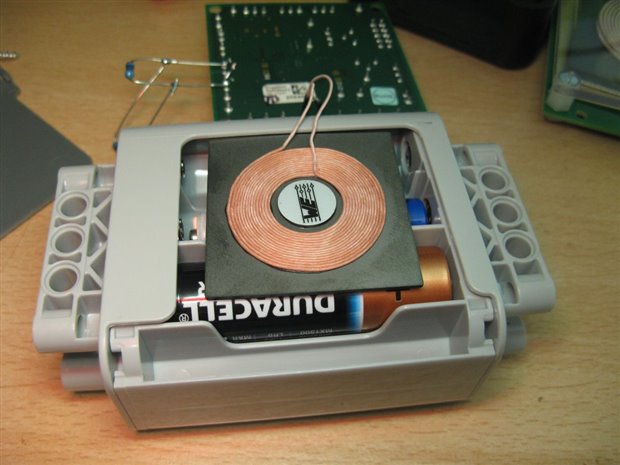
Close-up of the receiver coil fitted in the LEGO housing; underneath the coil you can see an original AA size battery, but also an AAA size next to it. The AAA gives a LITTLE bit of room for the electronics....