element14 Community
element14 Community
    Register Log In
  • Site
  • Search
  • Log In Register
  • Community Hub
    Community Hub
    • What's New on element14
    • Feedback and Support
    • Benefits of Membership
    • Personal Blogs
    • Members Area
    • Achievement Levels
  • Learn
    Learn
    • Ask an Expert
    • eBooks
    • element14 presents
    • Learning Center
    • Tech Spotlight
    • STEM Academy
    • Webinars, Training and Events
    • Learning Groups
  • Technologies
    Technologies
    • 3D Printing
    • FPGA
    • Industrial Automation
    • Internet of Things
    • Power & Energy
    • Sensors
    • Technology Groups
  • Challenges & Projects
    Challenges & Projects
    • Design Challenges
    • element14 presents Projects
    • Project14
    • Arduino Projects
    • Raspberry Pi Projects
    • Project Groups
  • Products
    Products
    • Arduino
    • Avnet & Tria Boards Community
    • Dev Tools
    • Manufacturers
    • Multicomp Pro
    • Product Groups
    • Raspberry Pi
    • RoadTests & Reviews
  • About Us
  • Store
    Store
    • Visit Your Store
    • Choose another store...
      • Europe
      •  Austria (German)
      •  Belgium (Dutch, French)
      •  Bulgaria (Bulgarian)
      •  Czech Republic (Czech)
      •  Denmark (Danish)
      •  Estonia (Estonian)
      •  Finland (Finnish)
      •  France (French)
      •  Germany (German)
      •  Hungary (Hungarian)
      •  Ireland
      •  Israel
      •  Italy (Italian)
      •  Latvia (Latvian)
      •  
      •  Lithuania (Lithuanian)
      •  Netherlands (Dutch)
      •  Norway (Norwegian)
      •  Poland (Polish)
      •  Portugal (Portuguese)
      •  Romania (Romanian)
      •  Russia (Russian)
      •  Slovakia (Slovak)
      •  Slovenia (Slovenian)
      •  Spain (Spanish)
      •  Sweden (Swedish)
      •  Switzerland(German, French)
      •  Turkey (Turkish)
      •  United Kingdom
      • Asia Pacific
      •  Australia
      •  China
      •  Hong Kong
      •  India
      • Japan
      •  Korea (Korean)
      •  Malaysia
      •  New Zealand
      •  Philippines
      •  Singapore
      •  Taiwan
      •  Thailand (Thai)
      • Vietnam
      • Americas
      •  Brazil (Portuguese)
      •  Canada
      •  Mexico (Spanish)
      •  United States
      Can't find the country/region you're looking for? Visit our export site or find a local distributor.
  • Translate
  • Profile
  • Settings
Imagine a World Without Cords
  • Challenges & Projects
  • Design Challenges
  • Imagine a World Without Cords
  • More
  • Cancel
Imagine a World Without Cords
Blog QiPi2 - Qi Battery Charged and Powered 512MB Raspberry Pi
  • Blog
  • Forum
  • Documents
  • Files
  • Mentions
  • Sub-Groups
  • Tags
  • More
  • Cancel
  • New
  • Share
  • More
  • Cancel
Group Actions
  • Group RSS
  • More
  • Cancel
Engagement
  • Author Author: johnsocm
  • Date Created: 22 Oct 2012 5:50 PM Date Created
  • Views 973 views
  • Likes 0 likes
  • Comments 5 comments
  • wireless_power
  • wireless_power_home
  • wireless_communication
  • wireless_power_challenge
  • qi
  • members_featured_project
  • wp_challenge_one
  • consumer_electronics
Related
Recommended

QiPi2 - Qi Battery Charged and Powered 512MB Raspberry Pi

johnsocm
johnsocm
22 Oct 2012

Hello World,


Last Week I made a Wireless Power Raspberry Pi. I also made that night a Battery Powered and Qi Charged Raspberry Pi. I would like to show my test setup to see if it would work. This is by no means a good way to do this but I wanted to test the concept with parts I had laying around.


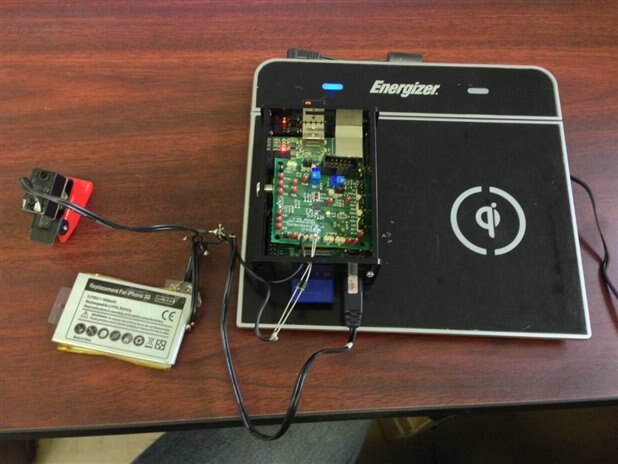
I took two batteries and soldered them in series.

One iPhone 3GS battery and a iPod Touch battery. Both at 3.7V for a total of 3.7V + 3.7V = 7.4V.Never parallel a Li-POL Battery with another battery to increase capacity as they can explode, start on fire, etc. This is very dangerous as most of them can only handle 300mA to 1000mA total.


image

I taped them together so they would be more compact!

Then I soldered them to a TI LP38690-5.0 Regulator. http://www.ti.com/product/lp38690 This is a 5V regulator and very easy to use! Basically 5.5V to 10V input and a regulated 5.0V output with 1A load current. The dropout voltage is low at 450mV.


imageimage


I wired the 7.4V to a switch and then to the Vin and wired the GND wire to the GND tab. Vout was the 5V output wire that goes to the Raspberry Pi that comes from the wireless eval kit output and the battery when switched in. I used two 1N4007 Diodes on the evaluation output pins to prevent the battery from powering and backfeeding into the eval kit. The eval kit was ground via the regulator as well. This setup allowed me to use the switch to turn on the Raspberry Pi, as well as place the Raspberry Pi on the Transmitter Pad and power the Raspberry Pi.


imageimage

imageimage


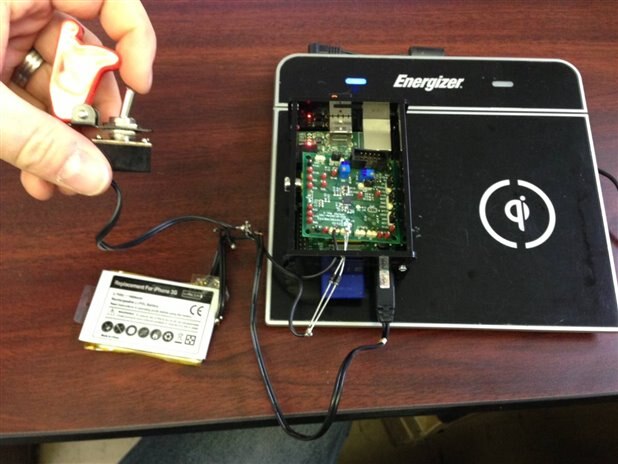
Now when I have the battery off, and the QiPi on the pad, the Raspberry Pi boots up. If I remove it with the battery switch off, the Raspberry Pi shuts off. Now when I turn the battery on, and I remove the Raspberry Pi, the Raspberry Pi stays on.


This is not the best method at all for charging a battery nor powering a Raspberry Pi. This was only a test setup and should/will not be used in a final product. I will be using a battery charging managment system that stops charging the battery when full. I just wanted to showcase a working model of the battery powered QiPi.


Here is a video of the setup working.


Enjoy!

You don't have permission to edit metadata of this video.
Edit media
x
image
Upload Preview
image

  • Sign in to reply

Top Comments

  • COMPACT
    COMPACT over 13 years ago in reply to johnsocm +1
    Hi Chad, I understand that is what you have done but your text says "Basically 2.7V to 10V input and a regulated 5.0V output with 1A load current"... I think you meant 5.5V to 10V input. Cheers Compac…
  • johnsocm
    johnsocm over 13 years ago in reply to COMPACT

    Hello Compact,


    I changed the original post to reflect our discussion. Thank you again for spotting the error.


    Chad

    • Cancel
    • Vote Up 0 Vote Down
    • Sign in to reply
    • More
    • Cancel
  • johnsocm
    johnsocm over 13 years ago in reply to COMPACT

    Hello COMPACT,


    Yes your absolutely correct. Let me clarify that statement.

    The LDO38690 in general has a wide input range of 2.7V to 10V. For this setup one must use 5V plus 450mV = 5.5V minimum to maintain a regulated 5V output for the LP38690-5.0. Your absolutely correct that this is a step down and not a buck boost or step up regulator.


    Thank you for finding the error!


    Chad

    • Cancel
    • Vote Up 0 Vote Down
    • Sign in to reply
    • More
    • Cancel
  • COMPACT
    COMPACT over 13 years ago in reply to johnsocm

    Hi Chad,

    I understand that is what you have done but your text says "Basically 2.7V to 10V input and a regulated 5.0V output with 1A load current"...

    I think you meant 5.5V to 10V input.


    Cheers


    Compact

    • Cancel
    • Vote Up +1 Vote Down
    • Sign in to reply
    • More
    • Cancel
  • johnsocm
    johnsocm over 13 years ago in reply to COMPACT

    Hello Compact,


    The LDO is correct, I used this to step down the 7.4V from the two 3.7V batteries in series.


    This LDO takes 7.4V input and outputs 5V to the Raspberry Pi when the battery is switched in.


    The wireless power eval receiver is directly inputed to the Raspberry Pi through connections made at the 5V side of the LDO.


    Hope this clears any confusion to my post.


    Thank you,

    Chad

    • Cancel
    • Vote Up 0 Vote Down
    • Sign in to reply
    • More
    • Cancel
  • COMPACT
    COMPACT over 13 years ago

    Chad,

    I think you have a typo in your blog. The LP38690 is an LDO Linear regulator that can't step up an input voltage lower than it's output voltage. For 5 volts out the minimum input voltage is about 5.5 volts.


    Cheers


    Compact

    • Cancel
    • Vote Up 0 Vote Down
    • Sign in to reply
    • More
    • Cancel
element14 Community

element14 is the first online community specifically for engineers. Connect with your peers and get expert answers to your questions.

  • Members
  • Learn
  • Technologies
  • Challenges & Projects
  • Products
  • Store
  • About Us
  • Feedback & Support
  • FAQs
  • Terms of Use
  • Privacy Policy
  • Legal and Copyright Notices
  • Sitemap
  • Cookies

An Avnet Company © 2025 Premier Farnell Limited. All Rights Reserved.

Premier Farnell Ltd, registered in England and Wales (no 00876412), registered office: Farnell House, Forge Lane, Leeds LS12 2NE.

ICP 备案号 10220084.

Follow element14

  • X
  • Facebook
  • linkedin
  • YouTube