element14 Community
element14 Community
    Register Log In
  • Site
  • Search
  • Log In Register
  • Community Hub
    Community Hub
    • What's New on element14
    • Feedback and Support
    • Benefits of Membership
    • Personal Blogs
    • Members Area
    • Achievement Levels
  • Learn
    Learn
    • Ask an Expert
    • eBooks
    • element14 presents
    • Learning Center
    • Tech Spotlight
    • STEM Academy
    • Webinars, Training and Events
    • Learning Groups
  • Technologies
    Technologies
    • 3D Printing
    • FPGA
    • Industrial Automation
    • Internet of Things
    • Power & Energy
    • Sensors
    • Technology Groups
  • Challenges & Projects
    Challenges & Projects
    • Design Challenges
    • element14 presents Projects
    • Project14
    • Arduino Projects
    • Raspberry Pi Projects
    • Project Groups
  • Products
    Products
    • Arduino
    • Avnet & Tria Boards Community
    • Dev Tools
    • Manufacturers
    • Multicomp Pro
    • Product Groups
    • Raspberry Pi
    • RoadTests & Reviews
  • About Us
    About the element14 Community
  • Store
    Store
    • Visit Your Store
    • Choose another store...
      • Europe
      •  Austria (German)
      •  Belgium (Dutch, French)
      •  Bulgaria (Bulgarian)
      •  Czech Republic (Czech)
      •  Denmark (Danish)
      •  Estonia (Estonian)
      •  Finland (Finnish)
      •  France (French)
      •  Germany (German)
      •  Hungary (Hungarian)
      •  Ireland
      •  Israel
      •  Italy (Italian)
      •  Latvia (Latvian)
      •  
      •  Lithuania (Lithuanian)
      •  Netherlands (Dutch)
      •  Norway (Norwegian)
      •  Poland (Polish)
      •  Portugal (Portuguese)
      •  Romania (Romanian)
      •  Russia (Russian)
      •  Slovakia (Slovak)
      •  Slovenia (Slovenian)
      •  Spain (Spanish)
      •  Sweden (Swedish)
      •  Switzerland(German, French)
      •  Turkey (Turkish)
      •  United Kingdom
      • Asia Pacific
      •  Australia
      •  China
      •  Hong Kong
      •  India
      •  Japan
      •  Korea (Korean)
      •  Malaysia
      •  New Zealand
      •  Philippines
      •  Singapore
      •  Taiwan
      •  Thailand (Thai)
      •  Vietnam
      • Americas
      •  Brazil (Portuguese)
      •  Canada
      •  Mexico (Spanish)
      •  United States
      Can't find the country/region you're looking for? Visit our export site or find a local distributor.
  • Translate
  • Profile
  • Settings
Ben Heck Featured Content
  • Challenges & Projects
  • element14 presents
  • element14's The Ben Heck Show
  • Ben Heck Featured Content
  • More
  • Cancel
Ben Heck Featured Content
Documents Mini Pinball Play Field Puzzle
  • Blog
  • Forum
  • Documents
  • Events
  • Polls
  • Files
  • Members
  • Mentions
  • Sub-Groups
  • Tags
  • More
  • Cancel
  • New
Join Ben Heck Featured Content to participate - click to join for free!
Actions
  • Share
  • More
  • Cancel
Engagement
  • Author Author: makerkaren
  • Date Created: 2 Feb 2018 11:08 PM Date Created
  • Last Updated Last Updated: 2 Feb 2018 11:18 PM
  • Views 636 views
  • Likes 6 likes
  • Comments 3 comments
Related
Recommended

Mini Pinball Play Field Puzzle

image
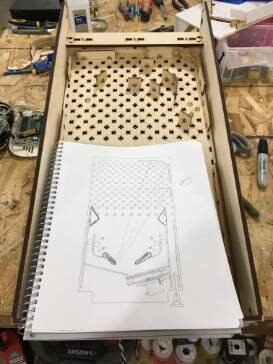
Mini Pinball Prototype with rendering of lower play field hardware, factoring in angles of ball deflection.


We're working on wrapping up the Mini Pinball. Most of the hardware is figured and finished. It's time to figure out how the game will actually be built. Previously, Ben and I devised a tab and slot system that utilized laser cut wooden walls that could slot into various holes on the upper play field. We even figured out that we could add living hinges to the wood walls to add curvature.


After a long break from the project, we put our attention back on the play field and discovered a hitch. Now that the flippers are in place and working, Ben was able to see the actual angles in which the pinball would be entering the upper play field. Our walls were previously set to 90 and 45 degree angle options. If you look at the drawing in the above image, you can see that the angles that the pinball would travel would not work well with the angles we had available. We need a new solution.


At my previous job at the Game Crafter, we had stands that would hold cards or chipboard game pieces vertically. When we were first talking about designing barriers in the upper play field, I had thought to use pieces that would perform similarly to the game stands. However, I was worried that the pinball would hit the stand and not the wall. We came up with the tab and slot system instead.


This week, with our minds back on the problem of being able to have sturdy walls with varying angles, I reconsidered my old idea. Looking closer at the pinball, I noticed that due to the curvature of the ball, there was much of the ball that was below the point of contact, possibly enough for a clip to hold the walls, without interfering with the ball. So I pitched the idea to Ben. The clip holding the wall could only be maybe 1/8" tall and not very thick. The walls need to be locked into the desired angle. Using just a screw does not work well as it would have to be fairly tight for the wall not to rotate in place, and given that our walls are laser cut, there isn't a good way to add a hole to the thickness of the wall. I realized that if the wall clip had a plug that was star shaped like a Torx bit, then the plug could be inserted into the board and the clip could be rotated to multiple angles, but would still lock in place.


image

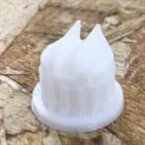
This gets inserted up through the play field. The thickness of the toothed bit is within the thickness of the play field so only the angled upper portion is exposed.


After some design discussion, Ben 3D printed some prototypes. They seem to work fairly well. The ball doesn't make contact with them. The holes in the play field are now more round and could allow for insertion of other sensors and mechanisms better than the previous cross design. Ben designed the clips to be inserted from the bottom of the play field so that the wall pinches the play field, holding the clip in place from the top. The downside is that this requires removing the wall from the clip to make any changes. My original concept had the clips inserted from the top of the play field so that once the wall was inserted, it would not have to be removed for experimentation; the wall and clip could be moved as one piece with the clip removed and reinserted into holes. Once the player was happy with their design, they could use a screw and washer to secure the clip in place from underneath.

The flaw in this design is that it requires the clip to have a slight lip that would catch on the top of the play field, otherwise it might fall straight through. The part is 3D printed from the bottom up and the lip would create a 90deg horizontal angle which doesn't work so well in 3D printing. We may still be able to play with tweaking that design by adding alight angles to the lip to get it to 3D print.


Either way, I think we've got a solid idea and are making good progress.


Do you have any ideas of how to make the upper play field layout customizable?

Tell us in the comments below!

  • mini pinball
  • theheckwithkaren_mini_pinball
  • 3D Printing
  • theheckwithkaren
  • behind the scenes
  • theheckwkaren
  • Share
  • History
  • More
  • Cancel
  • Sign in to reply

Top Comments

  • DAB
    DAB over 8 years ago +2
    Hi Karen, I wondered about that problem when I saw the first video of the idea, but was waiting to see how the prototype went together. I thought of maybe going to some 3D printed blocks, curves and arcs…
  • makerkaren
    makerkaren over 8 years ago in reply to fmilburn

    That's not a bad idea. The downside is they are a bit difficult to add by hand so would we just provide them in the kit and make the consumer add them? Or would it add an extra assembly step where someone would have to manually add the clips to the 3D printed part before being packaged for shipping?

    I'm trying to find the specs of retaining rings as they have the smallest difference of inner vs outer diameter. There is still a concern that it would be too wide and would interfere with the ball, but they may be narrow enough not to. The other concern is the expense that might add. I'm not sure how cheap you can get those in bulk and we would need to include one per plug/chip which could add up quickly. Consider we include 20-25 or more clips per kit?

    The marketing rule is that your total cost is 30% or 1/3 of the retail price.

    • Cancel
    • Vote Up 0 Vote Down
    • Sign in to reply
    • More
    • Cancel
  • DAB
    DAB over 8 years ago

    Hi Karen,


    I wondered about that problem when I saw the first video of the idea, but was waiting to see how the prototype went together.

    I thought of maybe going to some 3D printed blocks, curves and arcs that would fit on the pegs so that you could build up a structure similar to what we used to do with the small slot car tracks.


    The basic idea would be that each peg had a straight section or curve section with the pin in the center.  You would build your playing wall by putting the pieces in the peg board and then use a flexible U shaped channel to then hold all the pieces together in the shape you wanted.  You could also use more solid printed triangle and curves for he end pieces so you get a good solid contact with the outer walls of the playing field.


    DAB

    • Cancel
    • Vote Up +2 Vote Down
    • Sign in to reply
    • More
    • Cancel
  • fmilburn
    fmilburn over 8 years ago

    Hi Karen,


    I haven't started 3d printing yet but here are some ideas for the insertion through the top idea... If you can put a rounded groove circumferentially around the part then a c-clip from spring steel or maybe even printed plastic might keep it from falling through.  Another idea is to just make it two piece and have the kit builder glue the collars that keep it from falling through on.

    • Cancel
    • Vote Up 0 Vote Down
    • Sign in to reply
    • More
    • Cancel
element14 Community

element14 is the first online community specifically for engineers. Connect with your peers and get expert answers to your questions.

  • Members
  • Learn
  • Technologies
  • Challenges & Projects
  • Products
  • Store
  • About Us
  • Feedback & Support
  • FAQs
  • Terms of Use
  • Privacy Policy
  • Legal and Copyright Notices
  • Sitemap
  • Cookies

An Avnet Company © 2026 Premier Farnell Limited. All Rights Reserved.

Premier Farnell Ltd, registered in England and Wales (no 00876412), registered office: Farnell House, Forge Lane, Leeds LS12 2NE.

ICP 备案号 10220084.

Follow element14

  • X
  • Facebook
  • linkedin
  • YouTube