element14 Community
element14 Community
    Register Log In
  • Site
  • Search
  • Log In Register
  • About Us
  • Community Hub
    Community Hub
    • What's New on element14
    • Feedback and Support
    • Benefits of Membership
    • Personal Blogs
    • Members Area
    • Achievement Levels
  • Learn
    Learn
    • Ask an Expert
    • eBooks
    • element14 presents
    • Learning Center
    • Tech Spotlight
    • STEM Academy
    • Webinars, Training and Events
    • Learning Groups
  • Technologies
    Technologies
    • 3D Printing
    • FPGA
    • Industrial Automation
    • Internet of Things
    • Power & Energy
    • Sensors
    • Technology Groups
  • Challenges & Projects
    Challenges & Projects
    • Design Challenges
    • element14 presents Projects
    • Project14
    • Arduino Projects
    • Raspberry Pi Projects
    • Project Groups
  • Products
    Products
    • Arduino
    • Avnet Boards Community
    • Dev Tools
    • Manufacturers
    • Multicomp Pro
    • Product Groups
    • Raspberry Pi
    • RoadTests & Reviews
  • Store
    Store
    • Visit Your Store
    • Choose another store...
      • Europe
      •  Austria (German)
      •  Belgium (Dutch, French)
      •  Bulgaria (Bulgarian)
      •  Czech Republic (Czech)
      •  Denmark (Danish)
      •  Estonia (Estonian)
      •  Finland (Finnish)
      •  France (French)
      •  Germany (German)
      •  Hungary (Hungarian)
      •  Ireland
      •  Israel
      •  Italy (Italian)
      •  Latvia (Latvian)
      •  
      •  Lithuania (Lithuanian)
      •  Netherlands (Dutch)
      •  Norway (Norwegian)
      •  Poland (Polish)
      •  Portugal (Portuguese)
      •  Romania (Romanian)
      •  Russia (Russian)
      •  Slovakia (Slovak)
      •  Slovenia (Slovenian)
      •  Spain (Spanish)
      •  Sweden (Swedish)
      •  Switzerland(German, French)
      •  Turkey (Turkish)
      •  United Kingdom
      • Asia Pacific
      •  Australia
      •  China
      •  Hong Kong
      •  India
      •  Korea (Korean)
      •  Malaysia
      •  New Zealand
      •  Philippines
      •  Singapore
      •  Taiwan
      •  Thailand (Thai)
      • Americas
      •  Brazil (Portuguese)
      •  Canada
      •  Mexico (Spanish)
      •  United States
      Can't find the country/region you're looking for? Visit our export site or find a local distributor.
  • Translate
  • Profile
  • Settings
Hack Like Heck
  • Challenges & Projects
  • element14 presents
  • element14's The Ben Heck Show
  • Hack Like Heck
  • More
  • Cancel
Hack Like Heck
Blog HLH - Pi Portable Design blog 2
  • Blog
  • Forum
  • Documents
  • Events
  • Polls
  • Files
  • Members
  • Mentions
  • Sub-Groups
  • Tags
  • More
  • Cancel
  • New
Join Hack Like Heck to participate - click to join for free!
  • Share
  • More
  • Cancel
Group Actions
  • Group RSS
  • More
  • Cancel
Engagement
  • Author Author: dougw
  • Date Created: 26 Mar 2018 5:56 AM Date Created
  • Views 841 views
  • Likes 5 likes
  • Comments 4 comments
  • hlh
  • hack like heck
Related
Recommended

HLH - Pi Portable Design blog 2

dougw
dougw
26 Mar 2018

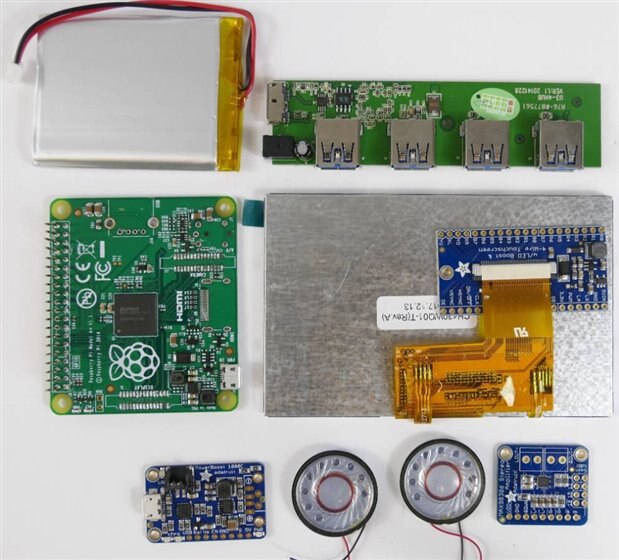
I finally received the build kit which included a copper clad card and a bottle of etchant. The parts were not exactly the same as the ones Ben and Felix used so it is unlikely the stl files would fit. The USB hub was quite large so I likely won't use it. I ordered some USB hub chips to be designed onto my PCB, but they won't arrive in time to be in this build. I removed the high components from the Raspberry Pi card, except the header, (I only removed the plastic from it). It will be soldered into my PCB and get trimmed flush with the PCB. There were 3 speakers in the kit, one was like the speakers in Ben's unit, the other 2 are larger and have wires attached. Not a big issue, but I don't think they would fit the original case. The battery is much smaller area wise - not sure about the depth. It is about the same area as the Raspberry Pi card. This may allow part of the device to be thinner - still deciding on that.

I created library parts for all the modules and components including the Raspberry Pi - so I could design a PCB to connect everything. This turned out to be a lot more work than creating normal library parts because there are no datasheets that have all the necessary dimensions for most of this stuff. I need all the connected through holes on each module to precisely line up with my PCB - very tedious measurements, offset calculations and reconciliation with what data is in the data sheets.

Once that library process was complete, designing and drawing the schematic was pretty quick, except I still have no info on what pins connect to the switch matrix rows and columns. If anyone can read Ben' schematic, I would love to see a jpeg of it.

Laying out the PCB was also pretty straight forward, but I'm hoping to nail down the rows and columns before printing....

Here is a quick look at some of the components after I modified them:

image

  • Sign in to reply

Top Comments

  • gecoz
    gecoz over 7 years ago +4
    Hi Doug, I'm not sure if this is what you are after, but here I'm attaching the button matrix schematics from the link you posted (rev 3): If, on the other hand, what you are after is the wiring details…
  • genebren
    genebren over 7 years ago +1
    Nice update on your Hack job. As usual a very clear and deliberate approach to the problem. Good luck on your build and on the competition. Gene
  • dougw
    dougw over 7 years ago in reply to gecoz +1
    Thanks gecoz . I couldn't read those files. Thanks for the keypad link.
  • binaryben
    binaryben over 7 years ago in reply to dougw

    Hey Doug, pretty sure they were made in EAGLE if that helps. Should be free to download and look at these files? Shout out if you need anymore of them opened and screenshot for you though!

    • Cancel
    • Vote Up +1 Vote Down
    • Sign in to reply
    • More
    • Cancel
  • dougw
    dougw over 7 years ago in reply to gecoz

    Thanks gecoz . I couldn't read those files. Thanks for the keypad link.

    • Cancel
    • Vote Up +1 Vote Down
    • Sign in to reply
    • More
    • Cancel
  • genebren
    genebren over 7 years ago

    Nice update on your Hack job.  As usual a very clear and deliberate approach to the problem.  Good luck on your build and on the competition.

    Gene

    • Cancel
    • Vote Up +1 Vote Down
    • Sign in to reply
    • More
    • Cancel
  • gecoz
    gecoz over 7 years ago

    Hi Doug,


    I'm not sure if this is what you are after, but here I'm attaching the button matrix schematics from the link you posted (rev 3):


    image


    imageimage

    If, on the other hand, what you are after is the wiring details of the rows/columns pins to the RPi GPIO pins, I'm not sure there is any schema around, because I think you are fairly free to map them the way suits your design best, as long as you reserve 8 GPIO pins on the RPi. The instructions you find here explain how to configure the kernel module matrix-keypad, in order to map your keys.


    I hope it helps,

    Fabio.

    • Cancel
    • Vote Up +4 Vote Down
    • Sign in to reply
    • More
    • Cancel
element14 Community

element14 is the first online community specifically for engineers. Connect with your peers and get expert answers to your questions.

  • Members
  • Learn
  • Technologies
  • Challenges & Projects
  • Products
  • Store
  • About Us
  • Feedback & Support
  • FAQs
  • Terms of Use
  • Privacy Policy
  • Legal and Copyright Notices
  • Sitemap
  • Cookies

An Avnet Company © 2025 Premier Farnell Limited. All Rights Reserved.

Premier Farnell Ltd, registered in England and Wales (no 00876412), registered office: Farnell House, Forge Lane, Leeds LS12 2NE.

ICP 备案号 10220084.

Follow element14

  • X
  • Facebook
  • linkedin
  • YouTube