
2.jpg.jpg-68x68x2.jpg?_=zqdYZYFj3EWNUExYxEhR6Q==)
Table of contents

Abstract
SEEED Studio Xiao Round TFT Displays for eyes on a scary Halloween mask with raspberry pi camera and screaming witch sounds.
Project
I started this project as an upgrade to an older scary Halloween project with raspberry pi.
Halloween-of-Things (HoT) And Your Little Internet Too - Hackster.io
I got a new scary mask and some Seeed Studio XIAO round tft displays for eyes.
My plan was to use my old python code to sense a trick-or-treater with a proximity detector, then play a scary maniacal witch's laugh/scream with the raspberry pi and take a photo with the Rpi camera.
In addition, I would show some strange eyes on the tft displays for added effect.
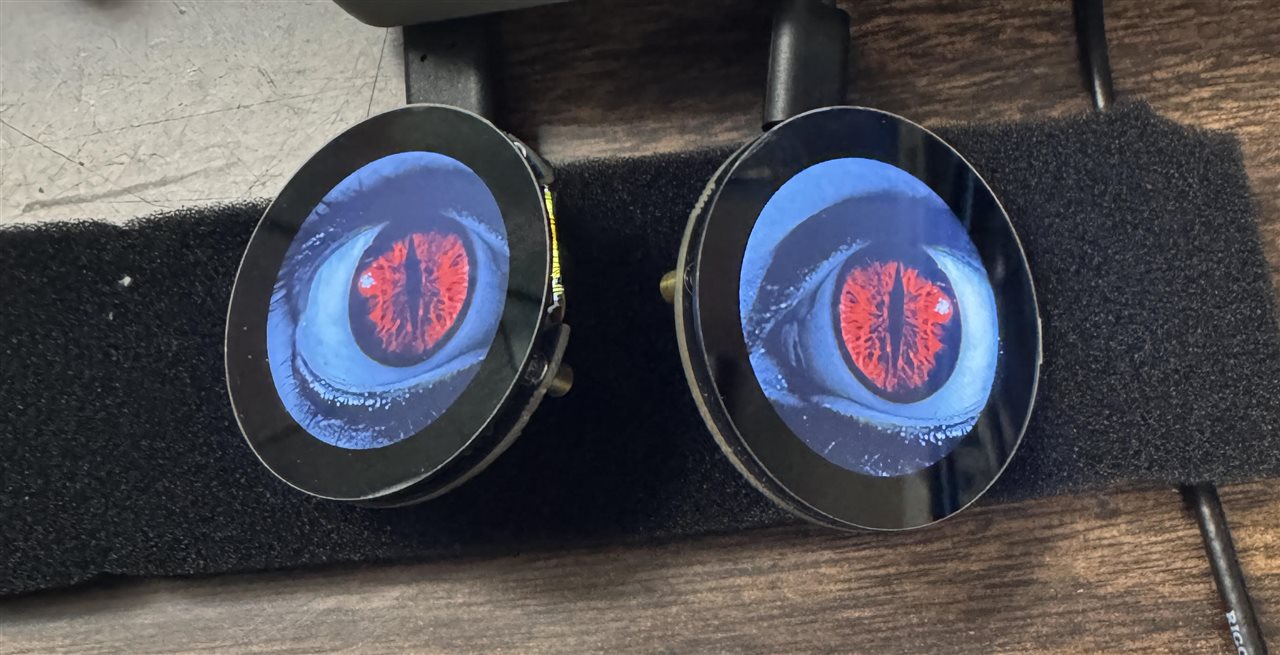
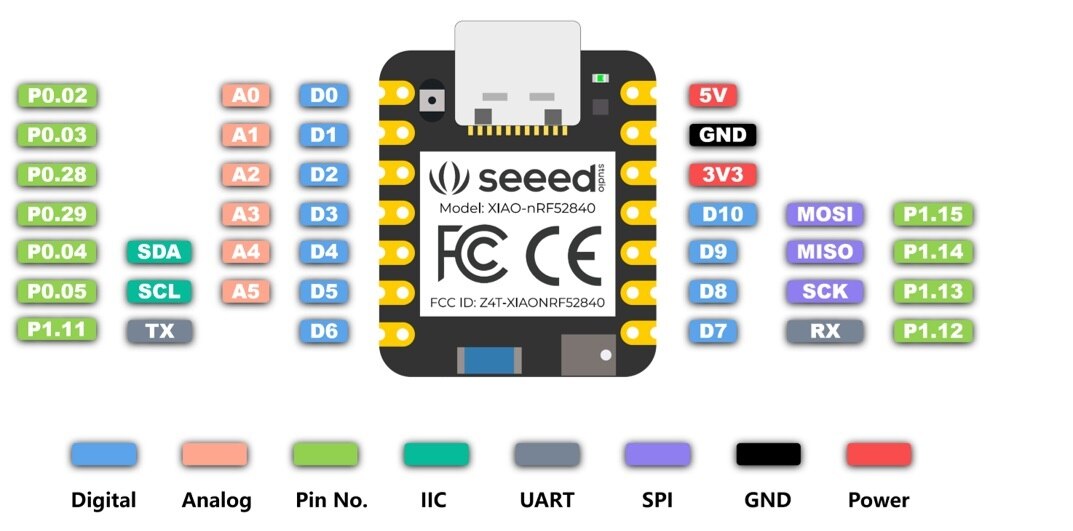
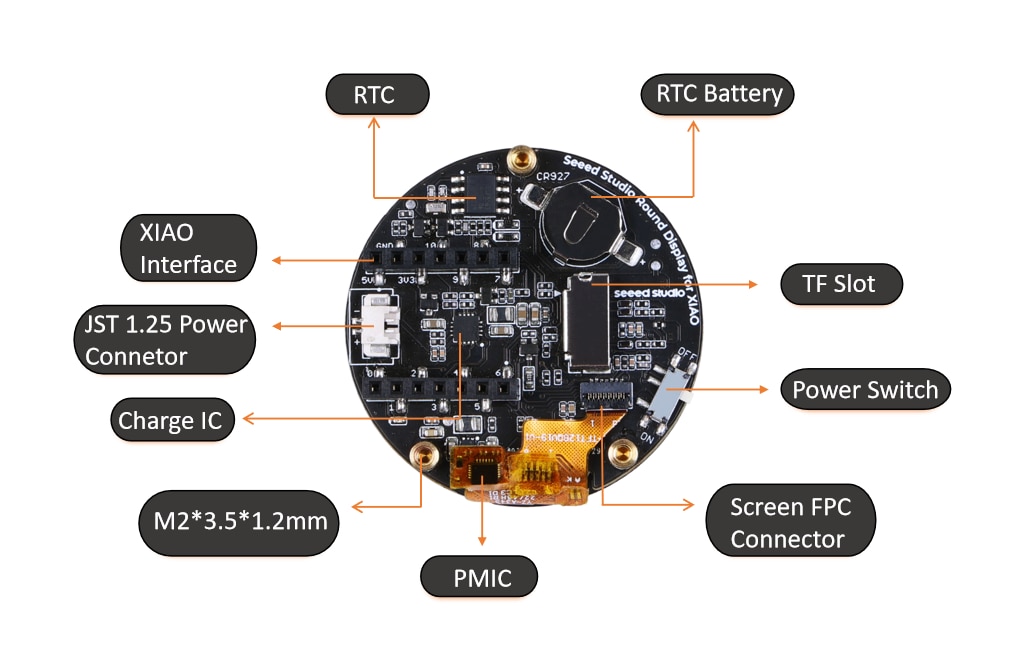
I used two Seeed Studio XIAO nRF52840 processors with the tft displays.
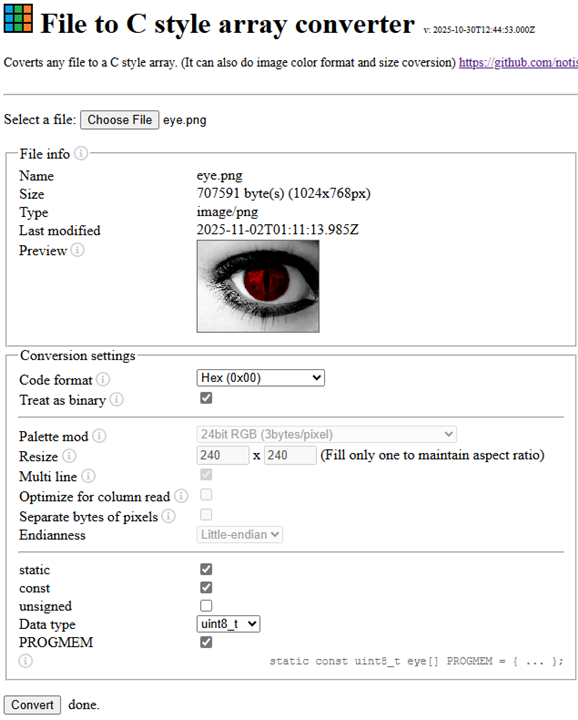
The image converter I used is:
I had to make a Left eye array file and a Right eye array file.
The XIAO program I used was a modified Arduino GUI example called TFT_flash_jpg.
// Renders images stored in an array in program (FLASH)
// The JPEG images are stored in header files (see jpeg1.h etc.)

// As well as the TFT_eSPI library:
// https://github.com/Bodmer/TFT_eSPI
// the sketch needs the JPEG Decoder library. This can be loaded via the Library Manager.
// or can be downloaded here:
// https://github.com/Bodmer/JPEGDecoder

//----------------------------------------------------------------------------------------------------
#define BOARD_SCREEN_COMBO 501
#include "driver.h"
#include <SPI.h>
#include <TFT_eSPI.h>

TFT_eSPI tft = TFT_eSPI();


// JPEG decoder library
#include <JPEGDecoder.h>

// Return the minimum of two values a and b
#define minimum(a,b)     (((a) < (b)) ? (a) : (b))

// Include the sketch header file that contains the image stored as an array of bytes
// More than one image array could be stored in each header file.
#include "jpeg1.h"

// Count how many times the image is drawn for test purposes
uint32_t icount = 0;
//----------------------------------------------------------------------------------------------------


//####################################################################################################
// Setup
//####################################################################################################
void setup() {
  Serial.begin(115200);
  tft.begin();
}

//####################################################################################################
// Main loop
//####################################################################################################
void loop() {

  tft.setRotation(1);  // portrait
  tft.fillScreen(TFT_RED);

  drawArrayJpeg(ScaryEyeLeft, sizeof(ScaryEyeLeft), 0, 0); // Draw a jpeg image stored in memory at x,y
  delay(2000);


}

//####################################################################################################
// Draw a JPEG on the TFT pulled from a program memory array
//####################################################################################################
void drawArrayJpeg(const uint8_t arrayname[], uint32_t array_size, int xpos, int ypos) {

  int x = xpos;
  int y = ypos;

  JpegDec.decodeArray(arrayname, array_size);

  jpegInfo(); // Print information from the JPEG file (could comment this line out)

  renderJPEG(x, y);

  Serial.println("#########################");
}

//####################################################################################################
// Draw a JPEG on the TFT, images will be cropped on the right/bottom sides if they do not fit
//####################################################################################################
// This function assumes xpos,ypos is a valid screen coordinate. For convenience images that do not
// fit totally on the screen are cropped to the nearest MCU size and may leave right/bottom borders.
void renderJPEG(int xpos, int ypos) {

  // retrieve information about the image
  uint16_t *pImg;
  uint16_t mcu_w = JpegDec.MCUWidth;
  uint16_t mcu_h = JpegDec.MCUHeight;
  uint32_t max_x = JpegDec.width;
  uint32_t max_y = JpegDec.height;

  // Jpeg images are draw as a set of image block (tiles) called Minimum Coding Units (MCUs)
  // Typically these MCUs are 16x16 pixel blocks
  // Determine the width and height of the right and bottom edge image blocks
  uint32_t min_w = minimum(mcu_w, max_x % mcu_w);
  uint32_t min_h = minimum(mcu_h, max_y % mcu_h);

  // save the current image block size
  uint32_t win_w = mcu_w;
  uint32_t win_h = mcu_h;

  // record the current time so we can measure how long it takes to draw an image
  uint32_t drawTime = millis();

  // save the coordinate of the right and bottom edges to assist image cropping
  // to the screen size
  max_x += xpos;
  max_y += ypos;

  // read each MCU block until there are no more
  while (JpegDec.readSwappedBytes()) {

    // save a pointer to the image block
    pImg = JpegDec.pImage ;

    // calculate where the image block should be drawn on the screen
    int mcu_x = JpegDec.MCUx * mcu_w + xpos;  // Calculate coordinates of top left corner of current MCU
    int mcu_y = JpegDec.MCUy * mcu_h + ypos;

    // check if the image block size needs to be changed for the right edge
    if (mcu_x + mcu_w <= max_x) win_w = mcu_w;
    else win_w = min_w;

    // check if the image block size needs to be changed for the bottom edge
    if (mcu_y + mcu_h <= max_y) win_h = mcu_h;
    else win_h = min_h;

    // copy pixels into a contiguous block
    if (win_w != mcu_w)
    {
      uint16_t *cImg;
      int p = 0;
      cImg = pImg + win_w;
      for (int h = 1; h < win_h; h++)
      {
        p += mcu_w;
        for (int w = 0; w < win_w; w++)
        {
          *cImg = *(pImg + w + p);
          cImg++;
        }
      }
    }

    // draw image MCU block only if it will fit on the screen
    if (( mcu_x + win_w ) <= tft.width() && ( mcu_y + win_h ) <= tft.height())
    {
      tft.pushRect(mcu_x, mcu_y, win_w, win_h, pImg);
    }
    else if ( (mcu_y + win_h) >= tft.height()) JpegDec.abort(); // Image has run off bottom of screen so abort decoding
  }

  // calculate how long it took to draw the image
  drawTime = millis() - drawTime;

  // print the results to the serial port
  Serial.print(F(  "Total render time was    : ")); Serial.print(drawTime); Serial.println(F(" ms"));
  Serial.println(F(""));
}

//####################################################################################################
// Print image information to the serial port (optional)
//####################################################################################################
void jpegInfo() {
  Serial.println(F("==============="));
  Serial.println(F("JPEG image info"));
  Serial.println(F("==============="));
  Serial.print(F(  "Width      :")); Serial.println(JpegDec.width);
  Serial.print(F(  "Height     :")); Serial.println(JpegDec.height);
  Serial.print(F(  "Components :")); Serial.println(JpegDec.comps);
  Serial.print(F(  "MCU / row  :")); Serial.println(JpegDec.MCUSPerRow);
  Serial.print(F(  "MCU / col  :")); Serial.println(JpegDec.MCUSPerCol);
  Serial.print(F(  "Scan type  :")); Serial.println(JpegDec.scanType);
  Serial.print(F(  "MCU width  :")); Serial.println(JpegDec.MCUWidth);
  Serial.print(F(  "MCU height :")); Serial.println(JpegDec.MCUHeight);
  Serial.println(F("==============="));
}

//####################################################################################################
// Show the execution time (optional)
//####################################################################################################
// WARNING: for UNO/AVR legacy reasons printing text to the screen with the Mega might not work for
// sketch sizes greater than ~70KBytes because 16-bit address pointers are used in some libraries.

// The Due will work fine with the HX8357_Due library.

void showTime(uint32_t msTime) {
  //tft.setCursor(0, 0);
  //tft.setTextFont(1);
  //tft.setTextSize(2);
  //tft.setTextColor(TFT_WHITE, TFT_BLACK);
  //tft.print(F(" JPEG drawn in "));
  //tft.print(msTime);
  //tft.println(F(" ms "));
  Serial.print(F(" JPEG drawn in "));
  Serial.print(msTime);
  Serial.println(F(" ms "));
}
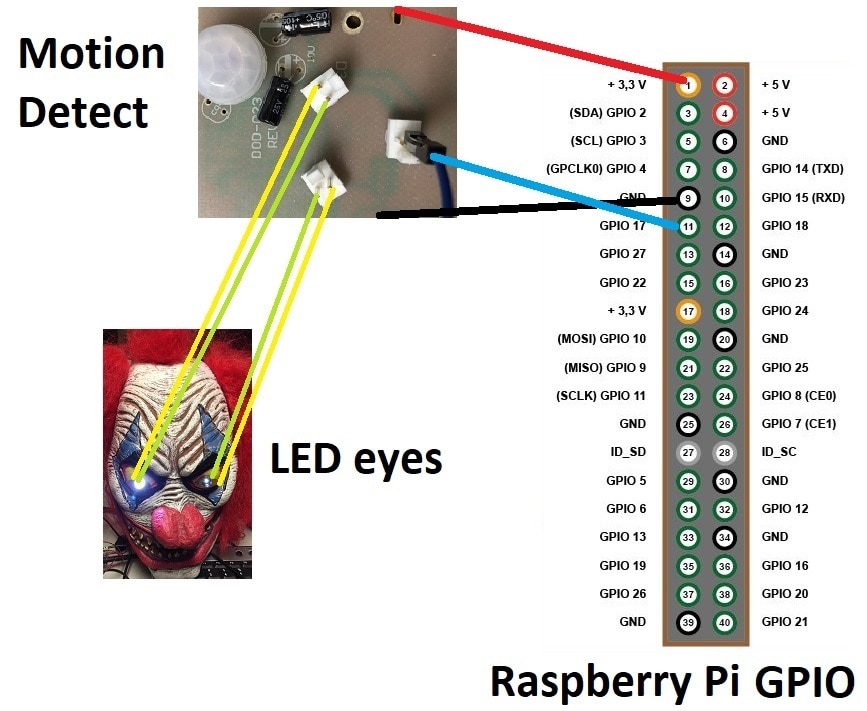
The motion sensor was part of a night light available at the local hardware store.

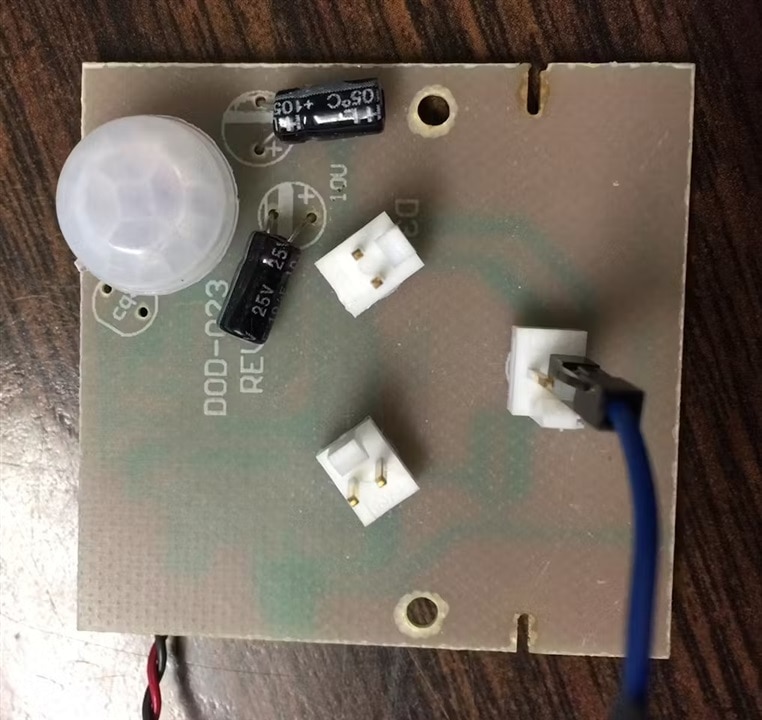
I powered the motion detector circuit from the 3.3V from the Rpi and used one of the LED outputs as a GPIO trigger input.
Last time I used the other LED outputs as eyes for the mask.
The old code didn't work of course on a Rpi5, so I had to change some things. The Gmail server won't allow unsecure posts, so I had to remove that code.
import RPi.GPIO as GPIO
import time
import os
import pygame
from shutil import copyfile
IRinputPin = 17
GPIO.setmode(GPIO.BCM)
GPIO.setup(IRinputPin,GPIO.IN, pull_up_down=GPIO.PUD_UP)
count = 10
pygame.mixer.init()
pygame.mixer.music.load("/home/pi/Music/Witch.mp3")
print('System Reset')
while (count>0):
    print(count)
    count-=1
    time.sleep(1)
print('System Armed')
while True:
    print('Waiting for input')
    if (GPIO.input(IRinputPin)):
        time.sleep(1)
    else:
        print('IR input detected')
        os.system("fswebcam -r 960x720 -d /dev/video0 /home/pi/webcam.jpg")
        timestr = time.strftime("%Y%m%d-%H%M%S")
        filename2 = ('/home/pi/'+timestr+'.jpg')
        copyfile('/home/pi/webcam.jpg', filename2)
        print('Saving Picture')
        os.system("python /home/pi/sendnotify.py")
        print('Sending email')
        pygame.mixer.music.play()
        print('Resetting System')
        count = 30
        while (count>0):
            print(count)
            count-=1
            time.sleep(1)
        print('System Armed')
The camera OS commands no longer worked also, so I had to change that code also.

Here's the new code without any email notification.
import RPi.GPIO as GPIO
import time
import os
import pygame
from shutil import copyfile
IRinputPin = 17
GPIO.setmode(GPIO.BCM)
GPIO.setup(IRinputPin,GPIO.IN, pull_up_down=GPIO.PUD_UP)
count = 10
pygame.mixer.init()
pygame.mixer.music.load("/home/rpi5/Music/Witch.mp3")
print('System Reset')
while (count>0):
    print(count)
    count-=1
    time.sleep(1)
print('System Armed')
while True:
    print('Waiting for input')
    if (GPIO.input(IRinputPin)):
        time.sleep(1)
    else:
        print('IR input detected')
        pygame.mixer.music.play()
        os.system("rpicam-still -o /home/rpi5/capt.jpg")
        timestr = time.strftime("%Y%m%d-%H%M%S")
        filename2 = ('/home/rpi5/'+timestr+'.jpg')
        copyfile('/home/rpi5/capt.jpg', filename2)
        print('Saving Picture')
        print('Resetting System')
        count = 10
        while (count>0):
            print(count)
            count-=1
            time.sleep(1)
        print('System Armed')
Here's the scarry witch laugh I found on the net.
We had a great Halloween!
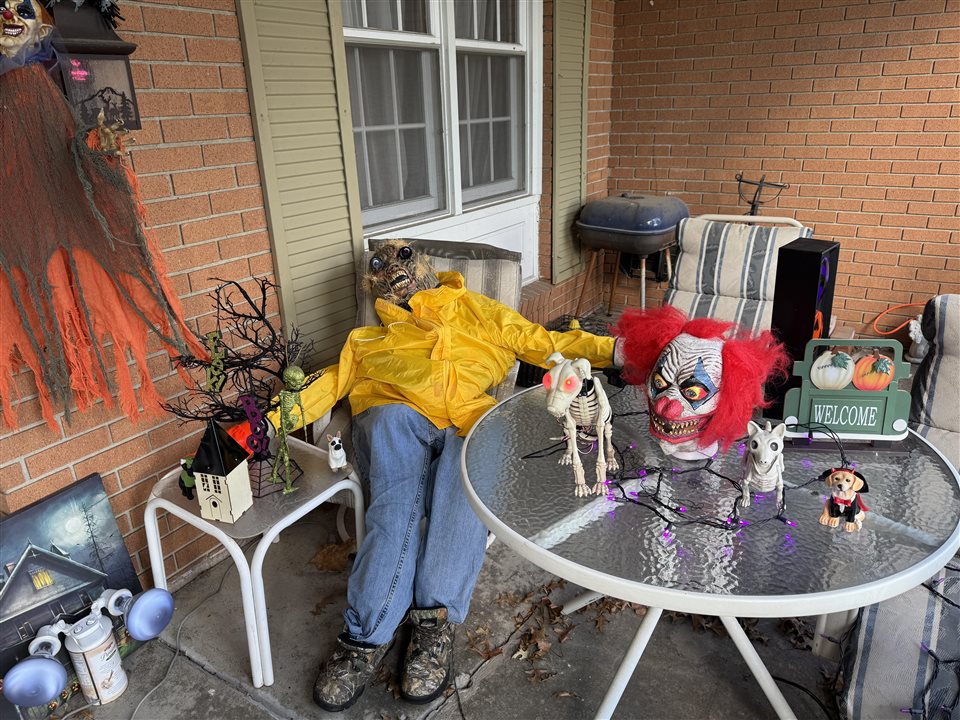
Enjoy!
References
Take A Look At These Gorgeous And Scary Eyes!
Getting Started with Seeed Studio Round Display for XIAO | Seeed Studio Wiki
Getting Started with Seeed Studio XIAO nRF52840 Series | Seeed Studio Wiki