

Table of contents

Abstract
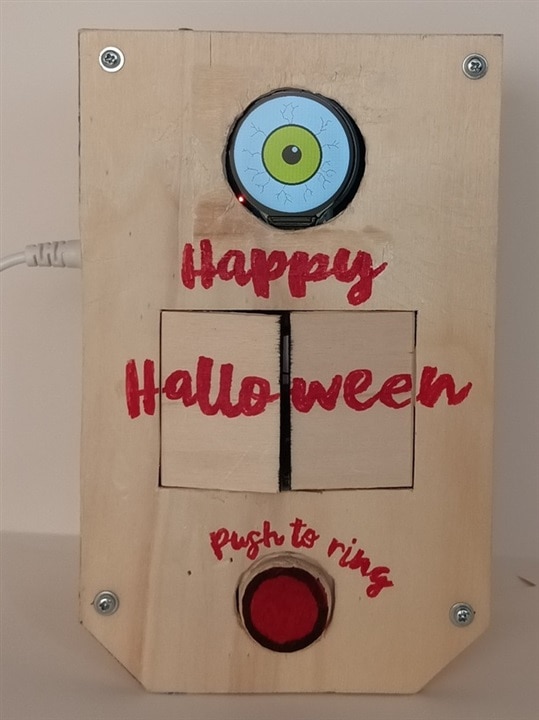
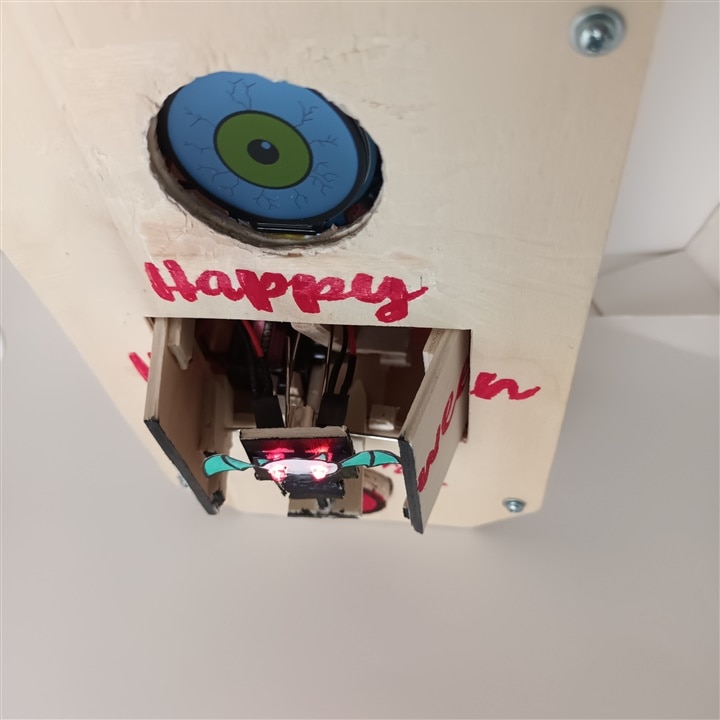
When our guests press the doorbell button, an eye will appear on the round screen to let us know it’s watching us, and when the doors open, a bat will appear with background music.
Project
A Terrifyingly Fun Doorbell
With this doorbell project, I want to create a moment of suspense: when the doorbell button is pressed, sounds will play, an image will appear on a round TFT screen, and a cute bat will pop up when the doors open. The youngest members of the family can help us build it.
When our guests press the doorbell button, an eye will appear on the round screen to let us know it’s watching us, and when the doors open, a bat will appear with background music.
The materials needed are:
- 1 Microcontroller Arduino UNO Board
- Jumper Wire cable 3 x 40 pcs. 20 cm M2M / F2M / F2F
- 1 MG90S Micro Servo Motor
- 1 Mini Breadboard 400 PIN with 4 power rails for jumper cable
- 1 KY-004 button module
- 1 GC9A01 1.28 inch Round LCD TFT display
- 1 Mini MP3 Player DFPlayer Master Module
- 1 DFPlayer Mini 3 Watt 8 Ohm Mini loudspeakers
- 2 Red LEDs 3 mm diameter
- 2 330 ohm resistors
- 1 1K ohm resistor
- 1 MB102 Breadboard Power Suppler Power Supply
- 3mm thick balsa wood and white glue for wood
The software needed is:
- Arduino IDE
- DFPlayer Mini library from DFRobot (DFRobotDFPlayerMini.h)
- Servo Library (Arduino Servo.h)
- SPI library (SPI.h, this library is included in the Arduino IDE)
- Adafruit GFX library (Arduino Adafruit_GFX.h)
- Adafruit GC9A01A library (Arduino Adafruit_GC9A01A.h)
- SoftwareSerial library (SoftwareSerial.h)
- doorbell_sketch.ino
- Sound files 001.mp3, 002.mp3, 003.mp3 and 004.mp3
Circuit and description of the modules used
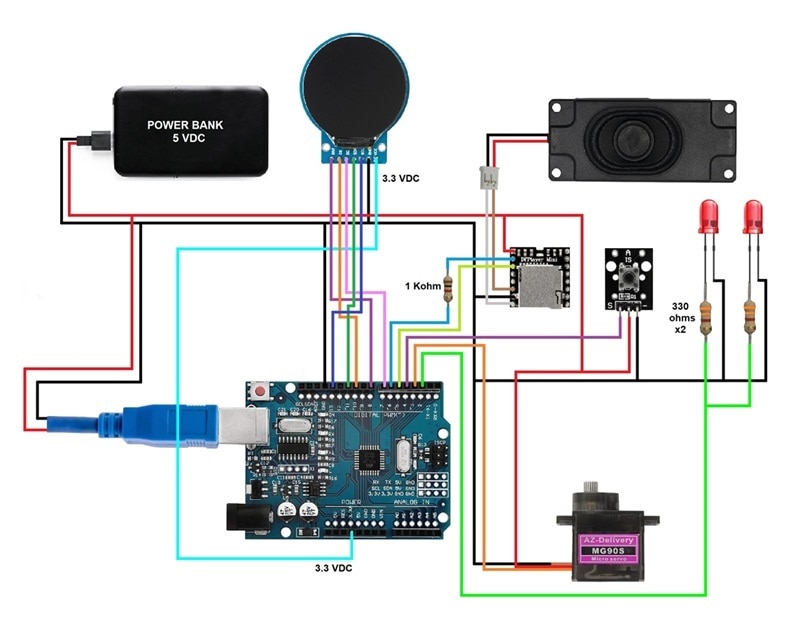
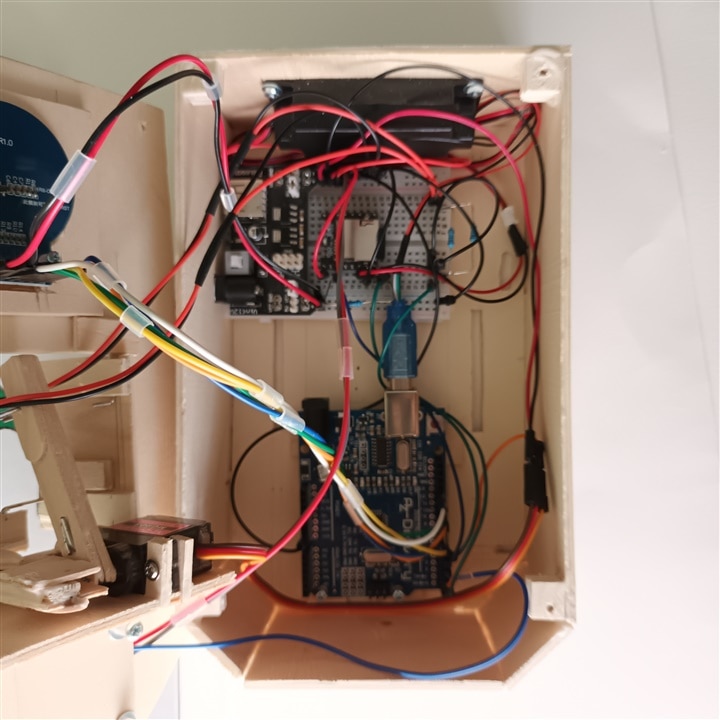
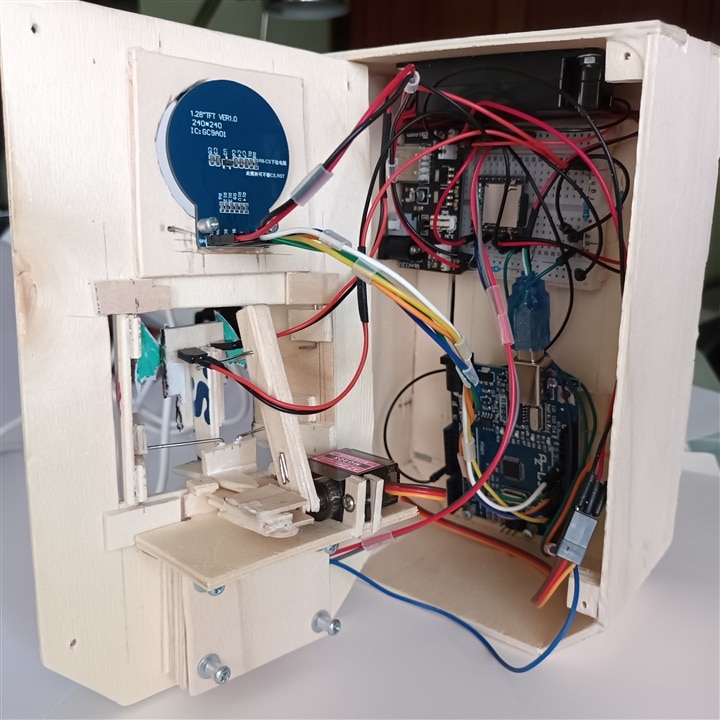
As we can see in the diagram of circuit components, to interact with the doorbell, we will have to press the KY-004 button module with which the sketch will begin to run, first the 001.mp3 sound file will be executed from the Mini MP3 Player DFPlayer Master Module (we must use a 1K ohm resistor in the mp3 player module to adapt the voltage in the communication line) and it will be played by In the DFPlayer Mini 3 Watt 8 Ohm Mini loudspeaker, at the end of this first file, an eye will be drawn on the GC9A01 1.28-Inch Round LCD TFT circular screen and the 002.mp3 sound file will be played. At the end of this second sound file, a third sound file will be played 003.mp3 and the two small doors will be opened by the drive of the MG90S servomotor, this will move the support of the chosen character and this in turn will make the movements of the doors. When this character comes out, we will illuminate his eyes in red using the two red LEDs to which we have connected two 330 ohm resistors to adjust his supply voltage and the sound file will be played 004.mp3, when this last mp3 file finishes its playback, the sound file will be played again 003.mp3 so that the servo motor acts again and saves the character inside the bell and close the doors, we will turn off the red LEDs. The modules and components described above will be controlled with the Arduino UNO Board microcontroller and the whole set will be powered with the MB102 Breadboard Power Supply, as it offers us an output of 3.3 VDC necessary to power the TFT screen and 5 VDC for the rest of the modules and components.
Project Assembly
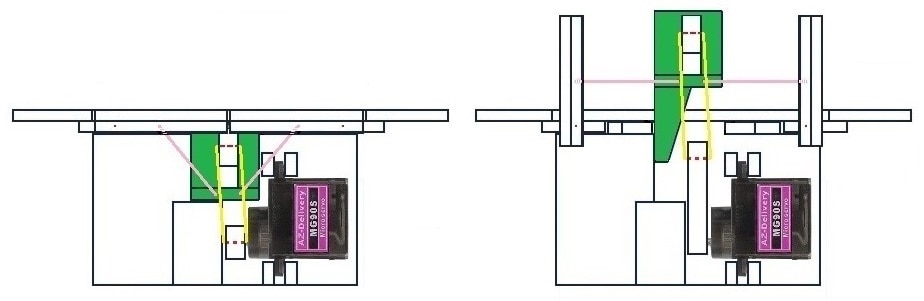
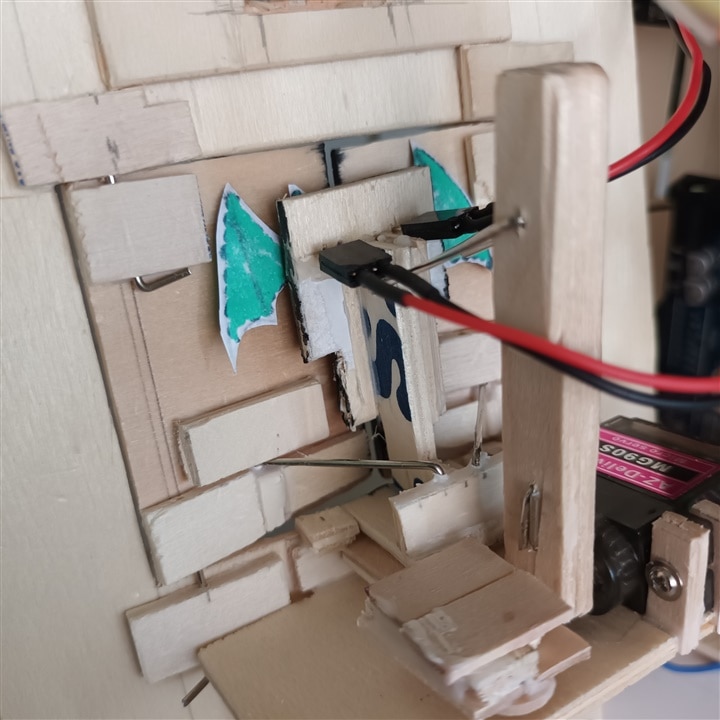
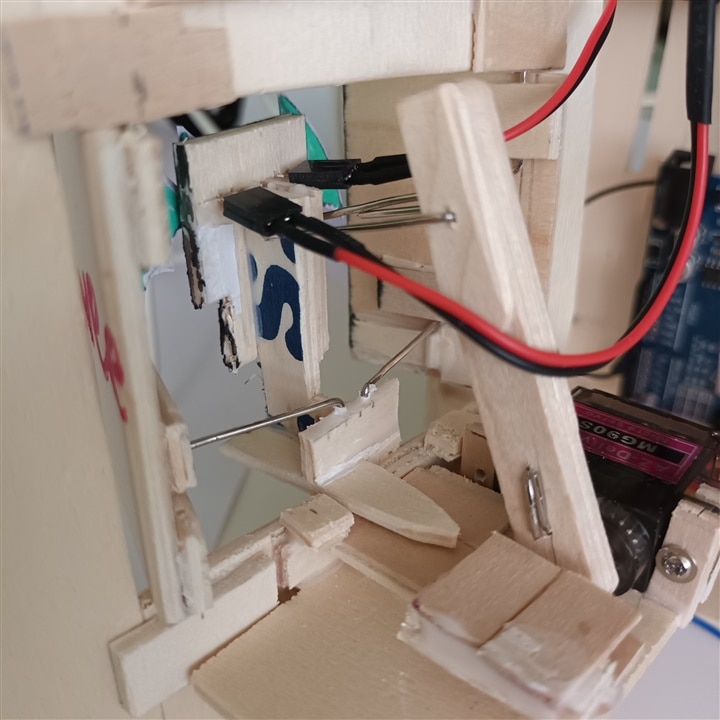
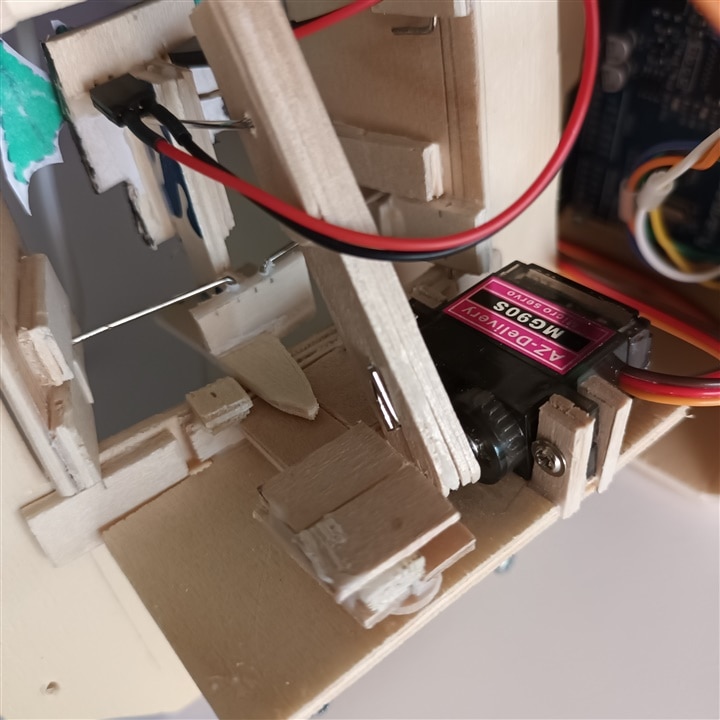
The pieces for the construction of this prototype doorbell are made of 3 mm thick balsa wood, the construction is simple, since it is basically a box. What is a little more difficult is the assembly of the mechanism for the opening of the two small doors and the exit of the character, since we use a single servomotor for the movements. As you can see in the graphics and photographs, we have adapted a stem to the servo motor to give it more travel in its movement, to connect the stem to the support of the figure, we have used a clip of those used to gather papers, we just have to straighten it and pass it through the holes. To activate the opening and closing of the doors, we have also used clips, we have straightened them and with the movement mechanism of the character fully retracted, we have taken the measurement and installed a stem to each door that will be connected to the character's mechanism, in this way, when the servomotor changes position and advances, through its stem it will apply the advance to the character's mechanism and this, in turn, through the two stems, will also apply the movement to the doors, as these doors have hinges, their movement will be made with the center of rotation on them and they will open. In this way, whenever the character's mechanism advances, it will push the doors and when it reverses it will pull them, which will pivot on the axis and close.
The character's piece, on its back, is a wedge that must enter the slot that we have manufactured, with this we guide the retraction movement of the mechanism and improve its operation. Perhaps, this is the part that needs more patience, since we must make the necessary adjustments for its correct functioning.
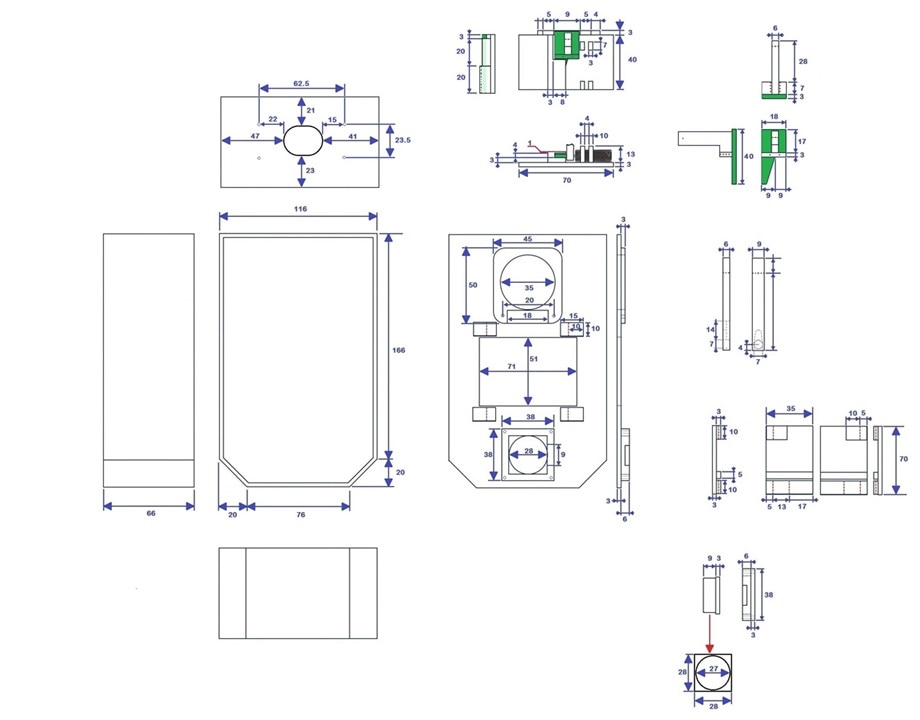
We have attached the plans and dimensions of the parts. The use of balsa wood for this prototype is due to the fact that it can be easily and quickly modified to make the necessary adjustments for its correct operation.
Description of how the project works and sketch
The operation of the circuit is very simple, the doorbell will be inactive as long as the call button module KY-004 is not pressed , when pressing this button, we change the state of its signal from high level to low level, the first thing that is done is the reproduction of the sound (001.mp3) of bells using the Mini MP3 Player DFPlayer Master Module and DFPlayer Mini 3 Watt 8 Ohm Mini loudspeaker, after the playback of this first sound file, the GC9A01 1.28-Inch Round LCD TFT screen will show an eye that will be followed by the playback of another sound file (002.mp2) with the message "I see you", when this other sound file ends, a third sound file (003.mp3) will be played with the noise of opening a door and the output movement will begin from inside the box of the chosen character by means of the MG90S servo motor and door opening, it must be remembered that we use a single servo motor for the movement of the character-doors set by means of stems. Once the character is completely out, his eyes will light up by means of two red LEDs and the sound file (004.mp3) will be played with a short song, when this sound file ends, the sound file (003.mp3) will be played again with the noise of the door and the servomotor will return to its initial position with which the set of character-doors will begin to recede and close respectively and the red LEDs of the eyes will be turned off.
The operation of this project will be played as long as the doorbell button is pressed again. Let's now move on to explain the sketch.
In order to be able to use the modules in an Arduino project, you must always implement the libraries required in the section on defining global variables (start of the sketch) in order to use these modules correctly, since in these libraries the methods that will later be used are defined. In this project we must install the libraries for serial communication with the modules, the libraries for the use of the TFT screen, the libraries for the use of the MP3 module and the servomotor library.
The first library that is added is "SPI.h", this library allows communication with devices with SPI ports, Arduino will be the controller device. The next library that is added is "Adafruit_GFX.h", this is the main graphics library for screens, it will provide us with the necessary methods to draw primitive graphics (dots, lines, circles, etc.). The third library that is added is "Adafruit_GC9A01A.h", this library provides the necessary configuration and support for the display driver the GC9A01A that will be used. With the <SoftwareSerial.h> library, the functionality is enabled for the microcontroller to enable any digital pin to use as serial communication, it is needed to be able to use the MP3 player module. <DFRobotDFPlayerMini.h> is the library that enables the functionalities necessary to use the MP3 module. The last library to be added is <Servo. h>, in this library is the configuration and methods required for the position change that the servo motor will use.
#include "SPI.h"
#include "Adafruit_GFX.h"
#include "Adafruit_GC9A01A.h"
#include <SoftwareSerial.h>
#include <DFRobotDFPlayerMini.h>
#include <Servo.h>
The next two lines of the sketch are the definition of two variables that will contain integers, these variables will be used a few lines later to implement an object of the TFT screen that will be used.
#define tft_screen_DC 7
#define tft_screen_CS 10
After defining the two variables for the screen, an object is implemented for each module or component that requires it, in this way, to use the MP3 player module, the mySoftwareSerial object of the library <SoftwareSerial.h> must be implemented to indicate to the microcontroller the digital pins that will be used for the serial communication of the module, in this project, the digital pin 5 is used to receive data and the digital pin 6 to send data to the MP3 module. To use the plug-in control methods and instructions, such as adjusting the volume or starting the playback of an mp3 file, the myDFPlayer object is created from the <DFRobotDFPlayerMini.h> library.
SoftwareSerial mySoftwareSerial(5, 6);
DFRobotDFPlayerMini myDFPlayer;
For the use of the GC9A01A screen, the tft object of the "Adafruit_GC9A01A.h" library is implemented, where the microcontroller will have to be informed where the connections of the lines of the TFT screen are made, the DC line is used to send the data to the screen, while the line for the selection of the screen to send the data is CS, they are connected to the digital ports 7 and 10 of the microcontroller respectively. The variables that were defined a little above are used to indicate the connection ports.
Adafruit_GC9A01A TFT(tft_screen_CS, tft_screen_DC);
To use the servo motor, the servo_door object of the <Servo" library is implemented. h>.
Servo servo_door;
To use the ring button of the doorbell you do not need to implement any object, since the module is simply a switch and only changes the state of its signal line from high level to low level, so first the variable ring_button will be created with a value of 4, this value will be the digital port to which the signal line of the switch will be connected and the variable ring_call to save the state of the signal, its state can only be high state with 5 VDC or low signal with 0 VDC. These two variables will be used later.
int ring_button = 4;
int ring_call;
And finally the variable bat_eyes is created with the value 2, this variable will be used to inform the microcontroller of the digital port of connection of the LEDs of the eyes of the character that will come out of inside the doorbell, in this project it is a small bat.
int bat_eyes = 2;
Variables are created to assign the numbers of the connection ports of the module or components to facilitate the modification of the sketches, when we modify the ports where we have connected a module or component, we will only have to modify it in this first section, since later, within the sketch, whenever we use the ports to perform an action, we will only have to use the name of the variable, in this way, we avoid many errors by not having to review the entire code and the modification is facilitated to people who have not written the code.
After having implemented the libraries, created the objects of the modules and the creation of the necessary variables, we must define the initial configuration of the timbre of the modules and components, this is done in the setup() method. The first thing we do within this method is the initialization of the MP3 module and its communication with the microcontroller through mySoftwareSerial. begin(9600), 9600 is the data transmission rate in baud, we also initialize the communication with the Serial Monitor using Serial.begin(115200) with a speed of 115200 baud (we will have to select the speed at the bottom right of the Serial Monitor when we open it), here we will see the messages of the initialization status or errors of the mp3 module.
mySoftwareSerial. begin(9600);
Serial. begin(115200);
The next thing we define in the code is the verification of the initialization of the mp3 module, for this, we use an if conditional statement. In the if statement, the code that is inside the keys will be executed if the condition of its parameter is true. We, in the condition we are checking that the mp3 module has not been initialized for some reason, we have written the denied initialization with the symbol ! , this symbol is used as a denial method, so if the module is not initialized, the condition is true and the code that is inside the keys is executed, and what we do is inform the Serial Console that the connections and the insertion of the microSD card are checked. If the mp3 player module is properly initialized, the condition is not met and the code we have explained is not executed, and the setup() method continues to be executed to report by the Serial Console that the mp3 player module has been successfully initialized with the line Serial.println(F("Correct DFPlayer initialization. ")).
if (! myDFPlayer. begin(mySoftwareSerial)) {
	Serial.print(F("Error initializing mp3 module:"));
	Serial.print(F("1. Please check the connections!"));
	Serial.print(F("2. Please insert the microSD memory!"));
	while(true){
		delay(0);
	}
}

Serial. println(F("Correct DFPlayer initialization." ));
When the MP3 module has been initialized, we must initialize the TFT screen, the first thing we have written in the code is to inform the Serial Monitor that the initialization of the screen begins with the code Serial.println("GC9A01A initialization." ), then we write tft. begin(), this is the initialization method of the screen itself, we give a waiting time of 3 seconds with delay(3000) for its correct initialization and finally we configure the screen so that all the pixels are black with the fillScreen(GC9A01A_BLACK) method of the tft object that we implemented at the beginning of the sketch.
Serial. println("GC9A01A initialization." );
TFT. begin();
delay(3000);
tft. fillScreen(GC9A01A_BLACK);
For the initial configuration of the servo motor, the first thing we define is the port of the microcontroller to which we have connected the signal line of the servo motor with servo_door. attach(3), the port is number 3. In the sketch, with the line of code servo_door. write(1), we have defined the value of the servo motor so that the doors remain closed when the project is initialized. This value is indicative, in this value you can write any value, but you must be careful to respect the approximate values that we have given to the servo motor when the doors are closed and when the doors are open.
servo_door. attach(3);
servo_door. write(1);
For the initial configuration of the LEDs of the character's eyes, the first thing we must do is configure the port as an output signal, so that it delivers voltage when we change its state, this is done with the pinMode code line (bat_eyes, OUTPUT). When the bat is inside the doorbell box, it must not have its eyes illuminated, so this port must not have voltage, we do this by establishing the signal level that the port delivers at that time at low level, that is, with 0 VDC, the line with which we will configure its output at low level is digitalWrite (bat_eyes, LOW).
pinMode (bat_eyes, OUTPUT);
digitalWrite (bat_eyes, LOW);
And to finish the initial configuration of our project, we must tell the microcontroller that the signal of the ring button must be an input signal to the microcontroller with pinMode (ring_button, INPUT), so that when we press it, the state of the input signal changes and the microcontroller detects it and performs the actions that we will program later, in the loop() method.
pinMode (ring_button, INPUT);
Once we have finished with the initial configuration, we begin to comment on the loop() method that will be the one that is continuously running, waiting for the ringer call button to be pressed.
The first line of this method is the reading that the microcontroller is continuously making of the signal of the ring call button by means of digitalRead(ring_button), remember that this reading can have a high level (button not activated) or low level (button activated), the reading it takes from the signal of the button is saved in the variable ring_call, this variable is created in the variable definition block.
ring_call = digitalRead(ring_button);
When the value of the pushbutton signal reading is saved in the variable, we implement an if-else statement to check if a comparison is true. As you can see in the code, the comparison it makes is that the value of the saved variable has a high level value with if (ring_call == HIGH), this will mean that if the comparison is true, it is because the button has not been activated, so the code inside its curly brackets will be executed, as you can see, it is empty, without code inside, so no action is executed and the start of the loop() method will be executed again.
if (ring_call == HIGH) {
	Action when the pushbutton is not pressed
} else {
	.. .. .. ..
	.. .. .. ..
	.. .. .. ..
}
If the comparison is not true, it means that the button has been actuated and the value of the variable has a low-level value, so the if statement code will not be executed and the next statement will be executed, which is else, and the code inside its curly braces will be executed. Let's explain the code that will be executed.
The first thing to do is to adjust the sound playback volume to a level of 15 out of 30 with myDFPlayer. volume(15), then the file with the name 001.mp3 is played with myDFPlayer. play(001), this file must be saved on the microSD card inserted in the mp3 player module and the bell sound will be played, then we pause for 11 seconds with delay(11000) so that the file is played in its entirety before the next line of the sketch is executed.
myDFPlayer. volume(15);
myDFPlayer. play(001);
delay(11000);
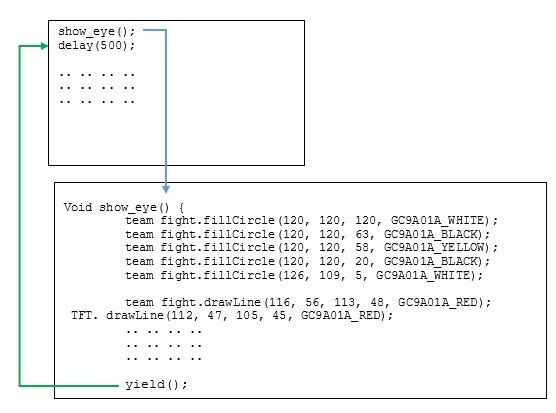
The next line of the code is a call to the show_eye() method to show an eye on the TFT screen. Let's explain to explain the method called, when the call is made, the sketch looks for the method in the code to execute it, the first thing it does is draw a circle with the eyeball in white using the tft statement. fillCircle(120, 120, 120, GC9A01A_WHITE), to draw a circle we must reflect the following data in the statement, tft. fillCircle(value center circle X-axis, value center circle Y-axis, radius of the circle, color of the circle), so to place the center of the circle we must position the course in the pixel 120 on the X axis and 120 on the Y axis, the third value is the radius of the circle in pixels, and the last data is the color. The round screen GC9A01A has 240 x 240 pixels of resolution, so the center of the circle will be located in the right center of the screen. The following statement tft. fillCircle(120, 120, 63, GC9A01A_BLACK), will draw a black circle with the same center and a radius of 63 pixels to create a black line separating the eyeball and the iris. The following statement tft.fillCircle(120, 120, 58, GC9A01A_YELLOW) will draw the iris in yellow, the values of the center of the circle are the same and a smaller radius. The next statement will draw the pupil black using a circle with the same values of the center of the circle and a radius of 20. The last circle it will draw will be a small blank circle in the upper right area of the pupil, as you can see in the code, in this case the value of the center of the circle is different.
After drawing the iris and pupil of the eye, the veins of the eyeball will be drawn in red using lines with the tft statements. drawLine(X axis start value, Y axis start value, X axis end value, Y axis end value, color). Tracking all statements for drawing the lines of the show_eye() method is easy to understand, as it only changes the parameters of the start of the line and the parameters of the end point of the line. The last line of this method is yield(), with this statement, it returns to the line immediately following the call to the show_eye() method, which is a half-second delay(500) pause. The yield() statement is used within processes that require a lot of time to finish executing so as not to slow down the development of the sketch, it returns to the next point from where the call was made to the method or process where it is included.
After the half-second timeout, the 002.mp3 sound file will be played, for this the sound playback volume is set to a level of 15 out of 30 with myDFPlayer. volume(15), then the file with the name 002.mp3 is played with myDFPlayer. play(002), this file and all the sound files, must be saved on the microSD card inserted in the mp3 player module and the sound "I see you" will be played, then we pause for 6 seconds with delay(6000) so that the sound file is played in its entirety before the next line of the sketch is executed.
myDFPlayer. volume(15);
myDFPlayer. play(002);
delay(6000);
After playing the previous sound file, the doors must be opened, the sound of movement of an old door must be played with the 003.mp3 sound file and the bat or any character of your choice comes out, for that you must adjust the sound playback volume to a level of 15 out of 30 with myDFPlayer. volume(15), then the file with name 003.mp3 is played with myDFPlayer. play(003) with the sound of movement of the door, we pause for 1 second with delay(1000) and with the line servo_door. write(45), the servomotor must be positioned at 45 degrees, as it was positioned at 1 degree when moving to its new position, the axis when rotating, will cause the wooden stem to advance, this, being connected to the bat support will advance and as this support is connected to the doors, they will advance and rotate on the axis of these, producing their opening and the bat advancing and exiting the box.
myDFPlayer. volume(15);
myDFPlayer. play(003);
delay(1000);
servo_door. write(45);
Once the bat is out of the box, we must illuminate the eyes with the red LEDs, for this, we must change the state of the port where the LEDs are connected to high state, so that it offers a voltage of 5 VDC and in this way power them to turn on, we must remember that we define a variable with the value of the connection port, this we do with the line:
digitalWrite (bat_eyes, HIGH);
When the bat is completely out of the box, a small song saved in the 004.mp3 sound file will be played for seconds, for this, the first thing to do is to adjust the sound playback volume to a level of 20 out of 30 with myDFPlayer. volume(20), then the file with name 004.mp3 is played with myDFPlayer. play(004), then pause for 6 seconds with delay(6000) to play the sound file in its entirety before executing the next line of the sketch.
myDFPlayer. volume(20);
myDFPlayer. play(004);
delay(6000);
When the song has ended, the bat or the character that we have chosen must be put back into the doorbell box and the doors must close, to perform these actions, the first thing that has been programmed is to adjust the playback volume of the sound to a level of 15 out of 30 with myDFPlayer. volume(15), the next thing must be to play the file with name 003.mp3 with the myDFPlayer command. play(003) , this sound file plays the sound of movement of a door, we pause for 1 second with delay(1000) and with the line servo_door. write(1), the servo motor will move and change its position to the initial 1 degree, so that the bat support will recede to get inside the box, as this assembly is connected to the doors, it will also recede and close.
myDFPlayer. volume(15);
myDFPlayer. play(003);
delay(1000);
servo_door. write(1);
When the whole assembly is inside the doorbell box and the doors are closed, the LEDs of the bat's eyes must be turned off, changing the port where they are connected to the microcontroller at low signal level, so the port will not have an output voltage and the LEDs will be paid. The line programmed to perform this action is:
digitalWrite (bat_eyes, LOW);
After turning off the LEDs, the image of the eye on the TFT screen must be removed, to do so, what is programmed is to change all the pixels to black with tft. fillScreen(GC9A01A_BLACK), so the image of the eye will disappear. The last line of our code is the yield() statement, which is used within processes that require a lot of time to finish executing and not slow down the development of the sketch, it is returned to the beginning of the sketch.
tft. fillScreen(GC9A01A_BLACK);
yield();


doorbell_sketch.ino file
#include "SPI.h"                                                // This library allows you to communicate with SPI devices.
#include "Adafruit_GFX.h"                                       // Library that provides a common set of graphical primitives (points, lines, circles, etc.).
#include "Adafruit_GC9A01A.h"                                   // Library to provide GC9A01A display driver support in Adafruit_GFX.
#include <SoftwareSerial.h>                                     // Library allows serial communication on other digital pins of an Arduino board.
#include <DFRobotDFPlayerMini.h>                                // Library for DFPlayer Mini from DFRobot.
#include <Servo.h>                                              // Library required for the servomotor.

#define tft_screen_DC 7                                         // Connection from screen data line pin to microcontroller pin.
#define tft_screen_CS 10                                        // Connection from screen chip select pin to microcontroller pin.

SoftwareSerial mySoftwareSerial(5, 6);                          // Digital pins RX, TX for the mp3 player module.
DFRobotDFPlayerMini myDFPlayer;                                 // Implementation of an object for the mp3 module.


Adafruit_GC9A01A tft(tft_screen_CS, tft_screen_DC);             // Object implementation for the screen.

Servo servo_door;                                               // Creation of a Servomotor object for the bat door .

int ring_button = 4;                                            // Digital pin conection for ring button.
int ring_call;                                                  // Variable to store the status of the call button.

int bat_eyes = 2;                                               // Connection red LEDs to microcontroller pin.


void setup() {

      mySoftwareSerial.begin(9600);                                                   // Initialization of SoftwareSerial communication for mp3 module.
      Serial.begin(115200);                                                           // Initialization Serial Monitor communitations.

      if (!myDFPlayer.begin(mySoftwareSerial)) {                                      // Use softwareSerial to communicate with mp3 module.
            Serial.println(F("Error initializing mp3 module:"));                      // Serial Monitor error message on failure to initialize the mp3 module.
            Serial.println(F("1. Please check the connections!"));                    // Serial Monitor error message on failure to initialize the mp3 module.
            Serial.println(F("2. Please insert the microSD memory!"));                // Serial Monitor error message on failure to initialize the mp3 module.
            while(true){
                  delay(0);                                                           // Code to compatible with ESP8266 watch dog.
            }
      }

      Serial.println(F("Correct DFPlayer initialization."));                          // Successful initialization message of the mp3 module.

      Serial.println("GC9A01A initialization.");                                      // Message in the Serial Monitor informing that the TFT display will be initialized.
      tft.begin();                                                                    // TFT display initilizate.
      delay(3000);                                                                    // 3 seconds pause.
      tft.fillScreen(GC9A01A_BLACK);                                                  // Fill the TFT screen with black color.

      servo_door.attach(3);                                                           // Pin of the microcontroller where the servomotor of the bat door is connected.
      servo_door.write(1);                                                            // Initial position of the bat door servomotor. 1 degrees - lid closed.

      pinMode (bat_eyes, OUTPUT);                                                     // Configuration of pin 2 of the microcontroller as output.
      digitalWrite (bat_eyes, LOW);                                                   // Initial state of microcontroller pin 2 low (no voltage).

      pinMode (ring_button, INPUT);                                                   // Configuration of pin 4 of the microcontroller as input signal.
}

void loop(void) {

      ring_call = digitalRead(ring_button);                                           // It reads the state of the microcontroller pin where the pushbutton is connected and stores it in the state variable.

      if (ring_call == HIGH) {                                                        // If the button signal is high (5 VDC), it has not been pressed.
            // Action when the pushbutton is not pressed                              // No action is taken.
      } else {                                                                        // Then, if the button signal is not high (0 VDC), the pushbutton has been pressed.
            // Action when the pushbutton is pressed                                  // The code inside the braces will be executed.

            myDFPlayer.volume(15);                                                    // Set the volume value to 15, values from 0 to 30.
            myDFPlayer.play(001);                                                     // Playback of 001.mp3 sound file from microSD card.
            delay(11000);                                                             // 11 seconds pause, so that the sound file is completely executed.

            show_eye();                                                               // A call is made to the show_eye method to be executed.
            delay(500);                                                               // Half second pause.

            myDFPlayer.volume(15);                                                    // Set the volume value to 15. Values from 0 to 30.
            myDFPlayer.play(002);                                                     // Playback of 002.mp3 sound file from microSD card.
            delay(6000);                                                              // 6 seconds pause, so that the sound file is completely executed.


            myDFPlayer.volume(15);                                                    // Set the volume value to 15, values from 0 to 30.
            myDFPlayer.play(003);                                                     // Playback of 003.mp3 sound from microSD card.
            delay(1000);                                                              // 1 second pause.
            servo_door.write(45);                                                     // The MG90S servo motor moves to the 45 degree position to open de doors.

            digitalWrite (bat_eyes, HIGH);                                            // Change the state of microcontroller pin 2 to high level, LEDs is ON.

            myDFPlayer.volume(20);                                                    // Set the volume value to 20, values from 0 to 30.
            myDFPlayer.play(004);                                                     // Playback of 004.mp3 sound from microSD card.
            delay(6000);                                                              // 6 seconds pause, so that the sound file is completely executed.

            myDFPlayer.volume(15);                                                    // Set the volume value to 15, values from 0 to 30.
            myDFPlayer.play(003);                                                     // Playback of 003.mp3 sound from microSD card.
            delay(1000);                                                              // 1 second pause.
            servo_door.write(1);                                                      // The MG90S servo motor moves to the 1 degree position to close de doors.

            digitalWrite (bat_eyes, LOW);                                             // Change the state of microcontroller pin 2 to low level, LEDs is OFF.

            tft.fillScreen(GC9A01A_BLACK);                                            // Fill the TFT screen with black color.
            yield();

      }

}

void show_eye() {                                                                     // show_eye method to show the eye in the TFT screen.
      tft.fillCircle(120, 120, 120, GC9A01A_WHITE);                                   // Draw the eyeball with white color.
      tft.fillCircle(120, 120, 63, GC9A01A_BLACK);                                    // Draw circle for the black separation line between the eyeball and the iris.
      tft.fillCircle(120, 120, 58, GC9A01A_YELLOW);                                   // Draw the iris eye with yellow color.
      tft.fillCircle(120, 120, 20, GC9A01A_BLACK);                                    // Draw the pupil eye with black color.
      tft.fillCircle(126, 109, 5, GC9A01A_WHITE);                                     // Draw small white circle inside the pupil.

      tft.drawLine(116, 56, 113, 48, GC9A01A_RED);                                    // Red lines to draw the veins of the eye.
      tft.drawLine(112, 47, 105, 45, GC9A01A_RED);
      tft.drawLine(103, 44, 101, 35, GC9A01A_RED);
      tft.drawLine(102, 34, 105, 32, GC9A01A_RED);
      tft.drawLine(100, 34, 96, 29, GC9A01A_RED);
      tft.drawLine(105, 31, 109, 22, GC9A01A_RED);
      tft.drawLine(108, 20, 102, 16, GC9A01A_RED);
      tft.drawLine(109, 20, 121, 13, GC9A01A_RED);

      tft.drawLine(119, 56, 123, 41, GC9A01A_RED);                                    // Red lines to draw the veins of the eye.
      tft.drawLine(123, 40, 120, 32, GC9A01A_RED);
      tft.drawLine(122, 31, 124, 24, GC9A01A_RED);
      tft.drawLine(123, 24, 120, 18, GC9A01A_RED);
      tft.drawLine(124, 24, 134, 19, GC9A01A_RED);

      tft.drawLine(169, 79, 179, 75, GC9A01A_RED);                                    // Red lines to draw the veins of the eye.
      tft.drawLine(179, 74, 183, 63, GC9A01A_RED);
      tft.drawLine(184, 62, 195, 57, GC9A01A_RED);
      tft.drawLine(183, 62, 185, 52, GC9A01A_RED);
      tft.drawLine(185, 51, 180, 42, GC9A01A_RED);
      tft.drawLine(191, 58, 194, 51, GC9A01A_RED);
      tft.drawLine(195, 50, 202, 51, GC9A01A_RED);
      tft.drawLine(181, 70, 193, 67, GC9A01A_RED);

      tft.drawLine(178, 148, 181, 147, GC9A01A_RED);                                  // Red lines to draw the veins of the eye.
      tft.drawLine(182, 146, 188, 136, GC9A01A_RED);
      tft.drawLine(189, 135, 200, 133, GC9A01A_RED);
      tft.drawLine(192, 135, 199, 141, GC9A01A_RED);
      tft.drawLine(180, 149, 189, 156, GC9A01A_RED);
      tft.drawLine(190, 156, 198, 151, GC9A01A_RED);
      tft.drawLine(199, 151, 207, 153, GC9A01A_RED);
      tft.drawLine(208, 154, 211, 157, GC9A01A_RED);
      tft.drawLine(191, 157, 195, 164, GC9A01A_RED);
      tft.drawLine(196, 165, 204, 162, GC9A01A_RED);

      tft.drawLine(173, 157, 180, 158, GC9A01A_RED);                                  // Red lines to draw the veins of the eye.
      tft.drawLine(181, 159, 185, 164, GC9A01A_RED);
      tft.drawLine(186, 165, 189, 172, GC9A01A_RED);
      tft.drawLine(190, 172, 200, 177, GC9A01A_RED);
      tft.drawLine(188, 173, 184, 183, GC9A01A_RED);
      tft.drawLine(185, 184, 188, 191, GC9A01A_RED);
      tft.drawLine(180, 160, 175, 171, GC9A01A_RED);
      tft.drawLine(176, 172, 178, 174, GC9A01A_RED);

      tft.drawLine(182, 105, 191, 98, GC9A01A_RED);                                   // Red lines to draw the veins of the eye.
      tft.drawLine(193, 99, 210, 101, GC9A01A_RED);
      tft.drawLine(205, 99, 211, 90, GC9A01A_RED);
      tft.drawLine(211, 100, 218, 94, GC9A01A_RED);
      tft.drawLine(211, 102, 217, 106, GC9A01A_RED);
      tft.drawLine(195, 100, 200, 108, GC9A01A_RED);

      tft.drawLine(106, 183, 101, 191, GC9A01A_RED);                                  // Red lines to draw the veins of the eye.
      tft.drawLine(101, 192, 104, 198, GC9A01A_RED);
      tft.drawLine(105, 199, 109, 211, GC9A01A_RED);
      tft.drawLine(108, 212, 104, 222, GC9A01A_RED);
      tft.drawLine(110, 212, 119, 218, GC9A01A_RED);
      tft.drawLine(107, 201, 118, 205, GC9A01A_RED);
      tft.drawLine(100, 194, 90, 206, GC9A01A_RED);
      tft.drawLine(90, 207, 92, 216, GC9A01A_RED);
      tft.drawLine(93, 201, 85, 203, GC9A01A_RED);

      tft.drawLine(68, 83, 60, 73, GC9A01A_RED);                                      // Red lines to draw the veins of the eye.
      tft.drawLine(59, 72, 50, 71, GC9A01A_RED);
      tft.drawLine(49, 71, 44, 65, GC9A01A_RED);
      tft.drawLine(43, 64, 35, 63, GC9A01A_RED);
      tft.drawLine(43, 63, 37, 54, GC9A01A_RED);
      tft.drawLine(54, 70, 51, 64, GC9A01A_RED);
      tft.drawLine(50, 72, 35, 83, GC9A01A_RED);

      tft.drawLine(56, 120, 51, 117, GC9A01A_RED);                                    // Red lines to draw the veins of the eye.
      tft.drawLine(50, 116, 37, 119, GC9A01A_RED);
      tft.drawLine(36, 119, 29, 112, GC9A01A_RED);
      tft.drawLine(28, 111, 17, 113, GC9A01A_RED);
      tft.drawLine(21, 111, 20, 108, GC9A01A_RED);
      tft.drawLine(39, 120, 37, 126, GC9A01A_RED);

      tft.drawLine(66, 155, 52, 159, GC9A01A_RED);                                    // Red lines to draw the veins of the eye.
      tft.drawLine(51, 159, 47, 152, GC9A01A_RED);
      tft.drawLine(47, 152, 31, 149, GC9A01A_RED);
      tft.drawLine(30, 149, 21, 155, GC9A01A_RED);
      tft.drawLine(29, 148, 27, 144, GC9A01A_RED);
      tft.drawLine(50, 159, 42, 163, GC9A01A_RED);
      tft.drawLine(41, 164, 37, 175, GC9A01A_RED);

      tft.drawLine(74, 165, 72, 176, GC9A01A_RED);                                    // Red lines to draw the veins of the eye.
      tft.drawLine(71, 177, 61, 184, GC9A01A_RED);
      tft.drawLine(60, 185, 59, 196, GC9A01A_RED);
      tft.drawLine(58, 197, 54, 200, GC9A01A_RED);
      tft.drawLine(59, 185, 53, 183, GC9A01A_RED);
      tft.drawLine(52, 184, 44, 182, GC9A01A_RED);
      tft.drawLine(50, 185, 52, 188, GC9A01A_RED);

      tft.drawLine(147, 179, 152, 189, GC9A01A_RED);                                  // Red lines to draw the veins of the eye.
      tft.drawLine(152, 190, 145, 202, GC9A01A_RED);
      tft.drawLine(145, 202, 146, 210, GC9A01A_RED);
      tft.drawLine(147, 211, 149, 217, GC9A01A_RED);
      tft.drawLine(153, 191, 159, 194, GC9A01A_RED);
      tft.drawLine(159, 195, 161, 205, GC9A01A_RED);
      tft.drawLine(160, 195, 163, 197, GC9A01A_RED);

      yield();                                                                        // Passes control to other tasks when called, should be used in functions that will take awhile to complete.
}
I hope you liked this spooky ringtone and that you enjoy it. Thank you very much, and happy Halloween.