

Table of contents

Abstract
A Halloween-themed game, Ember Hollow for the CHGame handheld.
Project
How It All Started
I have always found small gaming consoles fascinating, especially the ones built around microcontrollers that were never really designed for running games. There is something interesting about getting a proper graphical interface, animated characters, responsive controls, and an entire game running on a chip with only a few kilobytes of memory.
With Halloween approaching, I wanted to work on something that combined my interest in microcontrollers, embedded programming, and retro games. I had already been experimenting with a small, breadboard based gaming console using a WeAct development board, and I thought it would be interesting to take the project a little further by developing an original game specifically for it.
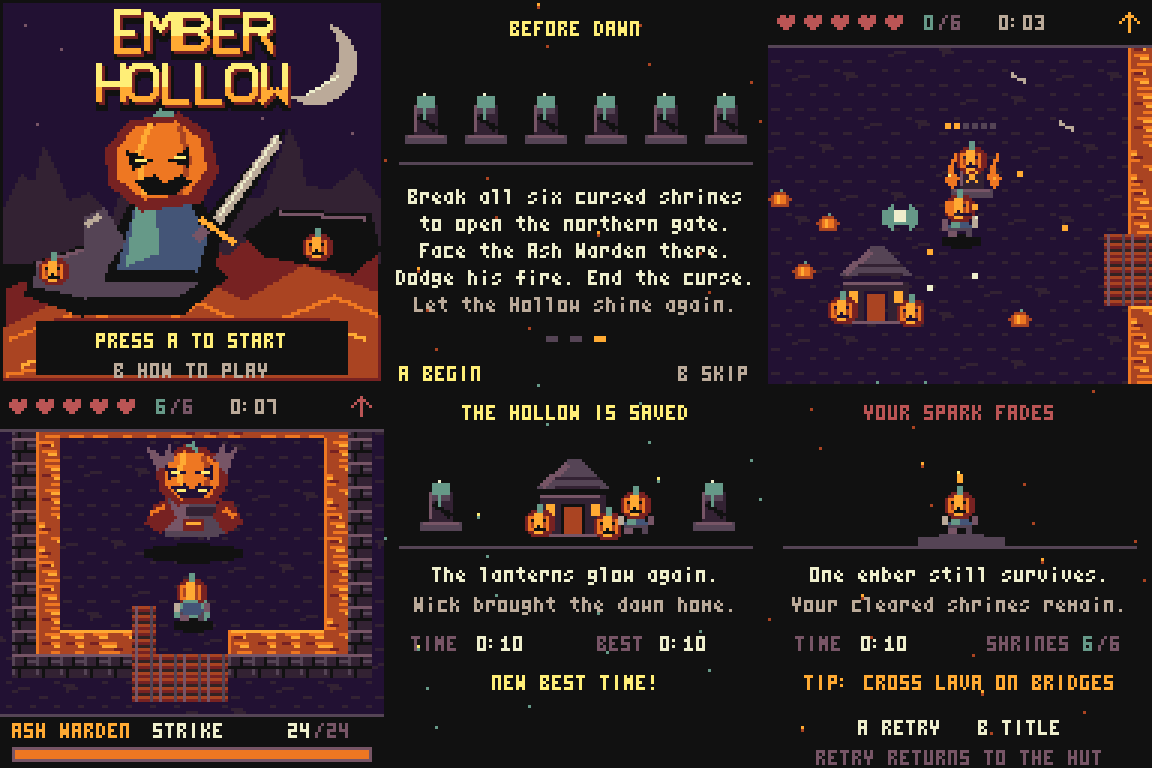
This turned out to be an interesting exercise in both hardware and software adaptation. Although the two consoles use closely related microcontrollers, getting the CHGame framework to work on my particular hardware required more than simply compiling the original code.
If you're interested to go through the specifics, the source Code of the game will be linked in the comments below!
Discovering CHGame
The first thing I had to decide was whether I wanted to write a bare-metal graphics program or build a complete game on top of an existing platform. The hardware was small enough that a bare-metal program looked tempting. I could initialize SPI, clear the LCD, poll GPIO pins, and move a square around the screen in a fairly short sketch. But a console is much more than a coloured square. It needs a consistent way to represent input, time frames, load games, present menus, persist data, and recover after a bad firmware update. It also needs tools that let me work on a laptop without repeatedly moving an SD card or rewriting flash.
CHGame gave me those pieces as a coherent system. The original machine is Kevin Bates's low-cost, open handheld based on a 48 MHz WCH CH32X035 RISC-V microcontroller. The original Rev0 design includes a 128 by 128 ST7735S display, eight front-panel buttons, an SD-card slot, a piezo buzzer, a status LED and power circuitry. Its software combines a CH32 Arduino-compatible board package, the CHGame gameplay library, CHGfx for graphics, CHSd for storage, a small bootloader with an SD game menu, and Python tooling for packaging, emulating, verifying, and uploading programs. I did not need to recreate those services to make the Halloween game.
What attracted me most was the deliberate separation of roles. The bootloader is installed independently and can show a visual or text menu. A game is an application image that begins after the bootloader, with a device identity and integrity checks. The game sources do not have to know the electrical location of a button because the variant translates real GPIO into logical button names. The graphics library does not need to know why I am drawing a pumpkin or a tombstone; it needs pixel coordinates, a palette, and packed image data. Each layer has a contract, and a hardware port works best when it honors the same contracts.
I also liked that CHGame was designed for severe resource constraints. Its memory budgets and software conventions are not based on the assumption that I have megabytes of SRAM. Those constraints became useful design pressure. I had to think about a 16-colour framebuffer, fixed object pools, small maps, and the cost of a string or extra frame of animation. The resulting game is better suited to the actual console than a desktop game engine cut down at the end.
I treated the original CHGame repository as the platform reference and my WeAct fork as the hardware adaptation. I tried to keep game-specific choices out of the shared libraries. A different shield colour does not belong in an SPI driver, and a Halloween boss should not change the board definition. This made it practical to update the framework later, re-run the regression suite, and understand where a future breaking change came from.
Using the CHGame Rev0 as the reference
The reference machine uses a CH32X035G8U6 rather than the F8U6 package on my WeAct board. They belong to the same microcontroller family, but the packages and exposed pins are different. The original console was laid out as a purpose-built handheld, with its buttons, display, SD card and sound connected on a dedicated board. My adaptation exposed those same logical functions using jumper wires and a development board. I therefore had to replicate the software-visible contract without pretending that the electrical board was identical.
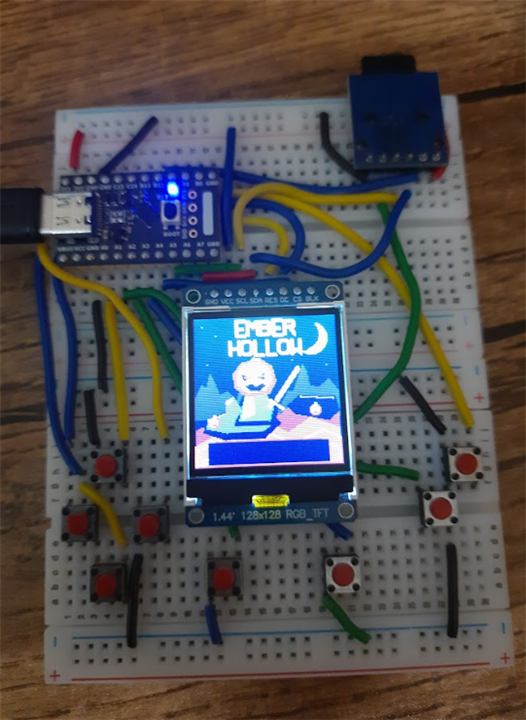
I began by separating what was essential to the game from what was merely part of the original physical implementation. The 128 by 128 ST7735S panel mattered because the graphics assumptions were built around its dimensions and SPI interface. The eight-button arrangement mattered because menu navigation and games expected directional inputs, A, B, START and SELECT. The SD path mattered because the bootloader installs games from the card. The piezo buzzer and status LED were useful features of Rev0, but I could remove them from the first WeAct variant without making the platform concept incoherent. I explicitly disabled those outputs in the variant instead of assigning imaginary pins to them.
This distinction shaped my entire port. I wanted source compatibility for well-behaved CHGame applications, not a claim that the hardware was pin-for-pin interchangeable. The same logical code could be rebuilt for each console. The resulting images had to carry separate device IDs and be installed on their intended boards. Treating the two targets as separate firmware devices was much safer than pretending a single binary could work on both.
The software stack for the game
I found it helpful to imagine the software in five layers. The bottom layer was the CH32X035 core: startup, memory layout, clock configuration, GPIO, SPI, USB and compiler support. Above that was the selected board variant, which described the physical pins and peripheral assumptions for Rev0 or WeAct. The next layer contained CHGame, CHGfx and CHSd, which turned those low-level facilities into reusable gameplay, drawing and card APIs. Above the libraries was my application sketch and its Game and View modules. Separate from the running application, the bootloader and host tools took responsibility for packaging and installing code.
In practice the direction of control is not perfectly vertical. The game calls the graphics library to draw; the graphics library drives SPI and DMA; the bootloader reads a CHG package; and both the uploader and the menu must agree on device identity and memory layout. The design still benefits from having a clear owner for each decision. A physical button mapping belongs in the variant. A saved quest belongs in the game. A CHG payload checksum belongs in the packaging and install mechanism. A screenshot fixture belongs in the simulator or build tooling.
As I learned the codebase I kept a written list of what should not change for a normal game feature. I did not alter the shared CHGame core to make the Ash Warden appear. I did not override the original SPI driver to draw the sword. I did not add a custom persistent-data format outside CHGame's save service. I instead used the public APIs wherever possible and concentrated the new code in the game repository. That decision reduced merge friction and kept the WeAct port meaningful beyond Ember Hollow.
#include <CHGame.h>

void setup() {
    chgame.boot();
    gfx_begin(GFX_DIV2, GFX_12BPP);
    pal::init();
    chgame.setFrameRate(60);
}

void loop() {
    if (!chgame.nextFrame()) return;
    chgame.pollButtons();
    gfx_wait();
    gfx_clear(FELT);
    text35x2s(10, 9, "HELLO", WHITE);
    gfx_flushAsync();
}
This tiny example taught me the division between loop frequency and drawing. Arduino repeatedly calls loop, but nextFrame decides when the next game update is due. pollButtons updates the logical button states. gfx_wait makes sure an in-progress screen transfer has finished before I alter graphics data that might still be in use. The frame is then drawn into the existing framebuffer, and gfx_flushAsync begins an asynchronous transfer so the CPU can perform work while the display is being serviced. My game reused the same choreography with a larger model-update step in the middle.
The asynchronous step is important on hardware of this size. A full-screen transfer is not free, and trying to draw while the DMA engine reads the same buffer can produce visible tearing or corruption. It is tempting to assume that the display is just a slow destination for a drawing function. In reality the ordering of rendering, DMA and flash writes is part of the correctness story, especially when the framebuffer accounts for such a large proportion of SRAM.
Building my own WeAct-based CHGame console
I assembled my version because I already had access to the WeAct CH32X035F8U6 Core Board V1.0 and wanted to experiment with the CHGame software before making a dedicated PCB. The breadboard approach kept the parts visible and changeable. The price was mechanical and signal-integrity uncertainty: jumper wires are convenient for revision but less predictable than a short, routed PCB, especially when a display and SD module share a reasonably fast SPI bus.
The core hardware was modest: one WeAct development board, a 128 by 128 ST7735S TFT, a compatible SPI microSD module, eight buttons, jumper wires, a breadboard and USB power. I did not have to add a GPU, external SRAM, camera, or second processor. The MCU runs the entire game and manages the screen. I also chose not to fit an external buzzer and status LED in this variant. That saved scarce GPIO and avoided borrowing pins from the debug interface merely to make the hardware look closer to the original console.
The board and chip are both 3.3 V logic devices. I kept the TFT on the 3.3 V rail and paid attention to the actual SD module instead of assuming all SD boards accept the same VCC. The buffered, regulator-equipped adapter described in my wiring guide expects a 5 V module input from USB VBUS while still communicating with the MCU over compatible 3.3 V signals. A bare 3.3 V SD breakout is different and would need a 3.3 V supply. I made that distinction explicit because a flash-card problem that looks like software can actually be a regulator dropout problem.
Choosing the pin assignments
I mapped each logical control and peripheral signal onto a pin available on the WeAct module. I needed to reserve SPI1 for the display and SD card, keep the USB data pins working, and leave the WCH single-wire debug interface available. That last choice was important because a board that boots the wrong firmware is much easier to recover when the physical debug interface remains accessible.
I assigned the four directions, A, B, START and SELECT to eight dedicated GPIO inputs. The controls use active-low switches against a common ground. The firmware enables internal pull-ups, so the normal state reads high and a pressed switch reads low. This avoids eight separate pull-up resistors and gives the game a consistent input polarity.
In the CHGame layer, a button press becomes a logical bit such as A_BUTTON or START_BUTTON, independent of the GPIO number on the module.
The display and SD card share the SPI hardware's SCK and MOSI signals. The card also needs MISO to send data back. The TFT needs a chip-select, a data/command signal and a reset signal. The SD adapter needs its own chip-select. I avoided using the generic Arduino SS assumption for the card because on this platform the LCD has its own CS mapping, and selecting the wrong SPI device can make a perfectly good card appear broken.
|
Function |
MCU pin |
WeAct header |
|
UP |
PA0 |
P1.4 |
|
B |
PA1 |
P1.5 |
|
START |
PA2 |
P1.6 |
|
SELECT |
PA3 |
P1.7 |
|
TFT CS |
PA4 |
P1.8 |
|
SPI SCK |
PA5 |
P1.9 |
|
SD MISO |
PA6 |
P1.10 |
|
SPI MOSI |
PA7 |
P1.11 |
|
TFT DC |
PB0 |
P2.10 |
|
A |
PB1 |
P2.9 |
|
LEFT |
PB3 |
P2.8 |
|
SD CS |
PB11 |
P2.7 |
|
TFT RESET |
PB12 |
P2.6 |
|
DOWN |
PC14 |
P2.5 |
|
RIGHT |
PC15 |
P2.4 |
I treated the table above as a contract. The application should not duplicate these raw assignments, because any later PCB revision might relocate one or more buttons. The variant defines what PA0 means; the game only asks whether UP was pressed. The package's build identity means the selected variant and the binary target travel together, which is exactly what I wanted once I began building the same title for both consoles.
I also left PC18 and PC19 for WCH SDI debugging. The variant uses CH32V_LOCK_DEBUG to avoid an automatic pin remapping that would remove that capability. With eight buttons, LCD controls, SD chip-select, SPI and the preserved debug pins, the design has effectively no free signal pin left. That is a serious limitation for later expansions, especially if I want sound, extra sensors, an encoder, a joystick or a controllable backlight. Those features might require a changed pin map, an I/O expander, or a different physical board.
The SB2/SB3 USB-C issue
The most easily misunderstood hardware modification involved two zero-ohm links. On the WeAct V1.0 board, PC14 and PC15 are connected to the USB-C CC nets through SB2 and SB3. I wanted to use PC14 and PC15 as DOWN and RIGHT button inputs. Leaving those GPIO tied into the Type-C configuration network would make their button behaviour electrically awkward and could interfere with how the connector announces the device. I therefore opened SB2 and SB3 to isolate those GPIOs from the CC nets.
A zero-ohm solder bridge is not equivalent to a Type-C pull-down resistor. The connector-side R4 and R5 are 5.1 kΩ CC pulldowns and have a different job. They should remain present for the documented USB-C sink configuration. In my documented build they were left in place. If they have been removed during experimentation, they should be restored while SB2 and SB3 remain open. Removing the bridge is a controlled net separation; removing the pulldown disables part of the connector's normal electrical behavior.
Before changing solder bridges, I reviewed the board revision and checked continuity on the unpowered module. I did not rely on appearance alone because small solder pads, zero-ohm resistors and CC pull-downs can look similar. The sensible repair workflow is to identify each component by reference designator on the schematic, make the required change with the board disconnected, inspect the pads, and verify continuity with a meter. Afterward, I would always re-check USB-C power operation and the DOWN and RIGHT button inputs independently. I also keep this detail in the wiring guide because another WeAct revision could use a different connection scheme.
Hardware safety The GPIO pins use 3.3 V logic. I do not connect 5 V directly to an MCU input. Factory ISP bootloader provisioning can erase application code and saved progress; ordinary CHG app installation should not be confused with this process.
Bringing up one subsystem at a time
A full game is a poor first test for a new board variant. If the display is blank, I cannot immediately tell whether the problem is its power rail, reset pin, SPI data, the framebuffer, or a game logic state that never reaches rendering. I instead started with a bring-up application that exercises the LCD and eight buttons. A colour or test-pattern display can verify orientation, dimensions, colour mapping and basic SPI operation before any game logic is involved. A button-state screen can verify all eight inputs with the correct polarity.
Next I separated storage from gameplay. The SD menu and SD reader applications are useful because they expose card access while reducing the number of moving parts. I checked that the card was formatted using a supported FAT format, that its chip-select was PB11, and that SCK, MOSI, MISO, power and ground were actually connected. I kept the jumper wiring short because bus ringing and poor common grounding often show up only when transfers become longer or faster. Passing a compiler check did not tell me whether the SD module was receiving enough voltage.
Only after the console functions worked did I consider the larger game. This order gave me a known-good baseline. If Ember Hollow later displayed the menu but failed to save, I could investigate the save and application memory layout. If it failed to launch from the SD menu at all, I could check target identity and package format. If graphics looked wrong only in this game, I could investigate asset packing and the palette before touching the SPI driver.
Why I left the buzzer and extra LED out
The original CHGame handheld has a speaker and status LED. My WeAct arrangement deliberately does not expose compatible external versions of those peripherals. The variant disables audio and LED output calls instead of pretending a device is connected. This is not an accidental omission: it allows me to preserve the core hardware functions and the SDI debug interface without forcing more signals onto a pin-constrained module.
This choice affects game design. Ember Hollow cannot depend on a warning sound to teach the player when the Warden is about to erupt. The danger zone, phase labels and enemy exclamation marks therefore need to be visually legible. The lack of sound encouraged me to treat readable visuals as functional information, not decoration. If I add a buzzer later, I must re-evaluate timer availability, pin allocation, CHGame's existing sound API and the compatibility of the WeAct variant. The current source continues to compile calls to the public audio API, but they are intentionally no-ops on my console. A future hardware revision could restore sound without rewriting every individual game.
My board variant: how the CHGame framework runs on WeAct
Once the wiring plan was stable, the software port had to make the WeAct board look like a CHGame target at the correct abstraction level. I did not want every game to contain a private set of #ifdef checks for PA0 or PC14. Instead I added a dedicated F8U6 variant to the maintained CHGame fork and exposed it to the build system. That variant selected the correct MCU model, clock, RISC-V ISA and ABI, logical pin mapping and application target identifier.
The original console target is CX35 and uses the CH32X035G8U6. My WeAct target is WF86 and uses the CH32X035F8U6. Keeping those identities separate is critical because software written for the original package may drive a different physical output if installed blindly on my breadboard. A game package is not compatible merely because two chips can execute similar machine instructions. The surrounding buses, button connections and reset signals must also match. My packaging and upload workflow uses the target identity as a guardrail.
The port lives in the maintained CHGame fork, not in an independent copy of every shared library. It reads the same core, tools, game examples and bootloader components as the parent project wherever possible. I treated the F8U6 mapping as configuration, not as permission to fork the whole platform. That approach made it possible to compile existing games and applications using the same source, while keeping only the electrical assumptions and device identity different.
The PlatformIO board definition
{

  "name": "CHGame on WeAct CH32X035F8U6",

  "vendor": "WeAct Studio",

  "frameworks": ["arduino"],

  "build": {

    "mcu": "ch32x035f8u6",

    "f_cpu": "48000000L",

    "march": "rv32imacxw",

    "mabi": "ilp32",

    "core": "chgame",

    "variant": "CHGame_WeActF8U6",

    "extra_flags": "-DARDUINO_CHGAME_WEACT_F8U6 -DCH32V_LOCK_DEBUG"

  },

  "upload": {

    "maximum_size": 50944,

    "maximum_ram_size": 18416,

    "protocol": "chgame"

  }

}
I used the board definition to make several constraints explicit. The build MCU is ch32x035f8u6 rather than a generic CH32. The CPU frequency is declared as 48 MHz. The architecture and ABI flags select the matching WCH RISC-V toolchain interface. The core name tells PlatformIO which Arduino-compatible runtime to build against, while the variant tells the framework which physical pins and features this console has. The upload protocol delegates application installation to the CHGame host tooling.
The stated 50,944-byte maximum image size is not the same as the maximum image size I should use for a game that expects two persistent save pages. When I reserve those pages, the save-safe application budget is 50,432 bytes. I keep that smaller number in the game tests and documentation. Static SRAM has a separate 18,416-byte budget after reserving the retained boot block and 2 KB stack. Those numbers turn a vague notion of 'small memory' into build-time checks I can audit.
I deliberately made the board package independent of Ember Hollow. A simple CHFour build, the bring-up application, an SD-card utility and another game all use the same board definition. That is how I know I have built a reusable console variant rather than a one-off firmware patch.
Looking under the hood: bootloader, memory, USB and storage
I found that understanding the bootloader was as important as understanding the game. CHGame is not a generic Arduino board where each upload simply replaces everything from address zero. The platform reserves a bootloader region so the handheld can present a menu and install applications from SD. That means the device behaves like a tiny cartridge console, even though a cartridge is really a file containing a program image and metadata. It also means the game must respect a carefully arranged flash map.
On the CH32X035 platform I work with, the user flash allocation is conventionally described as 62 KB. The first 12 KB is reserved for the loader, and normal application images link at 0x3000. A metadata region and persistent save pages occupy space near the end of available flash. CHGame's size checks make this practical: an application can reach up to 50,944 bytes as an image, but a game that wants both save pages must remain within 50,432 bytes. I favor the two-page reservation because saves are valuable in a multi-session adventure, and wear-aware alternation provides a better failure story than rewriting the only copy repeatedly.
The full-screen graphics buffer is a second large reservation, this time in RAM. At 128 by 128 pixels with four bits per pixel, it occupies 8,192 bytes. The machine only has 20 KB SRAM, and CHGame retains a 2 KB stack and a small boot block outside the ordinary static-data budget. When I looked at those numbers, I stopped thinking of sprites as free illustrations and started calculating how many bytes and how much work each new effect would require.
Booting and loading are distinct moments in the lifecycle. The bootloader can list existing games, read their headers, verify a selected file and write the application region of flash. After reset the application starts at the reserved origin and invokes chgame.boot() to initialize the runtime-facing services. At the end of a play session, my game can use the public exitToMenu() API. That is preferable to jumping to a guessed address or resetting peripheral registers by hand.
What a CHG file contains
I treated .CHG as a structured installation file, not as a raw binary with an unusual extension. The format includes a header, graphics suitable for the menu, and the program record. The build tooling fills in the target identity, length and integrity fields. The bootloader does not have to trust the filename alone. This matters because a card can contain more than one game and, in a multi-device distribution, several different binaries of the same title.
The richer .chgame format plays a different role. It is a distributable cart used by desktop or web tools to prepare a card, include art, retain metadata and select which device binary belongs to a particular console. I can distribute one combined cart that knows about CX35 and WF86 while producing two different GAMES/EMBER.CHG files for the actual machines. The distinction gives the console a small, simple installation format while keeping publishing workflows flexible.
I did not need to copy a separate runtime asset file for Ember Hollow. Its tiles, title scene, sprites and level table are compiled into the firmware. That saves me from adding an SD file-reading path to the play loop and avoids a new source of frame stutter. It also gives me an explicit tradeoff: the game image is larger, but operation after launch is less dependent on card latency. As the game grows, I might eventually use CHSd for streamed assets, but that would be a deliberate redesign of the art pipeline and buffer management rather than a casual new data file.
Why save pages are shared among games
A small device cannot offer unlimited independent save slots without additional storage. CHGame games share a small pair of reserved flash pages. Each game writes a record with a unique magic value and version and the save service uses integrity information to decide whether a record can be trusted. Ember Hollow's identity is EHLO and its existing save data is version 1. Opening a different game that writes those shared pages can replace the previous checkpoint. In other words, the SD card can hold many game binaries, but it is not a separate save card for each title.
I designed the player-facing text with that behaviour in mind. CONTINUE resumes a valid EHLO checkpoint on that console, not a copy stored somewhere in GAMES. Moving the SD card between the WeAct board and the original CHGame does not move an active save because the state lives in internal flash. If a future version of my game needs more persistent flags, I have to consider migration and page size, not only the number of bytes in the C++ structure. A game save is a contract between versions, not merely a memory dump I can rearrange freely.
static const uint32_t SAVE_MAGIC = save::magic("EHLO");


// During setup:

eh::Progress saved = {};

if (save::load(SAVE_MAGIC, EH_SAVE_VERSION, saved))

    game.load(saved);


// Later, after gfx_wait():

if (game.dirty) {

    game.saveOK = save::store(

        SAVE_MAGIC, EH_SAVE_VERSION, game.progress);

    game.dirty = false;

}
The `dirty` flag is an important safeguard. The game requests a save when something durable changes, but the sketch controls when the write takes place. It waits for the prior graphics DMA transfer before writing flash, and it does not hammer a failing save page every game frame. Failed saving is reported through game.saveOK so the pause screen can inform the player. This illustrates how persistence, graphics timing and UI feedback cooperate across files without collapsing into one enormous function.
A sudden power failure cannot be entirely engineered away with two tiny flash pages, but the CHGame saving scheme is designed to avoid making every write an unprotected replacement of the only checkpoint. I would still test power-loss behaviour on actual hardware before claiming a particular failure guarantee under every electrical condition. A simulated flash restart checks logical persistence and record handling; it does not reproduce brownout voltage curves or connector contact bounce.
USB upload and initial factory provisioning
With a compatible CHGame bootloader already installed, an ordinary application upload can use the platform's USB CDC-based handshake. The development machine opens the appropriate serial device, requests the transition into the loader and uploads the application with target and integrity checks. This is convenient on a handheld because the same USB cable provides power and the development path. I can rebuild a game and upload it without using the factory boot mode each time.
The initial installation of the WF86 bootloader is different. An unprovisioned WeAct board must receive the correct bootloader image through the supported factory ISP or a compatible WCH programmer. The port provides bootloader build environments, including a visual-menu choice, but the factory provisioning route can erase an installed application and its saves. It also does not have the high-level target check that the CHGame application loader provides. I am careful to name this operation explicitly instead of calling every firmware write 'upload' and assuming the same safety properties.
I also maintain a recovery plan. If a sketch crashes before USB can enumerate, I may need power cycling or factory ISP rather than ordinary serial upload. Preserving the SDI pins gave me another diagnostic and programming option. These paths are not a reason to panic about experimentation, but they are a reason to test the core bring-up and loader first, and to keep a copy of the known-working binary and wiring guide.
How the storage and display share SPI
The LCD and microSD adapter occupy the same SPI bus. I use PA5 for SCK and PA7 for MOSI, PA6 for SD MISO, PA4 as display chip-select and PB11 as SD chip-select. The LCD has its own data/command and reset pins. This arrangement is economical because SCK and MOSI are not duplicated, but it places responsibility on the software to select only the intended peripheral and respect each device's requirements.
During game loading, the bootloader and storage tooling read the card. During gameplay, Ember Hollow uses its embedded graphics and does not perform normal SD reads, leaving the bus mostly dedicated to TFT flushing. This reduces contention. It also means that if I later introduce streamed music, maps or sprite sheets, I cannot simply issue arbitrary SD transactions while a TFT DMA transfer is active. I will need disciplined bus ownership, transaction boundaries, buffering and performance measurements. For a 48 MHz MCU with a tiny SRAM budget, the simplest reliable design is often the one that avoids extra transfers altogether.
I kept the breadboard display SPI at a configured 12 MHz instead of using the maximum possible clock from the beginning. A short PCB trace and a long jumper wire behave differently at an edge transition, and the actual signal integrity depends on the full electrical path. Once physical measurements and gameplay tests establish reliability, a faster clock can be considered. Until then, a conservatively configured display is more useful than a theoretically fast but intermittent one.
From a Working Console to a Halloween Adventure
With the hardware variant and CHGame framework in place, I wanted the device to do more than launch existing examples. I built Ember Hollow as an original top-down quest. Wick, a pumpkin-headed guardian carrying the last spark of Halloween, must cross a valley divided by lava, restore six cursed shrines and defeat the Ash Warden. I wanted a compact but complete adventure: illustrated story pages, clear objectives, deliberate sword-and-shield combat, a readable boss encounter, and the ability to return later using checkpoints.
The game is configured for 30 updates a second. That is a timing target, not a measured performance result from the physical console. I kept the rules in Game.cpp, drawing in View.cpp and the CHGame interface in EmberHollow.ino so that hardware-specific choices would not spread through the game engine.
Planning Ember Hollow as a complete game
I did not want Ember Hollow to be another example program that stopped after showing a character on the screen. My design goal was a small but complete Halloween adventure: a beginning, a task worth pursuing, enemies that ask the player to react, a final encounter, persistence, defeat and victory states, and a clean return to the console menu. The hardware itself helped define the scope. A few carefully chosen mechanics could feel complete on a 128 by 128 screen, whereas a huge inventory or open-ended quest system would have consumed memory and development effort without making the most of the display.
The central story was simple. Wick is a pumpkin guardian carrying the final spark of Halloween. Six lantern shrines once protected a volcanic valley, but the Ash Warden cursed them and opened rivers of lava. Wick has to cross the valley, restore the six shrines, open the northern gate and defeat the Warden. I used a fixed number of objectives so progression could fit in a single six-bit mask. The player could tackle shrines in any order, but I could still give the quest a clear endpoint without implementing a complex mission scripting engine.
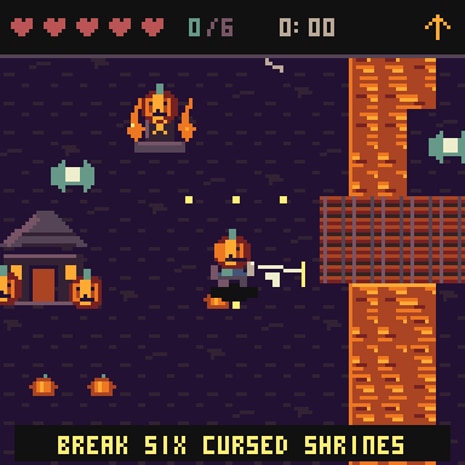
I started with a top-down perspective because it suited the ST7735S and the CHGame graphics toolkit. The player can see Wick, nearby terrain, approaching enemies and the immediate shape of a bridge. I could explain the game with eight buttons and a small HUD. Later I experimented with a first-person raycaster as a separate development track, but the original design already provided a full progression loop.
Defining the story as a lightweight state machine
The intro became three illustrated pages. The first established the cursed lanterns, the second introduced Wick and his sword and shield, and the third explained the six-shrine objective and the Ash Warden. I could make the player understand the premise before moving the character without implementing dialogue trees, scrolling text, or an inventory of lore items. On a tiny display, a brief narrative with legible images is more valuable than a wall of text.
I placed the intro in the game's mode system rather than writing a separate procedural scene runner. Title, Play, Pause, Fallen, Victory and Intro are the primary states. NEW enters Intro and advances with A or skips with B. CONTINUE bypasses Intro and restores the checkpoint. Opening the new-game story does not immediately destroy an old save; the persistent record is reset only when the new journey actually starts. That is a subtle but considerate interaction detail because a player can inspect the opening without losing their previous game.
I also decided early how a session ends. Defeat should not erase completed shrines, because repeating all progress after a mistake would make a small handheld game discouraging. Victory should celebrate the restored Hollow, preserve best time and allow the player to look around afterward. START should still be able to return to the console menu. These choices influenced the save structure and input handling long before I polished sprites.
Why I separated Game, View and the sketch
In the final source, Game.cpp owns the rules and View.cpp owns the display. The Arduino sketch is the bridge to CHGame. I made this separation so that the same model could run in a host-side unit test, a simulator, and a real handheld without being rewritten for each environment. The game model should not need to call an SPI register when it decides that a shrine has been restored. The renderer should not silently change player health when it draws a sword animation. The sketch should orchestrate the two and handle hardware services such as saving and frame pacing.
For example, Game::attack() calculates which enemies, shrines and bosses are within sword range and updates their health or state. View.cpp uses the resulting swing timer to draw a moving line for the sword, and it renders the boss health bar based on the model's value. EmberHollow.ino reads A_BUTTON, sets a bit in eh::Input, and calls Game::update(). That single interaction moves cleanly across three modules. It can be unit-tested by supplying synthetic inputs without attaching a TFT or creating a fake SPI bus.
I also learned that this architecture has a limit: some presentation-related timers naturally live in the game state because their values need deterministic advancement for tests. Fields such as swing, frame, notice and endingTicks appear in Game even though their visual interpretation belongs in View. I consider that an acceptable distinction. Game owns the timing and sequence; View chooses how it looks. What I avoid is having the renderer secretly mutate the core quest state while it draws.
Actual interface ideas from Game.h. Bitfields make synthesized test input easy to construct.
// The source keeps console input in compact masks.

namespace eh {

    enum Button : uint8_t {

        A=1, B=2, Up=4, Down=8,

        Left=16, Right=32, Start=64, Select=128

    };

    struct Input { uint8_t held, pressed; };


    enum Mode : uint8_t {

        Title, Play, Pause, Fallen, Victory, Intro

    };

}
The world as a finite, testable map
I chose a world measuring 64 by 48 tiles, with each tile representing eight by eight pixels. The result is 512 by 384 pixels of terrain, larger than the display but still small enough for a fixed 3,072-byte map table. I generated the world through a Python recipe rather than hand-drawing a giant lookup array. In that recipe I defined terrain rectangles, rivers, bridges, ridges, decorative objects, the final island and walkable footprints around important encounters. The result was original and reproducible.
The map is not an arbitrary image that the game cannot reason about. Each cell contains a tile type such as floor, wall, lava, bridge, grave, pumpkin, bones or gate. Collision tests use those categories. Rendering maps them onto packed 8 by 8 artwork, with variants for animation and decoration. The six shrine positions and pickups are stored as coordinate arrays. This is a compact form of data-driven design: terrain controls both how the world appears and which movements are legal.
I specifically wanted bridges to matter. Lava is not just an orange tile; it is a hazard that the shield cannot block. Bridges create safe, readable corridors, giving the player a route-finding task that uses the visual layout. I also arranged the Warden's arena behind a gate that opens only after all shrines are restored. The gate is a story beat, a collision condition and an on-screen graphic, all triggered by one small saved bitmask.
Actual layout constants and tile lookup, reformatted for explanation.
static const int Width  = 64;

static const int Height = 48;

static const int TileSize = 8;

static const uint8_t ShrineCount = 6;

static const uint8_t AllShrines = 63;


// World tile lookup, with out-of-range queries blocked.

Tile Game::tile(int tx, int ty) {

    if (tx < 0 || ty < 0 || tx >= Width || ty >= Height)

        return Wall;

    return static_cast<Tile>(assets::World[ty*Width+tx]);

}
That out-of-range result is intentionally conservative. Returning a wall means an invalid map coordinate cannot be treated as a walkable void. It also avoids having to guard every caller against negative indices before reading a tile. In a compact game, small defensive rules like this can prevent surprising memory faults when camera or collision code encounters the edge of the world.
Implementing movement, collision and the camera
The player does not move from tile to tile in abrupt eight-pixel steps. Wick's world position is kept in pixel coordinates and moves incrementally, while the background is made from eight-pixel tiles. This gives movement a smoother feel and lets enemies and projectiles use distances smaller than a full tile. It also makes collision slightly more complicated: a sprite has width and height, so checking only one center pixel would allow the character's edges to overlap a wall.
I used a simple four-corner footprint test. The game checks tiles around the proposed position at offsets of approximately three pixels in x and y. If any corner falls inside a wall, the movement is rejected. If the northern gate is still locked, the gate tile also blocks movement. If the tile is lava, the position is not accepted for ordinary walking, but the collision path can apply damage. This gives the player visible feedback for stepping into a hazardous edge without trapping Wick inside impassable terrain.
The camera follows Wick's location, subject to clamps that keep it inside the world. The gameplay view occupies the region below the 16-pixel HUD, with a height of 112 pixels. Rendering converts a world coordinate to a screen coordinate by subtracting cameraX or cameraY, and it adds a 16-pixel y offset for the HUD. The renderer iterates just enough tiles to cover the visible area rather than visiting every cell in the map each frame. This is an essential optimization on a 48 MHz MCU.
Actual four-corner collision logic. Flying enemies can cross lava, but walls and locked gates remain blocking.
bool Game::passable(int px, int py, bool flying) const {

    for (int dy=-3; dy<=3; dy+=6)

        for (int dx=-3; dx<=3; dx+=6) {

            Tile t = tile((px+dx)>>3, (py+dy)>>3);

            if (t == Wall ||

               (t == Gate && progress.cleared != AllShrines) ||

               (!flying && t == Lava))

                return false;

        }

    return true;

}
The `flying` argument is a small but expressive design choice. It lets bats pass over molten ground without needing an entirely separate map or AI system. The same movement query can be reused for normal creatures and aerial creatures, with just one rule changed. This is the sort of reuse that keeps the code compact without making every behaviour identical.
Movement direction also matters because the sword and shield work relative to where Wick is facing. I update facing from the directional input before applying motion. Normal walking is two pixels per step along a single axis. When guarding or moving diagonally, each axis uses a one-pixel step. That avoids extreme diagonal speed and makes blocking slightly slower. If a new mechanic changes speed, I would test narrow bridges carefully because a larger step can skip past a collision boundary if the code only tests the endpoint.
Player input and speed decisions from Game.cpp.
int dx = ((input.held & Right) ? 1 : 0) -

         ((input.held & Left) ? 1 : 0);

int dy = ((input.held & Down) ? 1 : 0) -

         ((input.held & Up) ? 1 : 0);


if (dx) facing = dx > 0 ? East : West;

else if (dy) facing = dy > 0 ? South : North;


const int speed = (guarding || (dx && dy)) ? 1 : 2;

if (dx) move(dx * speed, 0);

if (dy && mode == Play) move(0, dy * speed);
Screen-space mathematics
I found it helpful to keep a small set of coordinate equations in my notes. If the player stands at world position (x,y), and the camera origin is (cameraX,cameraY), the pixel position for an object on screen is (x-cameraX, y-cameraY+16). The sixteen-pixel offset is not a mysterious constant: it accounts for the top HUD. A position that is perfectly valid in world space can be off-screen after the subtraction, so drawing functions need clipping.
The view initializes a clip region that spans the 128-pixel width and the 112-pixel playfield below the HUD. Terrain, creatures and effects are drawn only in that region. When it is finished, the clip is reset and the HUD is rendered. This sequence prevents an enormous boss sprite or a sword line from overwriting the health display. I did not need separate framebuffers for world and UI; I needed a predictable drawing order and clipping policy.
For an entity's feet to appear in the right place, the sprite helper also uses its declared width and height. It centers the sprite horizontally and anchors its lower edge relative to the world position. That makes a 34-by-38 Warden and a smaller skeleton use the same conceptual placement rule. If I add a ghost, I will use the same helper so its world coordinate means the same thing as the others.
Camera clamping and map edges
A naive following camera would place Wick exactly at screen center at all times. Near the boundary of a finite world, that would reveal pixels outside the level. My code clamps cameraX between zero and the world width minus the screen width. It clamps cameraY between zero and the world height minus the gameplay height. This keeps a fully defined rectangle of tiles behind the viewport.
I originally thought of the camera as a purely visual effect, but it influences encounter readability. An enemy just off the screen should not be allowed to pursue forever if the player cannot see it. The enemy logic therefore also removes creatures that become sufficiently far away. This is both a gameplay choice and a resource-management choice: the fixed enemy pool should remain available for encounters near Wick. The player sees a living region of the level rather than a global simulation of every monster in every district.
Designing combat that feels fair with eight buttons
Combat had to be understandable without analog sticks, a touch screen, sound cues or a high-resolution display. I chose a sword and directional shield, because these controls create deliberate choices using only A, B and the D-pad. The attack comes from the player's facing direction. The shield protects against qualifying frontal creature attacks. A well-timed guard turns into a parry that stuns an attacker and strengthens the next sword strike. That gives the player a small skill to practice rather than relying on button mashing.
The player begins with five displayed hearts, represented internally as ten half-heart units. A normal creature hit reduces health by one half-heart unit. Lava and the Warden's eruption take two. Candies and completed shrines restore two units, capped at ten. This representation allows the game to show half-heart loss without floating-point arithmetic or a different health structure for every hazard.
A successful attack and its animation are intentionally separated. Pressing A starts a ten-tick swing and a fourteen-tick cooldown. When the swing reaches its designated hit frame, Game::attack() checks which shrines and enemies are in reach. View.cpp meanwhile draws a procedural sword line whose angle depends on the swing count and facing direction. The renderer does not decide who was hit. That makes the combat deterministic under test input and allows me to change the sword's appearance without changing damage timing.
Attack initiation, animation countdown, and riposte damage from the game logic.
if ((input.pressed & A) && !cooldown && !guarding) {

    swing = 10;

    cooldown = 14;

}

if (swing) {

    --swing;

    if (swing == 7) attack();

}


// The next strike after a parry is stronger.

const uint8_t power = riposte ? 2 : 1;

riposte = 0;
Why the shield has a timing window
If holding B always gave the best protection, the combat would become passive. I let guarding block qualifying attacks in front of Wick, but I reserve the stronger counterattack for a guard that has only recently started. The guardAge counter increments while B is held. When an attack arrives, a value below six game ticks produces a parry. The attacker is stunned and Wick gains a riposte window. Releasing B resets guardAge, so the player can deliberately time another guard.
At a configured 30 updates per second, six ticks correspond to roughly two tenths of a second. That is a starting design value, not a measured real-world reaction window on the breadboard. Display latency, button feel and actual sustained update rate all affect whether it feels fair. The source gives me a well-defined value to tune after hardware testing, and simulator fixtures let me reproduce the same situation when comparing changes.
Guarding also depends on direction. The game uses a front-facing test based on the relative position of the attacker and the player's facing. A strike arriving from behind should not be treated as a successful front shield block. In a tiny action game, that is enough spatial reasoning to make directional movement and facing meaningful without a complicated collision mesh or skeletal animation system.
Distinguishing molten ground from ordinary enemies
I wanted lava to act as a navigational rule rather than another enemy with different colours. The move() function first tries a normal passability test. If the destination is not ordinarily walkable but would be passable for a flying creature, the code treats it as molten ground and applies damage without accepting the new position. This encourages crossing at the bridges and prevents Wick from being stranded in an impassable hazard.
The shield explicitly cannot block ground damage. The same is true of the Warden's circular eruption. The player must move rather than rely on B. I used that distinction to give the game two complementary lessons: combat attacks reward facing and timing, while environmental hazards reward route awareness. These are small systems, but together they create more variety than three monsters that all apply damage in exactly the same way.
Keeping effects bounded
A sword hit is more satisfying when the target flashes and a few particles scatter. I used a fixed pool of sixteen particle records rather than allocating particle objects dynamically. When a requested burst is created, the effects function scans the pool and initializes only slots whose life counter is zero. If no slots are free, the extra particles are simply omitted. The game remains correct even if the visual effect is less dense.
Each particle stores its position, small velocities, lifetime and colour. The update loop advances those integers and changes the vertical velocity periodically. There is no physics engine and no runtime allocation. This design is less impressive on paper than a modern particle system, but it is predictable and fits the goal. I can test the largest possible number of active particles, know the memory cost in advance, and keep the HUD responsive during a boss fight.
Enemy AI without a neural network
I use the word 'AI' carefully in this part of the game. The current skeletons, bats and slimes are governed by state machines and simple steering rules. They are game AI in the traditional sense, not machine-learned agents. Their intelligence comes from deliberate conditions: whether Wick is nearby, whether an attack is winding up, whether a stun timer is active and whether a proposed movement step is walkable. This is enough for enemies to behave differently, and it runs comfortably on a constrained microcontroller.
There are at most eight active enemies. Each record includes position, type, health, an action timer, a phase, a stun counter and a flash counter. The game checks proximity to an uncleared shrine at intervals and populates a free slot with an appropriate enemy. If the entity is defeated or becomes too distant, its slot can be reused. This caps work and memory rather than allowing a larger and larger active list to form as the player explores.
I gave the three enemy types different movement rhythm and durability. Skeletons step toward Wick and wind up before striking. Bats can cross lava and have a shorter warning. Slimes move in bursts and take more hits. A skeleton, bat and slime can therefore share the same Enemy structure and much of the update code while still being recognizable in play. A simple '!' drawn above an attacking creature gives the player an honest warning before damage resolves.
The existing enemy record and spawn health assignment.
struct Enemy {

    int16_t x, y;

    uint8_t type, hp, timer, phase, stun, flash;

};


static const uint8_t EnemyCount = 8;


// Spawn health pattern in the current game:

e.hp = e.type == 1 ? 1 : (e.type == 2 ? 3 : 2);
The state machine I used for attacks
Each active creature alternates between approaching, warning, attacking and recovery. When close enough, it enters a warning phase and starts a timer. If Wick remains within attack range when the countdown finishes, the creature attempts a hit. Afterward the enemy recovers for a short interval before returning to its normal movement behaviour. If the creature is stunned, I decrement its stun counter and skip its usual logic.
This structure has two practical advantages. First, the player can learn the rhythm: the warning marks an opportunity to guard, parry or move. Second, the code can be tested as transitions. A unit test can place an enemy at a chosen distance, set timer values, inject button input and verify whether the expected health change occurs. It is much easier to debug than an opaque probability model that occasionally attacks without a readable reason.
The update logic also checks the distance from the player and removes an enemy after it becomes too far away. I do not simulate monsters chasing Wick across the entire world. The game uses a living window of nearby encounters so the fixed pool can be recycled. This makes sense for the display, too: unseen enemies rarely create useful tactical information when the screen shows only 128 pixels across.
How I would extend enemy behaviour
The safest first addition would be another deterministic archetype rather than a new AI library. A cautious wisp could circle Wick at a preferred distance, then dart inward after a brief warning. A shielded skeleton could move slowly until its front defense is broken by a parry. Both ideas can use the existing record and state machine, provided the new type is assigned a sprite and every hardcoded limit and type-to-frame calculation is updated consistently. I would not change the enemy pool size just to introduce a new appearance.
For more involved behaviour I might add a small finite-state table or an explicit enum, but I would keep the public behaviour interpretable. This is especially relevant to the AI-themed Easter egg later in the manuscript. On a console with roughly six kilobytes of spare static RAM in the measured release build, tiny scoring rules can add personality; a locally running natural-language model is not a sensible expectation.
Shrines, quest progress and the Ash Warden
The six shrines are the spine of the game. Each has a fixed position, six initial health points and a bit in a progress mask. When Wick damages a shrine enough, the corresponding bit is set, health is restored, a small effect is created and the game requests a checkpoint. The final gate checks whether all six bits are present. This design gives me non-linear objective order without a large mission manager or multiple save structures.
I intentionally made the nearest unfinished shrine the next HUD objective. The logic scans the six known coordinates, computes a compact integer distance and selects the closest that still has health. Once all six are complete, the arrow points toward the Warden instead. This is an example of a low-cost usability feature. It offers enough direction to reduce wandering without rendering a full quest map over the playfield.
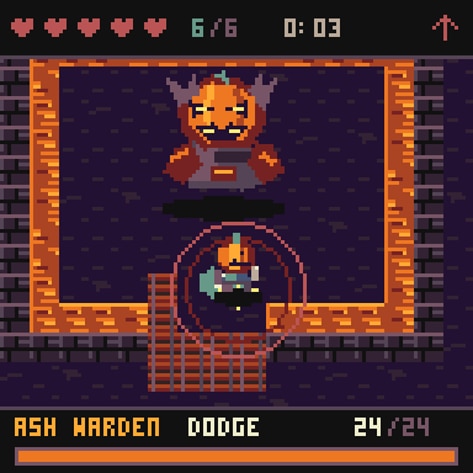
The Warden's arena exists in the generated map from the beginning, but it is isolated by the northern gate until the shrine mask is complete. I wanted the ending to feel earned and to be mechanically legible. That meant a phase-based fight with a visible danger circle, explicit HUD labels and recovery windows. The boss did not need a full physics system or a dozen animations to create a distinct encounter.
Encoding six objectives in one byte
Actual bitmask-based progression, reformatted for clarity.
// Completing shrine i:

progress.cleared |= uint8_t(1u << i);


// The northern gate checks all six bits:

const bool open = (progress.cleared == Game::AllShrines);


// Count remaining goals for the HUD:

uint8_t Game::clearedCount() const {

    uint8_t count = 0;

    for (uint8_t i=0; i<ShrineCount; ++i)

        if (progress.cleared & (1u << i)) ++count;

    return count;

}
A bitmask is convenient here because the shrines are independent yes-or-no objectives. Setting bit three does not require a variable-length list or a separate stored boolean array. The all-shrines constant is binary 00111111, or decimal 63. I can calculate the number of restored shrines from these bits and use that value for the HUD, victory status and save validation. It is also easy to set a test fixture to a nearly finished state by using a mask with five bits present.
The tradeoff is that a bitmask is a deliberately finite representation. If I add a seventh or eighth shrine, I must revisit the count and world layout. More than eight objectives would require a wider field or a different data structure and therefore may affect the save contract. For the original quest, six was a deliberate and useful limit.
The boss state machine
The Warden uses an explicit boss object containing position, target coordinates, health, phase, timer, flash and an awake flag. It begins with 24 health points and activates when Wick reaches the unlocked arena. During the preparation phase it waits before selecting a target. During the warning phase it marks Wick's recorded position. During the eruption it moves to that spot, checks whether Wick is still inside an 18-pixel radius and applies damage where appropriate. A recovery interval follows, giving Wick a chance to retaliate.
The target is recorded before the eruption occurs. That is what makes the telegraph meaningful. If the Warden simply hit Wick's current position at the last moment, the marked circle would be dishonest. Recording targetX and targetY gives the player time to move away, so the fight is about reading and responding to the cue. The circular marker is not an ornamental effect; it is gameplay information tied directly to the coordinates used for the damage test.
Below or at twelve health points the warning and recovery periods shorten. In the existing code the warning changes from 32 to 22 ticks and recovery from 45 to 28 ticks. The health bar turns red at half health. I regard this as a second phase created through pacing and UI rather than through a second boss class. It is cheap, clear and easy to adjust after real-device testing.
The existing Warden’s telegraphed-area attack, condensed from bossTick().
// The Warden chooses a target after preparation.

boss.targetX = x;

boss.targetY = y;

boss.phase = 1;

boss.timer = boss.hp <= 12 ? 22 : 32;


// When the warning expires, resolve the eruption.

const int dx = x - boss.targetX;

const int dy = y - boss.targetY;

if (dx*dx + dy*dy <= 18*18)

    hit(2, boss.targetX, boss.targetY, true, Warden);
Why I did not make the boss simply faster
Increasing movement speed is not always a good way to make a boss harder. On the small LCD, the player needs time to recognize what is happening. If the boss attacks without warning or teleports with no relationship to the shown marker, failure feels arbitrary. I would rather shorten a readable window after the player learns the pattern. That creates a genuine difficulty curve while preserving trust in the visual language.
My first physical boss tests should therefore measure actual update cadence and input-to-photon response. I would play through the normal and low-health phases repeatedly, note whether I can escape the circle when the input is pressed promptly, and only then adjust timers. The simulator demonstrates transitions and positioning but cannot fully capture button travel, backlight visibility, LCD persistence or the feeling of a crowded breadboard control layout.
Defeat, retry and victory
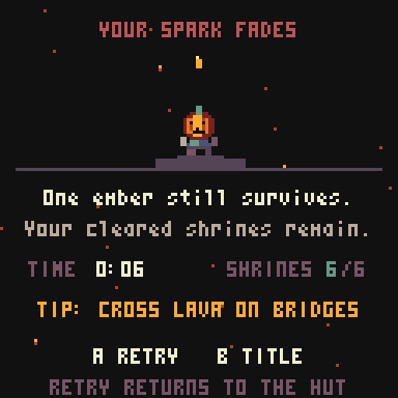
I made defeat and victory genuine game states rather than transient text drawn over a frozen screen. When health reaches zero, the model records the cause, enters Fallen and prepares a checkpoint that returns Wick to the hut with full health. The previous shrine mask and explored map remain intact. The defeat screen shows a brief animation, the run time, shrine count and a hint related to the hazard that caused the loss. That small contextual detail helps the player learn whether lava, a creature or the Warden ended the run.
On victory, the model marks the quest won, compares the completion time with bestTicks, requests a checkpoint and enters Victory. The screen celebrates the restored lanterns and shows the best-time status. After a short gate, A returns to the title while B allows exploration with full hearts and the completion clock frozen. I wanted the world to feel like a place worth revisiting, even after the gate and boss were finished.
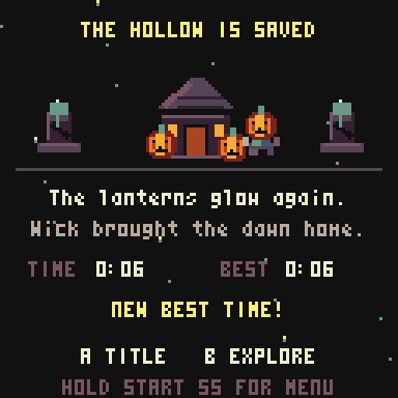
These states also force attention to input timing. If the player can accidentally skip a victory scene by holding A from the finishing sword strike, the experience feels broken. The implementation uses endingTicks to delay acceptance of ending actions. The menu-exit hold remains available independently. Separating presentation gates from save state gives me more freedom to polish transitions without changing what a checkpoint means.
Rendering Ember Hollow with CHGfx
I approached rendering as a limited-memory pipeline rather than as a series of desktop-style draw calls. A display resolution of 128 by 128 sounds small, but it is large compared with twenty kilobytes of SRAM. I use CHGfx's existing indexed framebuffer and its packed blitter. All runtime artwork uses the game's sixteen-colour palette. This leaves enough memory for game state and a reserved stack without creating a second full-screen image just to draw a title, a map or an enemy.
The display is configured through beginGraphics(), which calls gfx_begin(GFX_DIV4, GFX_12BPP) and installs the application's palette with gfx_setPalette. The DIV4 clock choice produces a configured 12 MHz SPI rate from the nominal 48 MHz CPU clock. The argument is an engineering compromise suitable for the breadboard, not a claim that twelve megahertz is the electrical limit of the panel. The 12BPP mode relates to output colour depth on the LCD transfer path; the stored framebuffer remains four-bit indexed art with sixteen displayed colours.
The graphics code clears, clips and draws in a predictable order. It converts world tile coordinates to screen positions, renders only visible map tiles, lays down static landmarks and shrines, draws pickups, sorts actors by their feet, adds particles, and finally draws the HUD or boss bar. Sorting by the foot y-coordinate is a simple way to make a foreground character visually overlap one behind it without a sophisticated Z-buffer. If I move a new ghost across Wick, I must choose whether it participates in that sort or is a deliberate HUD overlay.
The real graphics initialization and sprite helper, from View.cpp.
void beginGraphics() {

    gfx_begin(GFX_DIV4, GFX_12BPP);

    gfx_setPalette(assets::Palette, 16);

}


static void sprite(assets::SpriteId id, int x, int y) {

    const assets::Sprite &s = assets::Sprites[id];

    gfx_blit(s.pixels,

             x - s.width / 2,

             y - s.height + 3,

             s.width, s.height, 0);

}
What four bits per pixel actually save
The art pipeline stores a pixel as a palette index between zero and fifteen, which fits into four bits. Two pixels are packed into each byte. A 16 by 16 sprite therefore occupies 128 bytes in raw packed data. An equivalent uncompressed RGB565 sprite would require 512 bytes. A whole 128 by 128 screen requires 8,192 bytes at four bits per pixel but 32,768 bytes in RGB565. The latter does not fit as a single ordinary framebuffer inside the device's twenty-kilobyte SRAM, let alone leave space for game state.
The palette imposes creative limits. I cannot use arbitrary alpha gradients or an unlimited set of realistic shades. I have to choose a few colours that work together and rely on shape, contrast, dithering and animation. In Ember Hollow I used dark purples, charcoal and slate for stone and night, warm orange and gold for lava and pumpkins, and mint or cream for important highlights. The game deliberately trades smooth gradients for high-contrast signals the player can recognize at the panel's actual size.
This choice also makes assets reproducible. The Python script can store pixels directly as indices and write packed arrays to C++ source. I do not need an image decoder or dynamic allocation on the microcontroller. The price is that changing a palette index can affect many assets at once, and a sprite exported from a generic editor must be converted exactly rather than assumed compatible.
Tile drawing and lava animation
A static map can look lifeless, especially when the screen is small and the player pauses to read. I added animation through procedural tile selection rather than creating a separate full-screen video. The lava graphics have a few tile variants, and View.cpp changes the selected variant using the frame counter and tile coordinates. Neighboring lava tiles therefore do not all flicker in perfect synchrony. A few warm boundary lines help the player distinguish solid banks from molten channels.
The renderer also varies ordinary floor tiles with deterministic patterns based on tile coordinates. That prevents large regions from looking like one repeated flat square without requiring many additional map types. I like this technique because it uses a little calculation to create visual variety from a small art vocabulary. It is important not to overdo the noise: a bridge has to remain legible, and a boss warning marker must remain obvious against the terrain.
I clip all world drawing beneath the top HUD, and I render the boss health area near the bottom of the arena view when the Warden is active. This means the game's most important information cannot be accidentally hidden by terrain. When drawing an effect I always ask whether it might cover a hazard marker or button hint. On this hardware, readability is a performance and accessibility feature, not an optional cosmetic pass.
The game’s lightweight lava frame selection and tile placement.
// Lava animation selection inside the visible tile loop.

if (t == Lava) {

    const uint8_t phase =

        ((g.frame / 8) + tx / 3 + ty / 2) % 3;

    art = phase == 0 ? 2 : 7 + phase;

}


// Example world-space to screen-space mapping.

const int sx = tx * 8 - camX;

const int sy = ty * 8 - camY + 16;

gfx_blit(assets::Tiles[art], sx, sy, 8, 8, -1);
Depth sorting without a 3D engine
A top-down game still needs a consistent overlap rule. If a creature walks behind Wick, it should appear behind him; when it moves in front, it should cover the lower portion of his sprite. I use a very small sorted list of actor identifiers and order them by their foot y-coordinates. The list contains active enemies, Wick and the Warden when present. Since the maximum number of actors is small, a simple insertion sort is entirely reasonable and introduces no allocation.
This sort is a good example of matching the algorithm to the scale of the task. There is no need for a heavyweight rendering engine, spatial partition structure or polygon depth buffer when I have at most a handful of actor sprites in view. The goal is not asymptotic elegance for millions of objects. The goal is predictable, readable drawing of ten or fewer actors in a constrained frame budget.
Certain effects intentionally sit outside that actor order. The eruption circle is drawn as a marker tied to the boss's target coordinates, and particles can be drawn after actor bodies to make hits visible. Each choice has a reason. If I later want a hidden ghost to hover above the terrain but behind a doorway, I would have to decide whether to insert it into the actor sort or composite it in a different layer.
HUD priorities and human-readable feedback
The top HUD shows five hearts, shrine progress and run time. An arrow indicates the nearest unfinished shrine, then the boss location when the shrines are cleared. During a boss encounter the lower display region shows Warden health, phase text and a segmented or filled bar. I arranged the information so a player can glance at the screen and understand what to do without reading a manual after every attempt.
The words DODGE, FIRE and STRIKE correspond to real boss phases. A label is only useful if it has a truthful timing relationship to the mechanic. I would rather show three reliable words than fifteen decorative ones. The defeat screen uses cause-specific hints for the same reason. It tries to tell the player what caused the loss and what action might help next time.
I avoided relying on sound because my WeAct variant has no external buzzer output in its current configuration. This made on-screen cues especially important. I also accepted that the actual LCD's contrast, gamma and backlight are not identical to an RGB preview on a computer. Simulator screenshots can establish alignment, missing glyphs and palette differences, but real hardware remains the final test for readability.
Preserving player progress and keeping the save safe
Saving is where a small game starts feeling like a real console title. The player should be able to clear a shrine, leave the handheld, return later and continue. But saving is not just a convenient call to EEPROM.write. The CH32X035 does not provide a conventional, independently writable EEPROM for this use. CHGame uses reserved flash pages and a record format that includes magic, version, integrity information and sequence handling. The game must cooperate with those rules and with the bootloader's memory budget.
I kept the Ember Hollow progress record to forty bytes on the target build. It stores elapsed quest ticks, best completion ticks, current checkpoint coordinates, the cleared-shrine mask, health, active and won flags, and twenty-four bytes of explored-map bits. It does not store the positions of every creature, the exact boss attack timer, a half-finished sword swing, particles or every collected candy. Those are transient details that can be reconstructed or reset on continue. Shrines and exploration are durable accomplishments, whereas a moving enemy is merely part of the present encounter.
The game writes checkpoints when a shrine is restored, at pause/help transitions, on defeat, on victory and when a completed menu-exit hold occurs during play or pause. The sketch performs the actual write after the previous display transfer completes. I did not want a save operation to race the DMA engine or occur on every frame. I also make failed saves visible on the pause screen rather than quietly assuming storage worked.
The actual persistent game record. The current target layout is 40 bytes.
struct Progress {

    uint32_t ticks, bestTicks;

    uint16_t x, y;

    uint8_t cleared, hp, active, won;

    uint8_t visited[24];

};

static_assert(sizeof(Progress) <= 244,

              "Progress must fit a CHGame save page");
Map exploration in twenty-four bytes
The world contains 64 by 48 tiles, but the explored map does not need a bit for every tile. I divide it into a 16 by 12 coarse grid, with each coarse cell covering four by four terrain tiles or 32 by 32 world pixels. That gives 192 visibility cells. At one bit per cell, the map requires 192 divided by eight, or twenty-four bytes. Every time Wick moves, nearby coarse cells are marked visited. The pause map draws only the cells that have been seen.
This is a useful example of designing a data representation around the question being asked. The visited map does not need to remember the exact outline of every pixel explored. It needs to make the broad layout visible without revealing every unseen corridor. A twenty-four-byte bitset achieves that. It also fits cleanly into the forty-byte progress structure, which keeps saves small and predictable.
const int cx = x / 32, cy = y / 32;

for (int dy=-1; dy<=1; ++dy)

    for (int dx=-1; dx<=1; ++dx) {

        const int vx = cx+dx, vy = cy+dy;

        if (vx<0 || vx>=16 || vy<0 || vy>=12) continue;

        const int index = vy*16 + vx;

        progress.visited[index>>3] |=

            uint8_t(1u << (index&7));

    }
If I enlarge the world or change the exploration grid, I must revisit both the bitset size and its indexing. It would be unsafe to increase the map to a wider format while leaving the saved visited array at twenty-four bytes. The tests should include world-edge exploration and save/load cases that exercise the highest valid bit indexes.
Versioning and backwards compatibility
The current record uses EHLO and save version one. I preserve its layout when making cosmetic changes or adding transient runtime fields. Adding an Easter-egg sequence counter to the Game object does not require a save-version bump. Adding a new persistent quest flag inside Progress might. If I alter the binary layout, I need a deliberate migration or a new version with an explicit user-facing compatibility note. Merely keeping the same magic string is not enough to guarantee old and new data are interchangeable.
I also validate incoming progress rather than trusting every byte found in flash. Values such as HP, shrine mask, active state, won state and position are checked against legal ranges and geometry. If a saved position is not passable, the game returns the player to the hut rather than placing Wick inside a wall. That is how a small amount of defensive code can protect the experience from partial writes, stale records or changes in world layout.
When a player chooses NEW, I preserve only the best completion time and reset the active quest. I delay that reset until the intro is completed or skipped. This makes the title menu forgiving: opening the beginning of a new story does not instantly wipe the old checkpoint. The design is small, but it reflects the same care I wanted in the more visible boss fight.
Why the five-second START exit is special
The original CHGame framework exposes a shortcut for returning to the menu, with its own default timing. For Ember Hollow I wanted five continuous seconds. A short press was already used for the map, so I needed a gesture that felt deliberate and could not be triggered casually in the middle of a battle. I disabled the default platform shortcut with chgame.startExits=false and created QuitHold.h to track elapsed milliseconds while START remains held.
struct QuitHold {

    uint32_t began = 0;

    uint16_t elapsed = 0;

    bool tracking = false;


    bool update(uint32_t now, bool held) {

        if (!held) {

            tracking = false;

            elapsed = 0;

            return false;

        }

        if (!tracking) {

            tracking = true;

            began = now;

        }

        const uint32_t delta = now - began;

        elapsed = delta >= 5000 ? 5000

                                : static_cast<uint16_t>(delta);

        return elapsed == 5000;

    }

};
A countdown appears after half a second, not immediately. The player can release START to cancel. The elapsed time uses unsigned subtraction, so the calculation behaves properly if the millisecond counter wraps around. The exit handler lives in the sketch, outside normal play-state timing, which means it continues to work from the title, pause, intro and ending screens. When five seconds have elapsed, the sketch waits for display DMA, performs a checkpoint if appropriate, and calls chgame.exitToMenu().
I treated this as a platform interaction rather than a decorative feature. An exit control that sometimes loses progress undermines the usefulness of the SD menu. I wrote tests around cancellation and the full five-second threshold, including the timer rollover case. A future secret input code should never bypass this handler or require holding START in a way that conflicts with leaving the game.
Revisiting the Art Pipeline
After completing the main quest, I wanted Ember Hollow to contain details that might reward players who explored beyond the obvious objectives. The first experiment became the Seventh Lantern, a floating keeper that speaks differently depending on Wick’s progress. The second became A Note in the Ash, an envelope hidden southwest of the starting hut. Both are implemented game features, not concepts waiting to be added.
Before writing the encounters, I revisited my Python artwork generator. Its original sprites, terrain tiles and title scene use the same 16-colour palette. I could add a new character without replacing the renderer or introducing a file that the microSD card had to stream at runtime. This approach mattered because every additional object has to respect the flash budget.
Making all sprites, tile art and cartridge cover
I wanted the game to have its own visual identity and a reproducible build. Instead of using purchased sprite sheets or embedding the output of a large image editor without a processing path, I wrote drawing recipes in Python with Pillow. These recipes create indexed 16-colour images for Wick, the skeleton, bat, slime, shrines, home, candy, Warden, tiles and title. The generator then writes packed C++ arrays and preview PNGs. If I need a different pumpkin expression, I edit the source recipe and regenerate the output rather than touching thousands of hexadecimal bytes by hand.
The generator is stored at games/EmberHollow/tools/assets.py. It defines the palette, canvas helper, sprite drawing functions, tile generator, world constructor, title lettering and packer. The generated Assets.cpp and Assets.h expose data to the firmware. View.cpp requests sprites through a small table containing pixel pointers and dimensions. This arrangement is both friendly to artists and efficient for the microcontroller: the editor sees pixels, while the game reads compact statically stored bytes.
The classic build uses twenty sprite frames, twelve terrain tiles, an 8 KB packed title image and the world table. I created multiple frames only where movement makes them useful. The sword and shield have procedural drawing components. Some scenery flickers based on a frame counter. I tried to spend flash on things the player can recognize rather than turning every brief effect into another large bitmap.
The palette and packed 4bpp format
Here's the existing sixteen-colour palette and a readable rendering of the project pack() operation.
COLOURS = [

    "#101018", "#241b30", "#362538", "#524052",

    "#765766", "#39222a", "#752e2a", "#a64925",

    "#e8762c", "#ffae38", "#ffe071", "#b9af9e",

    "#eae1c1", "#679483", "#455775", "#be5653"

]
def pack(im):

    data = bytearray()

    for y in range(im.height):

        for x in range(0, im.width, 2):

            a = im.getpixel((x,y))

            b = im.getpixel((x+1,y)) if x+1 < im.width else 0

            data.append(a | (b << 4))

    return bytes(data)
The packer stores the first pixel in the low nibble and the second in the high nibble. If the first pixel uses palette index eight and the second index ten, the resulting byte is 0xA8. This relationship must match the graphics blitter's expectations. Swapping the nibble order or allowing an arbitrary twenty-four-bit PNG into this path produces wrong colours or geometry without necessarily producing a compiler error. I therefore keep pixel formats explicit and test them visually.
The game palette is a creative contract. Colour zero is used as a transparent index in some sprite drawing contexts. Warm indices emphasize embers, pumpkins and hit effects. Cooler indices define stone, shadows and clothing. When I add a new asset, I reuse those indices instead of casually adding a seventeenth colour. The number of on-screen palette entries is constrained by the rendering model, and the palette mapping is shared across the game.
How I constructed Wick
Wick is a small pumpkin guardian rather than a detailed humanoid. I drew him from a compact shape language: an octagonal pumpkin head, small face pixels, cloak, hands and legs. The source generates four directional views with two walking frames each. Rather than drawing eight unrelated sprites, the recipe reuses shapes and adjusts facial or body details for direction and step. A two-frame walk cycle can look lively at this resolution if the feet and body alternate clearly.
The sprite generator uses native dimensions around 14 by 18 pixels for the hero frames. That is small enough to leave useful scenery around Wick when the camera follows him. I resisted the temptation to make the protagonist much larger just to show more character detail. The player needs to see bridges, warning markers and nearby enemies. For a 128-pixel-wide display, scale is an intentional tradeoff between expression and situational awareness.
I also considered the interaction between orientation and combat. The view selects the current hero frame based on facing and frame count. The sword and shield are then drawn in positions that correspond to that facing. When I adjust one directional sprite, I should compare all four directions and inspect how the drawn weapon crosses the sprite boundary. Small alignment errors matter when the entire character is only a few pixels across.
Creating terrain that teaches the player
I designed the terrain tiles to carry meaning. Floor should be calm enough for moving sprites to stand out. Stone walls should visibly block movement. Bridges should look continuous and safe. Lava should be unmistakably dangerous and should visually separate districts. Decorative graves, pumpkins and bones should reinforce the Halloween atmosphere without accidentally making navigable cells look impassable.
The world recipe creates a two-dimensional list and fills rectangular regions with tile IDs. It uses deliberate corridors through rivers and adds safe footprints near shrines, pickups and the home location. That last step matters because a procedural map can accidentally place a quest object inside a wall or lava. I kept generation deterministic so test expectations remain stable and bug reports can reference repeatable coordinates.
I can regenerate docs/world.png whenever I modify the source and inspect the entire landscape as one image. The resulting PNG is not runtime scenery for the device; it is a development artifact that lets me understand the generated 64 by 48 tile arrangement. This distinction is important because editing docs/world.png by hand would not change the actual compiled map. The source of truth is the recipe.
Generating the title screen and menu cover
The title scene is an 128 by 128 original pixel-art composition. I used a night sky, ruined silhouettes, a crescent, lava and a more detailed Wick portrait than would fit in the tiny gameplay sprite. The title lettering uses a custom stroke alphabet in the Python script. It is drawn at its native pixel size, with a simple outline and warm face, rather than scaling a desktop typeface until it blurs.
I then used a second recipe, tools/cart.py, to adapt the title scene for CHGame's graphical menu. The cart picture is not identical to a free-form PNG. The tooling respects menu-reserved colours, dark edges and the installation bar's layout requirements. I used CHGame's artkit to preserve the pixel shapes and convert the image into the colour contract used by the visual menu. This is why renaming a PNG to .PIC would not work: the runtime picture is a prepared representation rather than a file extension trick.
The cover artwork serves a different purpose from gameplay sprites. It can be visually dramatic and dense because the player views it while choosing a game, not while dodging a boss. I still test it in the menu preview so text, icon and art do not collide with fixed interface elements. The source includes docs/cart.png so the cover can be reviewed before packaging.
Creating the Keeper of the Seventh Lantern
The original quest revolves around six lantern shrines, so I liked the idea of a forgotten seventh light. I wanted a silent ghostly keeper rather than another enemy or collectible. In `tools/assets.py`, I drew an ash-white hood, softly shaded violet wisps, dark eyes and a tiny amber lantern. The sprite is 24×28 pixels and has two frames that slightly shift its position and change the lantern flame.
Each 24×28 image contains 672 pixels. With the existing packed 4-bit representation, a frame needs 336 bytes, so two frames add 672 bytes of packed pixel art. These two frames were appended after Boss1, preserving the numeric IDs of existing sprites. That small detail matters because several existing animations depend on those IDs being consecutive.
The artwork did not need a new engine. I reused CHGfx’s packed blitter, with the same indexed palette as Wick and the existing enemies. The ghost’s eyes deliberately use opaque dark-purple index 1 instead of transparent palette index 0. Its menu panel is assembled mostly from CHGfx geometric primitives, embers, pale light and a few small gold marks.
A Very Small AI-Inspired Response Model
I wanted the keeper to notice the player’s journey, but not to claim that a language model was running on a microcontroller with only 20 KB SRAM. The implemented system is a deterministic, hand-tuned linear classifier. It is not a trained neural network, and it does not generate new sentences.
The model looks at four inputs: a constant bias, a low-health indicator, the number of restored shrines, and whether the Ash Warden was defeated. Its signed 8-bit weight matrix contains only 16 values, or 16 bytes of coefficients. It calculates four integer scores and chooses the highest, once per encounter.
const int8_t features[4] = {

    1,

    int8_t(g.hp <= 4),

    int8_t(g.clearedCount()),

    int8_t(g.progress.won)

};


static const int8_t weights[4][4] = {

    {   3, -1, -1, -8 },

    {  -2,  8,  0, -8 },

    {  -8,  0,  3, -8 },

    { -16,  0,  0, 24 }

};
The dialogue lines are intentionally short enough for the TFT: THE HOLLOW WATCHES, GUARD YOUR LAST SPARK, THE GATE GROWS RESTLESS, and THE HOLLOW REMEMBERS. The first is for an early, healthy run; the second appears with low health; the third corresponds to advancing through the shrine quest; the last is reserved for a completed game. The response remains fixed for the duration of the panel.
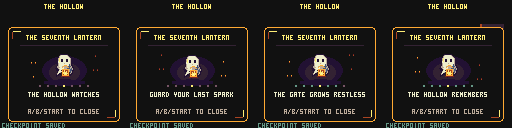
Installing the game
The SD menu was one of the reasons I wanted CHGame in the first place. I did not want a console that required recompiling its entire firmware whenever I changed games. Once the correct bootloader is installed, it can browse the SD card, select a CHG file and install the corresponding application.
The SD card to Serial Application is the ideal for loading the games onto the console and I've used it to load the .chg file of the Embers Hollow onto it.
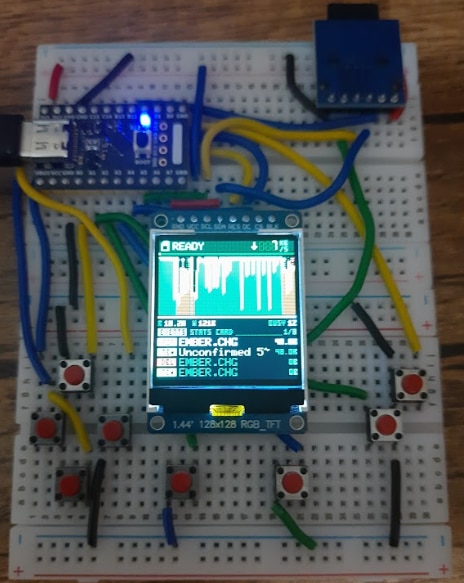
Here's the game on the console. It looks better in person than on the cam as it's a TFT display and the angle gotta be right for a proper view.
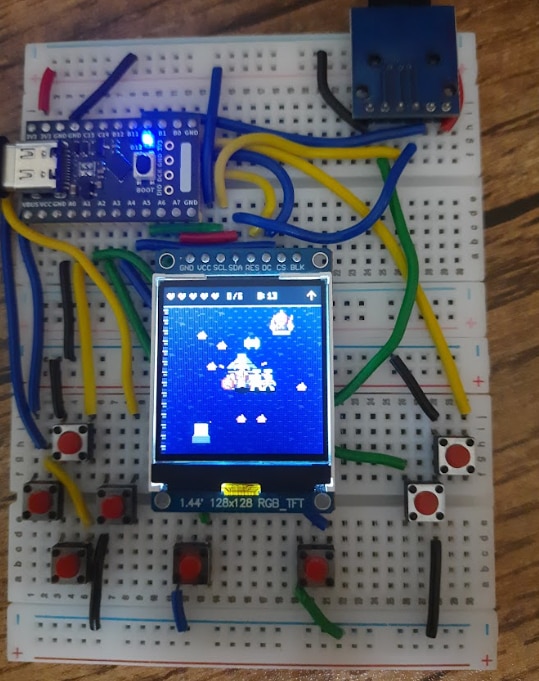
If you don't have a console and want to try out the game just go to https://play.chgame.website/ , where there's an emulator which you can use to play the Ember Hollow out by yourself!
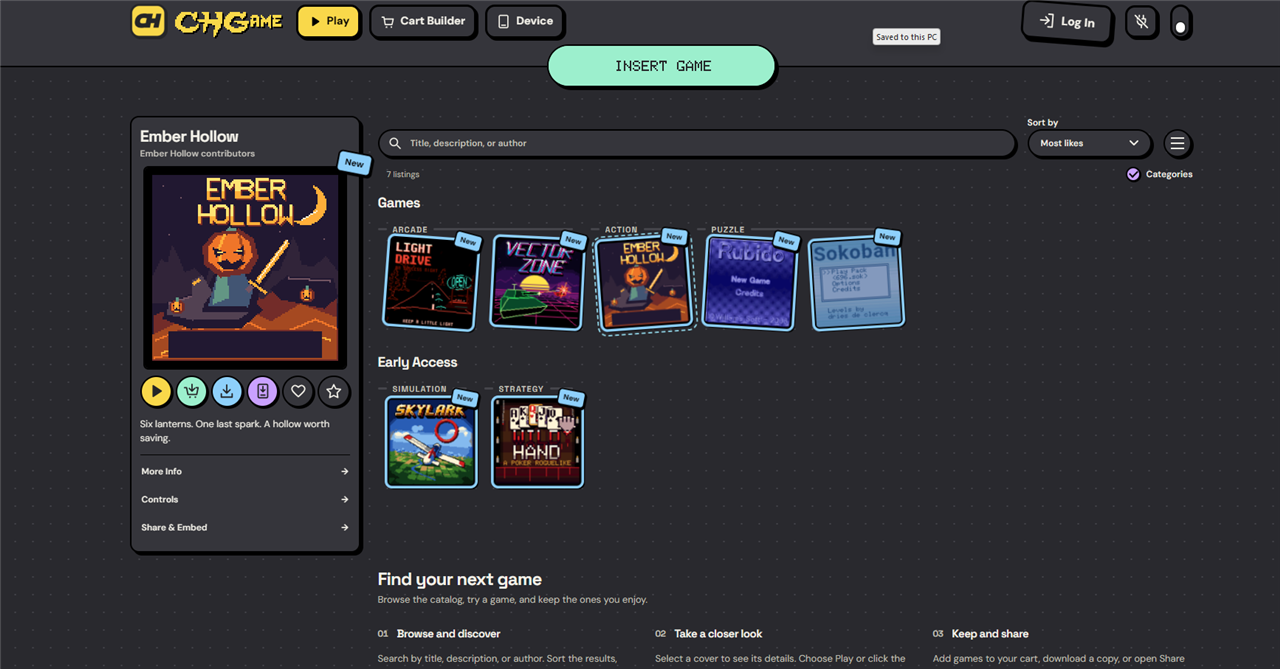
I've also added a hidden easter egg too, so do try to find it out! Happy Halloween!