


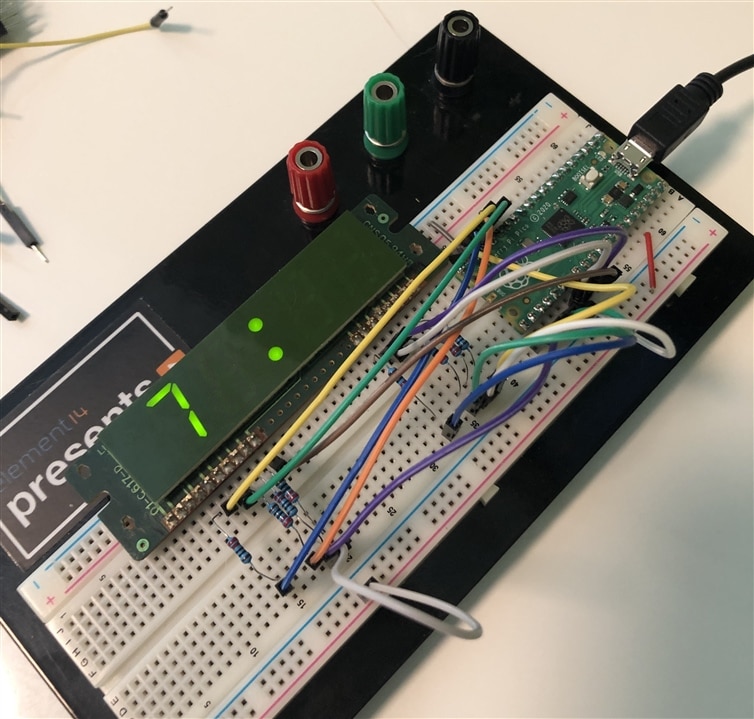
In this first step to building a digital timer, I've set up a clock display with a Raspberry Pi Pico, and then I simply have the Pico step through the 4 clock positions, showing each digit 0 through 9 for each position. At the same time, the divider colon flashes with each count.
It adds a few more wires, compared to the single-digit 7-segment display I had before: 4 wires to select one of 4 digit positions, 1 wire to control the divider colon (that divides hours:minutes or minutes:seconds), and 1 wire to provide power to the divider colon, as well as a current limiting resistor for the colon too.
I've sped up the timing a bit so it doesn't take long to test all the positions.
As you might notice, I put the clock display just a little too close to the Pi Pico, covering GP15, so I had to change one of the segment pins for this example. Because all the segment pins are defined as constants, this was very easy to do - just change the 15 to a 12 and plug the wire into the GP12 spot by the Pi Pico!
This is just a small step forward after having figured out how to control a single 7-segment display (see my previous blog posts for that). It just takes a few more wires, and a few extra bits of code that aren't much different than before.
The code is really just a small extension of what it was to control a single 7-segment display:
#
# Clock display test
#

from machine import Pin
import time


# For my clock display, the common wire connects to VCC
#  -> Note that this means we have to turn a pin "off" to light the segment LED, and "on" to turn it off
#
# You can test the display by using a small 3.3v button battery (CR2032 seems cheap and plentiful)
# Hopefully the display you have will have a model number you can look up to find the pinout.

# Define the segment GPIO connections
# hook up the segments as per the defined constants below
# Use a current limiting resistor for each segment (you'll need 7!)
# The resistors are also necessary to keep a constant brightness on the display
SEG_A_PIN = 13
SEG_B_PIN = 19
SEG_C_PIN = 17
SEG_D_PIN = 16
SEG_E_PIN = 12  # oops, I put the display too close to the Pi Pico, so pin 15 is covered.
SEG_F_PIN = 14
SEG_G_PIN = 18

# The clock display has 4 digit positions
# I'm calling them positions, as it could be hr:mm or mm:ss
POSITION_1 = 10
POSITION_2 = 11
POSITION_3 = 20
POSITION_4 = 21

DIVIDER_COLON = 22

# Python allows us to define global variables anywhere all willy-nilly,
#   but for clarity lets define them here at the top like good little programmers
#   The type is here just for clarity too - Python allows us to change it at any time
DIGITS :[Pin] = []
POSITIONS : [Pin] = []

def setup():
    # Define each segment
    SEG_A = Pin(SEG_A_PIN, Pin.OUT)
    SEG_B = Pin(SEG_B_PIN, Pin.OUT)
    SEG_C = Pin(SEG_C_PIN, Pin.OUT)
    SEG_D = Pin(SEG_D_PIN, Pin.OUT)
    SEG_E = Pin(SEG_E_PIN, Pin.OUT)
    SEG_F = Pin(SEG_F_PIN, Pin.OUT)
    SEG_G = Pin(SEG_G_PIN, Pin.OUT)

    # Define which segments make up each digit
    DIGIT_0 = [SEG_A, SEG_B, SEG_C, SEG_D, SEG_E, SEG_F       ]
    DIGIT_1 = [       SEG_B, SEG_C                            ]
    DIGIT_2 = [SEG_A, SEG_B,        SEG_D, SEG_E,        SEG_G]
    DIGIT_3 = [SEG_A, SEG_B, SEG_C, SEG_D,               SEG_G]
    DIGIT_4 = [       SEG_B, SEG_C,               SEG_F, SEG_G]
    DIGIT_5 = [SEG_A,        SEG_C, SEG_D,        SEG_F, SEG_G]
    DIGIT_6 = [SEG_A,        SEG_C, SEG_D, SEG_E, SEG_F, SEG_G]
    DIGIT_7 = [SEG_A, SEG_B, SEG_C                            ]
    DIGIT_8 = [SEG_A, SEG_B, SEG_C, SEG_D, SEG_E, SEG_F, SEG_G]
    DIGIT_9 = [SEG_A, SEG_B, SEG_C, SEG_D,        SEG_F, SEG_G]

    # Note that we are not limited to decimal digits. We could continue to add A through F for hexadecimal

    POS_1 = Pin(POSITION_1, Pin.OUT)
    POS_2 = Pin(POSITION_2, Pin.OUT)
    POS_3 = Pin(POSITION_3, Pin.OUT)
    POS_4 = Pin(POSITION_4, Pin.OUT)

    global divider_colon
    divider_colon = Pin(DIVIDER_COLON, Pin.OUT)

    global DIGITS
    DIGITS = [DIGIT_0, DIGIT_1, DIGIT_2, DIGIT_3, DIGIT_4, DIGIT_5, DIGIT_6, DIGIT_7, DIGIT_8, DIGIT_9]

    global POSITIONS
    POSITIONS = [POS_1, POS_2, POS_3, POS_4]

    displayOff()

def showPosition(position):
    positionsOff()
    position.on()

def displayDigit(digit):
    #start by turning off all the segments
    segmentsOff()

    for segment in digit:
        segment.off() # gpio "off" turns on the LED

def positionsOff():
    for pos in POSITIONS:
        pos.off()

def segmentsOff():
    for segment in DIGITS[8]:
        segment.on() # gpio "on" turns off the LED

def displayOff():
    # turn off all the digit positions
    positionsOff()
    # turn off all the segments
    segmentsOff()


# Start main code
setup()

while True:
    for position in POSITIONS:
        showPosition(position)

        for digit in DIGITS:
            displayDigit(digit)
            time.sleep(0.2)
            divider_colon.toggle()
As before, I'm aiming to have my code be readable rather than efficient. I hope my naming conventions make sense 
Next I'll try to have it do some actual time type display and maybe some counting.
Cheers,
-Nico
Previous: Testing the clock display using a button-cell battery