


Required Hardware
Before you get started, let's review what you'll need.
- Raspberry Pi 3 (Recommended) or Pi 2 Model B (Supported) - Buy on Element14 - Pi 3 orPi 2.
- MATRIX VoiceESP32 Version (Wi-Fi, Bluetooth, Microcontroller) - The Raspberry Pi does not have a built-in microphone, the MATRIX Voice has an 8 mic array perfect for Alexa and any other voice solution - Buy MATRIX Voice
- Micro-USB Power Supply for Raspberry Pi - 2.5A 5V power supply recommended
- Micro SD Card (Minimum 8 GB)
- A USB Keyboard & Mouse, and an external HDMI Monitor - we also recommend having a USB keyboard and mouse as well as an HDMI monitor handy if you're unable to remote(SSH) into your Pi.
- Internet connection (Ethernet or WiFi)
- (Optional) WiFi Wireless Adapter for Pi 2 (Buy on Element14). Note: Pi 3 has built-in WiFi.
- Personal Computer (Windows, Linux, or Mac)
Let's Get Started
The MATRIX Voice ESP32 version has an ESP-WROOM-32. This tiny module allows for standalone applications with WiFi and Bluetooth. We require the Raspberry Pi for the initial set up.
This guide goes over how to set up your ESP32 MATRIX Voice as a Bluetooth server. We can then send messages to it using the nRF Connect phone app and change the color of the LEDs.
To follow along with this guide, here is a guide that goes over installing the ESP32 development environment on your PC, and how to set up the Arduino IDE to support ESP32 development over WiFi.
Compiling the Code
After having set up your Raspberry Pi and MATRIX Voice, download the esp32-arduino-bluetooth GitHub repository to your PC.
git clone https://github.com/matrix-io/esp32-arduino-bluetooth.git Open the esp32-arduino-bluetooth/bluetooth/bluetooth.ino file in the Arduino IDE.
Click on Sketch -> Export Compiled Binary. This will create a binary (.bin) file from the arduino code which will then be flashed to the MATRIX Voice through the Raspberry Pi.
Deploy the Sketch to the ESP32
Connect your voice to the Raspberry Pi. Go on your Pi's terminal and type the following commands to erase any previous programs. This step must be performed on every re-flashing of the ESP32.
voice_esp32_enable
esptool.py --chip esp32 --port /dev/ttyS0 --baud 115200 --before default_reset --after hard_reset erase_flash
sudo reboot
Go on your PC's terminal and navigate to esp32-arduino-bluetooth/bluetooth.
cd esp32-arduino-bluetooth/bluetooth Once in the directory, edit the deploy_ota.sh file and change the IP to your Pi's IP address in the place of YOUR_PI_IP_HERE. Then run the command below.
sh deploy_ota.sh You will be prompted to enter your Pi's password. Then, this will flash the MATRIX Voice with the current program and you're ready to move on.
Using Your Phone to Connect to the MATRIX Voice
This program is meant to change the LEDs' color after having its service characteristic changed, which we will be doing using the nRF Connect app (Click here for Android, here for IOS).
The app allows us to see the services and characteristics of a client, as well as write new values if permission is granted.
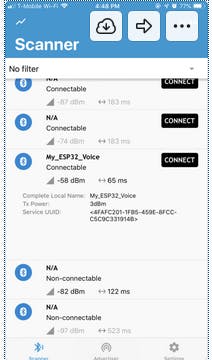
When you open the app, you will see a list of available devices to connect to; in this case, we will be connecting to the esp32 marked as "My_ESP32_Voice".
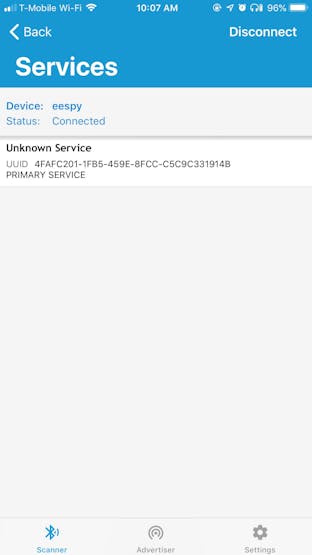
You will be shown available services such as the one above. Click on each service to see its characteristics.
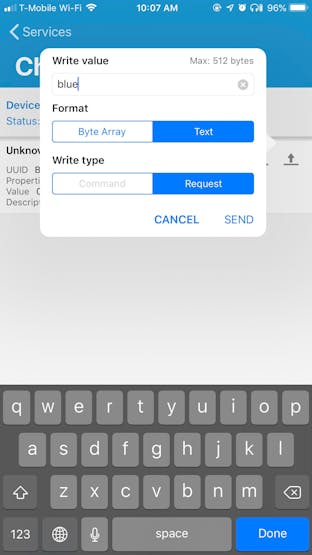
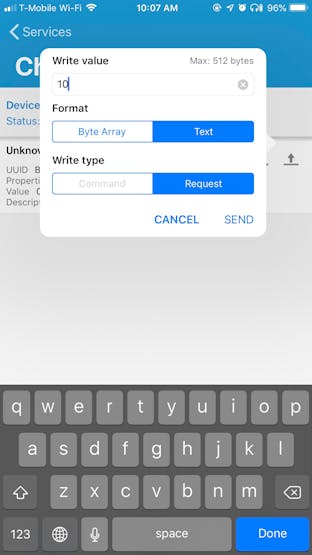
Sending brightness to the MATRIX Voice ESP32 over Bluetooth
The characteristic our MATRIX Voice created allows the user to write to it, so by clicking the upload icon, we can send it a message containing the color we want or a number value indicating the how bright we want the LEDs to be.
You're all set! Feel free to play around with the example for a better understanding of the ESP32's Bluetooth capabilities.