


Set up your MATRIX device with Snips.ai to have a voice-controlled arc reactor that pulses on command.
Required Hardware
Before getting started, let's review what you'll need.
- Raspberry Pi 3 (Recommended) or Pi 2 Model B (Supported).
- MATRIX Voice or MATRIXCreator - Raspberry Pi does not have a built-in microphone, the MATRIX Voice & MATRIXCreator each have an 8 mic array - Buy MATRIX Voice or Buy MATRIX Creator.
- Micro-USB power adapter for Raspberry Pi.
- Micro SD Card (Minimum 8 GB) - An operating system is required to get started. You can download Raspbian Stretch and use the guides for Mac OS, Linux and Windows In the Raspberry Pi website.
- External Speaker with 3.5 mm audio cable.
- PortableBattery Pack
- Micro-USB Cable
- A USB Keyboard & Mouse, and an external HDMI Monitor - we also recommend having a USB keyboard and mouse as well as an HDMI monitor handy. You can also use the Raspberry Pi remotely, see this guide from Google.
- Internet connection (Ethernet or WiFi)
- (Optional) WiFi Wireless Adapter for Pi 2. Note: Pi 3 has built-in WiFi.
- Iron Man suit
Let's Get Started
If you haven't already, be sure to setup your Raspberry Pi with your MATRIX Device.
Once setup, ensure you enable SSH on your Raspberry Pi. This allows the SAM CLI tool to connect to your Pi.
1. Installing MATRIX CORE
Before starting, ensure you have access to the terminal of your Raspberry Pi via an SSH-session or a connected screen, mouse, and keyboard. Then insert and run the following commands into your Raspberry Pi's terminal, one at a time.
Add the MATRIX repository and key.
curl https://apt.matrix.one/doc/apt-key.gpg | sudo apt-key add -
echo "deb https://apt.matrix.one/raspbian $(lsb_release -sc) main" | sudo tee /etc/apt/sources.list.d/matrixlabs.list
Update your repository and packages.
sudo apt-get update
sudo apt-get upgrade
Install the the MATRIX CORE packages.
sudo apt-get install matrixio-malos
Reboot your device.
sudo reboot
MATRIX CORE will now be running as a service each time your Raspberry Pi boots up.
These remaining commands will install ZeroMQ.
echo "deb http://download.opensuse.org/repositories/network:/messaging:/zeromq:/release-stable/Debian_9.0/ ./" | sudo tee /etc/apt/sources.list.d/zeromq.list
wget https://download.opensuse.org/repositories/network:/messaging:/zeromq:/release-stable/Debian_9.0/Release.key -O- | sudo apt-key add
Full installation instructions for MATRIX Core, including helpful information related to installation, is included in the MATRIX documentation.
2. Setting Up JavaScript
Once you have installed all the MATRIX Core dependencies, follow the steps outlined in the Javascript Setup section of the MATRIX documentation to install Node.js, learn how to create a Node.js application and to create a sample Javascript app.
3. Configuring Snips.ai
Next, follow the Snips guide on Hackster to get setup with Snips.ai on your MATRIX device and the SAM CLI tool.
4. Creating Your Iron Man Assistant on Snips.ai
We have outlined the steps for making a Snips.ai account, creating the iron man assistant and arc reactor app in this guide.
If you haven't already, sign up for an account on Snips.ai.
Once you have created an account, login to view your Snips Console.
- Thefirst time you login, you’ll be prompted to create your first Voice Assistant directly.
- If it’s not the first time, go to the Console’s home page and click on Create a New Assistant.
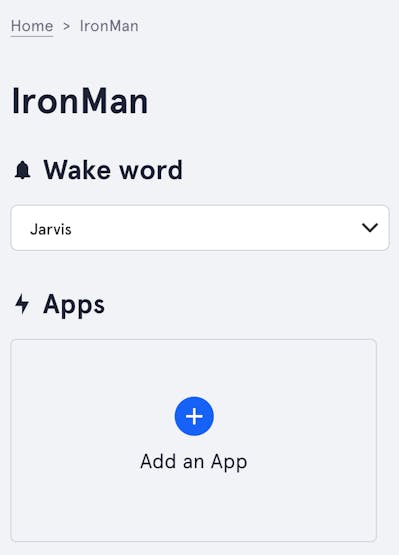
Create an assistant called "IronMan" and select the language of your choice. In this guide, we chose English.
Once you have created your assistant, select "Jarvis" as the Wake word from the drop-down menu on the Snips console.
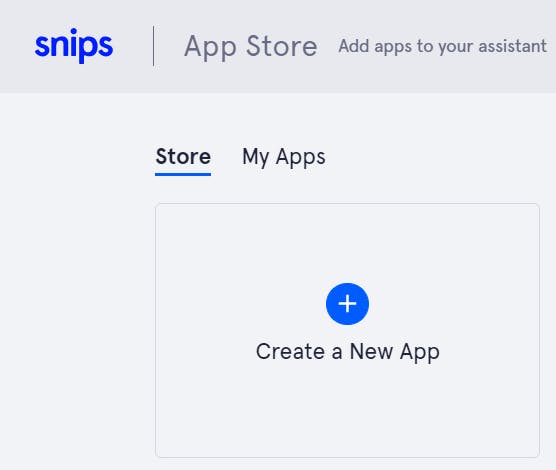
5. Adding the Iron Man App to Your Snips.ai Assistant
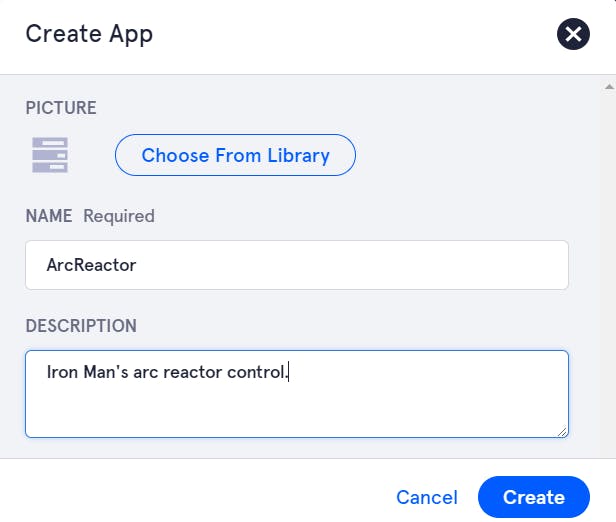
Click on Add an App, then Create a new App.
| {gallery} |
|---|
|
|
Name your app and provide a description if desired.
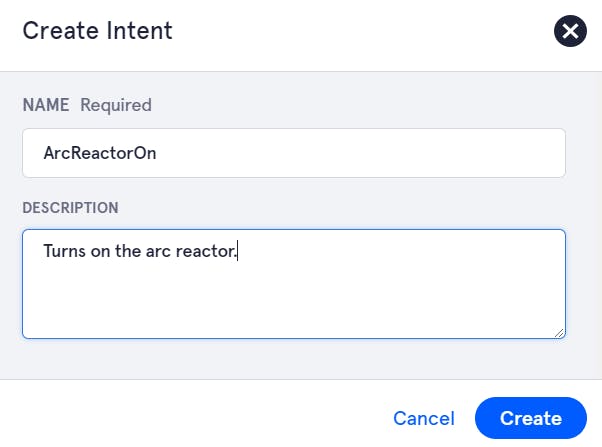
Click on the ArcReactor app you just created on the Snips.ai console, then the click Edit app button.
Under the Intents tab, click Create New Intent. Name your intent "ArcReactorOn" and add a description.
Add a new slot TYPE "On" from the drop-down menu by selecting "New Slot Type" and entering "On" for the "Slot Type Name."

Then begin adding as many training examples as you can think of. This improves the chances of your intent being recognized.
Once you've added training examples, double click on each instance of the word "on" and select the slot "On" from the drop-down.
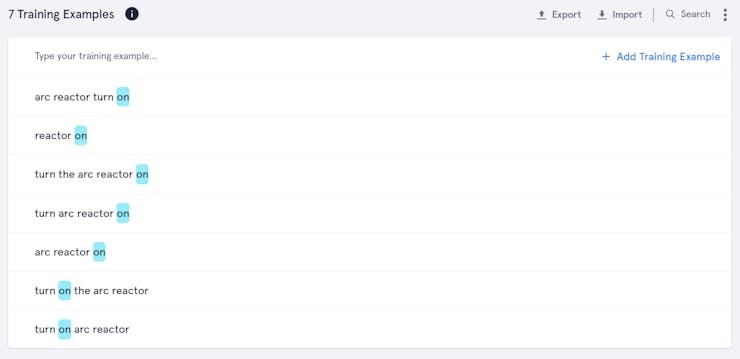
Make sure to save your intent by hitting the Savebutton on the bottom right of your screen.
Repeat the process for the ArcReactorOff Intent as shown below.
| {gallery} My Gallery Title |
|---|
|
 |
|

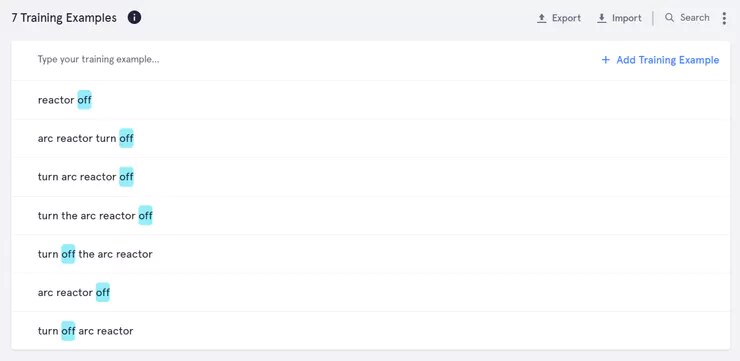
Be sure to save your intent by hitting the "Save" button on the bottom right corner!
7. Deploying Your Snips.ai Assistant
On your personal computer's terminal, type in the following command.
sam login
You will then be prompted to type your Snips.ai console email and password.
Once you have logged in to your Snips account through the SAM CLI tool, go back to the Snips Console on your browser.
Click on the Deploy Assistant button on the bottom right side panel of your Snips console. Then copy & paste the sam command Snips provides into the terminal on your personal computer.
8. Creating JavaScript Code with Everloop and MQTT
The following commands will download the ironman.js file from our GitHuband place it in the home/pi/js-matrix-core-app folder (created in Step 2).
(Run the following commands on your Raspberry PI)
cd /home/pi/js-matrix-core-app
curl https://raw.githubusercontent.com/matrix-io/MATRIX-Iron-Man/master/ironman.js >> ironman.js
PASS YOUR SNIPS.AI USERNAME
Before moving on, you'll need to pass in your snips username into the snipsUserName variable.
var snipsUserName = "YOUR_SNIPS_USERNAME";
You can obtain your username from the top right of the Snips Console page.

Once you have ironman.js setup, use the following commands in your Raspberry Pi's terminal to download MQTT and run your ironman app.
npm install mqtt --save
node ironman.js
9. Running Your Iron Man App on Boot
Once you have verified that your iron man app is running successfully, you can have ironman.js run on boot so that it starts whenever your Raspberry Pi starts up.
In your Raspberry Pi, open the rc.local file using the following command in the terminal.
sudo nano /etc/rc.local
Add the following line to the beginning of the file.
/home/pi/.nvm/versions/node/v8.6.0/bin/node /home/pi/js-matrix-core-app/ironman.js &
Save the file by entering Ctrl-X, then Y.
Check to see if rc.local woks by running the following command in your pi's terminal.
/etc/rc.local
If ironman.js runs through rc.local as expected, then you are good to go. The file ironman.js will now run on boot and you can command your arc reactor as soon as your Pi turns on.
10. Finally, Embedding Your MATRIX Device into an Iron Man Suit
You can purchase a polyester iron man suit from Amazon or from a local store.
Make a horizontal slit near the top of the Arc Reactor print on the suit with an X-ACTO knife to make room for your MATRIX device's GPIO pins to poke through.
| {gallery} |
|---|
|
|


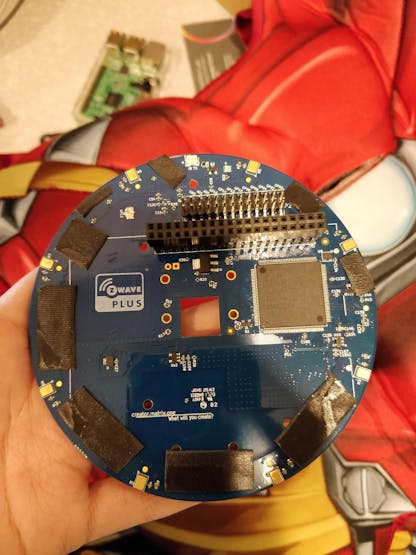
Use double-sided tape on the back of your MATRIX device to secure it to the suit. Make sure to leave the mics exposed as shown in the image below*.
*Be careful not to tape onto any of the small components!
Attach the Raspberry Pi from the inside of your suit to your MATRIX device's GPIO pins.
Don't forget to attach a speaker with an audio jack and a portable battery pack to power your Raspberry Pi.
Comfortably tuck away your speaker and batter pack in your pockets.
You are now ready for Halloween as Tony Stark!