


Electronic vintage weather station
In the past, some houses had small weather stations that showed the data of humidity, atmospheric pressure and temperature that were in that area by means of spheres, these spheres were framed in tables and hung on the walls; With the appearance of the media, these instruments fell into disuse, since in the news they offered meteorological information from all over the country.
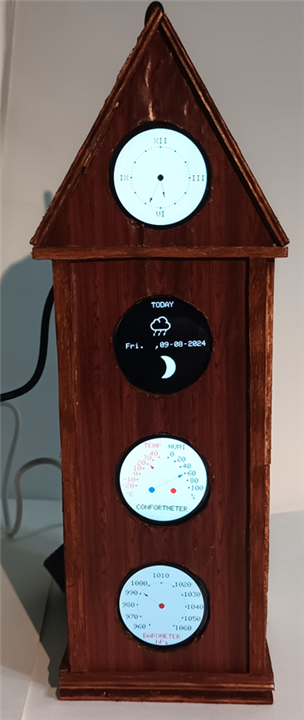
With this project we are going to recover this practical instrument by making a vintage electronic weather station. It is a Springfield-type weather station with imitation wood. This meteorological instrument is vertical and will have four spheres. The upper dial will show the current time, the second dial will offer a possible image of the state of the sky according to atmospheric pressure, the day and date and the state of the moon, the third sphere will offer the temperature in degrees Celsius and the percentage of humidity and the fourth and final sphere, will offer the atmospheric pressure in hPa, like the old dials, the reading of the values will be indicated by arrows.
Round 1.28-inch TFT GC901 displays will be used for the dials. The versatile DHT-22 module will be used for temperature and humidity values and the GY-68 BMP180 module will be used to take the atmospheric pressure value. The DS3231 RTC module will be used to obtain the current time and minutes, as well as the current date. These modules will be powered by the versatile MB102 breadboard power supply, as the outputs can be configured to one at 5 VDC and one at 3.3 VDC, the latter being the one you will use to power the modules.
Hardware Needed:
- 1 ESP-32 Dev Kit C V4
- 4 GC9A01 1.28 inch Round LCD TFT display
- 1 DHT22 AM2302 temperature & humidity module
- 1 GY-68 BMP180 barometer sensor module
- 1 Real time clock RTC DS3231 module
- 1 MB102 Breadboard Power Supply
- 1 PCB Board Set printed circuit board
- PIN Header Single Row Straight Sockets
- Pinleisten Header
- Heat shrink tubing
- Jumper wire cable 40 pcs. 20 cm each M2M male to male (optional)
- Ultra Flexible Tinned Copper Cable
- Wood planks
The software needed is:
- Arduino IDE
- Wire library (Wire.h, this library is included in the Arduino IDE)
- SPI library (SPI.h, this library is included in the Arduino IDE)
- Adafruit GC9A01A library (Arduino Adafruit_GC9A01A.h)
- BMP180 library (download library from AZ-Delivery)
- RTClib.h library (Adrafruit/RTClib.h)
- DHT.h library (Adafruit/DHT-sensor-library)
- Electronic_vintage_weather_station.ino
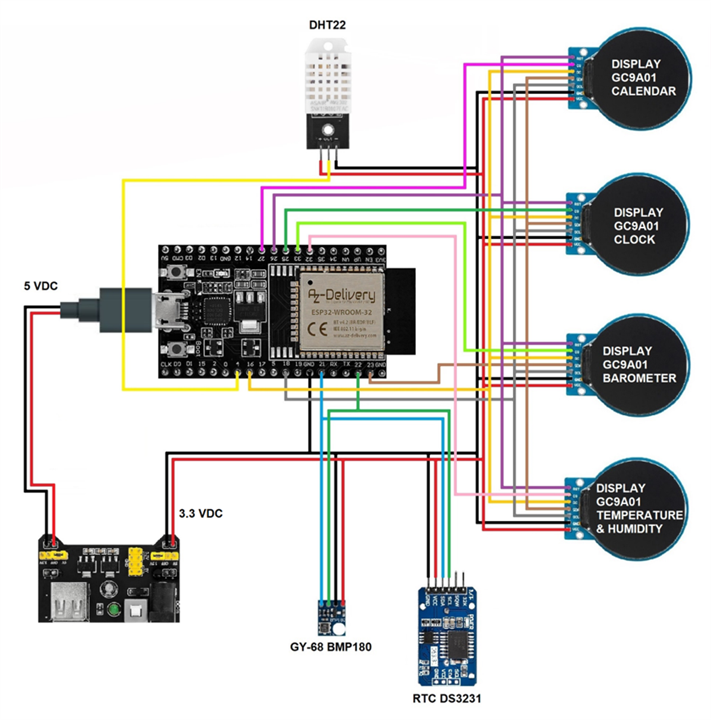
Electronic vintage weather station circuit
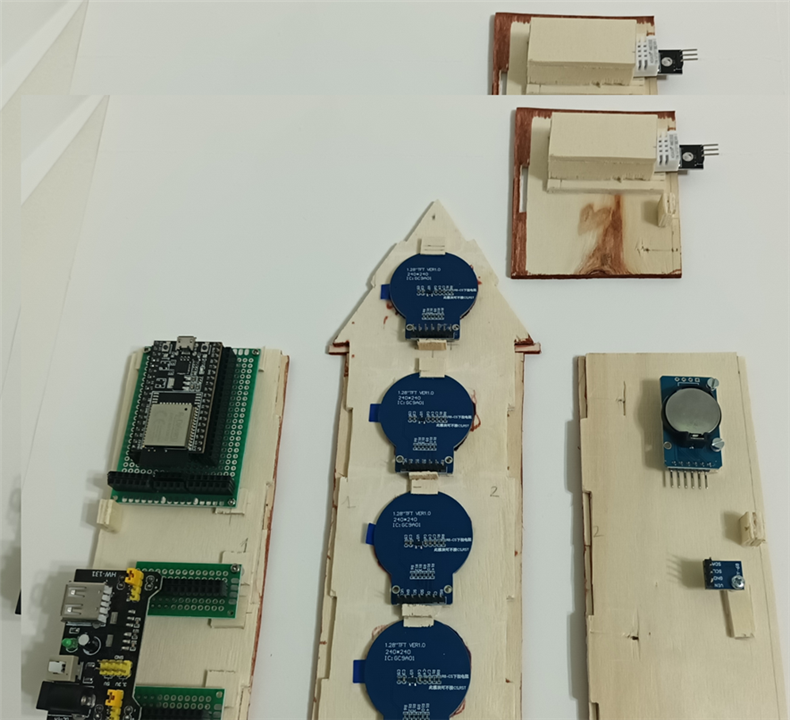
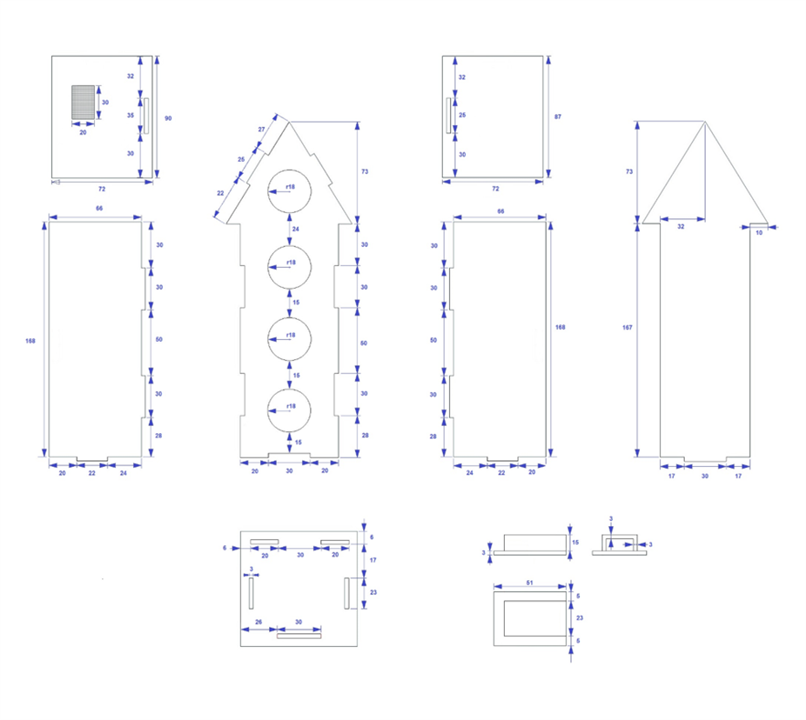
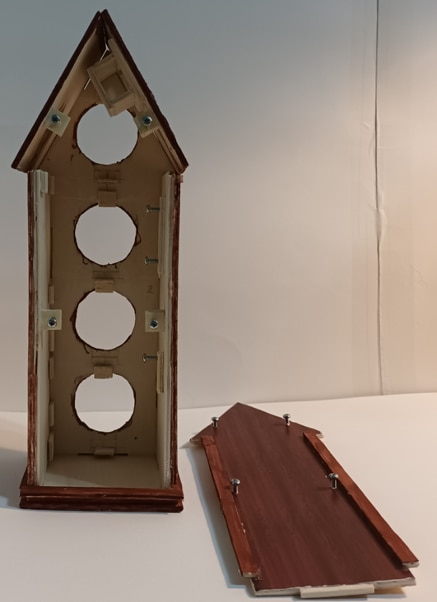
Electronic vintage weather station drawing parts
Description of the operation of the project
As can be seen in the diagram of the components of the circuit, to obtain the values of temperature and humidity the DHT22 AM2302 module has been used, the OUT signal pin of this sensor must be connected to port 4 of the ESP-32 Dev Kit C V4 microcontroller so that the sensor sends the readings taken. For the measurement of atmospheric pressure the versatile BMP180 barometric module is used, and for obtaining the current time and dates the RTC DS3231 Real Time Clock module is used, these two modules communicate with the microcontroller through the I2C bus, these modules have the SDA and SCL pins connected to ports 21 and 22 which are the pins of the I2C port of the ESP-32 Dev Kit microcontroller C V4, that the two modules are connected to the same ports is not a problem, since each module has a unique address to access from the microcontroller, in this case, these addresses (BMP180 module address: 0x77 and DS3231 module address: 0x68) are defined within the libraries that are implemented at the beginning of the sketch and should not be defined or implemented, they are transparent to the programmer.
For the display of the readings of the previous modules, the round 1.28-inch TFT screens GC9A01 have been used, these communicate with the microcontroller through the SPI bus, so in order to select the screen where to display each reading of the modules, the CS (Chip Select) pins of each screen must be connected to a single port of the microcontroller, the other pins of the displays are RST (reset), DC (data), SDA (mosi), SCL (clock) will be connected to the same ports of the microcontroller, as the displays must be synchronized.
Attention should be paid to the output voltage setting of the MB102 power supply using the jumpers, as the OFF and 3.3V pins must be bridged so that the output voltage of 3.3 VDC has the output voltage where the modules will be connected to power them. The entire assembly is controlled by the ESP-32 Dev Kit C V4 microcontroller.
This is a read-only project of data acquired by modules and displayed on the screen, no interaction is needed. The operation of the circuit is simple, once the modules have been initialized, they continuously send the measurements obtained to the microcontroller and it will show the data through the screens, to select the screen through which each value of the modules will be displayed, the appropriate screen must be selected through the port of the microcontroller to which the CS pin of the screen is connected.
The data from the sensor and clock readings will be represented on dials with scales.
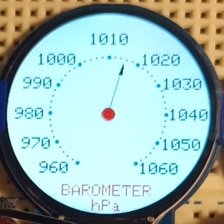
The sphere that will show the value of atmospheric pressure is composed of a single circumference where the scale of values will be located, where the points of pressure values with legends are thick blue points, while the intermediate points are significantly smaller, black and without a value legend. The name of the magnitude represented and the unit of measurement are indicated. The needle ends in an arrowhead and will mark the value of the pressure read by the BMP180 module.
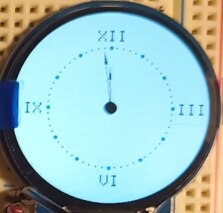
The dial that will mark the hours and minutes is composed of two concentric circles, where one circle will show the hour markers with blue dots and the other circle will mark the minutes with smaller black dots, it is the typical dial with the legend of the hours in Roman numerals at the cardinal points. The hour and minutes will be marked with hands ending in an arrowhead.
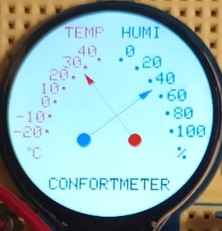
The sphere that will mark the temperature and humidity is composed of two non-concentric spheres, the scales of values will be arches of these and will be opposed. In these arcs, the markers of the values will be numbers and the legends of the values will be shown in red for temperature and blue for humidity. The legends of each magnitude will also be reflected at the top and bottom of the scale, the unit of measurement. They will mark the values obtained by the sensor by means of needles ending in an arrowhead.
As you can see in the photographs, the scales are circles or arcs of them, for the needle to show the exact value of the value read, the needle must be positioned at the angle by which the tip of it signals the value. Unfortunately, there is no method in the screen libraries that represents angles, so you must look for the method to be able to convert the value of the sensor reading and represent it on the perimeter of the circumference with radian degrees, for this conversion, operations with the sine and cosine of the angles will be used, with which the coordinates will be calculated in which the tip of the needle must be located on the screen to mark the value of the reading that the sensors send.
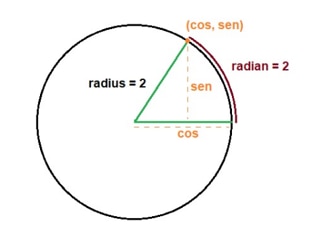
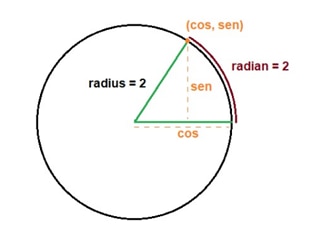
A radian is the measure of a central angle of a circle whose arc length subtended in equal to its radius, on the other hand, the value of 1 degree of a circle is equal to 0.0174533 radians. As you can see from the drawing, the orange dot of the circumference can be calculated using the cosine and sine, and that point will be a coordinate on the screen.
Analysis of the sketch
It begins with the analysis of the sketch. The first thing that should always be done at the beginning of a sketch of any project is to include the necessary libraries in the definition section of global variables to be able to use the modules that are used, in these libraries are the configurations and methods necessary to take the measurements.
The first library to be added is <Wire.h>, this library allows communication between devices by the I2C bus that is used by the BMP180 barometric module and the DS3231 clock. The next library to be included is "SPI.h", this library allows communication with devices with SPI ports such as TFT displays. The next library to be added is "Adafruit_GC9A01A.h", this library provides the necessary configuration and support for the controller of the GC9A01A displays. The libraries <BMP180.h> necessary to work with the barometer module, "RTClib.h" for the clock module and <DHT.h> to be able to work with the DHT22 module for temperature and humidity are added.
#include <Wire.h>
#include "SPI.h"
#include "Adafruit_GC9A01A.h"
#include <BMP180.h>
#include "RTClib.h"
#include <DHT.h>
The following six lines of the sketch are definitions of variables to contain integers, these variables will be used to implement the objects of the TFT screens. As you can see, the number of the microcontroller port by which the data will be sent to the screens with tft_dc 16 and with tft_cs_pressure 33, tft_cs_clock 25, tft_cs_temperature 32 and tft_cs_calendar 27 is defined, the microcontroller ports are defined for the selection of the screen that should display the information of each sensor and a variable for the connection to the RST pin of the screens with tft_rst 26. Thenames of the variables are quite intuitive.
#define tft_dc 16
#define tft_cs_pressure 33
#define tft_cs_clock 25
#define tft_cs_temperature 32
#define tft_cs_calendar 27
#define tft_rst 26
When the variables of the screens have already been defined, an object must be created for each screen to be able to operate with them, to do so, a name is declared and as arguments the port of the microcontroller to which the screen is connected and the port through which it will send the data to be displayed, as you can see, the names of the variables that we previously defined are reflected.
Adafruit_GC9A01A tft_pressure(tft_cs_pressure, tft_dc);
Adafruit_GC9A01A tft_clock (tft_cs_clock, tft_dc);
Adafruit_GC9A01A tft_temperature (tft_cs_temperature, tft_dc);
Adafruit_GC9A01A tft_calendar (tft_cs_calendar, tft_dc);
Basic colors will be used for the elements of the spheres, black, blue, red, white and gray, with which their names and the numerical value they have in rgb565 code are defined. In the http://rinkydinkelectronics.com/calc_rgb565.php address you can know the value of any color.
#define BLACK 0x0000
#define BLUE 0x001F
#define 0xF800 NETWORK
#define WHITE 0xFFFF
#define GREY 0x4A49
After defining the colors to be used, two essential variables are defined to calculate the coordinates of the values on the scale of values and the position of the needle to indicate the value. The first variable is defined with the name pi and will obviously contain the mathematical value of this constant, the second variable is defined with the name deg_to_rad and will contain the value in radians that has 1 degree of any circumference.
#define deg_to_rad 0.0174532925
float pi = 3.1415926535;
In order to receive the temperature and humidity data from the DHT22 module, a sensor object must be implemented and the necessary variables defined. The first thing is to define a variable to indicate the port of the microcontroller to which the module data pin will be connected, as well as another variable to indicate the sensor model, then, a module object named dht is implemented, as parameters of this object the port of the microcontroller to which the signal pin has been connected and the sensor model must be indicated, these parameters are reflected by the defined variables.
#define dht_pin 4
#define dht_type DHT22
DHT dht(dht_pin, dht_type);
Once the module object has been created, you must define variables to save the data, so that it can be displayed on the screen. Then, two variables are defined to store the temperature and humidity data read by the sensor, the names of these are easy to follow.
float humi;
float temp;
Before continuing with the sketch, the coordinates of the GC9A01 screen will be explained. This screen is round, but to know the coordinates of a point on the screen, it is important to know that the coordinate point X = 0 and Y = 0 is the upper left corner of the pink square in the following image, i.e. the actual screen would be a circular cutout of a square screen of 240 px x 240 px resolution.
The scale of values for both humidity and temperature will be drawn as an arc of circumference as seen in the image, so that the center of the humidity circumference will have the coordinates X = 89 and Y = 150, while the center of the circumference for the temperature scale will have the coordinates X = 149 and Y = 150, only the arc necessary to contain the necessary scale will be drawn. In the image you can see how the circles described are located.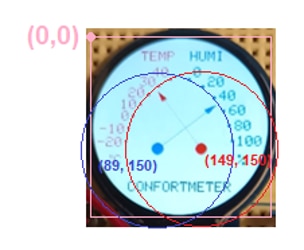
The sketch continues, the necessary variables are defined to then create both the scales of values, as well as the needles marking the temperature and humidity. For the subsequent creation of the arc of the temperature and humidity scale, the variables center_x_temperature, center_y_temperature, center_x_humidity and center_y_humidity of type int are created, which are the values of the coordinates of the center of the circumference to be used.
int center_x_temperature = 149;
int center_y_temperature = 150;

int center_x_humidity = 89;
int center_y_humidity = 150;
The complete image of the needles is composed of a line that starts from the center of the circumference and ends in arrowheads that are really triangles and will mark the value of temperature and humidity. To represent the new position of a needle, first, the previous state of the needle will have to be redrawn with the background color of the screen, which defines variables to contain the old coordinates and the new coordinates obtained from the new values to represent the new position of the needle.
The definition of the variables are float type to save the coordinates, both old and new, of the pivot of the needles, these are defined in the next line of the sketch.
float pivot_x_temperature, pivot_y_temperature, pivot_x_temperature_old, pivot_temperature_y_old;
Float variables are also defined to save the values of the coordinates of the position of the triangle of the arrowhead that will mark the value of the temperature that the DHT22 sensor has taken, variables are created for both old and new coordinates.
float p1_x_temperature, p1_y_temperature, p2_x_temperature, p2_y_temperature, p3_x_temperature, p3_y_temperature;
float p1_x_old_temperature, p1_y_old_temperature, p2_x_old_temperature, p2_y_old_temperature, p3_x_old_temperature, p3_y_old_temperature;
In the following two lines, the variables arc_x_temperature and arc_y_temperature float are defined to contain the coordinates of the arc drawing with the temperature value scale.
float arc_x_temperature;
float arc_y_temperature;
The variable needleAngle_temperature float type that will contain the position in degrees of the temperature is defined, this variable will be used to know the angle of the value of the temperatures of the scale of values and the temperature that the needle must mark, it is initialized with zero.
float needleAngle_temperature = 0;
The last two variables that are defined for temperature are the float-type temperature variable where the value that the DHT22 sensor detects will be saved and the needle_setter_temperature variable also float-type where the temperature that the needle must mark will be saved.
float temperature;
float needle_setter_temperature;
For humidity data, the same variables described in the previous lines are defined but ending in humidity, these lines of code are described in the sketch and tracking is very easy.
int center_x_humidity = 89;
int center_y_humidity = 150;

float pivot_x_humidity, pivot_y_humidity, pivot_x_humidity_old, pivot_humidity_y_old;
float p4_x_humidity, p4_y_humidity, p5_x_humidity, p5_y_humidity, p6_x_humidity, p6_y_humidity;
float p4_x_old_humidity, p4_y_old_humidity, p5_x_old_humidity, p5_y_old_humidity, p6_x_old_humidity, p6_y_old_humidity;

float arc_x_humidity;
float arc_y_humidity;

float needleAngle_humidity = 0;

float humidity;
float needle_setter_humidity;
The last line of the definitions for the temperature and humidity display defines the int type radius_temperature variable that is used to define the radius of the circles that the arcs will contain with the scale of temperature and humidity values, this radius is 100 pixels.
int radius_temperature = 100;
The definitions of variables for the BMP180 barometric module begin with the implementation of an object for the sensor, in this case only one name must be indicated to be able to operate with it, it will be called bmp180. The float pressu variable is also defined to save the value of the reading made by the sensor.
BMP180 bmp180;
float pressu;
The value scale for the BMP180 sensor is a single circumference and its center is the center of the 240 x 240 pixel screen, so the center will be at the coordinates X = 120 and Y = 120.
int center_x_pressure = 120;
int center_y_pressure = 120;
Float variables are also defined to save the coordinates, both old and new of the needle pivot, as well as variables to save the values of the coordinates of the position of the triangle of the arrowhead that will mark the value of atmospheric pressure, variables are created for both old coordinates, as new.
float pivot_x_pressure, pivot_y_pressure, pivot_x_old_pressure, pivot_y_old_pressure;
float p1_x_pressure, p1_y_pressure, p2_x_pressure, p2_y_pressure, p3_x_pressure, p3_y_pressure;
float p1_x_old_pressure, p1_y_old_pressure, p2_x_old_pressure, p2_y_old_pressure, p3_x_old_pressure, p3_y_old_pressure;
The scale of values will have points and numerical legends to indicate the values of pressures, to represent these points on the screen, two variables are defined to save the coordinates of these points and be able to draw them. For the circumference of the scale of values, we define a variable with the radius of the circumference.
float arc_x_pressure;
float arc_y_pressure;
int radius_pressure = 65;
To save the value of the pressure in radians and to be able to represent it in points on the scale of values, the variable needleAngle_pressure is defined, a variable is also defined to save the value of the pressure that the needle must mark, this variable is needle_setter_pressure.
float needleAngle_pressure = 0;
float needle_setter_pressure;
For pressure values on the value scale and to be able to represent the scale on the screen, the variable pressure_scale is defined. The last variable to be defined is pressure_module_calibration and this variable must reflect the difference that may exist between the reading of the BMP180 module and the reading of a calibrated sensor.
int pressure_scale;
int pressure_module_calibration = 126;
The necessary variables must be implemented to manage the DS3231 RTC module data for the day of the week, date and moon phase; the first thing is to implement an object of the DS3231 module, it will be called rtc, then two arrays must be defined. Since the day of the week and the date will be displayed on the same line on the screen, due to the space of the number of pixels, it is not possible to display the name of the days of the week with all their letters on the line, so they are abbreviated and the array code is char daysOfTheWeek[7][9] = {"Sun.", "Mon.", "Tues.", "Wed.", "Thurs.", "Fri.", "Sat."}. The array int daysInMonth[] = {0, 31, 28, 31, 30, 31, 30, 31, 31, 30, 31, 30, 31} is created, this array contains the number of days each month of the year has, it will be used later for the representation of the phase of the moon.
RTC_DS3231 RTC;
char daysOfTheWeek[7][9] = {"Sun.", "Mon.", "Tues.", "Wed.", "Thurs.", "Fri.", "Sat."}
int daysInMonth[] = {0, 31, 28, 31, 30, 31, 30, 31, 31, 30, 31, 30, 31};
A variable is created to save the time data and two other variables to save the updated minute data and the previous minute.
float time_h;
float time_m;
float time_m_old;
To save the date data, variables of type int are created, to save the day (date_d), month (date_m) and current year (date_y), as well as to save the days passed with past_days and days passed since January 1, 2024 with the variable total_past_days, these last defined variables will also be used in the calculation of the moon phase.
int date_d;
int date_m;
int date_y;
int past_days;
int total_past_days;
The watch face is made up of two concentric circles and two hands, one hand for the hours and one for the minutes. The center of these circles will be the center of the screen, which defines the coordinates for the center of the circles with values of X = 120 and Y = 120 pixels.
int center_x_clock = 120;
int center_y_clock = 120;
Variables are defined to save the coordinates of the center of rotation of the needles, variables are created for the old coordinates to be able to draw the small circle of the center of pivot when the positions of the needles change, if it is not redrawn, the mark of the previous position of the needle would be left blank.
float pivot_x_clock, pivot_y_clock, pivot_x_old_clock, pivot_y_old_clock;
As in the previous screens, variables must be defined for the tips of the two hands (hours and minutes), which like the previous ones, will also end in arrowheads that are built by triangles.
float p1_x_clock, p1_y_clock, p2_x_clock, p2_y_clock, p3_x_clock, p3_y_clock;
float p1_x_old_clock, p1_y_old_clock, p2_x_old_clock, p2_y_old_clock, p3_x_old_clock, p3_y_old_clock;
float p4_x_clock, p4_y_clock, p5_x_clock, p5_y_clock, p6_x_clock, p6_y_clock;
float p4_x_old_clock, p4_y_old_clock, p5_x_old_clock, p5_y_old_clock, p6_x_old_clock, p6_y_old_clock;
Two variables are also defined to save the coordinates of the position of the minutes and hours on the watch face, as well as the radius of the circumference of the value scale.
float arc_x_clock;
float arc_y_clock;
int radius_clock = 72;
To save the value of the position of the hours and minutes in radians, two variables are defined.
float needleAngle_hours_clock = 0;
float needleAngle_minutes_clock = 0;
Two variables are defined to save the value of the hours and minutes to draw their markings on the watch face.
float hours_dial;
float minutes_dial;
They are defined are the variables to store the data that must mark the hour and minute hand on the watch face.
float needle_setter_hours_clock;
float needle_setter_minutes_clock;
For the representation of the date on the fourth screen, three variables are implemented, these are arrays to contain the characters to be displayed on the screen, the names of the arrays are easy to attribute what data they are for.
char actual_day[2];
char actual_month[2];
char actual_year[4];
The last variables that are declared are variables to be used in the calculations of the moon phase that has to be represented on the screen. The variable new_moon_period = 29.5, keeps the number of days that elapses between new moons, this period of days is always the same. The next variable, first_day_new_moon_2024 = 10, saves the days that elapsed from January 1, 2024 for the first new moon of the year. The next_day_new_moon variable will save the number of days that must elapse from the last new moon to the next and in the past_day_new_moon variable, the number of days elapsed since the last new moon will be saved.
float new_moon_period = 29.5;
float first_day_new_moon_2024 = 10;
float next_day_new_moon;
float past_day_new_moon;
With these four new variables, the block of variable definitions necessary for the project is finalized, then the setup() method will be analyzed. The first thing that is done in this method is the initialization of the Serial Monitor and the sending of the initialization message of screens and sensors.
Serial.begin(115200);
Serial.println("Initialization of the set of sensors and displays.");
The next thing that is done in this method is the configuration of the microcontroller ports to which the pins of the displays and the DHT22 module have been connected. The microcontroller ports to which the pins of the TFT displays are connected must be configured as output, as the microcontroller will send the signals to select each display and send the data to display, instead, the port where the DHT22 module is connected is configured as input, because it will receive the temperature and humidity data.
pinMode(tft_dc, OUTPUT);
pinMode(tft_cs_pressure, OUTPUT);
pinMode(tft_cs_clock, OUTPUT);
pinMode(tft_cs_temperature, OUTPUT);
pinMode(tft_cs_calendar, OUTPUT);
pinMode(dht_pin, INPUT);
The first screen that is initialized by its begin() method of the created object is the one that will show the temperature and humidity data, the image of the screen is not rotated and this is indicated by the setRotation(0) method, where it is passed as parameter 0, the background of the screen is white and to indicate it the fillScreen(WHITE) method is used which, as you can see, has as a parameter the chosen color of wallpaper.
tft_temperature.begin();
tft_temperature.setRotation(0);
tft_temperature.fillScreen(WHITE);
With the following two lines of code the coordinates of the pivot point of the temperature needle are indicated, these coordinates are the same as the center of the circumference that will contain the scale of temperature values, you can see the pivot point of the needle in the image on the screen.
pivot_x_temperature = center_x_temperature;
pivot_y_temperature = center_y_temperature;
The setup() method is the initial configuration of all modules, which initializes the variables that will contain the coordinates to represent the triangle of the needle tip with the coordinates of the center of the circumference.
p1_x_old_temperature = center_x_temperature; p1_y_old_temperature = center_y_temperature;
p2_x_old_temperature = center_x_temperature; p2_y_old_temperature = center_y_temperature;
p3_x_old_temperature = center_x_temperature; p3_y_old_temperature = center_y_temperature;
As you can see, to indicate the pivot point of the moisture needle and the initialization of the variables with the coordinates of the triangle of the needle tip, the same steps are performed as above.
pivot_x_humidity = center_x_humidity;
pivot_y_humidity = center_y_humidity;
p4_x_old_humidity = center_x_humidity; p4_y_old_humidity = center_y_humidity;
p5_x_old_humidity = center_x_humidity; p5_y_old_humidity = center_y_humidity;
p6_x_old_humidity = center_x_humidity; p6_y_old_humidity = center_y_humidity;
To represent the temperature and humidity value scales on the screen, the create_dial_temperature() method is called, the draw_pivot_temperatue() method is called to represent the pivot point of the temperature needle, and draw_pivot_humidity the method is called to represent the pivot point of the humidity needle.
create_dial_temperature();
draw_pivot_temperature();
draw_pivot_humidity();
At this point, the temperature and humidity display has already been initialized and the value scales for these two quantities are displayed. The next screens to be initialized are the ones that show the value of the atmospheric pressure and that of the clock, as you can see in the code of the sketch, the analysis of the code was already done in part 2 and is exactly the same.
The first method called is create_dial_temperature() with which the interior of this method will be executed to represent the scale of values of both temperature and humidity, the creation of the temperature scale will be analyzed, for the creation of the humidity scale, the steps are similar.
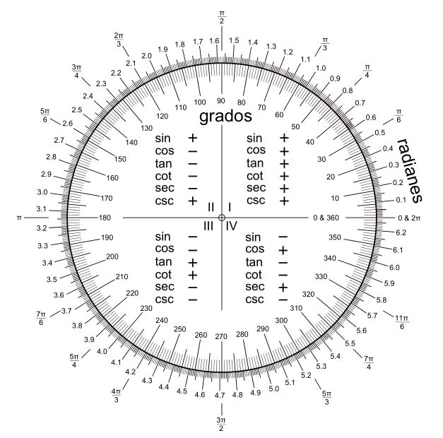
The first thing that is executed is for (temperature=-20; temperature<40.1; temperature+=10), this is a for loop to represent small red circles that will start at -20 degrees Celsius and end at 40 degrees Celsius, the increment will be 10, that is, every 10 degrees you should draw a red circle. Within the loop, the first thing to run is the line needleAngle_temperature = (temperature * deg_to_rad * 1) - 2.7, this line converts the value of the past temperature in degrees radians into the circumference of the temperature scale, for this, the temperature (temperature) is multiplied by the value of 1 degree in radians (deg_to_rad) and by the distance (1) between circles. The value of -2.7 is used for positioning the first value on the circumference of the scale. The following image shows the figure of a circle with the conversion values of degrees to radians, if you look at the drawing, to position the value of -20 degrees Celsius on the temperature scale of the screen, you have to subtract 2.7 radians from 0 degrees or zero radians to position it correctly, since in the screens the direction of the addition is in the direction of advance of the needles of clock.
for (temperature=-20; temperature<40.1; temperature+=10) {
	needleAngle_temperature = (temperature * deg_to_rad * 1) - 2.7;
As you can see in the following image, to convert the radians of the circumference into coordinates of the screen, we need to perform the calculations with the cosine to calculate the coordinate on the X-axis and with the sine for the Y coordinate.
The line arc_x_temperature = (pivot_x_temperature + ((radius_temperature + 4) * cos(needleAngle_temperature))) calculates the pixel coordinate on the X-axis of the display. The 4 pixels that are added to the radius of the circumference is to move the point away by that number of pixels and not have to make a call to the method to represent the scale every time the temperature value changes. The line arc_y_temperature = (pivot_y_temperature + ((radius_temperature + 4) * sin(needleAngle_temperature))) calculates the pixel coordinate of the Y-axis of the display.
arc_x_temperature = (pivot_x_temperature + ((radius_temperature + 4) * cos(needleAngle_temperature)));
arc_y_temperature = (pivot_y_temperature + ((radius_temperature + 4) * sin(needleAngle_temperature)));
Having calculated the X and Y coordinates of the value of the past temperature of the for loop counter, a circle of 2 red pixels will be displayed at the X and Y coordinates corresponding to the following line of code.
tft_temperature.fillCircle (arc_x_temperature, arc_y_temperature, 2, RED);
When you exit the for loop because all the circles of the meter temperatures have already been drawn, the legend of the magnitude of the scale with tft_temperature will be added.print ("TEMP")), the color of the text will be red set with tft_temperature.setTextColor (RED), with the tft_temperature line of code.setTextSize (2) sets the font size to 2 and to the coordinates specified with tft_temperature.setCursor (64, 16). The legends of the values of each point on the temperature scale will also be added in red, font size of 2 and in the coordinates specified for each value.
To make the superscript symbol "o" of degrees Celsius, a small red circle of 2 pixels is made and a concentric circle is added to the previous one of 1 pixel of background color of the screen.
tft_temperature.setTextColor (RED);
tft_temperature.setTextSize (2);
tft_temperature.setCursor (64, 16);
tft_temperature.print ("TEMP");

tft_temperature.setTextColor (RED);
tft_temperature.setTextSize (2);
tft_temperature.setCursor (80, 38);
tft_temperature.print ("40");
	   . . . . .
	   . . . . .
	   . . . . .
tft_temperature.setTextColor (RED);
tft_temperature.setTextSize (2);
tft_temperature.setCursor (29, 159);
tft_temperature.print ("C");
tft_temperature.fillCircle (24, 161, 2, RED);
tft_temperature.fillCircle (24, 161, 1, WHITE);
Within the create_dial_temperature() method, there is also the code needed to display the scale of humidity values, as it is displayed on the same screen. As you can see and analyze the code of the sketch, the steps to perform it are exactly similar.
When the value scales have been displayed, the pivot points of the temperature and humidity marker needles will be displayed by calling the draw_pivot_temperature() and draw_pivot_humidity() methods, in these methods, the only line of code that has been written is to display a red or blue circle, as appropriate, of a size of 8 pixels and in the center of each circumference, since these are the coordinates that were indicated above.
tft_temperature.fillCircle (pivot_x_temperature, pivot_y_temperature, 8, RED)
tft_temperature.fillCircle (pivot_x_humidity, pivot_y_humidity, 8, RED)
At this point, the temperature and humidity sphere has already been initialized and the value scales for these two quantities are displayed. The next code of the setup() method is the initialization of the atmospheric pressure dial, as you can see in the sketch code, the steps are the same as those used for the previous screen, as well as the initialization of the dial that will show the hour and minutes, the scale of values is created first and then the pivot circle of the needle.
The fourth screen will not represent any scale, it will only represent two images and a line with characters, so its initialization is simple, first a call is made to the begin() method of the object tft_calendar, the screen must not show the rotated data and the wallpaper is set to black.
tft_calendar.begin();
tft_calendar.setRotation (0);
tft_calendar.fillScreen (BLACK);
When the four screens have been initialized, the three modules that will offer us the data will be initialized. The first module to be initialized will be the DHT22 sensor module, you just have to make a call to the begin() method of the object that we define for this sensor.
DHT.begin();
The second sensor to be initialized will be the BMP180 barometer module with the call to the init() method of the bmp180 object of this sensor. It is reported by the Serial Monitor with Serial.println("BMP180 init") when this module is initializing and by means of a conditional, it is checked if this module has the correct address, the argument of the conditional is denied, so that, if the address of this module is not the one that is saved in the library, it is fulfilled and the inside of the keys is executed, which is only to report the initialization error of the module and requests that the module be checked. The code described is:
BMP180.init();
Serial.println("BMP180 Demo");
if (!BMP180.hasValidID()) {
	Serial.print("Error - please check the BMP180 board!");
}
The last module to be initialized is the DS3231 RTC clock module, this is done by using the begin() method of the object created for this module. The next two lines are the current date and time setting. The RTC instruction.adjust(DateTime(F(__DATE__), F(__TIME__))) retrieves the date and time data that the module has stored in its memory. If you want to adjust the date or time, you must comment on the previous line and uncomment the PSTN line.adjust(DateTime(2024, 10, 25, 0, 33, 0)), where you must manually enter the current year, month, day, hour, minute, and second values in the arguments.
RTC.begin();
RTC.adjust(DateTime(F(__DATE__), F(__TIME__)));
rtc.adjust(DateTime(2024, 9, 1, 0, 33, 0));
With this, the setup() method is finished parsing and the loop() method will be passed, which is the one that is continuously running. The code for this method is simple, the first thing it does is call the now() method of the DS3231 module object. To get the current time, you use the now function.hour() and its value is saved in the variable time_ h, using the now function.minute() gets the current minutes and saves it in the time_m variable that was defined at the beginning of the sketch.
DateTime now =rtc.now();
time_h = now.hour();
time_m = now.minute();
In order for the hour hand to have the position of the hour correctly on the dial, the past minutes must be added to the hour, with this, the hour hand will also advance the travel according to the past minutes. The dial has the markings for the 60 minutes that an hour has, so that every minute that passes, the minute hand will advance one position, so that the hour hand advances 60 positions in an hour, the minutes must be divided by 60 so that it advances 60 positions from one hour to another.
time_h = time_h + (time_m/60);
The data for the hour and minute variables will be displayed in the Serial Monitor.
Serial.println(time_h);
Serial.println(time_m);
The screens will update their data every minute, since the values of the BMP180 and DHT22 sensors will not change significantly in that short period of time, in addition, we take advantage of the fact that every minute the minute hand of the clock must change position, with this in mind, a double conditional is implemented, in which the condition of change of value in the variable of the minutes is checked, If this happens, the inside of the if keys will be executed and a call will be made to the refresh_screens() method where the data on the screens will be updated, on the contrary, if the minute variable has not changed, it returns to the beginning of the loop() method, since else() is empty.
if (time_m != time_m_old) {
	refresh_screens();
} else { }
When the refresh_screens() method is called, what is executed in summary is the reading of the value of the magnitude of the sensor, saves the value in the corresponding variable, copies the value of the magnitude data in the variable of the value that the needle must indicate and makes the call to the corresponding method to modify the position of the needle. To update the temperature and humidity display data, the first thing that is done, as described, is the temperature reading using the readTemperature() method of the sensor object and it is saved in the temp variable and the value is displayed by the Serial Monitor. For the humidity reading, the readHumidity() method is called and its value is saved in the humi variable, its value is also reported by the Serial Monitor. If the variables do not store any value, the Serial Monitor is informed of the sensor failure.
Temp = DHT.readTemperature();
Serial.print("Temperature ºC -->");
Serial.println(temp);
humi = dht.readHumidity();
Serial.print("Humidyty %-->");
Serial.println(humi);
if (isnan(humi) || isnan(temp)) {
	Serial.print("DHT sensor read failure !!");
After taking the reading and saving the temperature and humidity values in the variables, the value of the temp and humi variables is saved in the needle_setter_temperature and needle_setter_humidity variables, these variables will be used in the methods to position the needle indicating its values, calls are made to the needle_temperature() and needle_humidity() methods For this purpose, the methods draw_pivot_temperature() and draw_pivot_humidity() are called to update the representation of the circle of the axis of rotation of the needles and avoid lack of color in portions when the hands change their position.
needle_setter_temperature = temp;
needle_setter_humidity = humi;
needle_temperature();
draw_pivot_temperature();
needle_humidity();
draw_pivot_humidity();
When the needle_temperature() method is called to update the position of the needle with the new temperature data, what is done is first to redraw the current state of the needle with the background color of the screen which is white, which will "erase" it and then the needle will be represented again in red to mark the new value.
To "erase" the current position of the needle, its line must be redrawn and the triangle of the arrowhead in white, which is the background color of the sphere, is done with the next two lines.
tft_temperature.drawLine (pivot_x_temperature, pivot_y_temperature, p1_x_old_temperature, p1_y_old_temperature, WHITE);
tft_temperature.fillTriangle (p1_x_old_temperature, p1_y_old_temperature, p2_x_old_temperature, p2_y_old_temperature, p3_x_old_temperature, p3_y_old_temperature, WHITE);
With the temperature data saved, the position of the radian value of this temperature in the drawn arc of the value scale has to be calculated, this calculation is done on the following line.
needleAngle_temperature = (needle_setter_temperature * deg_to_rad * 1) - 2.7;
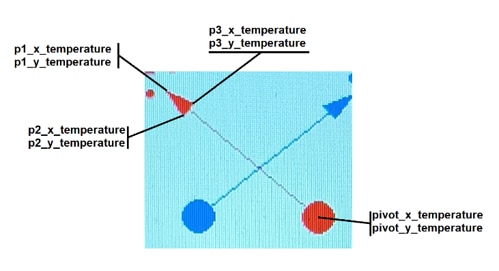
When the position on the circumference of the temperature value in radians has been calculated, the coordinates of the needle must be calculated on the display and saved in its variables. To represent the needle, you must know the coordinates of the starting point, which will be its point of rotation (pivot_x_temperature and pivot_y_temperature), the tip of the needle (p1_x_temperature and p1_y_temperature), the left vertex of the triangle of the needle tip (p2_x_temperature and p2_y_temperature) and the right vertex (p3_x_temperature and p3_y_temperature), to calculate the coordinates, calculations are made with the sine and cosine, as described when representing the scale of values, so that the following lines of code will be easy to follow.
p1_x_temperature = (pivot_x_temperature + ((radius_temperature - 1) * cos(needleAngle_temperature)));
p1_y_temperature = (pivot_y_temperature + ((radius_temperature - 1) * sin(needleAngle_temperature)));
p2_x_temperature = (pivot_x_temperature + ((radius_temperature - 16) * cos(needleAngle_temperature - 0.05)));
p2_y_temperature = (pivot_y_temperature + ((radius_temperature - 16) * sin(needleAngle_temperature - 0.05)));
p3_x_temperature = (pivot_x_temperature + ((radius_temperature - 16) * cos(needleAngle_temperature + 0.05)));
p3_y_temperature = (pivot_y_temperature + ((radius_temperature - 16) * sin(needleAngle_temperature + 0.05)));
When coordinates are calculated and saved in the corresponding variables, they are also saved in the variables of the old coordinates (e.g. p1_x_old_temperature) for when the current representation of the needle has to be "erased".
p1_x_old_temperature = p1_x_temperature; p1_y_old_temperature = p1_y_temperature;
p2_x_old_temperature = p2_x_temperature; p2_y_old_temperature = p2_y_temperature;
p3_x_old_temperature = p3_x_temperature; p3_y_old_temperature = p3_y_temperature;
To represent the needle in the new position and mark the new value on the value scale, a red line will first be represented from the rotation point to the tip of the arrow.
tft_temperature.drawLine (pivot_x_temperature, pivot_y_temperature, p1_x_temperature, p1_y_temperature, RED);
And to represent the tip of the arrow, a triangle will be drawn in red with the following line.
tft_temperature.fillTriangle (p1_x_temperature, p1_y_temperature, p2_x_temperature, p2_y_temperature, p3_x_temperature, p3_y_temperature, RED);
The procedure for representing the hands of the other magnitudes is similar to the one described, so that their follow-up, together with the comments on the sketch, can be a good guide.
For updating the data on the atmospheric pressure and clock displays, the steps are the same. It should be noted that there is only one difference and that is with the variable of the minute hand data, the clock face has the representation of 12 hours and 60 minutes, and for the correct representation of the values, these must be between 0 and 12, so the past minutes must be converted based on the two previous values, That is the reason why the value of the minutes is multiplied by 0.2 on the line needle_setter_minutes_clock = time_m * 0.2, to adjust the actual value of the minutes at the position that the hand will mark, e.g. the 30 minutes will be marked at the 6 o'clock position as in all hand clocks, The 45 minutes will be marked at the 9 o'clock position, you can check that the minutes will be represented in their correct position.
Pressu = BMP180.getPressure();
pressu = pressu + pressure_module_calibration;
Serial.print("Pressure hPa -->");
Serial.println(pressu);
needle_setter_pressure = pressu;
needle_pressure();
draw_pivot_pressure();

needle_setter_hours_clock = time_h;
needle_setter_minutes_clock = time_m * 0.2;
needle_hours_clock();
needle_minutes_clock();
draw_pivot_clock();
time_m_old = time_m;
The last screen that is programmed will show the state of the sky according to atmospheric pressure, the day of the week and date with characters and the phase of the moon with an image, it begins with the analysis of the code for the data update of this screen.
Thefirst one that is made is a call to the now() method of the DS3231 module object, with this method the information of the current time and date is obtained to be displayed on the screen through the functions of this method. To get the current day, you use the now function.day() and its value is saved in the variable date_ d, using the now function.month() is fetched for the current month and saved in the date_m variable and by using the now function.year() is retrieved from the current year and saved in the date_y variable.
DateTime now =rtc.now();

date_d = now.day();
date_m = now.month();
date_y = now.year();
The background of this screen is black, since both the images and the characters will be represented in white. The screen background color settings are set with the following line.
tft_calendar.fillScreen(BLACK);
The next four lines of the sketch set up the caption at the top of the screen. With the setTextColor (WHITE) function , the white color of the text is set, the setTextSize function (2) is used to set the text size to size, it will be displayed at the coordinates set with setCursor (93, 4) and the text that appears is configured with the print function ("TODAY").
tft_calendar.setTextColor (WHITE);
tft_calendar.setTextSize (2);
tft_calendar.setCursor (93, 4);
tft_calendar.print ("TODAY");
To get the day of the week, the println(daysOfTheWeek[now.dayOfTheWeek()]) function makes a call to the array where the abbreviations of the days of the week are saved, the module has the days of the week configured in numbers, for example, Sunday is day 0 of the week, when the array call is made. The position in the array of the passed text is searched and the text is displayed on the screen. Coordinates are set using the setCursor function (20, 112), text color is set using the setTextColor function (WHITE), and text size is set using the setTextSize function (2).
tft_calendar.setCursor(20, 112);
tft_calendar.setTextColor(WHITE);
tft_calendar.setTextSize(2);
tft_calendar.println(daysOfTheWeek[now.dayOfTheWeek()]);
For the separation between the day of the week and the date, a comma is used, the functions for its representation on the screen are similar to those analyzed above.
tft_calendar.setTextColor (WHITE);
tft_calendar.setTextSize (2);
tft_calendar.setCursor (97, 114);
tft_calendar.print (",");
The information for the first nine days of the month and the first nine months of the year that the RTC DS3231 module sends, only have one digit, while the remaining days and months have two, if they were represented by screen as received with a single digit, they would be placed in the first position of two, leaving a blank space until the hyphen separating days and months, so it must be converted into a number of two characters, the method is simple, the number is converted into text and this into a string of characters, this string of characters is positioned (concatenated) in front of the number the zero passed as a character, with this, the text already has two characters and the representation on the screen is correct.
The code needed for the explained process is analyzed. A double conditional if-else is implemented to check if the value of the variable date_d is less than 10, if it were less, it would indicate that it has a single digit and the inner code of if would be executed, but if the value of the variable was greater than 9 the code of else would be executed.
if (date_d < 10) {
	. . . .
} else {
	. . . .
}
When the value of the variable is less than 10, the first thing to do is to convert the numeric value to text with String(date_d) and this text is saved in the variable convert_day, which is of type text string. To the previous variable, the character 0 (zero) is concatenated in front of the text that has been saved, this is done with the line of the code convert_day = '0' + convert_day, so you already have a string of 2 characters. The contents of the variable are stored in an array of type characters with 3 elements and actual_day name with the line convert_day.toCharArray(actual_day, 3). Now all that's left is to display the data on the screen and implement the necessary functions to place the cursor in the correct coordinates with setCursor(112, 112), select the color of the text with setTextColor(WHITE), set the font size to 2 with tft_calendar.setTextSize(2) and finally, display the contents of the character array with println(actual_day), which will display the current day on the screen.
if (date_d < 10) {
	String convert_day = String(date_d);
	convert_day = '0' + convert_day;
	convert_day.toCharArray(actual_day, 3);
	tft_calendar.setCursor(112, 112);
	tft_calendar.setTextColor(WHITE);
	tft_calendar.setTextSize(2);
	tft_calendar.print(actual_day);
}
On the other hand, if the number is greater than 10 the inside of the else block is executed, this code is easy to follow, since only the line where a character is concatenated to the variable that contains the value passed to text has been eliminated.
else {
	String convert_day = String(date_d);
	convert_day.toCharArray(actual_day, 3);
	tft_calendar.setCursor(112, 112);
	tft_calendar.setTextColor(WHITE);
	tft_calendar.setTextSize(2);
	tft_calendar.print(actual_day);
}
For the separation between the days, months and year, it has been decided to make two small lines together as a hyphen, so that it has more visibility than a single line or the character "-". In arguments, the start and end coordinates of the line and the color of the line must be passed.
tft_calendar.drawLine (139, 118, 144, 118, WHITE);
tft_calendar.drawLine (139, 119, 144, 119, WHITE);
To display the current month on the screen, the functions are the same as for displaying the days, you just have to change the names of the variables to refer to the months and the coordinates of the screen where the text is displayed. A script will also be shown on the screen to separate the months of the year.
if (date_m < 10) {
	String convert_month = String(date_m);
	convert_month = '0' + convert_month;
	convert_month.toCharArray(actual_month, 3);
	tft_calendar.setCursor(150, 112);
	tft_calendar.setTextColor(WHITE);
	tft_calendar.setTextSize(2);
	tft_calendar.print(actual_month);
} else {
	String convert_month = String(date_m);
	convert_month.toCharArray(actual_month, 3);
	tft_calendar.setCursor(150, 112);
	tft_calendar.setTextColor(WHITE);
	tft_calendar.setTextSize(2);
	tft_calendar.print(actual_month);
}

tft_calendar.drawLine (177, 118, 182, 118, WHITE);
tft_calendar.drawLine (177, 119, 182, 119, WHITE);
To show the year on the screen there is no problem of number of characters, since it will always have 4, so the functions necessary to display the text are the same as those of the else blocks described above, changing the name of the variables, the array and the coordinates where displaying the text is sufficient.
String convert_year = String(date_y);
convert_year.toCharArray (actual_year, 5);
tft_calendar.setCursor(188, 112);
tft_calendar.setTextColor(WHITE);
tft_calendar.setTextSize(2);
tft_calendar.println(actual_year);
To display the image of the moon phase, it has been chosen to display a gray circle for the new moon, a white circle for the full moon and for the waxing and waning phases, two circles will be represented, one white first and one black later, so that the black circle "erases" the intersection with the white circle and shows the image correctly, in addition, it has been decided to take four images of each waxing and waning phase. As you may recall, the period between new moons is 29.5 days, the first new moon of the year 2024 occurred on January 10, that is, the 10th day of the year and knowing the total days that have passed since the first new moon, we can calculate the state of the lunar phase.
To calculate the days that have elapsed since January 1, 2024, a call has been created to the method days_from_2024(date_y, date_m, date_d), which, as you can see, is passed as parameters the current day, month and year and will return the number of elapsed days that will be saved in the total_past_days variable of integer value type, the value of the variable is displayed by the Serial Monitor.
int total_past_days = days_from_2024(date_y, date_m, date_d);
Serial.print("Days since January 1, 2024: ");
Serial.println(total_past_days);
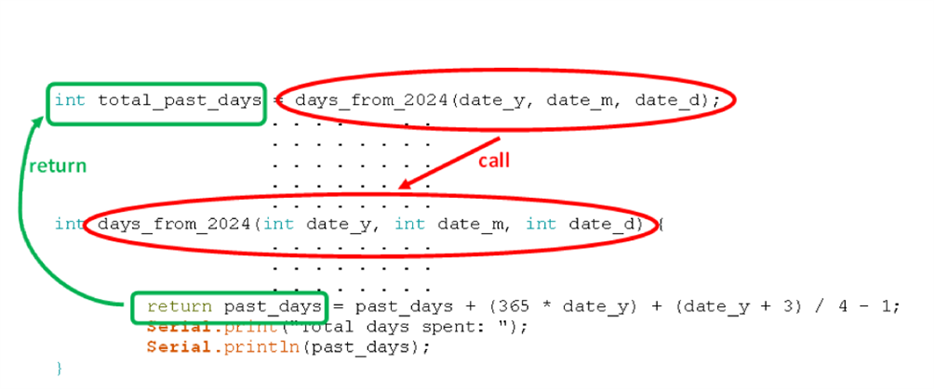
When you call the int days_from_2024(int date_y, int date_m, int date_d) method to calculate the total elapsed days, you receive the year, month, and current day. Then, the first conditional is executed when the year is equal to or greater than 2024, if it is fulfilled, the year 2024 is subtracted from the current year and the result is saved again in the variable of the year date_y -= 2024 and the result is shown by the Serial Monitor.
int days_from_2024(int date_y, int date_m, int date_d) {
	if (date_y >= 2024) {
		date_y -= 2024;
		Serial.print("Past years: ");
		Serial.print(date_y);
  }
The days that are received are saved in the variable with past_days = date_d, their value is also shown by the Serial Monitor.
past_days = date_d;
Serial.print("Days gone: ");
Serial.println(past_days);
To calculate the number of days spent in the months, a loop is implemented that counts the number of days that each month has passed, where the counter has as its maximum value the month prior to the current c < date_m, the days counted in each month will be added to the variable past_days. The array daysInMonth[c] contains the number of days that each month has, the counter c that is passed is the month, in the array, the position 0 has the value of 0 days, since the first month of the year is the number 1, so it has to correspond to the position 1 of the array.
for (byte c = 1; c < date_m; c = c + 1) {
	past_days = past_days + daysInMonth[c];
	Serial.print("Days gone by months: ");
	Serial.print(past_days);
}
In the event that the current year is a leap year, one more day will have to be added, since February has 29 days, this addition of a day is made if a conditional is fulfilled in which it is verified that the current month is greater than month 2 of the year, in addition, it must also be fulfilled that dividing the year by 4, the rest is zero. If both conditions are met, one day will be added to the variable past_days.
if (date_m > 2 & date_y % 4 == 0) {
	past_days = past_days + 1;
	Serial.print("Days passed by leap year: ");
	Serial.print(past_days);
}
So far the number of days that have passed in the current year has been calculated, now the number of days that have passed since January 1, 2024 must be calculated, for this, to the number of days passed in the current year (past_days), the number of days of each past year since 2024 (365 * date_y) will be added, one more day is added for each leap year that has passed since 2024 ((date_y + 3) / 4) and with the -1 the current day is subtracted. The total days are saved in the past_days variable.
return past_days = past_days + (365 * date_y) + (date_y + 3) / 4 - 1;
Serial.print("Total days spent: ");
Serial.println(past_days);
And the number of total days is returned with return past_days to the call that was made from the sketch line int total_past_days = days_from_2024(date_y, date_m, date_d).
The full code of the method for calculating the number of days spent is:
int days_from_2024(int date_y, int date_m, int date_d) {
	if (date_y >= 2024) {
		date_y -= 2024;
		Serial.print("Past years: ");
		Serial.print(date_y);
	}
	past_days = date_d;
	Serial.print("Days gone: ");
	Serial.print(past_days);

	for (Byte c = 1; c < date_m; c = c + 1) {
		past_days = past_days + daysInMonth[c];
		Serial.print("Days gone by months: ");
		Serial.print(past_days);
	}
	if (date_m > 2 && date_y % 4 == 0) {
		past_days = past_days + 1;
		Serial.print("Days passed by leap year: ");
		Serial.print(past_days);
	}

	Return past_days = past_days + (365 * date_y) + (date_y + 3) / 4 - 1;
	Serial.print("Total days spent: ");
	Serial.print(past_days);
}
With the number of days since January 1, 2024, the current state of the moon's phase is calculated, for this, the first day of the new moon of the year 2024 is saved in the variable next_day_new_moon.
next_day_new_moon = first_day_new_moon_2024;
To know in the period of 29.5 days that per date is there, a while loop is implemented, as long as the variable total_past_days has a value greater than the variable next_day_new_moon, it will mean that it is not within the period of 29.5 days of the current moon phase and the value of the variable will be added to this last variable new_moon_period and the comparison will be made again until its value is greater than the value of the variable total_past_days.
while (total_past_days > next_day_new_moon) {
	next_day_new_moon += new_moon_period;
	Serial.print("Next day moon: ");
	Serial.print(next_day_new_moon);
}
When you go out of the loop because the value of the next_day_new_moon variable is higher, the value of the total_past_days variable is subtracted, and the result of the subtraction is the days that have passed since the last new moon, the value is saved in the state_moon variable.
float state_moon = next_day_new_moon - total_past_days;
To represent an image of the moon's phase on the screen, conditionals are used to perform checks on the value of the variable state_moon, when the value of the variable is between the values of one of the conditionals, the inside of its curly brackets is executed, e.g. if the value of the variable is 15, the conditional will be executed:
if (state_moon <= 15.5 & state_moon >= 14.5) {
	Serial.print("Today is a full moon.");
	tft_calendar.fillCircle (120, 180, 30, WHITE);
}
Then, will represent a white circle of radius 30 pixels at the coordinates X = 120 and Y = 180. As can be seen in the code, for the waxing and waning phases of the moon, a white circle is represented first and then a black circle, the latter black circle will occupy its intersection with the white circle, so the white circle will lack the intersection with the black circle and will show the image of the moon's state. The rest of the conditionals are easy to follow.
All that remains is the representation of the possible state of the sky depending on atmospheric pressure, to represent the symbols of rain, cloud with sun and sunny, four methods have been defined that represent lines to form the symbols.
Three conditionals have been implemented, when the pressure measured by the sensor is included between the values of one of them, its interior will be executed and a call will be made to the method or methods that are inside.
if (pressu < 1000) {
	cloud();
	rain();
}
if (pressu >=1000 && pressu <= 1020) {
	cloud();
	sun_in_cloud();
}
if (pressu > 1020) {
	sun();
}
With these last 3 conditionals, the code of the refresh_screens() method ends and the barometer is fully operational. The data on the screen will be updated every minute and you will be able to know if you should take the umbrella or a hat.
Project photos
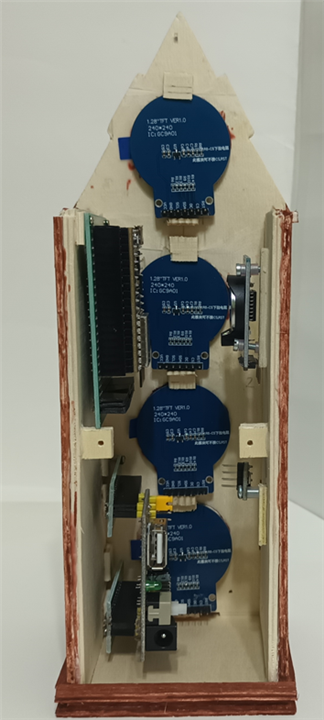
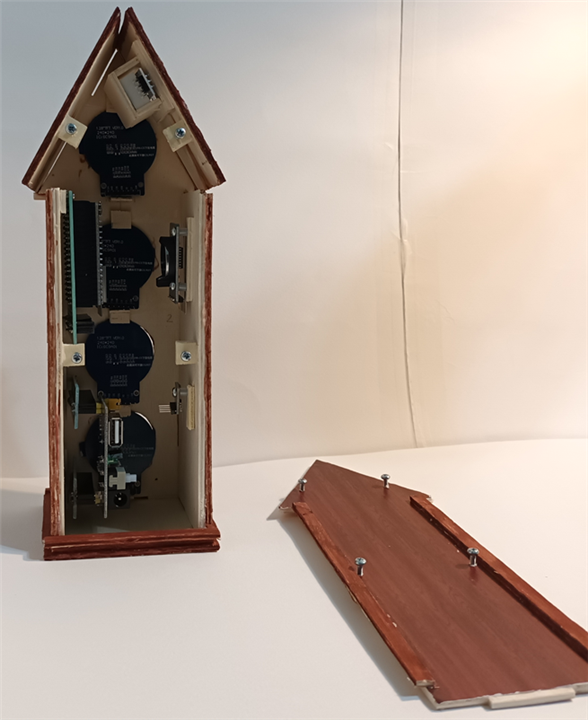
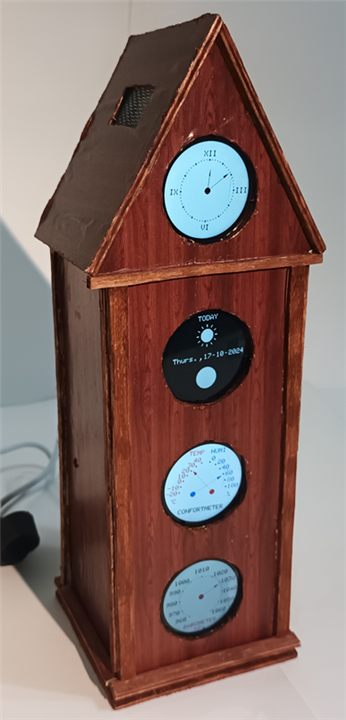
Project video
Complete sketch
/*----------------------------------------------------------------------------------------------------------------
Vintage Weather station project, a BMP180 barometric sensor module,
a DS3231 RTC module and a DHT22 temperature and humidity sensor have been used. Four 1.28 inch GC9A01 round
displays are used to display the data.
This sketch is free software, so any user is free to modify it for their use and needs.
Miguel Torres Gordo
Getafe (Madrid) - ESPAÑA Last revision 08-11-2024
----------------------------------------------------------------------------------------------------------------*/
#include <Wire.h> // I2C communication library.
#include "SPI.h" // SPI communication library for communications with the BMP180 and RTC modules..
#include "Adafruit_GC9A01A.h" // Library for GC9A01A TFT display.
#include <BMP180.h> // Library for BMP180 Barometric Air Pressure module.
#include "RTClib.h" // Library for Real Time Clock module.
#include <DHT.h> // Library for DHT11 module.
#define tft_dc 16 // Variable to define the microcontroller pin to send the data to the screens.
#define tft_cs_pressure 33 // Variable to define the microcontroller pin to select the pressure screen.
#define tft_cs_clock 25 // Variable to define the microcontroller pin to select the clock screen.
#define tft_cs_temperature 32 // Variable to define the microcontroller pin to select the temperature and humidity screen.
#define tft_cs_calendar 27 // Variable to define the microcontroller pin to select the calendar screen.
#define tft_rst 26 // Variable to define the pin of the microcontroller to select the reset line of the screens.
Adafruit_GC9A01A tft_pressure(tft_cs_pressure, tft_dc); // Definition of the screen object for pressure display.
Adafruit_GC9A01A tft_clock (tft_cs_clock, tft_dc); // Definition of the screen object for clock display.
Adafruit_GC9A01A tft_temperature (tft_cs_temperature, tft_dc); // Definition of the screen object for temperature and humidity display.
Adafruit_GC9A01A tft_calendar (tft_cs_calendar, tft_dc); // Definition of the screen object for calendar display.
#define BLACK 0x0000 // Definition of the black color for the screens.
#define BLUE 0x001F // Definition of the blue color for the screens.
#define RED 0xF800 // Definition of the red color for the screens.
#define WHITE 0xFFFF // Definition of the white color for the screens.
#define GREY 0x4A49 // Definition of the grey color for the screens.
#define deg_to_rad 0.0174532925 // Variable with the value in radians of 1 degree of circumference.
float pi = 3.1415926535; // Variable with the value of the PI number.
/***** DHT11 sensor parameters and variables *****/
#define dht_pin 4 // Variable to define the microcontroller pin to receive data from the DHT module.
#define dht_type DHT22 // Variable to define the DHT type sensor.
DHT dht(dht_pin, dht_type); // Definition of a DHT module object.
float humi; // Variable to store the humidity value.
float temp; // Variable to store the temperature value.
int center_x_temperature = 149; // Variable with the X coordinate value of the center of the dial for the temperature.
int center_y_temperature = 150; // Variable with the Y coordinate value of the center of the dial for the temperature.
int center_x_humidity = 89; // Variable with the X coordinate value of the center of the dial for the humidity.
int center_y_humidity = 150; // Variable with the Y coordinate value of the center of the dial for the humidity.
float pivot_x_temperature, pivot_y_temperature, pivot_x_temperature_old, pivot_temperature_y_old; // Variables for the value of the center of rotation of the temperature indicating needle.
float p1_x_temperature, p1_y_temperature, p2_x_temperature, p2_y_temperature, p3_x_temperature, p3_y_temperature; // Variables for the new values of the triangle at the tip of the temperature indicator needle.
float p1_x_old_temperature, p1_y_old_temperature, p2_x_old_temperature, p2_y_old_temperature, p3_x_old_temperature, p3_y_old_temperature; // Variables for the old values of the triangle at the tip of the temperature indicator needle.
float arc_x_temperature; // Variable with the X coordinate of the arc for temperature display.
float arc_y_temperature; // Variable with the Y coordinate of the arc for temperature display.
float needleAngle_temperature = 0; // Variable for the distance between the values on the temperature dial.
float temperature; // Variable for the temperature value dial.
float needle_setter_temperature; // Variable with the temperature value to be displayed by the needle.
float pivot_x_humidity, pivot_y_humidity, pivot_x_humidity_old, pivot_humidity_y_old; // Variables for the value of the center of rotation of the humidity indicating needle.
float p4_x_humidity, p4_y_humidity, p5_x_humidity, p5_y_humidity, p6_x_humidity, p6_y_humidity; // Variables for the new values of the triangle at the tip of the humidity indicator needle.
float p4_x_old_humidity, p4_y_old_humidity, p5_x_old_humidity, p5_y_old_humidity, p6_x_old_humidity, p6_y_old_humidity; // Variables for the old values of the triangle at the tip of the humidity indicator needle.
float arc_x_humidity; // Variable with the X coordinate of the arc for humidity display.
float arc_y_humidity; // Variable with the Y coordinate of the arc for humidity display.
float needleAngle_humidity = 0; // Variable for the distance between the values on the humidity dial.
float humidity; // Variable for the humidity value dial.
float needle_setter_humidity; // Variable with the humidity value to be displayed by the needle.
int radius_temperature = 100; // Variable with the value of the radius of the circumference of the temperature and humidity dials.
/***** End DHT11 sensor parameters and variables *****/
/***** BMP180 sensor *****/
BMP180 bmp180; // Create a instance of BMP180 barometer sensor.
float pressu; // Variable for the pressure value.
int center_x_pressure = 120; // Variable with the X coordinate value of the center of the dial on the pressure screen.
int center_y_pressure = 120; // Variable with the Y coordinate value of the center of the dial on the pressure screen.
float pivot_x_pressure, pivot_y_pressure, pivot_x_old_pressure, pivot_y_old_pressure; // Variables for the value of the center of rotation of the pressure indicating needle.
float p1_x_pressure, p1_y_pressure, p2_x_pressure, p2_y_pressure, p3_x_pressure, p3_y_pressure; // Variables for the new values of the triangle at the tip of the pressure indicator needle.
float p1_x_old_pressure, p1_y_old_pressure, p2_x_old_pressure, p2_y_old_pressure, p3_x_old_pressure, p3_y_old_pressure; // Variables for the old values of the triangle at the tip of the pressure indicator needle.
float arc_x_pressure; // Variable with the X coordinate of the arc for pressure display.
float arc_y_pressure; // Variable with the Y coordinate of the arc for pressure display.
int radius_pressure = 65; // Variable with the value of the radius of the circumference of the pressure dial.
float needleAngle_pressure = 0; // Variable for the distance between the values on the pressure dial.
float needle_setter_pressure; // Variable with the pressure value to be displayed by the needle.
int pressure_scale; // Variable for the pressure value dial.
int pressure_module_calibration = 126; // Variable for adjust the pressure value read.
/***** End BMP180 sensor *****/
/***** DS3231 rtc module *****/
RTC_DS3231 rtc; // Create a instance of Real Time Clock module.
char daysOfTheWeek[7][9] = {"Sun.", "Mon.", "Tues.", "Wed.", "Thurs.", "Fri.", "Sat."}; // Array with the days of the week.
int daysInMonth[] = {0, 31, 28, 31, 30, 31, 30, 31, 31, 30, 31, 30, 31}; // Array with the days of the months.
float time_h; // Variable for the hours values.
float time_m; // Variable for the minutes values.
float time_m_old; // Variable for the old minutes values.
int date_d; // Variable for the current day's value.
int date_m; // Variable for the current month's value.
int date_y; // Variable for the current year's value.
int past_days; // Variable for the value of days spent in the current month.
int total_past_days; // Variable for the value of the total days elapsed since January 1, 2024.
int center_x_clock = 120; // Variable with the X coordinate value of the center of the dial on the clock screen.
int center_y_clock = 120; // Variable with the Y coordinate value of the center of the dial on the clock screen.
float pivot_x_clock, pivot_y_clock, pivot_x_old_clock, pivot_y_old_clock; // Variables for the value of the center of rotation of the clock needles.
float p1_x_clock, p1_y_clock, p2_x_clock, p2_y_clock, p3_x_clock, p3_y_clock; // Variables for the new values of the triangle at the tip of the clock hours needle.
float p1_x_old_clock, p1_y_old_clock, p2_x_old_clock, p2_y_old_clock, p3_x_old_clock, p3_y_old_clock; // Variables for the old values of the triangle at the tip of the clock hours needle.
float p4_x_clock, p4_y_clock, p5_x_clock, p5_y_clock, p6_x_clock, p6_y_clock; // Variables for the new values of the triangle at the tip of the clock minutes needle.
float p4_x_old_clock, p4_y_old_clock, p5_x_old_clock, p5_y_old_clock, p6_x_old_clock, p6_y_old_clock; // Variables for the old values of the triangle at the tip of the clock minutes needle.
float arc_x_clock; // Variable with the X coordinate of the arc for clock display.
float arc_y_clock; // Variable with the Y coordinate of the arc for clock display.
int radius_clock = 72; // Variable with the value of the radius of the circumference of the clock dial.
float angle_circle_clock = 0; // ¿Delete?
float needleAngle_hours_clock = 0; // Variable for the distance between the hours values on the clock dial.
float needleAngle_minutes_clock = 0; // Variable for the distance between the minutes values on the clock dial.
float hours_dial; // Variable for the hours value dial.
float minutes_dial; // Variable for the minutes value dial.
float needle_setter_hours_clock; // Variable with the hours value to be displayed by the needle.
float needle_setter_minutes_clock; // Variable with the minutes value to be displayed by the needle.
char actual_day[2]; // Char type matrix to display the day on the screen.
char actual_month[2]; // Char type matrix to display the month on the screen.
char actual_year[4]; // Char type matrix to display the year on the screen.
/***** End DS3231 rtc module *****/
/***** Moon show *****/
float new_moon_period = 29.5; // Lunar cycle from new moon to new moon.
float first_day_new_moon_2024 = 10; // The first new moon in 2004 was January 10.
float next_day_new_moon; // Variable to store the next day number for the new moon.
float past_day_new_moon; // Variable to store the last day number new moon.
/***** End moon show *****/
/***** setup() method start *****/
void setup() {
Serial.begin(115200); // Initializes the Serial Monitor.
Serial.println("Initialization of the set of sensors and displays."); // Message in the Serial Monitor.
pinMode(tft_dc, OUTPUT); // Config the microcontroller port like output signal to send data.
pinMode(tft_cs_pressure, OUTPUT); // Config the microcontroller port like output signal to select pressure screen.
pinMode(tft_cs_clock, OUTPUT); // Config the microcontroller port like output signal to select clock screen.
pinMode(tft_cs_temperature, OUTPUT); // Config the microcontroller port like output signal to select temperature screen.
pinMode(tft_cs_calendar, OUTPUT); // Config the microcontroller port like output signal to select calendar screen.
pinMode(dht_pin, INPUT); // Config the microcontroller port like input signal to receive data.
/***** Initialitation temperature and humidity screen *****/
tft_temperature.begin(); // Initializes the TFT temperature and humidity display screen.
tft_temperature.setRotation(0); // No screen rotation setting (0 degrees).
tft_temperature.fillScreen(WHITE); // Full white screen.
pivot_x_temperature = center_x_temperature; // Set the center of rotation of the temperature needle with the X coordinate of the center of its circumference.
pivot_y_temperature = center_y_temperature; // Set the center of rotation of the temperature needle with the Y coordinate of the center of its circumference.
p1_x_old_temperature = center_x_temperature; p1_y_old_temperature = center_y_temperature; // Set the values of the old coordinates of the temperature needle tip triangle with the current values.
p2_x_old_temperature = center_x_temperature; p2_y_old_temperature = center_y_temperature; // Set the values of the old coordinates of the temperature needle tip triangle with the current values.
p3_x_old_temperature = center_x_temperature; p3_y_old_temperature = center_y_temperature; // Set the values of the old coordinates of the temperature needle tip triangle with the current values.
pivot_x_humidity = center_x_humidity; // Set the center of rotation of the humidity needle with the X coordinate of the center of its circumference.
pivot_y_humidity = center_y_humidity; // Set the center of rotation of the humidity needle with the Y coordinate of the center of its circumference.
p4_x_old_humidity = center_x_humidity; p4_y_old_humidity = center_y_humidity; // Set the values of the old coordinates of the humidity needle tip triangle with the current values.
p5_x_old_humidity = center_x_humidity; p5_y_old_humidity = center_y_humidity; // Set the values of the old coordinates of the humidity needle tip triangle with the current values.
p6_x_old_humidity = center_x_humidity; p6_y_old_humidity = center_y_humidity; // Set the values of the old coordinates of the humidity needle tip triangle with the current values.
create_dial_temperature(); // Call to the “create_dial_temperature” method to draw the temperature and humidity values scales.
draw_pivot_temperature(); // Call to the “draw_pivot_temperature” method to draw a small circle at the point of rotation of the temperature needle.
draw_pivot_humidity(); // Call to the “draw_pivot_humidity” method to draw a small circle at the point of rotation of the humidity needle.
/***** End initialitation temperature and humidity screen *****/
/***** Initialitation pressure screen *****/
tft_pressure.begin(); // Initializes the TFT pressure display screen.
tft_pressure.setRotation (0); // No screen rotation setting (0 degrees).
tft_pressure.fillScreen (WHITE); // Full white screen.
tft_pressure.drawCircle (center_x_pressure, center_y_pressure, 120, WHITE); // Draw white circle.
pivot_x_pressure = center_x_pressure; // Set the center of rotation of the pressure needle with the X coordinate of the center of its circumference.
pivot_y_pressure = center_y_pressure; // Set the center of rotation of the pressure needle with the Y coordinate of the center of its circumference.
p1_x_old_pressure = center_x_pressure; p1_y_old_pressure = center_y_pressure; // Set the values of the old coordinates of the pressure needle tip triangle with the current values.
p2_x_old_pressure = center_x_pressure; p2_y_old_pressure = center_y_pressure; // Set the values of the old coordinates of the pressure needle tip triangle with the current values.
p3_x_old_pressure = center_x_pressure; p3_y_old_pressure = center_y_pressure; // Set the values of the old coordinates of the pressure needle tip triangle with the current values.
create_dial_pressure(); // Call to the “create_dial_pressure” method to draw the pressure values scale.
draw_pivot_pressure(); // Call to the “draw_pivot_pressure” method to draw a small circle at the point of rotation of the pressure needle.
/***** End initialitation pressure screen *****/
/***** Initialitation clock screen *****/
tft_clock.begin(); // Initializes the TFT clock display screen.
tft_clock.setRotation (0); // No screen rotation setting (0 degrees).
tft_clock.fillScreen (WHITE); // Full white screen.
tft_clock.drawCircle (center_x_clock, center_y_clock, 120, WHITE); // Draw white circle.
pivot_x_clock = center_x_clock; // Set the center of rotation of the clock needle with the X coordinate of the center of its circumference.
pivot_y_clock = center_y_clock; // Set the center of rotation of the clock needle with the Y coordinate of the center of its circumference.
p1_x_old_clock = center_x_clock; p1_y_old_clock = center_y_clock; // Set the values of the old coordinates of the triangle at the tip of the hour needle to the current values.
p2_x_old_clock = center_x_clock; p2_y_old_clock = center_y_clock; // Set the values of the old coordinates of the triangle at the tip of the hour needle to the current values.
p3_x_old_clock = center_x_clock; p3_y_old_clock = center_y_clock; // Set the values of the old coordinates of the triangle at the tip of the hour needle to the current values.
p4_x_old_clock = center_x_clock; p4_y_old_clock = center_y_clock; // Set the values of the old coordinates of the triangle at the tip of the minute hand to the current values.
p5_x_old_clock = center_x_clock; p5_y_old_clock = center_y_clock; // Set the values of the old coordinates of the triangle at the tip of the minute hand to the current values.
p6_x_old_clock = center_x_clock; p6_y_old_clock = center_y_clock; // Set the values of the old coordinates of the triangle at the tip of the minute hand to the current values.
create_dial_clock(); // Call to the “create_dial_clock” method to draw the clock face.
draw_pivot_clock(); // Call to the “draw_pivot_clock” method to draw a small circle at the point of rotation of the clock needles.
/***** End initialitation clock screen *****/
/***** Initialitation calendar screen *****/
tft_calendar.begin(); // Initializes the TFT clock display screen.
tft_calendar.setRotation (0); // No screen rotation setting (0 degrees).
tft_calendar.fillScreen (BLACK); // Full black screen.
/***** End initialitation calendar screen *****/
/***** Initialization of the modules *****/
dht.begin(); // Initializate DHT module.
bmp180.init(); // Initialize BMP180 barometric module.
Serial.println("BMP180 Demo"); // Message in the Serial Monitor.
if (!bmp180.hasValidID()) { // If the barometric module is not recognized, a message is displayed on the Serial Monitor.
Serial.println("Error - please check the BMP180 board!");
}
rtc.begin(); // Initialize DS3231 Real Time Clock module.
rtc.adjust(DateTime(F(__DATE__), F(__TIME__))); // Set the date and time stored in the RTC module (usually uncommented line).
//rtc.adjust(DateTime(2024, 11, 1, 20, 18, 0)); // Manually set the date and time, it will be saved in the RTC module (usually annotated line).
/***** End initialization of the modules *****/
}
/***** setup() method finish *****/
/***** loop(void) method start *****/
void loop(void) {
DateTime now = rtc.now(); // We use the “now” function to acquire the current date and time data.
time_h = now.hour(); // We store in the variable “time_h” the number of the current hour.
time_m = now.minute(); // We store in the variable “time_m” the number of the current minutes.
time_h = time_h + (time_m/60); // We divide the number of the current hour by 60 (minutes) to display the advance of the needle between the hours.
Serial.println(time_h); // Message in the Serial Monitor with the number of hours passed.
Serial.println(time_m); // Message in the Serial Monitor with the number of minutes passed.
if (time_m != time_m_old) { // If the number of minutes elapsed is different from the saved number, the method inside the keys will be executed.
refresh_screens(); // Call to the refresh_screens().
} else { } // If the number of minutes elapsed is equal to the number saved, it will jump to the beginning of the loop() method.
}
/***** loop(void) method finish *****/
/***** refresh_screens() method start *****/
void refresh_screens() {
/***** DHT sensor data acquisition *****/
temp = dht.readTemperature(); // We use the “readTemperature” function to acquire the current temperature and save it in the "temp" variable.
Serial.print("Temperature ºC --> "); // Message in the Serial Monitor.
Serial.println(temp); // Message in the Serial Monitor with the temperature data.
humi = dht.readHumidity(); // We use the “readHumidity” function to acquire the current temperature and save it in the "humi" variable.
Serial.print("Humidity % --> "); // Message in the Serial Monitor.
Serial.println(humi); // Message in the Serial Monitor with the humidity data.
if (isnan(humi) || isnan(temp)) { // If there is no temperature or humidity reading, the method will be executed within the keys.
Serial.println("DHT sensor read failure !!!"); // A message is displayed on the Serial Monitor to inform.
}
needle_setter_temperature = temp; // Store in the variable "needle_setter_temperature" the value of the temperature read and stored in the variable "temp".
needle_setter_humidity = humi; // Store in the variable "needle_setter_humidity" the value of the temperature read and stored in the variable "humi".
needle_temperature(); // Call to the “needle_temperature” method to be executed.
draw_pivot_temperature(); // Call to the “draw_pivot_temperature” method to be executed.
needle_humidity(); // Call to the “needle_humidity” method to be executed.
draw_pivot_humidity(); // Call to the “draw_pivot_humidity” method to be executed.
/***** DHT sensor data acquisition finish *****/
/***** BMP180 sensor data acquisition *****/
pressu = bmp180.getPressure(); // We use the “getPressure” function to acquire the current presuure and save it in the "pressu" variable.
pressu = pressu + pressure_module_calibration; // Adjustment of the pressure, adding the possible reading error to it.
Serial.print("Pressure hPa --> "); // Message in the Serial Monitor.
Serial.println(pressu); // Message in the Serial Monitor with the pressure data.
needle_setter_pressure = pressu; // Store in the variable "needle_setter_pressure" the value of the presurre read and stored in the variable "pressu".
needle_pressure(); // Call to the “needle_pressure” method to be executed.
draw_pivot_pressure(); // Call to the “draw_pivot_pressure” method to be executed.
/***** BMP180 sensor data acquisition finish *****/
/***** DS3231 clock show data *****/
needle_setter_hours_clock = time_h; // Store in the variable "needle_setter_hours_clock" the value of the current hour stored in the variable "time_h".
needle_setter_minutes_clock = time_m * 0.2; // Store in the variable “needle_setter_minutes_clock” the value of the current minutes stored in the variable “time_m” multiplied by 0.2 for correct display.
needle_hours_clock(); // Call to the “needle_hours_clock” method to be executed.
needle_minutes_clock(); // Call to the “needle_minutes_clock” method to be executed.
draw_pivot_clock(); // Call to the “draw_pivot_clock” method to be executed.
time_m_old = time_m; // Store the value of the current minutes in the variable "time_m_old".
/***** DS3231 clock show data finish *****/
/***** Calendar show data *****/
DateTime now = rtc.now(); // We use the “now” function to acquire the current date and time data.
date_d = now.day(); // We store in the variable "date_d" the number of the current day.
date_m = now.month(); // We store in the variable "date_m" the number of the actual month.
date_y = now.year(); // We store in the variable "date_y" the number of the actual year.
tft_calendar.fillScreen(BLACK); // The calendar screen fill in black color.
tft_calendar.setTextColor(WHITE); // Set color text in white.
tft_calendar.setTextSize(2); // Text size 2.
tft_calendar.setCursor(93, 4); // Coordinates of the first letter of the text to be written.
tft_calendar.print("TODAY"); // TODAY text show in the upper position on the calendar screen.
tft_calendar.setCursor(20, 112); // Coordinates of the first letter of the day to be displayed on the screen.
tft_calendar.setTextColor(WHITE); // Set color text in white.
tft_calendar.setTextSize(2); // Text size 2.
tft_calendar.println(daysOfTheWeek[now.dayOfTheWeek()]); // Display the current day on the screen.
tft_calendar.setTextColor(WHITE); // Set color text in white.
tft_calendar.setTextSize(2); // Text size 2.
tft_calendar.setCursor(97, 114); // Coordinates of the character to draw on the screen.
tft_calendar.print(","); // Draw the character comma.
if (date_d < 10) { // If the current day is less than 10, it will only have one number.
String convert_day = String(date_d); // The text string of the day is saved in the variable convert_day.
convert_day = '0' + convert_day; // We concatenate a zero in front of the text string.
convert_day.toCharArray(actual_day, 3); // We convert the text string in an char array to show the text on the screen.
tft_calendar.setCursor(112, 112); // Coordinates of the first character to draw on the screen.
tft_calendar.setTextColor(WHITE); // Set color text in white.
tft_calendar.setTextSize(2); // Text size 2.
tft_calendar.println(actual_day); // Draw the two characters.
} else { // If the current day is not less than 10, the following will be executed:
String convert_day = String(date_d); // The text string of the day is saved in the variable convert_day.
convert_day.toCharArray(actual_day, 3); // We convert the text string in an char array to show the text on the screen.
tft_calendar.setCursor(112, 112); // Coordinates of the first character to draw on the screen.
tft_calendar.setTextColor(WHITE); // Set color text in white.
tft_calendar.setTextSize(2); // Text size 2.
tft_calendar.println(actual_day); // Draw the two characters.
}
tft_calendar.drawLine (139, 118, 144, 118, WHITE); // Draw a line from the coordinates x = 139 and y = 118 to the coordinates x = 144 and y = 118.
tft_calendar.drawLine (139, 119, 144, 119, WHITE); // Draw a line from the coordinates x = 139 and y = 119 to the coordinates x = 144 and y = 119.
if (date_m < 10) { // If the current month is less than 10, it will only have one number.
String convert_month = String(date_m); // The text string of the month is saved in the variable convert_month.
convert_month = '0' + convert_month; // We concatenate a zero in front of the text string.
convert_month.toCharArray(actual_month, 3); // We convert the text string in an char array to show the text on the screen.
tft_calendar.setCursor(150, 112); // Coordinates of the first character to draw on the screen.
tft_calendar.setTextColor(WHITE); // Set color text in white.
tft_calendar.setTextSize(2); // Text size 2.
tft_calendar.println(actual_month); // Draw the two characters.
} else { // If the current month is not less than 10, the following will be executed:
String convert_month = String(date_m); // The text string of the month is saved in the variable convert_month.
convert_month.toCharArray(actual_month, 3); // We convert the text string in an char array to show the text on the screen.
tft_calendar.setCursor(150, 112); // Coordinates of the first character to draw on the screen.
tft_calendar.setTextColor(WHITE); // Set color text in white.
tft_calendar.setTextSize(2); // Text size 2.
tft_calendar.println(actual_month); // Draw the two characters.
}
tft_calendar.drawLine (177, 118, 182, 118, WHITE); // Draw a line from the coordinates x = 177 and y = 118 to the coordinates x = 182 and y = 118.
tft_calendar.drawLine (177, 119, 182, 119, WHITE); // Draw a line from the coordinates x = 177 and y = 119 to the coordinates x = 182 and y = 119.
String convert_year = String(date_y); // The text string of the year is saved in the variable convert_year.
convert_year.toCharArray(actual_year, 5); // We convert the text string in an char array to show the text on the screen.
tft_calendar.setCursor(188, 112); // Coordinates of the first character to draw on the screen.
tft_calendar.setTextColor(WHITE); // Set color text in white.
tft_calendar.setTextSize(2); // Text size 2.
tft_calendar.println(actual_year); // Draw the four characters.
/***** Calendar show data finish *****/
/***** Count of days elapsed since January 1, 2024 *****/
int total_past_days = days_from_2024(date_y, date_m, date_d); // We call the method “days_from_2024” passing as parameters the day, month and year number data. We will receive the number of days passed.
Serial.print("Days since January 1, 2024: "); // Message in the Serial Monitor.
Serial.println(total_past_days); // Message in the Serial Monitor with the number of days passed.
/***** End of process for counting days elapsed since January 1, 2024 process *****/
/***** Calculations to know the days elapsed since January 1, 2024 to draw the state of the moon on the screen *****/
next_day_new_moon = first_day_new_moon_2024; // The value of the variable first_day_new_moon_2024 is saved in the variable next_day_new_moon
while (total_past_days > next_day_new_moon) { // As long as the value of the total_past_days variable is greater than the value of the next_day_new_moon variable, the code inside the braces will be executed.
next_day_new_moon += new_moon_period; // The value of the variable new_moon_period (29.5 days) will be added to the variable next_day_new_moon and their value will be compared again.
Serial.print("Next day moon: "); // Message in the Serial Monitor.
Serial.println(next_day_new_moon); // Message in the Serial Monitor with the next_day_new moon variable value.
}
float state_moon = next_day_new_moon - total_past_days; // When the value of the variable next_day_new_moon is greater than total_past_day, the values are subtracted to find out how many days are left until the next new moon and the value is stored in the variable state_moon.
if (state_moon <= 29.5 && state_moon > 28.4) { // If the value of the state_moon variable is less than or equal to 29.5 and greater than or equal to 28.5, the following will be executed:
Serial.println("Today is a new moon."); // Message in the Serial Monitor.
tft_calendar.fillCircle (120, 180, 30, GREY); // A gray circle will be drawn on the tft_calendar screen at coordinates x = 120, y = 180 and radius = 30.
}
if (state_moon <= 28.4 && state_moon > 25.2) { // If the value of the state_moon variable is less than or equal to 28.4 and greater than 25.2, the following will be executed:
Serial.println("Today is the crescent moon."); // Message in the Serial Monitor.
tft_calendar.fillCircle (120, 180, 30, WHITE); // A white circle will be drawn on the tft_calendar screen at coordinates x = 120, y = 180 and radius = 30.
tft_calendar.fillCircle (103, 180, 35, BLACK); // A black circle will be drawn on the tft_calendar screen at coordinates x = 103, y = 180 and radius = 35.
}
if (state_moon <= 25.2 && state_moon > 22) { // If the value of the state_moon variable is less than or equal to 25.2 and greater than 22, the following will be executed:
Serial.println("Today is the crescent moon."); // Message in the Serial Monitor.
tft_calendar.fillCircle (120, 180, 30, WHITE); // A white circle will be drawn on the tft_calendar screen at coordinates x = 120, y = 180 and radius = 30.
tft_calendar.fillCircle (91, 180, 35, BLACK); // A black circle will be drawn on the tft_calendar screen at coordinates x = 91, y = 180 and radius = 35.
}
if (state_moon <= 22 && state_moon > 18.8) { // If the value of the state_moon variable is less than or equal to 22 and greater than 18.8, the following will be executed:
Serial.println("Today is the crescent moon."); // Message in the Serial Monitor.
tft_calendar.fillCircle (120, 180, 30, WHITE); // A white circle will be drawn on the tft_calendar screen at coordinates x = 120, y = 180 and radius = 30.
tft_calendar.fillCircle (79, 180, 35, BLACK); // A black circle will be drawn on the tft_calendar screen at coordinates x = 79, y = 180 and radius = 35.
}
if (state_moon <= 18.8 && state_moon >= 15.6) { // If the value of the state_moon variable is less than or equal to 18.8 and greater than or equal to 15.6, the following will be executed:
Serial.println("Today is the crescent moon."); // Message in the Serial Monitor.
tft_calendar.fillCircle (120, 180, 30, WHITE); // A white circle will be drawn on the tft_calendar screen at coordinates x = 120, y = 180 and radius = 30.
tft_calendar.fillCircle (67, 180, 35, BLACK); // A black circle will be drawn on the tft_calendar screen at coordinates x = 67, y = 180 and radius = 35.
}
if (state_moon <= 15.5 && state_moon >= 14.5) { // If the value of the state_moon variable is less than or equal to 15.5 and greater than or equal to 14.5, the following will be executed:
Serial.println("Today is a full moon."); // Message in the Serial Monitor.
tft_calendar.fillCircle (120, 180, 30, WHITE); // A white circle will be drawn on the tft_calendar screen at coordinates x = 120, y = 180 and radius = 30.
}
if (state_moon <= 14.4 && state_moon > 10.8) { // If the value of the state_moon variable is less than or equal to 14.4 and greater than 10.8, the following will be executed:
Serial.println("Today is the waning moon."); // Message in the Serial Monitor.
tft_calendar.fillCircle (120, 180, 30, WHITE); // A white circle will be drawn on the tft_calendar screen at coordinates x = 120, y = 180 and radius = 30.
tft_calendar.fillCircle (173, 180, 35, BLACK); // A black circle will be drawn on the tft_calendar screen at coordinates x = 173, y = 180 and radius = 35.
}
if (state_moon <= 10.8 && state_moon > 7.2) { // If the value of the state_moon variable is less than or equal to 10.8 and greater than 7.2, the following will be executed:
Serial.println("Today is the waning moon."); // Message in the Serial Monitor.
tft_calendar.fillCircle (120, 180, 30, WHITE); // A white circle will be drawn on the tft_calendar screen at coordinates x = 120, y = 180 and radius = 30.
tft_calendar.fillCircle (161, 180, 35, BLACK); // A black circle will be drawn on the tft_calendar screen at coordinates x = 161, y = 180 and radius = 35.
}
if (state_moon <= 7.2 && state_moon > 3.6) { // If the value of the state_moon variable is less than or equal to 7.2 and greater than 3.6, the following will be executed:
Serial.println("Today is the waning moon."); // Message in the Serial Monitor.
tft_calendar.fillCircle (120, 180, 30, WHITE); // A white circle will be drawn on the tft_calendar screen at coordinates x = 120, y = 180 and radius = 30.
tft_calendar.fillCircle (149, 180, 35, BLACK); // A black circle will be drawn on the tft_calendar screen at coordinates x = 149, y = 180 and radius = 35.
}
if (state_moon <= 3.6 && state_moon >= 0.1) { // If the value of the state_moon variable is less than or equal to 3.6 and greater than or equal to 0.1, the following will be executed:
Serial.println("Today is the waning moon."); // Message in the Serial Monitor.
tft_calendar.fillCircle (120, 180, 30, WHITE); // A white circle will be drawn on the tft_calendar screen at coordinates x = 120, y = 180 and radius = 30.
tft_calendar.fillCircle (137, 180, 35, BLACK); // A black circle will be drawn on the tft_calendar screen at coordinates x = 137, y = 180 and radius = 35.
}
if (state_moon < 0.1) { // If the value of the state_moon variable is less than 0.1, the following will be executed:
Serial.println("Today is a new moon."); // Message in the Serial Monitor.
tft_calendar.fillCircle (120, 180, 30, GREY); // A gray circle will be drawn on the tft_calendar screen at coordinates x = 120, y = 180 and radius = 30.
}
/***** End of calculations to know the days elapsed since January 1, 2024 to draw the state of the moon on the screen *****/
/***** Representation of weather images on the screen depending on atmospheric pressure *****/
if (pressu < 1000) { // If the pressure read is most low than 1000 hPa, the following will be executed:
cloud(); // The cloud() method is called to draw a cloud on the screen.
rain(); // The rain() method is called to draw rain below the cloud on the screen.
}
if (pressu >= 1000 && pressu <= 1020) { // If the pressure read is between 1001 hPa and 1019 hPa, the following will be executed:
cloud(); // The cloud() method is called to draw a cloud on the screen.
sun_in_cloud(); // The sun_in_cloud() method is called to draw a sun above the cloud on the screen.
}
if (pressu > 1020) { // If the pressure read is most higher than 1020 hPa, the following will be executed:
sun(); // The sun() method is called to draw a sun on the screen.
}
/***** End of displaying weather images on the screen depending on atmospheric pressure *****/
}
/***** refresh_screens() method finish *****/
/***** Methods for DHT22 show needle *****/
void create_dial_temperature() { // Method to draw the temperature and humidity values scale.
for (temperature=-20; temperature<40.1; temperature+=10) { // Loop to display divisions every 10 degrees on the temperature scale.
needleAngle_temperature = (temperature * deg_to_rad * 1) - 2.7; // Needle positioning angle for a temperature value, must be converted to position in radians.
arc_x_temperature = (pivot_x_temperature + ((radius_temperature + 4) * cos(needleAngle_temperature))); // Calculation to know the position on the X axis of the circumference of the radian value obtained.
arc_y_temperature = (pivot_y_temperature + ((radius_temperature + 4) * sin(needleAngle_temperature))); // Calculation to know the position on the Y axis of the circumference of the radian value obtained.
tft_temperature.fillCircle (arc_x_temperature, arc_y_temperature, 2, RED); // A red circle of size 2 is drawn at the obtained X and Y coordinates.
}
tft_temperature.setTextColor (RED); // Set color text in red.
tft_temperature.setTextSize (2); // Text size 2.
tft_temperature.setCursor (64, 16); // Coordinates of the first letter of the text to be written.
tft_temperature.print ("TEMP"); // Text to be written on the screen.
tft_temperature.setTextColor (RED); // Set color text in red.
tft_temperature.setTextSize (2); // Text size 2.
tft_temperature.setCursor (80, 38); // Coordinates of the first character of the next number to be written.
tft_temperature.print ("40"); // The number 40 will be written on the screen.
tft_temperature.setTextColor (RED);
tft_temperature.setTextSize (2);
tft_temperature.setCursor (62, 51);
tft_temperature.print ("30");
tft_temperature.setTextColor (RED);
tft_temperature.setTextSize (2);
tft_temperature.setCursor (47, 66);
tft_temperature.print ("20");
tft_temperature.setTextColor (RED);
tft_temperature.setTextSize (2);
tft_temperature.setCursor (36, 82);
tft_temperature.print ("10");
tft_temperature.setTextColor (RED);
tft_temperature.setTextSize (2);
tft_temperature.setCursor (38, 98);
tft_temperature.print ("0");
tft_temperature.setTextColor (RED);
tft_temperature.setTextSize (2);
tft_temperature.setCursor (8, 116);
tft_temperature.print ("-10");
tft_temperature.setTextColor (RED);
tft_temperature.setTextSize (2);
tft_temperature.setCursor (5, 134);
tft_temperature.print ("-20");
tft_temperature.setTextColor (RED); // Set color text in red to write the degrees Celsius simbol.
tft_temperature.setTextSize (2); // Text size 2.
tft_temperature.setCursor (29, 159); // Coordinates of the C letter.
tft_temperature.print ("C"); // Letter C for writing degrees Celsius.
tft_temperature.fillCircle (24, 161, 2, RED); // Red circle of size 2 in the past coordinates.
tft_temperature.fillCircle (24, 161, 1, WHITE); // White circle of size 1 in the past coordinates to do one small "o" before C letter.
for (humidity=0; humidity<101; humidity+=20) { // Loop to show percentage divisions of 20 on the humidity scale.
needleAngle_humidity = (humidity * deg_to_rad * 0.6)- 1.15; // Needle positioning angle for a humidity value, must be converted to position in radians.
arc_x_humidity = (pivot_x_humidity + ((radius_temperature + 4) * cos(needleAngle_humidity))); // Calculation to know the position on the X axis of the circumference of the radian value obtained.
arc_y_humidity = (pivot_y_humidity + ((radius_temperature + 4) * sin(needleAngle_humidity))); // Calculation to know the position on the Y axis of the circumference of the radian value obtained.
tft_temperature.fillCircle (arc_x_humidity, arc_y_humidity, 2, BLUE); // A blue circle of size 2 is drawn at the obtained X and Y coordinates.
}
tft_temperature.setTextColor (BLUE); // Set color text in blue.
tft_temperature.setTextSize (2); // Text size 2.
tft_temperature.setCursor (132, 16); // Coordinates of the first letter of the text to be written.
tft_temperature.print ("HUMI"); // Text to be written on the screen.
tft_temperature.setTextColor (BLUE); // Set color text in blue.
tft_temperature.setTextSize (2); // Text size 2.
tft_temperature.setCursor (137, 38); // Coordinates of the first character of the next number to be written.
tft_temperature.print ("0"); // The number 0 will be written on the screen.
tft_temperature.setTextColor (BLUE);
tft_temperature.setTextSize (2);
tft_temperature.setCursor (157, 51);
tft_temperature.print ("20");
tft_temperature.setTextColor (BLUE);
tft_temperature.setTextSize (2);
tft_temperature.setCursor (173, 70);
tft_temperature.print ("40");
tft_temperature.setTextColor (BLUE);
tft_temperature.setTextSize (2);
tft_temperature.setCursor (187, 90);
tft_temperature.print ("60");
tft_temperature.setTextColor (BLUE);
tft_temperature.setTextSize (2);
tft_temperature.setCursor (195, 111);
tft_temperature.print ("80");
tft_temperature.setTextColor (BLUE);
tft_temperature.setTextSize (2);
tft_temperature.setCursor (198, 132);
tft_temperature.print ("100");
tft_temperature.setTextColor (BLUE);
tft_temperature.setTextSize (2);
tft_temperature.setCursor (200, 158);
tft_temperature.print ("%");
tft_temperature.setTextColor (BLACK); // Set color text in black.
tft_temperature.setTextSize (2); // Text size 2.
tft_temperature.setCursor (49, 195); // Coordinates of the first letter of the text to be written.
tft_temperature.print ("CONFORTMETER"); // Text to be written on the screen.
}
void draw_pivot_temperature() { // Method for drawing a circle on the base of the temperature indicating needle.
tft_temperature.fillCircle (pivot_x_temperature, pivot_y_temperature, 8, RED); // Red circle of size 8 in the past coordinates.
}
void draw_pivot_humidity() { // Method for drawing a circle on the base of the humidity indicating needle.
tft_temperature.fillCircle (pivot_x_humidity, pivot_y_humidity, 8, BLUE); // Blue circle of size 8 in the past coordinates.
}
void needle_temperature() { // Method for the dynamic management of the temperature indicating needle.
tft_temperature.drawLine (pivot_x_temperature, pivot_y_temperature, p1_x_old_temperature, p1_y_old_temperature, WHITE); // Draw the needle in white color with the old values, it will be erased from the screen.
tft_temperature.fillTriangle (p1_x_old_temperature, p1_y_old_temperature, p2_x_old_temperature, p2_y_old_temperature, p3_x_old_temperature, p3_y_old_temperature, WHITE); // Draw the needle tip triangles in white with the old values, they will be erased from the screen.
needleAngle_temperature = (needle_setter_temperature * deg_to_rad * 1) - 2.7; // The temperature value will be converted to radians.
p1_x_temperature = (pivot_x_temperature + ((radius_temperature - 1) * cos(needleAngle_temperature))); // Calculation to know the position on the X-axis of the circumference of the radian value obtained for the tip of the needle.
p1_y_temperature = (pivot_y_temperature + ((radius_temperature - 1) * sin(needleAngle_temperature))); // Calculation to know the position on the Y-axis of the circumference of the radian value obtained for the tip of the needle.
p2_x_temperature = (pivot_x_temperature + ((radius_temperature - 16) * cos(needleAngle_temperature - 0.05))); // Calculation to know the position on the X-axis of the circumference of the radian value obtained for the triangle to the left of the tip of the needle.
p2_y_temperature = (pivot_y_temperature + ((radius_temperature - 16) * sin(needleAngle_temperature - 0.05))); // Calculation to know the position on the Y-axis of the circumference of the radian value obtained for the triangle to the left of the tip of the needle.
p3_x_temperature = (pivot_x_temperature + ((radius_temperature - 16) * cos(needleAngle_temperature + 0.05))); // Calculation to know the position on the X-axis of the circumference of the radian value obtained for the triangle to the right of the tip of the needle.
p3_y_temperature = (pivot_y_temperature + ((radius_temperature - 16) * sin(needleAngle_temperature + 0.05))); // Calculation to know the position on the Y-axis of the circumference of the radian value obtained for the triangle to the right of the tip of the needle.
p1_x_old_temperature = p1_x_temperature; p1_y_old_temperature = p1_y_temperature; // Save current values in the old value variables.
p2_x_old_temperature = p2_x_temperature; p2_y_old_temperature = p2_y_temperature; // Save current values in the old value variables.
p3_x_old_temperature = p3_x_temperature; p3_y_old_temperature = p3_y_temperature; // Save current values in the old value variables.
tft_temperature.drawLine (pivot_x_temperature, pivot_y_temperature, p1_x_temperature, p1_y_temperature, RED); // Draw a red line for the temperature indicator needle with the coordinates passed.
tft_temperature.fillTriangle (p1_x_temperature, p1_y_temperature, p2_x_temperature, p2_y_temperature, p3_x_temperature, p3_y_temperature, RED); // Draw the two red triangles for the tip of the temperature indicator needle with the coordinates passed.
}
void needle_humidity() { // Method for the dynamic management of the humidity indicating needle.
tft_temperature.drawLine (pivot_x_humidity, pivot_y_humidity, p4_x_old_humidity, p4_y_old_humidity, WHITE); // Draw the needle in white color with the old values, it will be erased from the screen.
tft_temperature.fillTriangle (p4_x_old_humidity, p4_y_old_humidity, p5_x_old_humidity, p5_y_old_humidity, p6_x_old_humidity, p6_y_old_humidity, WHITE); // Draw the needle tip triangles in white with the old values, they will be erased from the screen.
needleAngle_humidity = (needle_setter_humidity * deg_to_rad * 0.6) - 1.15; // The humidity value will be converted to radians.
p4_x_humidity = (pivot_x_humidity + ((radius_temperature - 1) * cos(needleAngle_humidity))); // Calculation to know the position on the X-axis of the circumference of the radian value obtained for the tip of the needle.
p4_y_humidity = (pivot_y_humidity + ((radius_temperature - 1) * sin(needleAngle_humidity))); // Calculation to know the position on the Y-axis of the circumference of the radian value obtained for the tip of the needle.
p5_x_humidity = (pivot_x_humidity + ((radius_temperature - 16) * cos(needleAngle_humidity - 0.05))); // Calculation to know the position on the X-axis of the circumference of the radian value obtained for the triangle to the left of the tip of the needle.
p5_y_humidity = (pivot_y_humidity + ((radius_temperature - 16) * sin(needleAngle_humidity - 0.05))); // Calculation to know the position on the Y-axis of the circumference of the radian value obtained for the triangle to the left of the tip of the needle.
p6_x_humidity = (pivot_x_humidity + ((radius_temperature - 16) * cos(needleAngle_humidity + 0.05))); // Calculation to know the position on the X-axis of the circumference of the radian value obtained for the triangle to the right of the tip of the needle.
p6_y_humidity = (pivot_y_humidity + ((radius_temperature - 16) * sin(needleAngle_humidity + 0.05))); // Calculation to know the position on the Y-axis of the circumference of the radian value obtained for the triangle to the right of the tip of the needle.
p4_x_old_humidity = p4_x_humidity; p4_y_old_humidity = p4_y_humidity; // Save current values in the old value variables.
p5_x_old_humidity = p5_x_humidity; p5_y_old_humidity = p5_y_humidity; // Save current values in the old value variables.
p6_x_old_humidity = p6_x_humidity; p6_y_old_humidity = p6_y_humidity; // Save current values in the old value variables.
tft_temperature.drawLine (pivot_x_humidity, pivot_y_humidity, p4_x_humidity, p4_y_humidity, BLUE); // Draw a blue line for the humidity indicator needle with the coordinates passed.
tft_temperature.fillTriangle (p4_x_humidity, p4_y_humidity, p5_x_humidity, p5_y_humidity, p6_x_humidity, p6_y_humidity, BLUE); // Draw the two blue triangles for the tip of the humidity indicator needle with the coordinates passed.
}
/***** Ends methods for DHT22 show needle *****/
/***** Methods for bmp180 show needle *****/
void create_dial_pressure() { // Method to draw the pressure values scale.
needleAngle_pressure = (((needle_setter_pressure) * deg_to_rad * 3 )- ((4 * pi) / 3)); // Needle positioning angle for a pressure value, must be converted to position in radians.
for (pressure_scale=960; pressure_scale<1061; pressure_scale+= 2) { // Loop to display divisions every 2 unit pressure on the pressure scale.
needleAngle_pressure = ((pressure_scale * deg_to_rad * 3)- ((4 * pi) / 3)); // Needle positioning angle for a pressure value, must be converted to position in radians.
arc_x_pressure = (pivot_x_pressure + ((radius_pressure + 4) * cos(needleAngle_pressure))); // Calculation to know the position on the X axis of the circumference of the radian value obtained.
arc_y_pressure = (pivot_y_pressure + ((radius_pressure + 4) * sin(needleAngle_pressure))); // Calculation to know the position on the Y axis of the circumference of the radian value obtained.
tft_pressure.fillCircle (arc_x_pressure, arc_y_pressure, 1, BLACK); // A black circle of size 1 is drawn at the obtained X and Y coordinates.
}
for (pressure_scale=960; pressure_scale<1061; pressure_scale+=10) { // Loop to display divisions every 10 unit pressure on the pressure scale.
needleAngle_pressure = ((pressure_scale * deg_to_rad * 3)- ((4 * pi) / 3)); // Needle positioning angle for a pressure value, must be converted to position in radians.
arc_x_pressure = (pivot_x_pressure + ((radius_pressure + 4) * cos(needleAngle_pressure))); // Calculation to know the position on the X axis of the circumference of the radian value obtained.
arc_y_pressure = (pivot_y_pressure + ((radius_pressure + 4) * sin(needleAngle_pressure))); // Calculation to know the position on the Y axis of the circumference of the radian value obtained.
tft_pressure.fillCircle (arc_x_pressure, arc_y_pressure, 2, BLUE); // A blue circle of size 2 is drawn at the obtained X and Y coordinates.
}
tft_pressure.setTextColor (BLACK); // Set color text in black.
tft_pressure.setTextSize (2); // Text size 2.
tft_pressure.setCursor (40, 178); // Coordinates of the first number of the text to be written.
tft_pressure.print ("960"); // Numbers to be written on the screen.
tft_pressure.setTextColor (BLACK);
tft_pressure.setTextSize (2);
tft_pressure.setCursor (18, 149);
tft_pressure.print ("970");
tft_pressure.setTextColor (BLACK);
tft_pressure.setTextSize (2);
tft_pressure.setCursor (9, 113);
tft_pressure.print ("980");
tft_pressure.setTextColor (BLACK);
tft_pressure.setTextSize (2);
tft_pressure.setCursor (18, 76);
tft_pressure.print ("990");
tft_pressure.setTextColor (BLACK);
tft_pressure.setTextSize (2);
tft_pressure.setCursor (34, 47);
tft_pressure.print ("1000");
tft_pressure.setTextColor (BLACK);
tft_pressure.setTextSize (2);
tft_pressure.setCursor (96, 22);
tft_pressure.print ("1010");
tft_pressure.setTextColor (BLACK);
tft_pressure.setTextSize (2);
tft_pressure.setCursor (158, 47);
tft_pressure.print ("1020");
tft_pressure.setTextColor (BLACK);
tft_pressure.setTextSize (2);
tft_pressure.setCursor (184, 76);
tft_pressure.print ("1030");
tft_pressure.setTextColor (BLACK);
tft_pressure.setTextSize (2);
tft_pressure.setCursor (192, 113);
tft_pressure.print ("1040");
tft_pressure.setTextColor (BLACK);
tft_pressure.setTextSize (2);
tft_pressure.setCursor (184, 149);
tft_pressure.print ("1050");
tft_pressure.setTextColor (BLACK);
tft_pressure.setTextSize (2);
tft_pressure.setCursor (158, 178);
tft_pressure.print ("1060");
tft_pressure.setTextColor (RED);
tft_pressure.setTextSize (2);
tft_pressure.setCursor (67, 205);
tft_pressure.print ("BAROMETER");
tft_pressure.setTextColor (RED);
tft_pressure.setTextSize (2);
tft_pressure.setCursor (103, 223);
tft_pressure.print ("hPa");
}
void draw_pivot_pressure() { // Method for drawing a circle on the base of the pressure indicating needle.
tft_pressure.fillCircle (pivot_x_pressure, pivot_y_pressure, 8, RED); // Red circle of size 8 in the past coordinates.
tft_pressure.drawCircle (pivot_x_pressure, pivot_y_pressure, 8, BLACK); // Black circumference of size 8 in the past coordinates.
tft_pressure.drawCircle (pivot_x_pressure, pivot_y_pressure, 3, BLACK); // Black circumference of size 3 in the past coordinates.
}
void needle_pressure() { // Method for the dynamic management of the pressure indicating needle.
tft_pressure.drawLine (pivot_x_pressure, pivot_y_pressure, p1_x_old_pressure, p1_y_old_pressure, WHITE); // Draw the needle in white color with the old values, it will be erased from the screen.
tft_pressure.fillTriangle (p1_x_old_pressure, p1_y_old_pressure, p2_x_old_pressure, p2_y_old_pressure, p3_x_old_pressure, p3_y_old_pressure, WHITE); // Draw the needle tip triangles in white with the old values, they will be erased from the screen.
needleAngle_pressure = (((needle_setter_pressure) * deg_to_rad * 3 )- ((4 * pi) / 3)); // The pressure value will be converted to radians.
p1_x_pressure = (pivot_x_pressure + ((radius_pressure - 1) * cos(needleAngle_pressure))); // Calculation to know the position on the X-axis of the circumference of the radian value obtained for the tip of the needle.
p1_y_pressure = (pivot_y_pressure + ((radius_pressure - 1) * sin(needleAngle_pressure))); // Calculation to know the position on the Y-axis of the circumference of the radian value obtained for the tip of the needle.
p2_x_pressure = (pivot_x_pressure + ((radius_pressure - 16) * cos(needleAngle_pressure-0.05))); // Calculation to know the position on the X-axis of the circumference of the radian value obtained for the triangle to the left of the tip of the needle.
p2_y_pressure = (pivot_y_pressure + ((radius_pressure - 16) * sin(needleAngle_pressure-0.05))); // Calculation to know the position on the Y-axis of the circumference of the radian value obtained for the triangle to the left of the tip of the needle.
p3_x_pressure = (pivot_x_pressure + ((radius_pressure - 16) * cos(needleAngle_pressure+0.05))); // Calculation to know the position on the X-axis of the circumference of the radian value obtained for the triangle to the right of the tip of the needle.
p3_y_pressure = (pivot_y_pressure + ((radius_pressure - 16) * sin(needleAngle_pressure+0.05))); // Calculation to know the position on the Y-axis of the circumference of the radian value obtained for the triangle to the right of the tip of the needle.
p1_x_old_pressure = p1_x_pressure; p1_y_old_pressure = p1_y_pressure; // Save current values in the old value variables.
p2_x_old_pressure = p2_x_pressure; p2_y_old_pressure = p2_y_pressure; // Save current values in the old value variables.
p3_x_old_pressure = p3_x_pressure; p3_y_old_pressure = p3_y_pressure; // Save current values in the old value variables.
tft_pressure.drawLine (pivot_x_pressure, pivot_y_pressure, p1_x_pressure, p1_y_pressure, BLACK); // Draw a black line for the pressure indicator needle with the coordinates passed.
tft_pressure.fillTriangle (p1_x_pressure, p1_y_pressure, p2_x_pressure, p2_y_pressure, p3_x_pressure, p3_y_pressure, BLACK); // Draw the two black triangles for the tip of the pressure indicator needle with the coordinates passed.
}
/***** End methods for bmp180 show needle *****/
/***** Methods for clock show needle *****/
void create_dial_clock() { // Method to draw the clock face.
for (minutes_dial=0; minutes_dial<12.1; minutes_dial+=0.2) { // Loop to display the minute divisions.
needleAngle_minutes_clock = ((minutes_dial * deg_to_rad * 30)- (pi / 2)); // Positioning angle of the minute hand must be converted to radian position.
arc_x_clock = (pivot_x_clock + ((radius_clock + 4) * cos(needleAngle_minutes_clock))); // Calculation to know the position on the X axis of the circumference of the radian value obtained.
arc_y_clock = (pivot_y_clock + ((radius_clock + 4) * sin(needleAngle_minutes_clock))); // Calculation to know the position on the Y axis of the circumference of the radian value obtained.
tft_clock.fillCircle (arc_x_clock, arc_y_clock, 1, BLACK); // A black circle of size 1 is drawn at the obtained X and Y coordinates.
}
for (hours_dial=0; hours_dial<13; hours_dial+=1) { // Loop to display the hours divisions.
needleAngle_hours_clock = ((hours_dial * deg_to_rad * 30)- (pi / 2)); // Positioning angle of the hours hand must be converted to radian position.
arc_x_clock = (pivot_x_clock + ((radius_clock + 4) * cos(needleAngle_hours_clock))); // Calculation to know the position on the X axis of the circumference of the radian value obtained.
arc_y_clock = (pivot_y_clock + ((radius_clock + 4) * sin(needleAngle_hours_clock))); // Calculation to know the position on the Y axis of the circumference of the radian value obtained.
tft_clock.fillCircle (arc_x_clock, arc_y_clock, 2, BLUE); // A blue circle of size 2 is drawn at the obtained X and Y coordinates.
}
tft_clock.setTextColor (BLACK); // Set color text in black.
tft_clock.setTextSize (2); // Text size 2.
tft_clock.setCursor (104, 22); // Coordinates of the first letter of the text to be written.
tft_clock.print ("XII"); // Text to be written on the screen.
tft_clock.setTextColor (BLACK);
tft_clock.setTextSize (2);
tft_clock.setCursor (202, 114);
tft_clock.print ("III");
tft_clock.setTextColor (BLACK);
tft_clock.setTextSize (2);
tft_clock.setCursor (110, 205);
tft_clock.print ("VI");
tft_clock.setTextColor (BLACK);
tft_clock.setTextSize (2);
tft_clock.setCursor (14, 114);
tft_clock.print ("IX");
}
void draw_pivot_clock() { // Method for drawing a circle on the base of the clock indicating needle.
tft_clock.fillCircle (pivot_x_clock, pivot_y_clock, 8, BLACK); // Black circle of size 8 in the past coordinates.
}
void needle_hours_clock() { // Method for the dynamic management of the hours indicating needle.
tft_clock.drawLine (pivot_x_clock, pivot_y_clock, p1_x_old_clock, p1_y_old_clock, WHITE); // Draw the needle in white color with the old values, it will be erased from the screen.
tft_clock.fillTriangle (p1_x_old_clock, p1_y_old_clock, p2_x_old_clock, p2_y_old_clock, p3_x_old_clock, p3_y_old_clock, WHITE); // Draw the needle tip triangles in white with the old values, they will be erased from the screen.
needleAngle_hours_clock = (((needle_setter_hours_clock) * deg_to_rad * 30 ) - (pi / 2)); // The hour will be converted to radians.
p1_x_clock = (pivot_x_clock + ((radius_clock - 20) * cos(needleAngle_hours_clock))); // Calculation to know the position on the X-axis of the circumference of the radian value obtained for the tip of the needle.
p1_y_clock = (pivot_y_clock + ((radius_clock - 20) * sin(needleAngle_hours_clock))); // Calculation to know the position on the Y-axis of the circumference of the radian value obtained for the tip of the needle.
p2_x_clock = (pivot_x_clock + ((radius_clock - 35) * cos(needleAngle_hours_clock - 0.05))); // Calculation to know the position on the X-axis of the circumference of the radian value obtained for the triangle to the left of the tip of the needle.
p2_y_clock = (pivot_y_clock + ((radius_clock - 35) * sin(needleAngle_hours_clock - 0.05))); // Calculation to know the position on the Y-axis of the circumference of the radian value obtained for the triangle to the left of the tip of the needle.
p3_x_clock = (pivot_x_clock + ((radius_clock - 35) * cos(needleAngle_hours_clock + 0.05))); // Calculation to know the position on the X-axis of the circumference of the radian value obtained for the triangle to the right of the tip of the needle.
p3_y_clock = (pivot_y_clock + ((radius_clock - 35) * sin(needleAngle_hours_clock + 0.05))); // Calculation to know the position on the Y-axis of the circumference of the radian value obtained for the triangle to the right of the tip of the needle.
p1_x_old_clock = p1_x_clock; p1_y_old_clock = p1_y_clock; // Save current values in the old value variables.
p2_x_old_clock = p2_x_clock; p2_y_old_clock = p2_y_clock; // Save current values in the old value variables.
p3_x_old_clock = p3_x_clock; p3_y_old_clock = p3_y_clock; // Save current values in the old value variables.
tft_clock.drawLine (pivot_x_clock, pivot_y_clock, p1_x_clock, p1_y_clock, BLACK); // Draw a black line for the hour hand with the past coordinates.
tft_clock.fillTriangle (p1_x_clock, p1_y_clock, p2_x_clock, p2_y_clock, p3_x_clock, p3_y_clock, BLACK); // Draw the two black triangles for the tip of the hour hand needle with the coordinates passed.
}
void needle_minutes_clock() { // Method for the dynamic management of the minutes indicating needle.
tft_clock.drawLine (pivot_x_clock, pivot_y_clock, p4_x_old_clock, p4_y_old_clock, WHITE); // Draw the needle in white color with the old values, it will be erased from the screen.
tft_clock.fillTriangle (p4_x_old_clock, p4_y_old_clock, p5_x_old_clock, p5_y_old_clock, p6_x_old_clock, p6_y_old_clock, WHITE); // Draw the needle tip triangles in white with the old values, they will be erased from the screen.
needleAngle_minutes_clock = (((needle_setter_minutes_clock) * deg_to_rad * 30 ) - (pi / 2)); // The minute will be converted to radians.
p4_x_clock = (pivot_x_clock + ((radius_clock - 1) * cos(needleAngle_minutes_clock))); // Calculation to know the position on the X-axis of the circumference of the radian value obtained for the tip of the needle.
p4_y_clock = (pivot_y_clock + ((radius_clock - 1) * sin(needleAngle_minutes_clock))); // Calculation to know the position on the Y-axis of the circumference of the radian value obtained for the tip of the needle.
p5_x_clock = (pivot_x_clock + ((radius_clock - 16) * cos(needleAngle_minutes_clock - 0.05))); // Calculation to know the position on the X-axis of the circumference of the radian value obtained for the triangle to the left of the tip of the needle.
p5_y_clock = (pivot_y_clock + ((radius_clock - 16) * sin(needleAngle_minutes_clock - 0.05))); // Calculation to know the position on the Y-axis of the circumference of the radian value obtained for the triangle to the left of the tip of the needle.
p6_x_clock = (pivot_x_clock + ((radius_clock - 16) * cos(needleAngle_minutes_clock + 0.05))); // Calculation to know the position on the X-axis of the circumference of the radian value obtained for the triangle to the right of the tip of the needle.
p6_y_clock = (pivot_y_clock + ((radius_clock - 16) * sin(needleAngle_minutes_clock + 0.05))); // Calculation to know the position on the Y-axis of the circumference of the radian value obtained for the triangle to the right of the tip of the needle.
p4_x_old_clock = p4_x_clock; p4_y_old_clock = p4_y_clock; // Save current values in the old value variables.
p5_x_old_clock = p5_x_clock; p5_y_old_clock = p5_y_clock; // Save current values in the old value variables.
p6_x_old_clock = p6_x_clock; p6_y_old_clock = p6_y_clock; // Save current values in the old value variables.
tft_clock.drawLine (pivot_x_clock, pivot_y_clock, p4_x_clock, p4_y_clock, BLACK); // Draw a black line for the minute hand with the past coordinates.
tft_clock.fillTriangle (p4_x_clock, p4_y_clock, p5_x_clock, p5_y_clock, p6_x_clock, p6_y_clock, BLACK); // Draw the two black triangles for the tip of the minute hand needle with the coordinates passed.
}
/***** End methods for clock show needle *****/
/***** Method to know the days since January 1, 2024 *****/
int days_from_2024(int date_y, int date_m, int date_d) { // Received the current day, month and year.
if (date_y >= 2024) { // Conditional that compares the year received, if it is equal or greater than 2024, the instruction inside the braces is attached.
date_y -= 2024; // It is subtracted from the year received 2024 and stored in the same variable.
Serial.print("Past years: "); // Message in the Serial Monitor.
Serial.println(date_y); // Message in the Serial Monitor of the value of the variable "date_y".
}
past_days = date_d; // Store the days received in the variable “past_days”.
Serial.print("Days gone: "); // Message in the Serial Monitor.
Serial.println(past_days); // Message in the Serial Monitor of the value of the variable “days_past”.
for (byte c = 1; c < date_m; c = c + 1) { // Loop to convert past and completed months of the year into days.
past_days = past_days + daysInMonth[c]; // The days of each completed month are added to the days contained in the variable “past_days” and stored in the same variable.
Serial.print("Days gone by months: "); // Message in the Serial Monitor.
Serial.println(past_days); // Message in the Serial Monitor of the value of the variable "past_days".
}
if (date_m > 2 && date_y % 4 == 0) { // If one of the past months is February and the year is a leap year the instruction inside the braces is attached.
past_days = past_days + 1; // A day is added to the variable “past_days”.
Serial.print("Days passed by leap year: "); // Message in the Serial Monitor.
Serial.println(past_days); // Message in the Serial Monitor of the value of the variable "past_days".
}
return past_days = past_days + (365 * date_y) + (date_y + 3) / 4 - 1; // The value of the past days is added, the result of multiplying the days of a year by the past years since 2024, one day for each leap year and subtracting 1 from the current day. The value is returned to the call of this method.
Serial.print("Total days spent: "); // Message in the Serial Monitor.
Serial.println(past_days); // Message in the Serial Monitor of the value of the variable "past_days".
}
/***** End method to know the days since January 1, 2024 *****/
/***** Methods to draw a cloud, rain and sun when they are called *****/
/***** Method show only cloud picture *****/
void cloud() { // Draw on the screen white lines to draw a cloud.
tft_calendar.drawLine (118, 43, 122, 43, WHITE); // Draw in the TFT_calendar screen a white line from the coordinates x = 118 and y = 43 to x = 122 and y = 43 coordinates.
tft_calendar.drawLine (114, 44, 124, 44, WHITE);
tft_calendar.drawLine (112, 45, 126, 45, WHITE);
tft_calendar.drawLine (111, 46, 116, 46, WHITE); tft_calendar.drawLine (122, 46, 127, 46, WHITE);
tft_calendar.drawLine (110, 47, 113, 47, WHITE); tft_calendar.drawLine (125, 47, 128, 47, WHITE);
tft_calendar.drawLine (109, 48, 112, 48, WHITE); tft_calendar.drawLine (126, 48, 129, 48, WHITE);
tft_calendar.drawLine (101, 49, 111, 49, WHITE); tft_calendar.drawLine (128, 49, 130, 49, WHITE);
tft_calendar.drawLine (99, 50, 110, 50, WHITE); tft_calendar.drawLine (128, 50, 131, 50, WHITE);
tft_calendar.drawLine (98, 51, 103, 51, WHITE); tft_calendar.drawLine (106, 51, 111, 51, WHITE); tft_calendar.drawLine (129, 51, 131, 51, WHITE);
tft_calendar.drawLine (98, 52, 101, 52, WHITE); tft_calendar.drawLine (108, 52, 111, 52, WHITE); tft_calendar.drawLine (130, 52, 132, 52, WHITE);
tft_calendar.drawLine (97, 53, 100, 53, WHITE); tft_calendar.drawLine (109, 53, 112, 53, WHITE); tft_calendar.drawLine (130, 53, 132, 53, WHITE);
tft_calendar.drawLine (97, 54, 99, 54, WHITE); tft_calendar.drawLine (110, 54, 112, 54, WHITE); tft_calendar.drawLine (130, 54, 132, 54, WHITE);
tft_calendar.drawLine (96, 55, 98, 55, WHITE); tft_calendar.drawLine (111, 55, 113, 55, WHITE); tft_calendar.drawLine (131, 55, 133, 55, WHITE);
tft_calendar.drawLine (96, 56, 98, 56, WHITE); tft_calendar.drawLine (111, 56, 113, 56, WHITE); tft_calendar.drawLine (131, 56, 133, 56, WHITE);
tft_calendar.drawLine (94, 57, 98, 57, WHITE); tft_calendar.drawLine (111, 57, 113, 57, WHITE); tft_calendar.drawLine (131, 57, 133, 57, WHITE);
tft_calendar.drawLine (92, 58, 98, 58, WHITE); tft_calendar.drawLine (111, 58, 112, 58, WHITE); tft_calendar.drawLine (129, 58, 133, 57, WHITE);
tft_calendar.drawLine (91, 59, 95, 59, WHITE); tft_calendar.drawLine (128, 59, 135, 59, WHITE);
tft_calendar.drawLine (90, 60, 94, 60, WHITE); tft_calendar.drawLine (129, 60, 136, 60, WHITE);
tft_calendar.drawLine (90, 61, 92, 61, WHITE); tft_calendar.drawLine (133, 61, 137, 61, WHITE);
tft_calendar.drawLine (89, 62, 91, 62, WHITE); tft_calendar.drawLine (135, 62, 138, 62, WHITE);
tft_calendar.drawLine (89, 63, 91, 63, WHITE); tft_calendar.drawLine (136, 63, 139, 63, WHITE);
tft_calendar.drawLine (88, 64, 90, 64, WHITE); tft_calendar.drawLine (137, 64, 139, 64, WHITE);
tft_calendar.drawLine (88, 65, 90, 65, WHITE); tft_calendar.drawLine (137, 65, 139, 65, WHITE);
tft_calendar.drawLine (88, 66, 90, 66, WHITE); tft_calendar.drawLine (138, 66, 140, 66, WHITE);
tft_calendar.drawLine (88, 67, 90, 67, WHITE); tft_calendar.drawLine (138, 67, 140, 67, WHITE);
tft_calendar.drawLine (88, 68, 90, 68, WHITE); tft_calendar.drawLine (138, 68, 140, 68, WHITE);
tft_calendar.drawLine (88, 69, 90, 69, WHITE); tft_calendar.drawLine (138, 69, 140, 69, WHITE);
tft_calendar.drawLine (88, 70, 90, 70, WHITE); tft_calendar.drawLine (138, 70, 140, 70, WHITE);
tft_calendar.drawLine (89, 71, 91, 71, WHITE); tft_calendar.drawLine (138, 71, 140, 71, WHITE);
tft_calendar.drawLine (89, 72, 91, 72, WHITE); tft_calendar.drawLine (137, 72, 139, 72, WHITE);
tft_calendar.drawLine (90, 73, 92, 73, WHITE); tft_calendar.drawLine (137, 73, 139, 73, WHITE);
tft_calendar.drawLine (90, 74, 93, 74, WHITE); tft_calendar.drawLine (136, 74, 138, 74, WHITE);
tft_calendar.drawLine (91, 75, 94, 75, WHITE); tft_calendar.drawLine (135, 75, 137, 75, WHITE);
tft_calendar.drawLine (92, 76, 96, 76, WHITE); tft_calendar.drawLine (133, 76, 136, 76, WHITE);
tft_calendar.drawLine (93, 77, 135, 77, WHITE);
tft_calendar.drawLine (95, 78, 133, 78, WHITE);
tft_calendar.drawLine (98, 79, 131, 79, WHITE);
}
/***** End method show only cloud picture *****/
/***** Method show the sun in the cloud picture *****/
void sun_in_cloud() { // Draw on the screen white lines the sun in the cloud.
tft_calendar.drawLine (142, 57, 145, 60, WHITE); tft_calendar.drawLine (142, 56, 146, 60, WHITE); tft_calendar.drawLine (143, 56, 146, 59, WHITE); tft_calendar.drawLine (144, 56, 147, 59, WHITE);
tft_calendar.drawLine (147, 44, 152, 44, WHITE); tft_calendar.drawLine (147, 45, 152, 45, WHITE); tft_calendar.drawLine (147, 46, 152, 46, WHITE);
tft_calendar.drawLine (144, 34, 147, 31, WHITE); tft_calendar.drawLine (143, 34, 146, 31, WHITE); tft_calendar.drawLine (142, 34, 146, 30, WHITE); tft_calendar.drawLine (142, 33, 145, 30, WHITE);
tft_calendar.drawLine (131, 24, 131, 30, WHITE); tft_calendar.drawLine (132, 24, 132, 30, WHITE);
tft_calendar.drawLine (121, 33, 118, 30, WHITE); tft_calendar.drawLine (121, 34, 117, 30, WHITE); tft_calendar.drawLine (120, 34, 117, 31, WHITE); tft_calendar.drawLine (119, 34, 116, 31, WHITE);
tft_calendar.drawLine (142, 41, 142, 49, WHITE);
tft_calendar.drawLine (141, 39, 141, 51, WHITE);
tft_calendar.drawLine (140, 38, 140, 42, WHITE); tft_calendar.drawLine (140, 48, 140, 52, WHITE);
tft_calendar.drawLine (139, 37, 139, 40, WHITE); tft_calendar.drawLine (139, 50, 139, 53, WHITE);
tft_calendar.drawLine (138, 36, 138, 39, WHITE); tft_calendar.drawLine (138, 51, 138, 54, WHITE);
tft_calendar.drawLine (137, 36, 137, 38, WHITE); tft_calendar.drawLine (137, 52, 137, 55, WHITE);
tft_calendar.drawLine (136, 35, 136, 38, WHITE); tft_calendar.drawLine (136, 53, 136, 55, WHITE);
tft_calendar.drawLine (135, 35, 135, 37, WHITE); tft_calendar.drawLine (135, 53, 135, 55, WHITE);
tft_calendar.drawLine (134, 34, 134, 36, WHITE); tft_calendar.drawLine (134, 54, 134, 56, WHITE);
tft_calendar.drawLine (133, 34, 133, 36, WHITE);
tft_calendar.drawLine (132, 34, 132, 36, WHITE);
tft_calendar.drawLine (131, 34, 131, 36, WHITE);
tft_calendar.drawLine (130, 34, 130, 36, WHITE);
tft_calendar.drawLine (129, 34, 129, 36, WHITE);
tft_calendar.drawLine (128, 35, 128, 37, WHITE);
tft_calendar.drawLine (127, 35, 127, 37, WHITE);
tft_calendar.drawLine (126, 36, 126, 38, WHITE);
tft_calendar.drawLine (125, 36, 125, 39, WHITE);
tft_calendar.drawLine (124, 37, 124, 40, WHITE);
tft_calendar.drawLine (123, 38, 123, 42, WHITE);
tft_calendar.drawLine (122, 39, 122, 42, WHITE);
tft_calendar.drawPixel (121, 41, WHITE);
}
/***** End method show the sun in the cloud picture *****/
/***** Method show rain in the cloud picture *****/
void rain() { // Draw on the screen white rain lines on the cloud.
tft_calendar.drawLine (100, 80, 102, 80, WHITE); tft_calendar.drawLine (114, 80, 116, 80, WHITE); tft_calendar.drawLine (127, 80, 129, 80, WHITE);
tft_calendar.drawLine (100, 81, 101, 81, WHITE); tft_calendar.drawLine (114, 81, 115, 81, WHITE); tft_calendar.drawLine (127, 81, 128, 81, WHITE);
tft_calendar.drawLine (99, 82, 101, 82, WHITE); tft_calendar.drawLine (113, 82, 115, 82, WHITE); tft_calendar.drawLine (127, 82, 128, 82, WHITE);
tft_calendar.drawLine (99, 83, 100, 83, WHITE); tft_calendar.drawLine (113, 83, 114, 83, WHITE); tft_calendar.drawLine (126, 83, 127, 83, WHITE);
tft_calendar.drawLine (99, 84, 100, 84, WHITE); tft_calendar.drawLine (113, 84, 114, 84, WHITE); tft_calendar.drawLine (126, 84, 127, 84, WHITE);
tft_calendar.drawLine (97, 87, 98, 87, WHITE); tft_calendar.drawLine (110, 87, 112, 87, WHITE); tft_calendar.drawLine (124, 87, 126, 87, WHITE);
tft_calendar.drawLine (96, 88, 97, 88, WHITE); tft_calendar.drawLine (109, 88, 111, 88, WHITE); tft_calendar.drawLine (123, 88, 126, 88, WHITE);
tft_calendar.drawLine (96, 89, 97, 89, WHITE); tft_calendar.drawLine (109, 89, 111, 89, WHITE); tft_calendar.drawLine (123, 89, 125, 89, WHITE);
tft_calendar.drawLine (95, 90, 97, 90, WHITE); tft_calendar.drawLine (108, 90, 110, 90, WHITE); tft_calendar.drawLine (122, 90, 125, 90, WHITE);
tft_calendar.drawLine (95, 91, 97, 91, WHITE); tft_calendar.drawLine (108, 91, 110, 91, WHITE); tft_calendar.drawLine (122, 91, 124, 91, WHITE);
tft_calendar.drawLine (95, 92, 96, 92, WHITE); tft_calendar.drawLine (108, 92, 109, 92, WHITE); tft_calendar.drawLine (122, 92, 123, 92, WHITE);
tft_calendar.drawLine (95, 93, 96, 93, WHITE); tft_calendar.drawLine (108, 93, 109, 93, WHITE); tft_calendar.drawLine (122, 93, 123, 93, WHITE);
}
/***** End method show rain in the cloud picture *****/
/***** Method show sun picture *****/
void sun() { // Draw on the screen a sun.
tft_calendar.fillCircle (120, 60, 18, WHITE);
tft_calendar.drawLine (119, 29, 119, 36, WHITE); tft_calendar.drawLine (120, 29, 120, 36, WHITE); tft_calendar.drawLine (121, 30, 121, 35, WHITE);
tft_calendar.drawLine (135, 33, 131, 38, WHITE); tft_calendar.drawLine (136, 33, 131, 39, WHITE); tft_calendar.drawLine (136, 34, 132, 39, WHITE);
tft_calendar.drawLine (145, 44, 141, 47, WHITE); tft_calendar.drawLine (146, 44, 141, 48, WHITE); tft_calendar.drawLine (146, 45, 142, 48, WHITE);
tft_calendar.drawLine (150, 59, 144, 59, WHITE); tft_calendar.drawLine (151, 60, 144, 60, WHITE); tft_calendar.drawLine (150, 61, 144, 61, WHITE);
tft_calendar.drawLine (147, 75, 142, 71, WHITE); tft_calendar.drawLine (146, 75, 142, 72, WHITE); tft_calendar.drawLine (146, 76, 141, 72, WHITE);
tft_calendar.drawLine (136, 86, 132, 81, WHITE); tft_calendar.drawLine (135, 86, 132, 82, WHITE); tft_calendar.drawLine (135, 87, 131, 82, WHITE);
tft_calendar.drawLine (121, 90, 121, 85, WHITE); tft_calendar.drawLine (120, 91, 120, 84, WHITE); tft_calendar.drawLine (119, 91, 119, 85, WHITE);
tft_calendar.drawLine (105, 87, 108, 83, WHITE); tft_calendar.drawLine (104, 87, 108, 82, WHITE); tft_calendar.drawLine (104, 86, 108, 81, WHITE);
tft_calendar.drawLine (94, 76, 99, 73, WHITE); tft_calendar.drawLine (93, 76, 99, 72, WHITE); tft_calendar.drawLine (93, 75, 98, 72, WHITE);
tft_calendar.drawLine (89, 61, 95, 61, WHITE); tft_calendar.drawLine (89, 60, 95, 60, WHITE); tft_calendar.drawLine (90, 59, 95, 59, WHITE);
tft_calendar.drawLine (93, 45, 97, 48, WHITE); tft_calendar.drawLine (93, 44, 98, 48, WHITE); tft_calendar.drawLine (94, 44, 99, 48, WHITE);
tft_calendar.drawLine (104, 35, 107, 39, WHITE); tft_calendar.drawLine (104, 34, 108, 39, WHITE); tft_calendar.drawLine (104, 33, 108, 38, WHITE);
}
/***** Method show sun picture *****/