


One of the most irritating things I face whenever I buy a smart device is installing manufacturer provided app to provision the device. Even if you have Alexa or Nest device, you are required to delegate the provisioning to 1st party app. The problem is, most of them require all kind of permission possible to work.
- Accurate GPS location is needed along with WiFi or Bluetooth to connect the device first.
- Some apps might require activity tracking, device usage information.
- Scan for devices connected on local network
- Contacts, Storage permissions
- Most of all, sharing data with partners who use it for who knows what.
Most of the devices are actually white labelled versions of T*y* devices which has shady history regarding the data it collects and the number of devices without proper security patches.
Few months ago, I came across a cheap RGB led strip that could be controlled from internet. It was easy to open and found the WB3S chip as expected. Since it is still under warranty, I did not make any hardware changes to it.
Using the device required the following steps
- Installing manufacturer provided app from play store. If you scan the QR code, you are first directed to a website that was initially blocked by my Firefox app as the website tracked some user information. Only after manually allowing to visit, it redirected to Play Store.
- Once installed I had to provide accurate GPS info and few other permissions for it to actually start scanning for devices.
- Once the device is detected and paired, you can provide microphone permission to voice control the device. Since I already have a much more privacy invading Alexa app, I decided to control the device through Alexa.
- From the Alexa app, I installed the Manufacturer skill and provided permission for Alexa to use the device.
At this point it made me realize the amount of data all these apps are collecting. I can’t escape out of Alexa eco system as my family got used to it and all of my devices have Alexa support. Since I can’t escape from Alexa, I decided to cut down the permission required by Manufacturer apps.
How Alexa controls the devices through skills
The devices respond to the instructions from users through MQTT with Manufacturer server as endpoint. By default, Alexa has no control over the devices unless the endpoints are exposed by the Manufacturers through skill integration. Alexa provides Smart Home skills to manufacturer so that they can implement the endpoints to be used by Alexa.
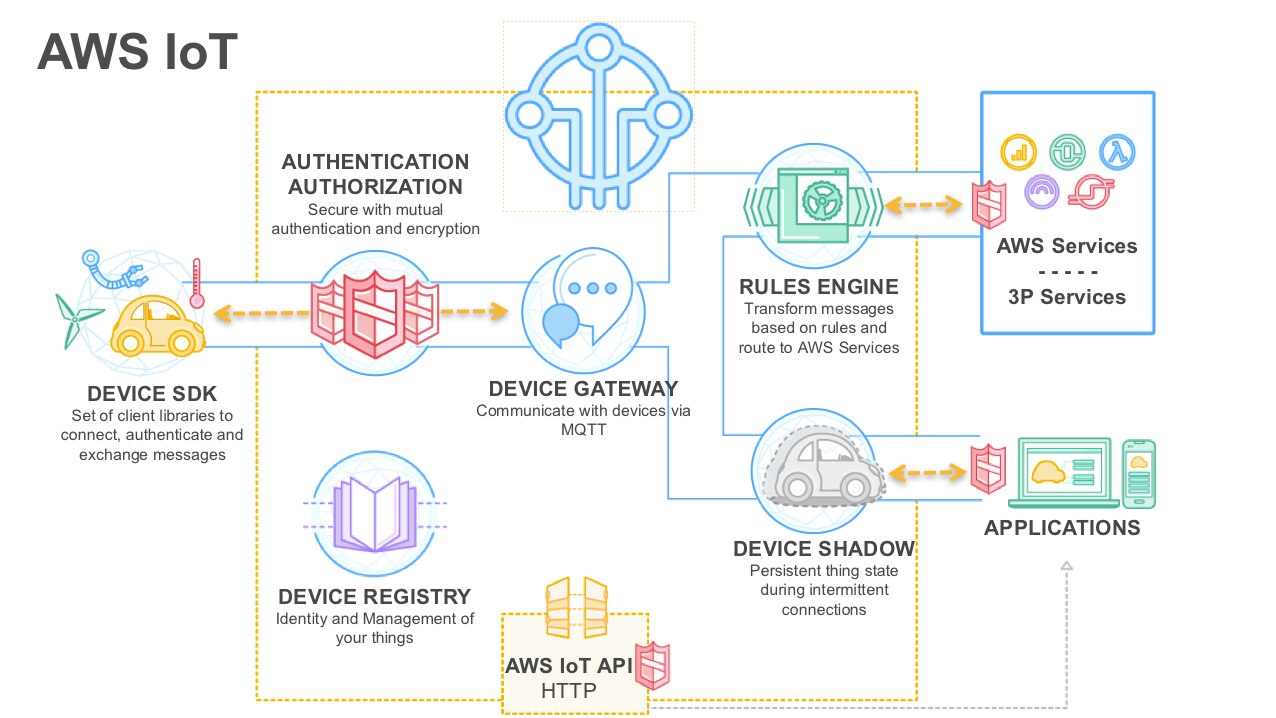
Image taken from an Alexa blog post
Removing manufacturer dependency
One of the important steps when pairing a device is the device authentication which can only be done from Manufacturer side. One simple way to avoid providing data or permission to 3rd party app is by flashing the device with our own firmware and providing Alexa with our own skills.
Advantages of Custom firmware and Skills
- There are several privacy friendly firmware readily available on Github for generic WIFI module based IoT devices.
- Using our skills, even in development mode could limit the amount of information Alexa could get from our device as we are in control of what information we want to share with Alexa.
- If we create our own skills, we don’t even need to own an Alexa device, we can install the Alexa app, activate our skills and without even enabling microphone permission or GPS.
Designing a Custom Voice Interface with Alexa as a proof of concept
OpenBeken is a famous project for flashing custom firmware in T*y* devices. But if you want to control build the firmware from the scratch, these are the steps you need to follow. In this tutorial we will see how to turn on/off a device, whether it’s a device as simple as light or a motor. The process involves the following steps
- Creating an AWS device shadow with permission to read and write to device shadow.
- Creating an Alexa skill from scratch through the Alexa development portal
- Creating an interface between Alexa and IoT device through AWS Lambda
Creating a new IoT device with Shadow enabled
From the AWS management console, navigate to IoT and from the options, select things and create a new thing. Give the name as “SmartBulb” which will be our thing name we will use throughout this tutorial.
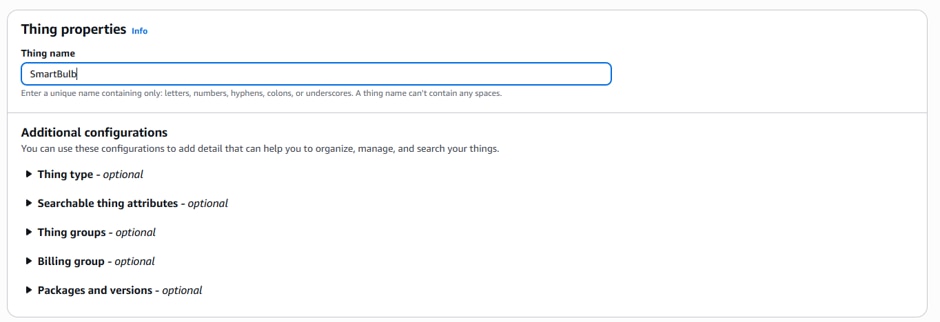
Leave rest of the configurations as it is.
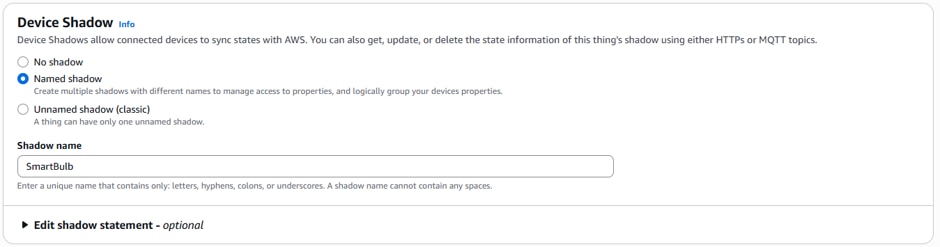
Creating a named shadow
Select the named shadow option and provide the name as same as our thing name.
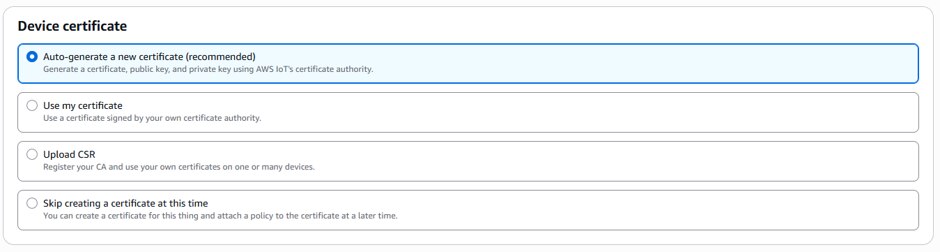
Generating certificates
Keep rest of the information as default and generate certificates. If you have your own CA signed certificated you can use them as well.
Creating policy
Policies allow to restrict the permission a device can have. For now, provide all permissions. We can later fine tune it to respond to Alexa alone. Here I already have a policy named “SmartPlantPolicy” which I use for all my test devices initially before fine tuning them. You can use “SmartBulbPolicy”

Assign the policy to the device and create the thing

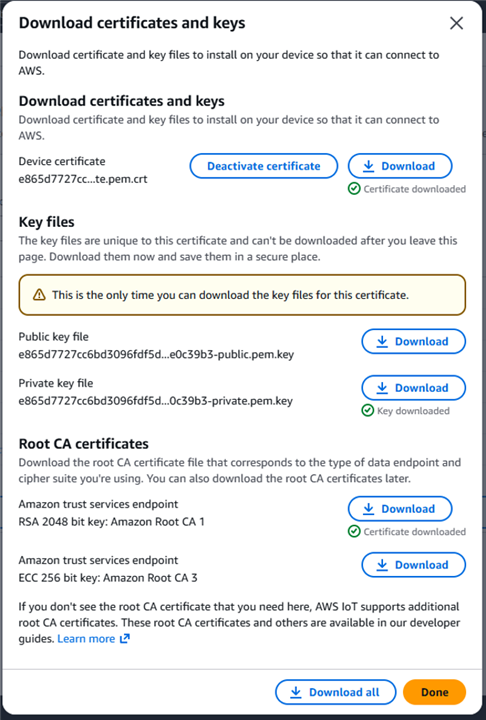
Download the certificates
Once the device is created, we will be prompted to download the certificates. Download and save them in a secure folder.
Creating an Alexa Skill through web portal
From the Developer Console navigate to create a new skill. Provide the name of the skill as “SmartBulb”. Click next.
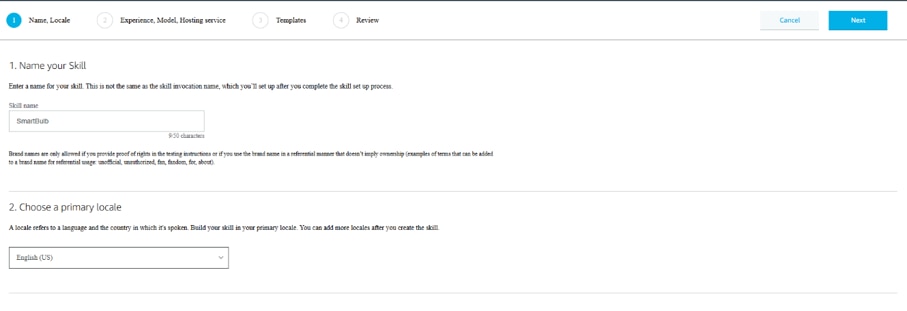
List of Alexa Model available
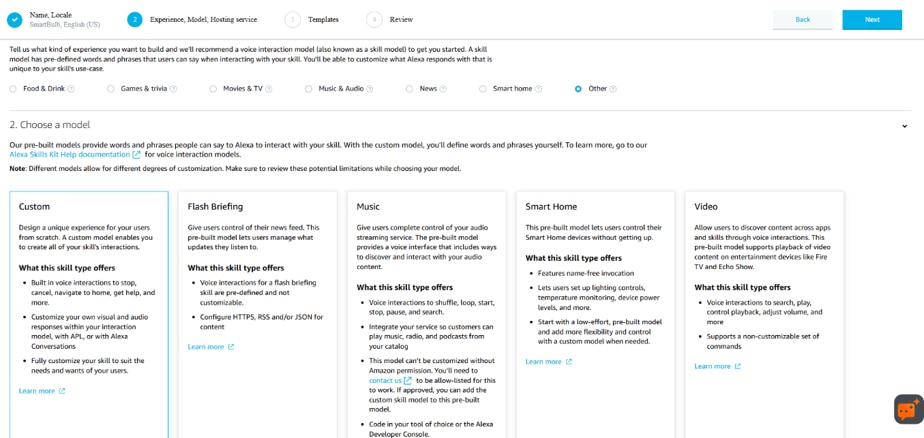
Alexa comes with several models catering to different devices. For our requirement we will go with Custom options. Smart Home provides cookie cutter template, which is useful if your device matches it, but if you would like to mix in multiple properties it's better to opt for custom model. Even though our device will act as a simple switch we will use custom skill for now.
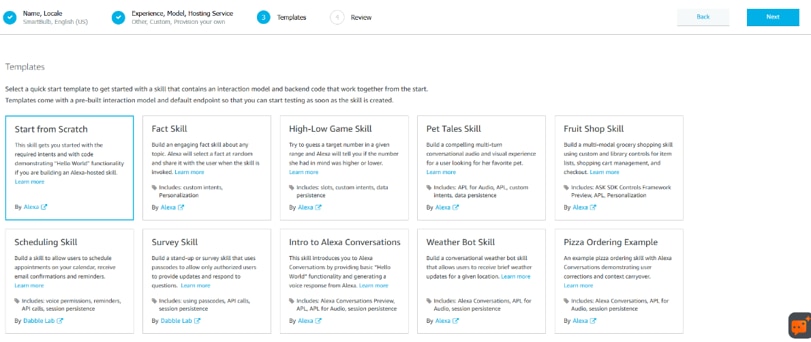
List of custom templates
Even for the custom options, there will be tons of predefined templates available, for now select "Start from scratch" option.
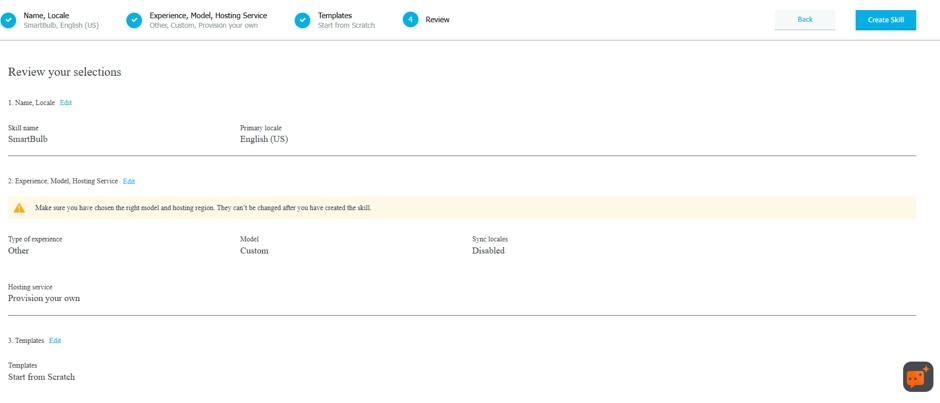
Review the options
Once the options are selected you will be prompted to review the changes and create the skill.
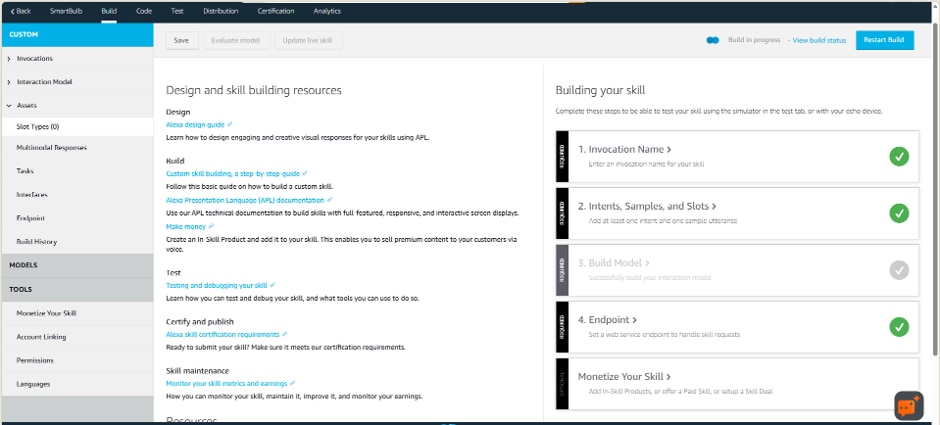
Build completion
If all the process are validated, you will be presented with build successful screen.
Update the Smart Bulb skill with custom options
In this section, we can make how our device behaves. There are multiple intent available, for our purpose we only need to enable the below intents and options alone.
- Since we will use this thing to turn on/off a GPIO, we can club together output devices which uses simple on/off logic using “DeviceType” for example,
- Bulb
- Fan
- Motor
- Getting device information through “GetDeviceStatusIntent”
- This permission requires read permission to be enabled on AWS IOT thing device shadow.
- Controlling the device state through “ControlDeviceIntent”
- This permission requires write permission to be enabled on AWS IOT thing device shadow
- Since we are exploring the device as a switch, we provide states as “On” and “Off” through “DeviceStateType” option.
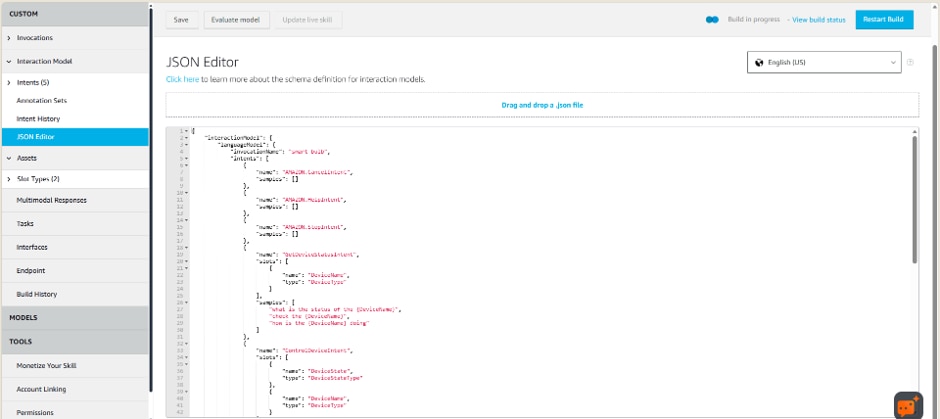
The json file is attached along with this post.
{
    "interactionModel": {
        "languageModel": {
            "invocationName": "smart bulb",
            "intents": [
                {
                    "name": "AMAZON.CancelIntent",
                    "samples": []
                },
                {
                    "name": "AMAZON.HelpIntent",
                    "samples": []
                },
                {
                    "name": "AMAZON.StopIntent",
                    "samples": []
                },
                {
                    "name": "GetDeviceStatusIntent",
                    "slots": [
                        {
                            "name": "DeviceName",
                            "type": "DeviceType"
                        }
                    ],
                    "samples": [
                        "what is the status of the {DeviceName}",
                        "check the {DeviceName}",
                        "how is the {DeviceName} doing"
                    ]
                },
                {
                    "name": "ControlDeviceIntent",
                    "slots": [
                        {
                            "name": "DeviceState",
                            "type": "DeviceStateType"
                        },
                        {
                            "name": "DeviceName",
                            "type": "DeviceType"
                        }
                    ],
                    "samples": [
                        "Power the {DeviceName} {DeviceState}",
                        "turn the {DeviceName} {DeviceState}",
                        "Switch the {DeviceName} {DeviceState}"
                    ]
                },
                {
                    "name": "AMAZON.NavigateHomeIntent",
                    "samples": []
                }
            ],
            "types": [
                {
                    "name": "DeviceStateType",
                    "values": [
                        {
                            "name": {
                                "value": "on"
                            }
                        },
                        {
                            "name": {
                                "value": "off"
                            }
                        }
                    ]
                },
                {
                    "name": "DeviceType",
                    "values": [
                        {
                            "name": {
                                "value": "Bulb"
                            }
                        },
                        {
                            "name": {
                                "value": "Fan"
                            }
                        },
                        {
                            "name": {
                                "value": "Motor"
                            }
                        }
                    ]
                }
            ]
        }
    }
}
Once the json file is uploaded, rebuild the skill.
Configure AWS lambda endpoint
From the endpoint section, copy the skill ID. We need to provide this in AWS lambda.

Create a lambda function
From AWS management console, navigate to AWS Lambda and create a python-based lambda.
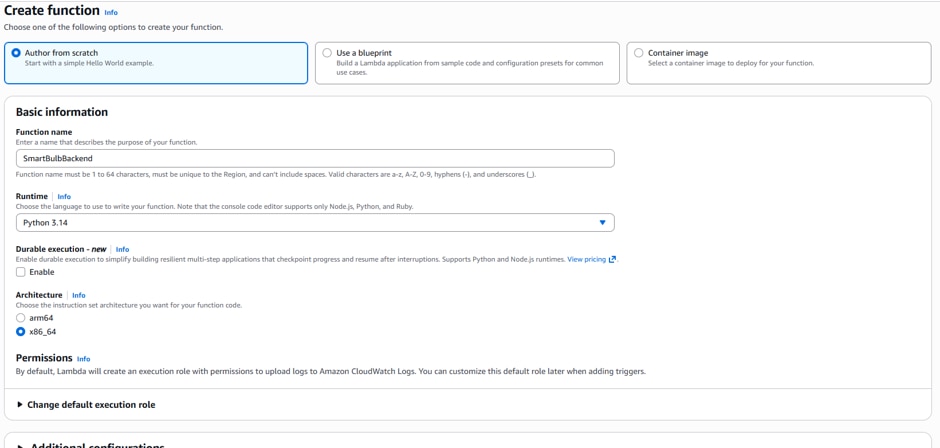
Functions in Lambda
The python code will use boto library to connect to AWS IOT core and fetch the device shadow. Based on user interaction it either set the status to on or off, or fetch the status of the device.
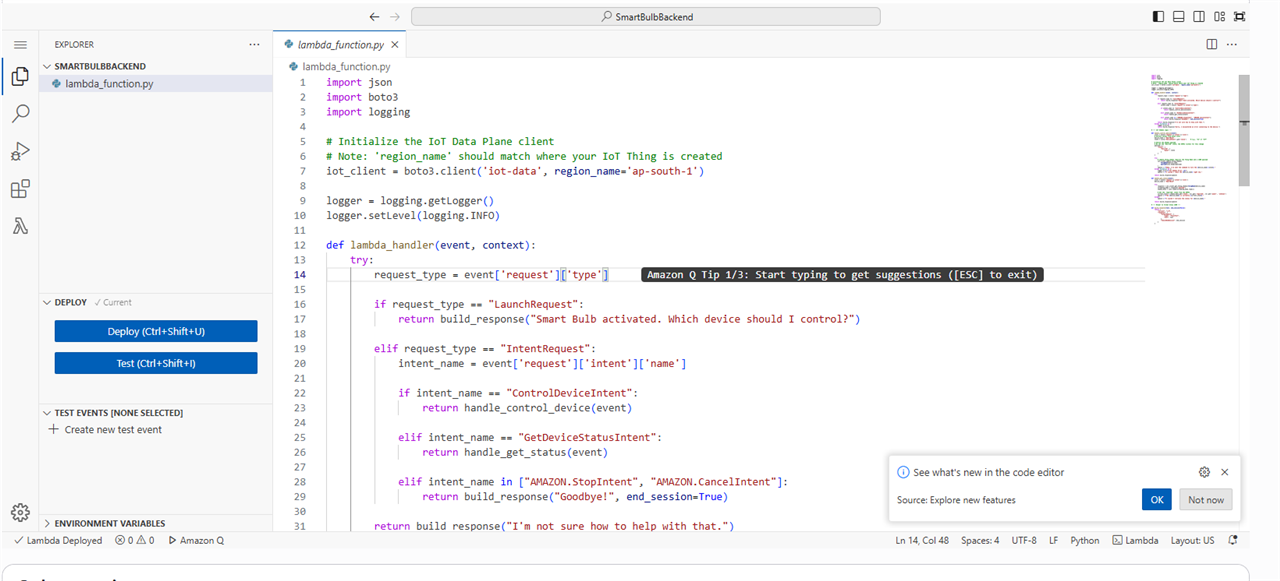
import json
import boto3
import logging

# Initialize the IoT Data Plane client
# Note: 'region_name' should match where your IoT Thing is created
iot_client = boto3.client('iot-data', region_name='ap-south-1')

logger = logging.getLogger()
logger.setLevel(logging.INFO)

def lambda_handler(event, context):
    try:
        request_type = event['request']['type']

        if request_type == "LaunchRequest":
            return build_response("Smart Bulb activated. Which device should I control?")

        elif request_type == "IntentRequest":
            intent_name = event['request']['intent']['name']

            if intent_name == "ControlDeviceIntent":
                return handle_control_device(event)

            elif intent_name == "GetDeviceStatusIntent":
                return handle_get_status(event)

            elif intent_name in ["AMAZON.StopIntent", "AMAZON.CancelIntent"]:
                return build_response("Goodbye!", end_session=True)

        return build_response("I'm not sure how to help with that.")
    except Exception as e:
        logger.error(e)
        return build_response("Sorry, I encountered an error connecting to the device.")

# --- IoT Shadow Logic ---

def handle_control_device(event):
    slots = event['request']['intent']['slots']
    # Extract values from Alexa slots
    device_name = "SmartBulb"
    state = slots['DeviceState'].get('value')     # e.g., "on" or "off"

    # Define the Shadow payload
    # We set the "desired" state; the ESP32 listens for this change
    payload = {
        "state": {
            "desired": {
                "power": state
            }
        }
    }

    try:
        # update_thing_shadow requires the Thing Name and a JSON payload
        iot_client.update_thing_shadow(
            thingName=device_name,
            payload=json.dumps(payload)
        )
        speech = f"Okay, I've sent the command to turn the {device_name} {state}."
    except Exception as e:
        logger.error(f"IoT Shadow Error: {e}")
        speech = f"I couldn't reach the {device_name} right now."

    return build_response(speech)

def handle_get_status(event):
    slots = event['request']['intent']['slots']
    device_name = "SmartBulb"

    try:
        response = iot_client.get_thing_shadow(thingName=device_name)
        streaming_body = response['payload']
        shadow_data = json.loads(streaming_body.read())

        # Get the 'reported' state from the ESP32
        current_state = shadow_data.get('state', {}).get('reported', {}).get('power', 'unknown')
        speech = f"The {device_name} is currently {current_state}."
    except:
        speech = f"I couldn't retrieve the status for {device_name}."

    return build_response(speech)

# --- Helper to format Alexa JSON ---

def build_response(text, end_session=False):
    return {
        "version": "1.0",
        "response": {
            "outputSpeech": {
                "type": "PlainText",
                "text": text
            },
            "shouldEndSession": end_session
        }
    }
Create a trigger and configure it to use Alexa skill
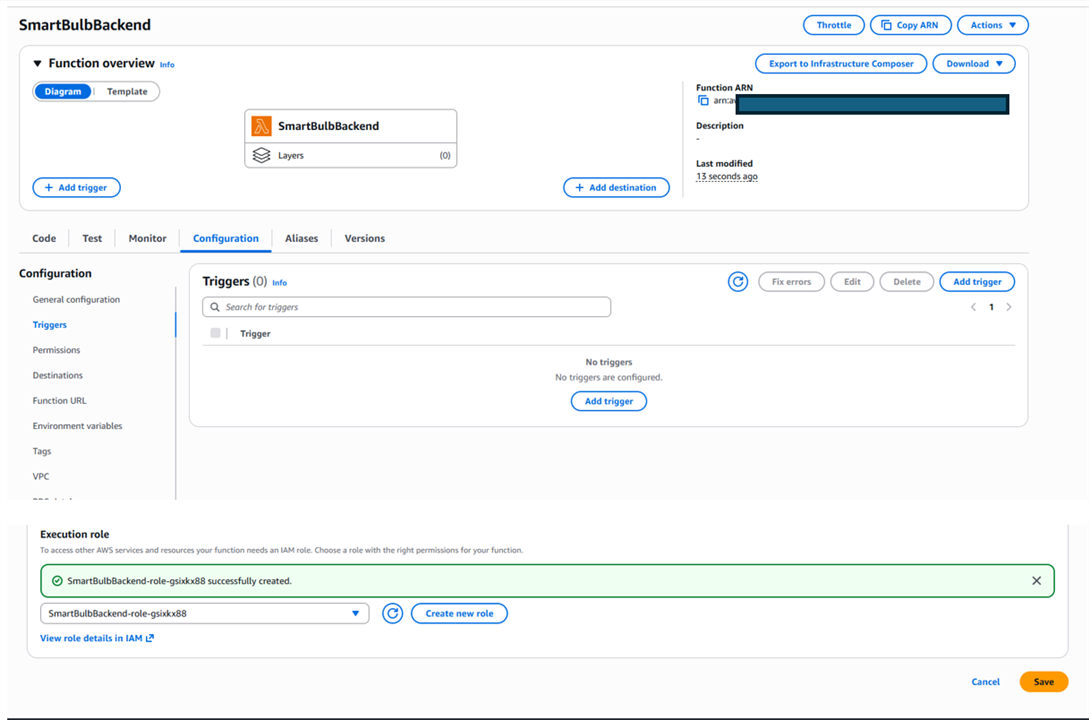
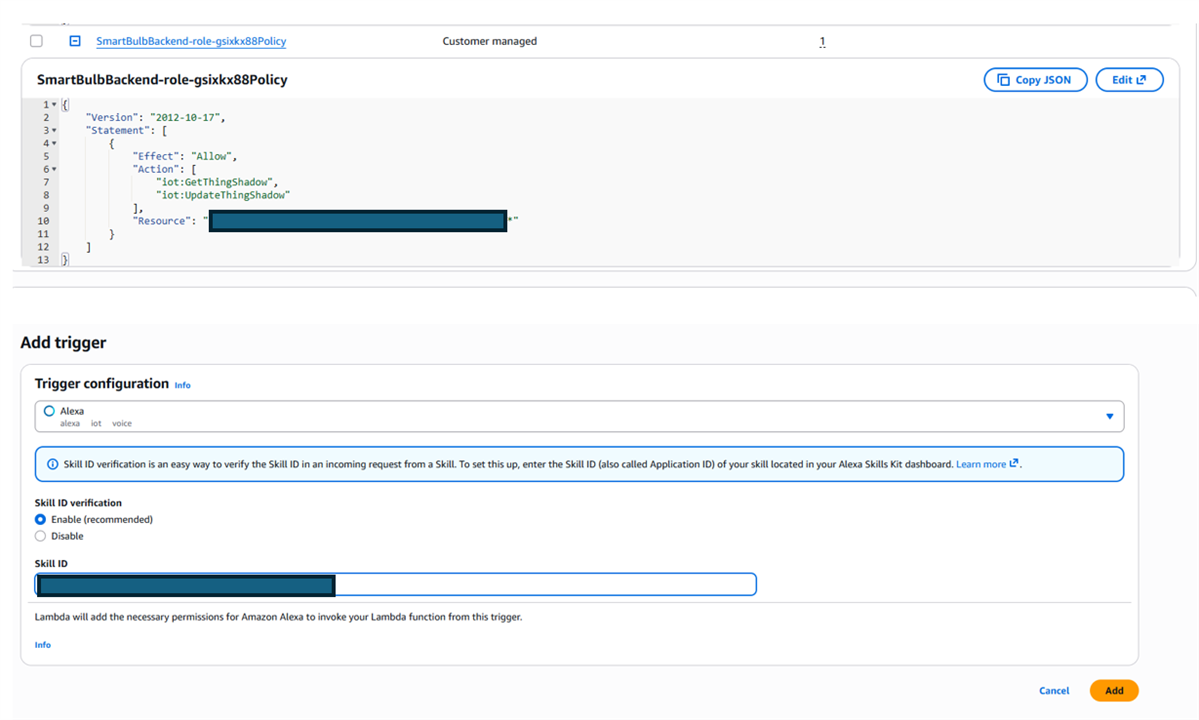
From the configuration section, click “Add trigger” and paste the Alexa Skill ID. Create a new execution policy that allows connecting to AWS IOT devices and fetch device shadow. Copy the function ARN, we need to paste this information in Alexa developer console.
Testing our proof of concept: Testing communication between AWS IOT console and IOT device
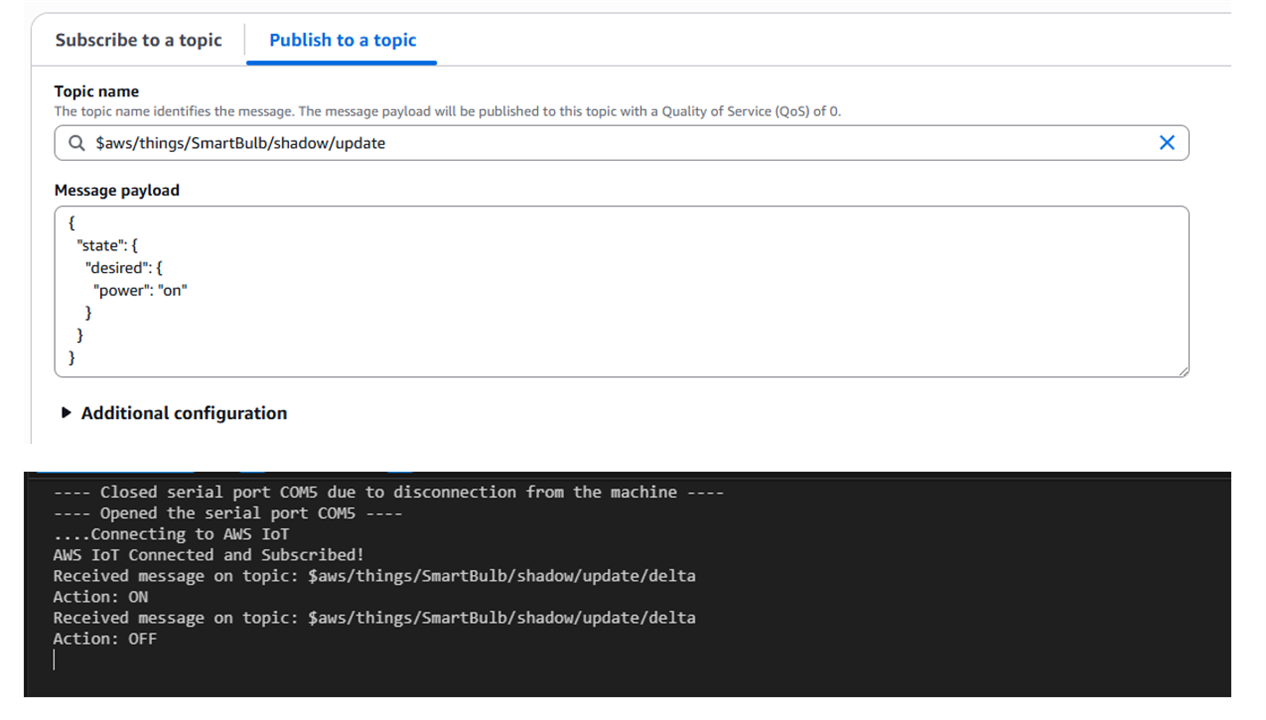
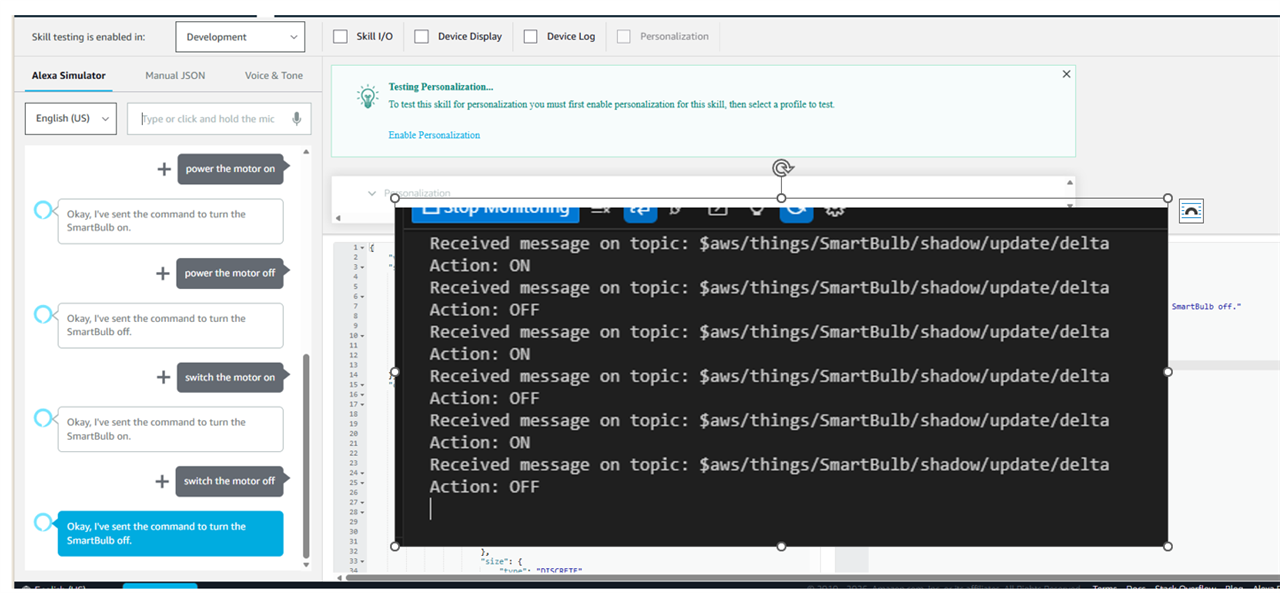
Using Arduino IDE, create a new project and upload the below code to ESP32. From the AWS IOT management console page, using "MQTT client connectivity" tab, publish a MQTT message. If it's successful, we will see the below message in serial monitor.
#include <WiFi.h>
#include <WiFiClientSecure.h>
#include <PubSubClient.h>
#include <ArduinoJson.h>
#include "secrets.h" // Store your certificates and WiFi credentials here

// GPIO pin for the relay/LED
const int DEVICE_PIN = 2;

// AWS IoT Topics for Device Shadow
// Replace 'Bulb' with your specific Thing Name
#define THING_NAME "SmartBulb"
char deltaTopic[128];
char updateTopic[128];

WiFiClientSecure net = WiFiClientSecure();
PubSubClient client(net);

void messageHandler(char* topic, byte* payload, unsigned int length) {
    JsonDocument doc;
    DeserializationError error = deserializeJson(doc, payload);
    Serial.print("Received message on topic: ");
    Serial.println(topic);

    if (error) {
        Serial.print("deserializeJson() failed: ");
        Serial.println(error.c_str());
        return;
    }

    // NEW SYNTAX: Check if "state" is an object
    if (doc["state"].is<JsonObject>()) {
        const char* state = doc["state"]["power"];

        if (state) { // Check if 'power' actually exists and has a value
            if (strcmp(state, "on") == 0) {
                digitalWrite(DEVICE_PIN, HIGH);
                Serial.println("Action: ON");
                reportState("on");
            } else if (strcmp(state, "off") == 0) {
                digitalWrite(DEVICE_PIN, LOW);
                Serial.println("Action: OFF");
                reportState("off");
            }
        }
    }
}

void reportState(const char* state) {
    // Replace StaticJsonDocument<128> with the new JsonDocument
    JsonDocument doc;

    doc["state"]["reported"]["power"] = state;

    char jsonBuffer[128];
    serializeJson(doc, jsonBuffer);

    // Ensure we use .c_str() for the String topic
    client.publish(updateTopic, jsonBuffer);
}

void connectAWS() {
    WiFi.mode(WIFI_STA);
    WiFi.begin(WIFI_SSID, WIFI_PASSWORD);

    Serial.println("Connecting to Wi-Fi");
    while (WiFi.status() != WL_CONNECTED) {
        delay(500);
        Serial.print(".");
    }

    // Configure certificates
    net.setCACert(AWS_CERT_CA);
    net.setCertificate(AWS_CERT_CRT);
    net.setPrivateKey(AWS_CERT_PRIVATE);

    client.setServer(AWS_IOT_ENDPOINT, 8883);
    client.setCallback(messageHandler);

    Serial.println("Connecting to AWS IoT");
    while (!client.connect(THING_NAME)) {
        delay(100);
        Serial.print(".");
    }

    client.subscribe(deltaTopic);
    Serial.println("AWS IoT Connected and Subscribed!");
}

void setup() {
    Serial.begin(115200);
    pinMode(DEVICE_PIN, OUTPUT);
    snprintf(deltaTopic, sizeof(deltaTopic), "$aws/things/%s/shadow/update/delta", THING_NAME);
    snprintf(updateTopic, sizeof(updateTopic), "$aws/things/%s/shadow/update", THING_NAME);
    connectAWS();
}

void loop() {
    client.loop();
    delay(10);
}
const char WIFI_SSID[] = "bala";
const char WIFI_PASSWORD[] = "bala1234";
const char AWS_IOT_ENDPOINT[] = "abcd-ats.iot.ap-south-1.amazonaws.com";

// Amazon Root CA 1
static const char AWS_CERT_CA[] PROGMEM = R"EOF(
-----BEGIN CERTIFICATE-----
----
-----END CERTIFICATE-----
)EOF";

// Device Certificate
static const char AWS_CERT_CRT[] PROGMEM = R"EOF(
-----BEGIN CERTIFICATE-----
---
-----END CERTIFICATE-----
)EOF";

// Device Private Key
static const char AWS_CERT_PRIVATE[] PROGMEM = R"EOF(
-----BEGIN RSA PRIVATE KEY-----
--
-----END RSA PRIVATE KEY-----
)EOF";
Testing communication between Alexa Skills dashboard and device
From the Alexa development dashboard, enter the message to turn on motor or light. You will receive the message in the device if all the device configurations are done properly.
Connecting from mobile app
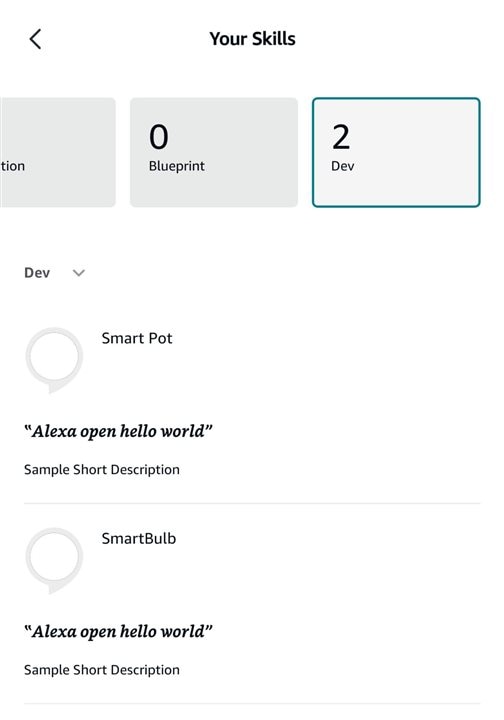
From the Alexa app, navigate to skills section, under "Your skllls", navigate to the skills you have created under dev section. By default they are enabled.
| {gallery}Alexa Mobile Appp |
|---|
|
|
|
|
 |

Conclusion
That's it. We have created a custom skill that could provide us with as much privacy as possible. Once the device warranty is over, I will create a new post that will provide information on how to control a RGB device through custom skill and firmware.
Disclaimer
Some portion of the code was generated using Gemini AI.