element14 Community
element14 Community
    Register Log In
  • Site
  • Search
  • Log In Register
  • About Us
  • Community Hub
    Community Hub
    • What's New on element14
    • Feedback and Support
    • Benefits of Membership
    • Personal Blogs
    • Members Area
    • Achievement Levels
  • Learn
    Learn
    • Ask an Expert
    • eBooks
    • element14 presents
    • Learning Center
    • Tech Spotlight
    • STEM Academy
    • Webinars, Training and Events
    • Learning Groups
  • Technologies
    Technologies
    • 3D Printing
    • FPGA
    • Industrial Automation
    • Internet of Things
    • Power & Energy
    • Sensors
    • Technology Groups
  • Challenges & Projects
    Challenges & Projects
    • Design Challenges
    • element14 presents Projects
    • Project14
    • Arduino Projects
    • Raspberry Pi Projects
    • Project Groups
  • Products
    Products
    • Arduino
    • Avnet Boards Community
    • Dev Tools
    • Manufacturers
    • Multicomp Pro
    • Product Groups
    • Raspberry Pi
    • RoadTests & Reviews
  • Store
    Store
    • Visit Your Store
    • Choose another store...
      • Europe
      •  Austria (German)
      •  Belgium (Dutch, French)
      •  Bulgaria (Bulgarian)
      •  Czech Republic (Czech)
      •  Denmark (Danish)
      •  Estonia (Estonian)
      •  Finland (Finnish)
      •  France (French)
      •  Germany (German)
      •  Hungary (Hungarian)
      •  Ireland
      •  Israel
      •  Italy (Italian)
      •  Latvia (Latvian)
      •  
      •  Lithuania (Lithuanian)
      •  Netherlands (Dutch)
      •  Norway (Norwegian)
      •  Poland (Polish)
      •  Portugal (Portuguese)
      •  Romania (Romanian)
      •  Russia (Russian)
      •  Slovakia (Slovak)
      •  Slovenia (Slovenian)
      •  Spain (Spanish)
      •  Sweden (Swedish)
      •  Switzerland(German, French)
      •  Turkey (Turkish)
      •  United Kingdom
      • Asia Pacific
      •  Australia
      •  China
      •  Hong Kong
      •  India
      •  Korea (Korean)
      •  Malaysia
      •  New Zealand
      •  Philippines
      •  Singapore
      •  Taiwan
      •  Thailand (Thai)
      • Americas
      •  Brazil (Portuguese)
      •  Canada
      •  Mexico (Spanish)
      •  United States
      Can't find the country/region you're looking for? Visit our export site or find a local distributor.
  • Translate
  • Profile
  • Settings
Data Conversion
  • Challenges & Projects
  • Project14
  • Data Conversion
  • More
  • Cancel
Data Conversion
Blog Sample and Hold - vADC | Part 3
  • Blog
  • Forum
  • Documents
  • Events
  • Polls
  • Files
  • Members
  • Mentions
  • Sub-Groups
  • Tags
  • More
  • Cancel
  • New
Join Data Conversion to participate - click to join for free!
  • Share
  • More
  • Cancel
Group Actions
  • Group RSS
  • More
  • Cancel
Engagement
  • Author Author: baldengineer
  • Date Created: 5 Mar 2021 4:34 AM Date Created
  • Views 1461 views
  • Likes 6 likes
  • Comments 0 comments
  • visual adc
  • baldengineer
  • dataconverch
Related
Recommended

Sample and Hold - vADC | Part 3

baldengineer
baldengineer
5 Mar 2021


A SAR ADC generates voltages through a DAC and then compares that analog voltage to the input voltage. This search takes some amount of time. If the input voltage changes while the search happens, then the search would fall apart. A "sample and hold" amplifier (S/H) holds a copy of the input voltage while the binary search happens. An S/H is a special op-amp circuit that charges up a capacitor and maintains the voltage until it samples again.


S/H and Comparator Schematic

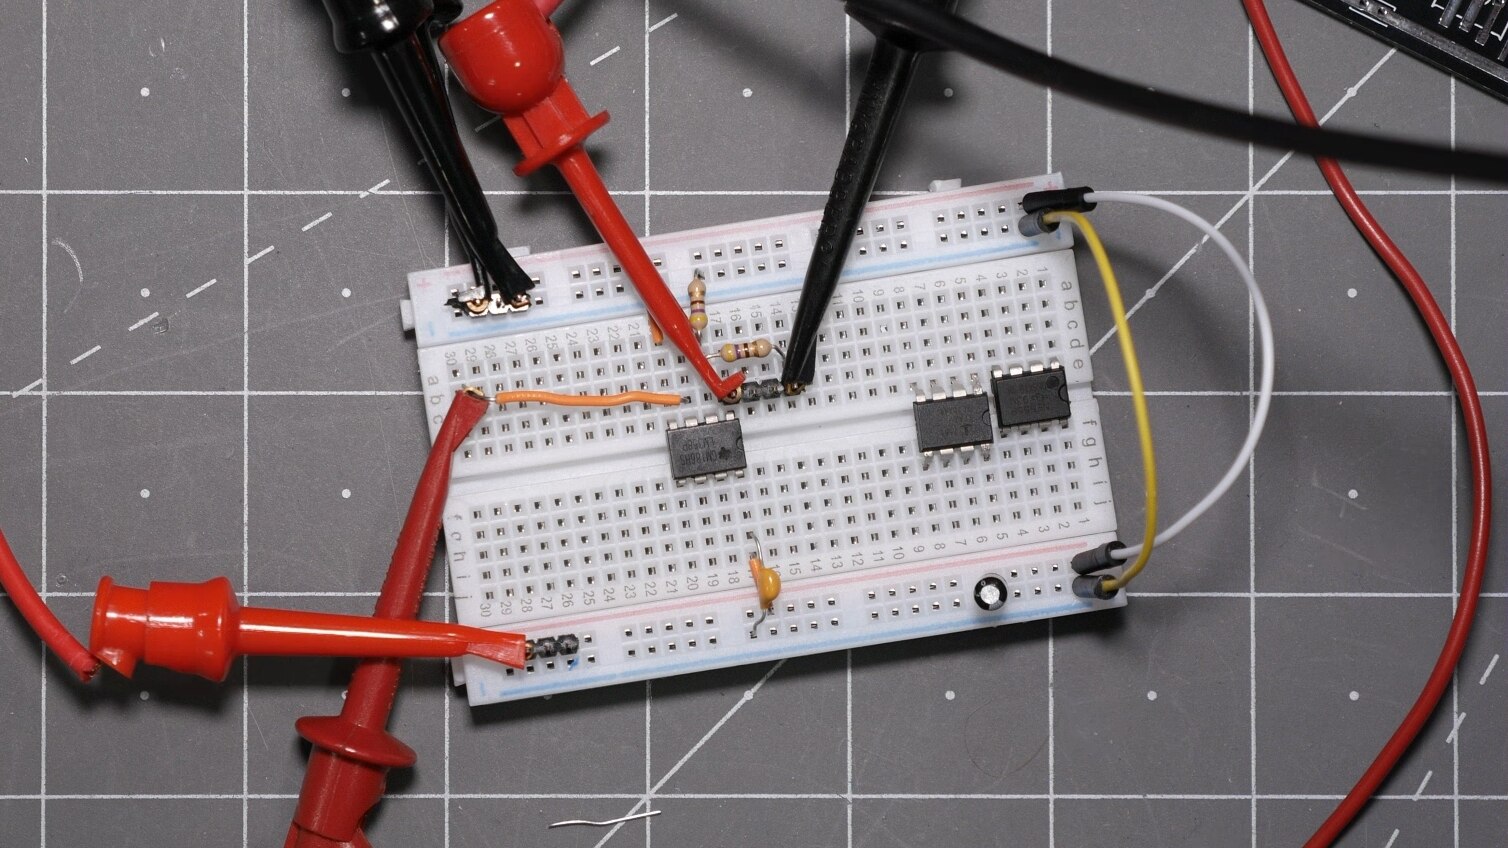
Back when I was waiting for the DAC boards to come back from the fab, I built some initial breadboard circuits. For documentation, I built these circuits on a breadboard and then captured them in KiCad. The LF398 is set but the comparator will likely change when moving to perma-board.

image


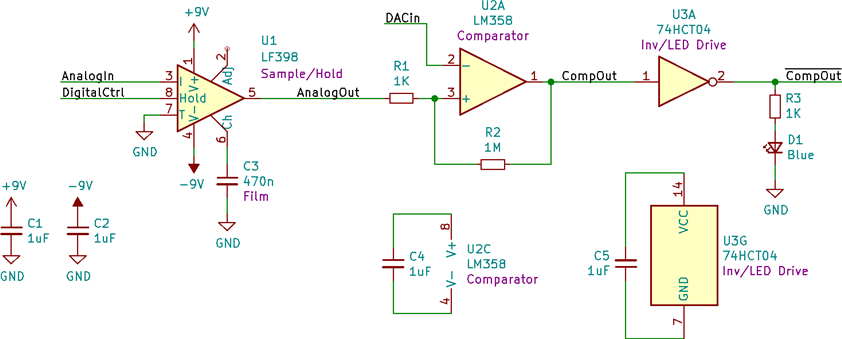
Sample and Hold Amplifier

The sample and hold amplifier is based on an old Texas Instruments LF398 IC. While available in an 8-pin DIP package, it also came in a TO-99. While I do not plan to use the TO-99 in the design, I had to grab one because they look cool.

image

One down-side to this IC, at least from my perspective, is that it really wants to have a negative voltage supply. The output is limited to about 1.4 volts from the plus and minus rails. For the positive rail, that wouldn't be a problem. But without a negative supply, the output would never go below 1.0 volt.

image

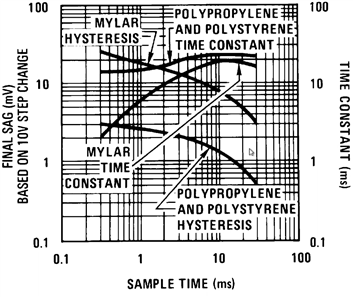
On the other hand, this circuit was dead simple to use. It only requires the positive and negative supplies, a digital signal for the sample control, and a capacitor to hold the sampled voltage. In operation, you pulse the hold pin, and the IC takes care of the rest. When my friend showed me the IC, I immediately looked at the datasheet to see how much it would drift over time. The datasheet looked promising. And with testing, I found I a 470 nF film capacitor would hold the sampled voltage for at least 30 seconds while only losing about 100 mV.

image

If you think that losing 100 mV is bad. However, with a 4-bit ADC, the resolution is going to be around 300 mV. And that was after 30 seconds. I do not expect the SAR to search for more than 3-5 seconds. So overall, I think the performance is great for this application.

Comparator

Despite having a wall of components with boxes that literally describe everything available from a distributor and talking about the essential active components to have on-hand, I am still running into parts I do not have. For example, I do not have a dedicated comparator IC. So, I built a simple comparator with a generic op-amp for the breadboard design, the LM358. There are many negatives to use a generic op-amp, but it would be fine in a circuit like this one. That said, I did pick up some LM339s for the next iteration.

image

One reason for a dedicated comparator IC is that its output drive is strong enough for an LED. The LM358-based design required an extra buffer, which I prototyped with a 74HC04 inverter chip I had on-hand. (It was on-hand when I built these circuits right after recording the Workbench Wednesdays 35: Essential Logic Families video.)


Next Steps

An obvious next step is to build this circuit on something more permanent than a breadboard. After that, the circuit is ready for integration with the DAC bits. It is shocking to me how fast this project went from a crazy idea to parts in progress and partially functional blocks.

  • Sign in to reply
element14 Community

element14 is the first online community specifically for engineers. Connect with your peers and get expert answers to your questions.

  • Members
  • Learn
  • Technologies
  • Challenges & Projects
  • Products
  • Store
  • About Us
  • Feedback & Support
  • FAQs
  • Terms of Use
  • Privacy Policy
  • Legal and Copyright Notices
  • Sitemap
  • Cookies

An Avnet Company © 2025 Premier Farnell Limited. All Rights Reserved.

Premier Farnell Ltd, registered in England and Wales (no 00876412), registered office: Farnell House, Forge Lane, Leeds LS12 2NE.

ICP 备案号 10220084.

Follow element14

  • X
  • Facebook
  • linkedin
  • YouTube