


INTRODUCTION
this project is based on the principle of
electromagnetic introduction, this phenomenon
was discovered by an English scientist Michael Faraday in 1831 ,
according to this principle if a conductor is placed in a variable magnetic field an EMF (electromotive force) is produced across the ends of the conductor.
This is a very helpful theory and have many real life applications wireless electricity transmission is one of them.
Another example is Tesla tower,
also electric motors runs on this principle.
for more information
visit:
COMPONENTS REQUIRED :
1. Enameled copper wire (appx 5 meter)
2. A 2n2222 (NPN) transistor
3. A resistor (1k-2k)
4. A battery(9v or 12v)
5. A battery connector
6. A LED
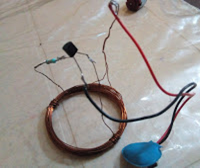 |
| PRIMARY COIL |
PROCEDURE :
- 1. coil 1(primary coil):
- 1. Lets first make our primary coil for this take the enameled copper wire and make 15 or more turns with the help of a cylindrical base(more the number of turns more will be the distance of transmission).
- 2. Now make a loop.
- 3. Again make same number of turns as before (for example, if the number of turns was 15, you have to make 15 more turns) and cut it.
- 4. Now with the help of a match stick or a lighter burn all the three ends of the coil(2-ends and one loop) to remove the insulation.
2. coil 2 (secondary coil):
- 5. Now we have to make the secondary coil,
For this again take some enameled copper wire and make same number of turns as it was made in primary coil( for example, if the total number of turns were 30, you have to make secondary coil of 30 turns)
- 6. Again as previous with the help of a lighter or a blade remove the insulation of both the ends of the secondary coil.
 |
| SECONDARY COIL |
CONNECTIONS
1. primary coil
1) Connect the negative terminal of the battery connector to the emitter of the transistor.
2) Connect the positive terminal of battery connector to the loop of the coil(the loop which was made after half of the total numbers of the turn).
3) Connect one end of the resistor to the base of the transistor and other to the end of the of primary coil.
- 2. secondary coil
Connect both ends of the LED to the secondary coil.
WORKING |
In this, in the primary coil the transistor is generating high-frequency AC current across the primary coil and this results in the generation a magnetic field around the primary coil. As the coil is center tapped, the two sides of the coil start to charge up. One side of the coil is connected to the resistor and another side is connected to the collector terminal of NPN transistor. During the charging condition, the base resistor starts to conduct which turns on the transistor. The transistor then discharges the primary coil as the emitter is connected with the ground. This charging and discharging of the primary coil produces a very high frequency oscillation signal which is further transmitted as a magnetic field. And in secondary coil that magnetic field is transferred into the other coil, and by the Faraday’s law of induction, the receiver coil start producing EMF voltage which makes the LED bulb to glow.