


The RC Hammering Rubber Duck in the Tub has its first public exhibition on January 5th for a homeschooling group's "Intro to Robotics" class.
The class is compromised of about a dozen middle and high schoolers. I was invited to bring a couple projects to class to get the students excited for the spring semester.
The students had a blast just driving the Rubber Duck up and down the hallway. I'll publish the video after I climb out of this bunny hole.
I noticed tho the battery didnt last as long as I thought it should have, and was really sluggish on a short pile carpet.
Early on in the design, I had used a lab bench power supply to check behavior at different voltages and record amps while running.
The wheels were lifted off the floor, but the gearbox and wheels were still attached, so would be somewhat close to full load running.
AT dead stop, the idle load current varied from 200mA @ 10V to 400mA @ 12v.
12V of course ran the fastest, and had the highest load 1.5A in forward , 2A during acceleration.
The Rubber Duck uses a 3S (11.1v) 1500mA Lipo Battery. I try to stick around 12V for projects, so I can use 12V wall warts, LipOs, and/or AA or AAA batteries during test runs.
First down the bunny hole to check on the LipO battery rating. It is a IRAHobby 3S 11.1V 1500mAhr 45C battery.
battery BUNNY HOLE TAKEAWAY #1
Altho load vs voltage measurements were taken using a bench power supply, the data isnt enough to reflect real load conditions while
running around on different terrain and surfaces.
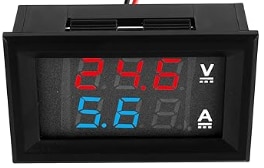
I've installed a DVM and 10A DC ammeter on the Rubber Duck to collect better load and volts data while running.
The running load is close to 3A and it seemed only a couple minutes running sucked the battery down to 10 ish volts after a full recharge.
Battery is 5 years old, hardly used. Conclusion is old crappy battery.
Have a couple more batteries on order, 2200mA hr rather than 1500mAhr, and 35C rather than 50C.
Battery BUNNY HOLE TAKEAWAY #2
------> I should run a battery voltage monitor into the Arduino or Raspberry Pi for my Lipo based projects (using a voltage divider)
for a 3S battery, vigorously flash a low battery alarm at ~10V to indicate a low battery , and then to shutdown into an alarm mode when the battery gets ~ 9V
see evaluation below
Referring to and https://www.ufinebattery.com/blog/understanding-c-rating-on-lipo-battery-your-in-depth-guide/
this 1.5A mAhr battery with 45C should be able to deliver peaks of 67+Amps. Spec checks good.
https://www.ufinebattery.com/blog/3s-lipo-battery-guide-from-voltage-basics-to-full-charge/
A well-maintained 3S LiPo can last 150 to 300 cycles. If abused, it may fail after just 30 to 50 cycles.
| Voltage Type | Value per Cell | 3S Total Voltage |
|---|---|---|
| Nominal Voltage | 3.7V | 11.1V |
| Fully Charged Voltage | 4.2V | 12.6V |
| Storage Voltage | 3.8V | 11.4V |
| Minimum Safe Voltage | 3.0V | 9.0V |
https://yungbangpower.com/blog/lipo-discharge-curve-beginner-guide/
The Typical Curve—A Quick Mental Picture

2. Plateau (Main Zone):
- This is your main usable power. For most packs, 3.7V to 3.3V per cell.
- Performance is strong—this is your “happy” running stage.
3. The Knee & Rapid Drop:
- Just after 3.3V/cell, the curve falls FAST. This signals the battery is running out.
- This is your cue: LAND your drone or stop driving now—don’t squeeze out the last bit!
4. Cutoff (Critical Danger):
- Below 3.0V/cell: serious risk of permanent battery damage, swelling, or even fire hazard. Never go this far.
If you only remember this: Never run your battery past the “knee” to the bottom. Always land or stop before it nosedives.
