element14 Community
element14 Community
    Register Log In
  • Site
  • Search
  • Log In Register
  • About Us
  • Community Hub
    Community Hub
    • What's New on element14
    • Feedback and Support
    • Benefits of Membership
    • Personal Blogs
    • Members Area
    • Achievement Levels
  • Learn
    Learn
    • Ask an Expert
    • eBooks
    • element14 presents
    • Learning Center
    • Tech Spotlight
    • STEM Academy
    • Webinars, Training and Events
    • Learning Groups
  • Technologies
    Technologies
    • 3D Printing
    • FPGA
    • Industrial Automation
    • Internet of Things
    • Power & Energy
    • Sensors
    • Technology Groups
  • Challenges & Projects
    Challenges & Projects
    • Design Challenges
    • element14 presents Projects
    • Project14
    • Arduino Projects
    • Raspberry Pi Projects
    • Project Groups
  • Products
    Products
    • Arduino
    • Avnet Boards Community
    • Dev Tools
    • Manufacturers
    • Multicomp Pro
    • Product Groups
    • Raspberry Pi
    • RoadTests & Reviews
  • Store
    Store
    • Visit Your Store
    • Choose another store...
      • Europe
      •  Austria (German)
      •  Belgium (Dutch, French)
      •  Bulgaria (Bulgarian)
      •  Czech Republic (Czech)
      •  Denmark (Danish)
      •  Estonia (Estonian)
      •  Finland (Finnish)
      •  France (French)
      •  Germany (German)
      •  Hungary (Hungarian)
      •  Ireland
      •  Israel
      •  Italy (Italian)
      •  Latvia (Latvian)
      •  
      •  Lithuania (Lithuanian)
      •  Netherlands (Dutch)
      •  Norway (Norwegian)
      •  Poland (Polish)
      •  Portugal (Portuguese)
      •  Romania (Romanian)
      •  Russia (Russian)
      •  Slovakia (Slovak)
      •  Slovenia (Slovenian)
      •  Spain (Spanish)
      •  Sweden (Swedish)
      •  Switzerland(German, French)
      •  Turkey (Turkish)
      •  United Kingdom
      • Asia Pacific
      •  Australia
      •  China
      •  Hong Kong
      •  India
      •  Korea (Korean)
      •  Malaysia
      •  New Zealand
      •  Philippines
      •  Singapore
      •  Taiwan
      •  Thailand (Thai)
      • Americas
      •  Brazil (Portuguese)
      •  Canada
      •  Mexico (Spanish)
      •  United States
      Can't find the country/region you're looking for? Visit our export site or find a local distributor.
  • Translate
  • Profile
  • Settings
Going Green
  • Challenges & Projects
  • Project14
  • Going Green
  • More
  • Cancel
Going Green
Blog Garden Watering Project: getting started (finally!)
  • Blog
  • Forum
  • Documents
  • Events
  • Polls
  • Files
  • Members
  • Mentions
  • Sub-Groups
  • Tags
  • More
  • Cancel
  • New
Join Going Green to participate - click to join for free!
  • Share
  • More
  • Cancel
Group Actions
  • Group RSS
  • More
  • Cancel
Engagement
  • Author Author: sasquatch84
  • Date Created: 10 Aug 2017 10:06 PM Date Created
  • Views 918 views
  • Likes 4 likes
  • Comments 3 comments
  • gogreench
Related
Recommended

Garden Watering Project: getting started (finally!)

sasquatch84
sasquatch84
10 Aug 2017

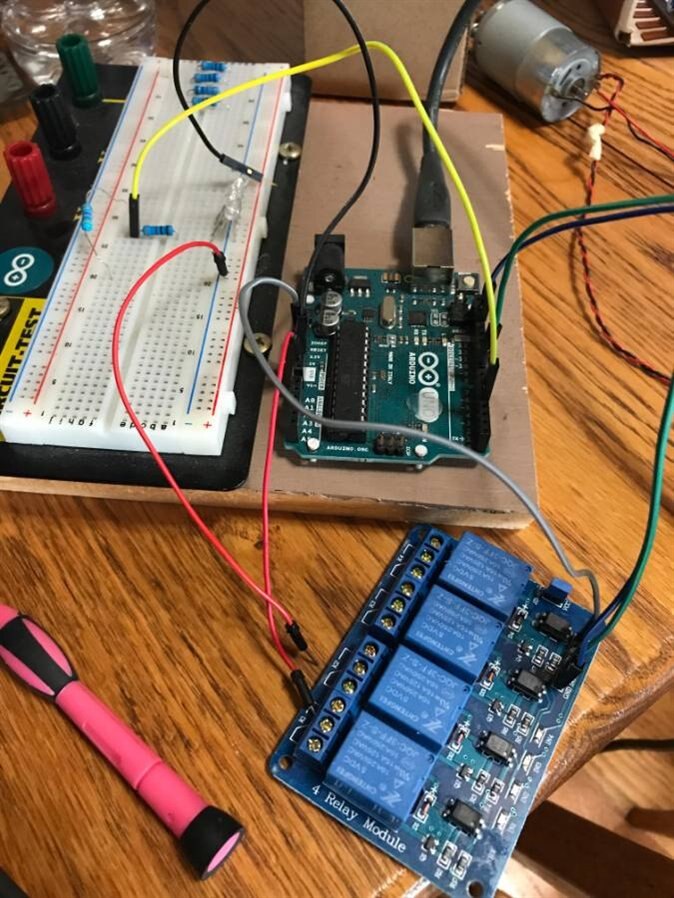
Ok so I finally got some time to myself (difficult because I have 4 kids going on 5 under 7) to play around with this project.  I got my Uno out and my ebay-special 4 relay module.  I figured out how it works and what the little picture on the relay meant as far as which one is normally open and which one is normally closed. 

I have been reading up on different ways to get the Arduino to keep track of time and turn/off for long periods of time.  While doing this reading I am constantly being reminded of how little I acutally know about coding. 

I found this "Timer" library that seems to be pretty straight forward. 

A couple things I have always been confused about is the the concept of "returning" things.  When reading up on different functions and ways of doing things on Arduino people are always talking about something being "returned" and I have no idea what that means.  Also "ID", umm huh?  Also, this Timer library makes use of t.update or else it doesn't work.  What is being updated?  Am I just way over my head or are these easily explained to a noob like myself?

image

  • Sign in to reply

Top Comments

  • gecoz
    gecoz over 8 years ago +3
    Hi Clinton, Having 2 kids myself, I do sympathise with you! The good news is that getting started with a project is usually the biggest hurdle, and you are over it now! About the concept of "returning…
  • sasquatch84
    sasquatch84 over 8 years ago in reply to gecoz +1
    Wow, that was very helpful. Thanks so much!
  • fariez97
    fariez97 over 8 years ago

    can I have full codes and circuit of this project?????........I very interested of this project to do my FYP

    • Cancel
    • Vote Up 0 Vote Down
    • Sign in to reply
    • More
    • Cancel
  • sasquatch84
    sasquatch84 over 8 years ago in reply to gecoz

    Wow, that was very helpful.  Thanks so much! 

    • Cancel
    • Vote Up +1 Vote Down
    • Sign in to reply
    • More
    • Cancel
  • gecoz
    gecoz over 8 years ago

    Hi Clinton,

    Having 2 kids myself, I do sympathise with you! The good news is that getting started with a project is usually the biggest hurdle, and you are over it now! image


    About the concept of "returning something", I take the context is coding. I will try and answer your questions the best I can, but I apologise in advance for taking the "long route" for my expalnation, and for repeating things you probably already know along the way.


    Arduino programs are basically written using the "C" programming language (you can use "C++" as well, but lets focus on C for the time being). This language allows you to describe your program using what is known as functional programming paradigm: when you want your program to do something, to make the programming easier, you can break the overall task into smaller actions, executed in a defined sequence. Each action thus is fullfilling a logically cohesive "function", sometimes generating a result for such processing. Your main program defines the logic (and order) for the execution of the functions (i.e. the main program is "calling" the functions), and gets back the results of the functions' processing (i.e. the something "returned" by each function). The function's code will have a "return" statement, which tells you exactly what is passed back to the main program by the function when it finishes its processing (i.e. upon "exiting").


    To make the coding job easier, people have written and organised function into "libraries" (they are the equivalent of COTS, applied to the software world). Usually, each library tries to deal and solve one specific problem: the Timer library for Arduino you mention, for instance, deals with the timing problem, and offers some functions to make the use of timing easier for you. This library is written in C++. The reason I mention this is because this language adds another powerful programming paradigm: object oriented programming, and many libraries are written in C++. You don't need to worry about it at this time, the only thing to remember is that C++ will define "objects", and objects will have functions and the functions will need to be "called" on those objects (the functions of an object are known as "methods"). Therefore, to use a function, you first need to create the object that "owns" the method, then you can call the method using the "dot" notation (the famous "t.update()" for example is calling the update() method on the t object).


    Now, the idea behind the Timer library is that you can define the timing events you are interested in using by calling the appropriate Timer object method. The list of methods can be found in the Timer.h file. Lets use the blink2 example from the library source code to try and understand who does what:


    //Flash two LEDs at different rates using Simon Monk's Timer library
    //http://www.doctormonk.com/2012/01/arduino-timer-library.html
    //
    //Jack Christensen 30Sep2013
    //
    //Beerware license: Free for any and all purposes, but if you find it
    //useful AND we actually meet someday, you can buy me a beer!
    
    #include "Timer.h" //http://github.com/JChristensen/Timer
    
    const int LED1 = 8; //connect one LED to this pin (with appropriate current-limiting resistor of course)
    const int LED2 = 9; //connect another LED to this pin (don't forget the resistor)
    const unsigned long PERIOD1 = 1000; //one second
    const unsigned long PERIOD2 = 10000; //ten seconds
    Timer t; //instantiate the timer object
    
    void setup(void)
    {
      pinMode(LED1, OUTPUT);
      pinMode(LED2, OUTPUT);
      t.oscillate(LED1, PERIOD1, HIGH);
      t.oscillate(LED2, PERIOD2, HIGH);
    }
    
    void loop(void)
    {
      t.update();
    }


    First of all, this example will make 2 led blink at different intervals: led 1 will periodically switch on for 1 second then off  for 1 second, led 2 will do the same , but with a period of 10 seconds instead. Lets focus on the use of the Timer library.


    The Timer object "t" is created at line 15. In the setup() function. The timer is initialized by defining the 2 events it will have to manage. This is done at line 21 and 22, where the calls "t.oscillate(...)" basically instruct the timer to create 2 events. The "oscillate" method is basically a periodic binary switch, where you can define the output that is switched (LED1 and LED2), how long the period each state of the switch needs to be kept on for (PERIOD1 and PERIOD2) and the initial state of the switch (HIGH for both).


    As said, those 2 lines only setup the events, but they don't actually start the switching. That actually happens in the loop() cycle. This is where the "t.update()" comes into play.

    Atline 27, the call to the update(...) method will cause the timer object to go through all the events setup (in our case, the 2 events setup before), and for each event, check if the defined period has lapsed, and if so cause the output to switch state (i.e. switch the leds or on off according to the time lapsed).


    This cycle will go on indefinitely, as the call to update is in the loop() function.


    One final note about the Timer library: the number of events it can handle is limited to 10, so if for your project you need more than 10 events for your timing, this library will not be suitable.


    i hope this helps.


    Looking forward to see how your project will progress. image

    Fabio.


    P.S: As for the "ID" question, it depends on the context where you found it used. Typically I'd use ID to assign a unique (and immutable) identifier to a device...

    • Cancel
    • Vote Up +3 Vote Down
    • Sign in to reply
    • More
    • Cancel
element14 Community

element14 is the first online community specifically for engineers. Connect with your peers and get expert answers to your questions.

  • Members
  • Learn
  • Technologies
  • Challenges & Projects
  • Products
  • Store
  • About Us
  • Feedback & Support
  • FAQs
  • Terms of Use
  • Privacy Policy
  • Legal and Copyright Notices
  • Sitemap
  • Cookies

An Avnet Company © 2025 Premier Farnell Limited. All Rights Reserved.

Premier Farnell Ltd, registered in England and Wales (no 00876412), registered office: Farnell House, Forge Lane, Leeds LS12 2NE.

ICP 备案号 10220084.

Follow element14

  • X
  • Facebook
  • linkedin
  • YouTube