The Covid pandemic has really put a damper on our holiday celebrations for the past 3 years - no family dinners and holiday gatherings with friends. This year we have a new grandson, so we are still keeping things low key. One tradition that was a casualty was the Christmas Tree. It just has not seemed worth the effort to put one up and decorate it when there's no one to share it with.
This year, my wife decided that she would get a small tree. Turns out she got a very small tree... and apparently she already had some miniature ornaments to go with it.

I thought it would be nice to put some lights on it, but it's hard to find a string of lights that small - so, it seemed like a good opportunity to participate in "Hack the Holidays" .
I have a Xiao BLE board that I had used for BLE transmit tests with the FPC1500 Spectrum Analyzer and I also have leftover Neopixels from a 10 x 10 sheet of them that I had bought for my Neopixel Dice project.
I'm going to build a string of Neopixel lights that I can control with my iPhone using BLE.
I'll document the project in two blog posts. In this first post, I'm going to develop the Xiao BLE program to interface the iPhone to the Neopixels. In the second post, I'll build (wire) the Neopixel string and do a demo video of the lights on the tree..
To develop the program I'm going to use an 8 Neopixel stick that I use for testing. I'm going to use the Arduino IDE because I'm familiar with the BLE library and the Adafruit Neopixel library. On the iPhone I'm going to use the LightBlue app which is available from the AppStore (I already have it loaded).
Xiao BLE
The Xiao BLE is a member of the Xiao family of small form factor MCU boards. I've found them very convenient to use with sensors that use I2C, SPI or UART interfaces. The form factor only breaks out a total of 11 GPIO pins total, so that could be a limitation. The Xiao BLE uses a Nordic nRF52840 MCU with Bluetooth 5.0 and NFC capability and has an onboard Bluetooth antenna. The picture below is actually of a Xiao BLE Sense with uses the same processor and PCB, but also adds a PDM microphone (lower right) and IMU (back).

Arduino IDE
The Board library that I used is shown below. The board is also available in the non-mbed-enabled library which should also work, but I normally use the mbed version.

I am only including the following two libraries (Arduino.h is included by default):
#include <ArduinoBLE.h>
#include <Adafruit_NeoPixel.h>
I use the BLE LED Service to pass values back to the program to indicate what pattern to run on the Neopixels (characteristic is read/write).
BLEService ledService("19B10000-E8F2-537E-4F6C-D104768A1214"); // Bluetooth® Low Energy LED Service
Currently, I only have 4 patterns:
- Off
- Sweep
- Rainbow
- Fixed
Xiao_BLE_Neopixel_LightBlue_Expanded.ino
// BLE controlled Christmas tree lights

#include <ArduinoBLE.h>
#include <Adafruit_NeoPixel.h>

#define PIN       2   // Neopixel Data Pin
#define NUMPIXELS 8   // Number of pixels in light string
#define DELAYVAL 500  // Time (in milliseconds) to pause between pixels

Adafruit_NeoPixel pixels(NUMPIXELS, PIN, NEO_GRB + NEO_KHZ800);

BLEService ledService("19B10000-E8F2-537E-4F6C-D104768A1214"); // Bluetooth® Low Energy LED Service

// Bluetooth® Low Energy LED Switch Characteristic - custom 128-bit UUID, read and writable by central
BLEByteCharacteristic switchCharacteristic("19B10001-E8F2-537E-4F6C-D104768A1214", BLERead | BLEWrite);

void setup() {
  Serial.begin(9600);
  while (!Serial);

  pixels.begin(); // INITIALIZE NeoPixel strip object
  pixel_Off();    // clear
  pixels.setBrightness(50); // Set BRIGHTNESS to about 1/5 (max = 255)

  // begin initialization
  if (!BLE.begin()) {
    Serial.println("starting Bluetooth® Low Energy module failed!");

    while (1);
  }

  // set advertised local name and service UUID:
  BLE.setLocalName("NEOPIXEL");
  BLE.setAdvertisedService(ledService);

  // add the characteristic to the service
  ledService.addCharacteristic(switchCharacteristic);

  // add service
  BLE.addService(ledService);

  // set the initial value for the characeristic:
  switchCharacteristic.writeValue(0);

  // start advertising
  BLE.advertise();

  Serial.println("BLE NEOPIXEL Peripheral");
}

void loop() {
//  int Sweep = 0;
  int Select = 0;
  // listen for Bluetooth® Low Energy peripherals to connect:
  BLEDevice central = BLE.central();

  // if a central is connected to peripheral:
  if (central) {
    Serial.print("Connected to central: ");
    // print the central's MAC address:
    Serial.println(central.address());

    // while the central is still connected to peripheral:
  while (central.connected()) {
        if (switchCharacteristic.written()) {
          Select = switchCharacteristic.value();
        }
        switch (Select) {
          case 0:
            Serial.println("Neopixels off");
            pixel_Off();
            break;
          case 1:
            Serial.println("Neopixels sweep");
            pixel_Sweep();
            break;
          case 2:
            Serial.println("Neopixels rainbow");
            rainbow();
            break;
          case 3:
            Serial.println("Neopixels fixed");
            pixel_Fixed();
            break;
        }
      }

//  while (central.connected()) {
//        if (switchCharacteristic.written()) {
//          if (switchCharacteristic.value()) {
//            Serial.println("Neopixels on");
//            Sweep = 1;
//          } else {
//            Serial.println("Neopixels off");
//            Sweep = 0;
//          }
//        }
//        if (Sweep) {
//          pixel_Sweep();
//        } else {
//          pixel_Off();
//        }
//      }

    // when the central disconnects, print it out:
    Serial.print(F("Disconnected from central: "));
    Serial.println(central.address());
  }
}

void pixel_Sweep() {
    pixels.clear(); // Set all pixel colors to 'off'

  // The first NeoPixel in a strand is #0, second is 1, all the way up
  // to the count of pixels minus one.
  for(int i=0; i<NUMPIXELS; i++) { // For each pixel...

    // pixels.Color() takes RGB values, from 0,0,0 up to 255,255,255
    // Here we're using a moderately bright green color:
    pixels.setPixelColor(i, pixels.Color(0, 150, 0));
    pixels.setPixelColor(i+1, pixels.Color(150, 0, 0));
    pixels.setPixelColor(i+2, pixels.Color(0, 0, 150));
    pixels.setPixelColor(i+3, pixels.Color(0, 150, 0));
    pixels.setPixelColor(i+4, pixels.Color(150, 0, 0));
    pixels.setPixelColor(i+5, pixels.Color(0, 0, 150));
    pixels.setPixelColor(i+6, pixels.Color(0, 150, 0));
    pixels.setPixelColor(i+7, pixels.Color(150, 0, 0));

    pixels.show();   // Send the updated pixel colors to the hardware.

    delay(DELAYVAL); // Pause before next pass through loop
  }
}

void pixel_Off() {
  pixels.clear();
  pixels.show();
  delay(DELAYVAL*2); // Pause before next pass through loop
}

// Rainbow cycle along whole strip. Pass delay time (in ms) between frames.
void rainbow() {
  // Hue of first pixel runs 5 complete loops through the color wheel.
  // Color wheel has a range of 65536 but it's OK if we roll over, so
  // just count from 0 to 5*65536. Adding 256 to firstPixelHue each time
  // means we'll make 5*65536/256 = 1280 passes through this loop:
  for(long firstPixelHue = 0; firstPixelHue < 5*65536; firstPixelHue += 256) {
    // pixels.rainbow() can take a single argument (first pixel hue) or
    // optionally a few extras: number of rainbow repetitions (default 1),
    // saturation and value (brightness) (both 0-255, similar to the
    // ColorHSV() function, default 255), and a true/false flag for whether
    // to apply gamma correction to provide 'truer' colors (default true).
    pixels.rainbow(firstPixelHue);
    // Above line is equivalent to:
    // strip.rainbow(firstPixelHue, 1, 255, 255, true);
    pixels.show(); // Update strip with new contents
    delay(10);  // Pause for a moment
  }
}

void pixel_Fixed() {
    pixels.clear(); // Set all pixel colors to 'off'

    int i = 0;
  // The first NeoPixel in a strand is #0, second is 1, all the way up
  // to the count of pixels minus one.
//  for(int i=0; i<NUMPIXELS; i++) { // For each pixel...

    // pixels.Color() takes RGB values, from 0,0,0 up to 255,255,255
    // Here we're using a moderately bright green color:
    pixels.setPixelColor(i, pixels.Color(0, 150, 0));
    pixels.setPixelColor(i+1, pixels.Color(150, 0, 0));
    pixels.setPixelColor(i+2, pixels.Color(0, 0, 150));
    pixels.setPixelColor(i+3, pixels.Color(0, 150, 0));
    pixels.setPixelColor(i+4, pixels.Color(150, 0, 0));
    pixels.setPixelColor(i+5, pixels.Color(0, 0, 150));
    pixels.setPixelColor(i+6, pixels.Color(0, 150, 0));
    pixels.setPixelColor(i+7, pixels.Color(150, 0, 0));

    pixels.show();   // Send the updated pixel colors to the hardware.

    delay(DELAYVAL*2); // Pause before next pass through loop
//  }
}
LightBlue App
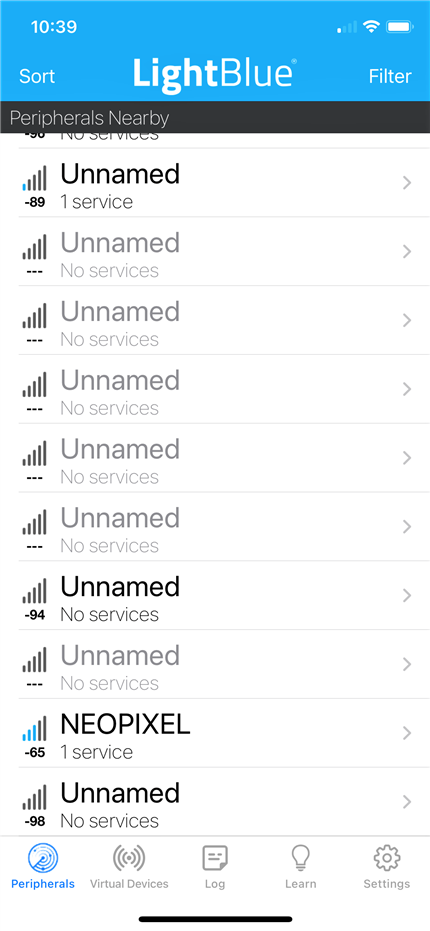
The LightBlue app from PunchThrough allows you to scan for and connect to peripherals. I am using it to read/write the LED service characteristic value.

The peripheral shows as "NEOPIXEL".

Once connected to the peripheral, you can see what service(s) and characteristic(s) are available.
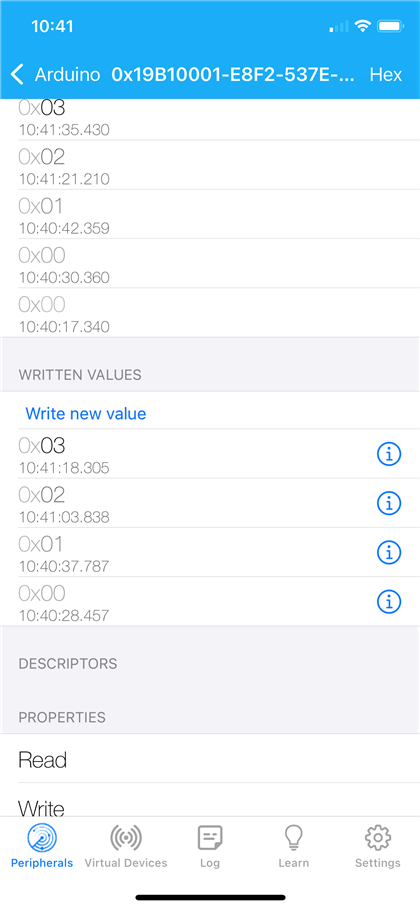
I think that app must have caching because even though I connected to "NEOPIXEL" - it is displaying "Arduino" which was the previous name before I changed it in the program.

And when you click on the service - you can read and write the characteristic (I've written the values shown).

Demo of test setup
Here is a demo of the different patterns being written and displayed on the Neopixels. I intentionally have the stick skewed to reduce the glare picked up by the camera.

