


 | Enter Your Project for a chance to win robot prizes for your robot builds and a $200 shopping cart! The Birthday Special: Robot Prizes for Robot Projects! | Project14 Home |
| Monthly Themes | ||
| Monthly Theme Poll |

IoT: In the Cloud - Arduino IoT Cloud controlled MKR Robot ARM
Overview
In a previous post, it was outlined how to get a Device Configured and a Thing created in the Arduino IoT Cloud. Here this is taken to the next step to configure multiple Thing Properties in the Arduino IoT Cloud to control a Robotics Arm. Currently, since the Arduino IoT Cloud is still in Beta, there are some limitations. These include:
- Only a Single Device can be attached at a time
- Only 1 Thing can be created per user at this time.
- The 1 Thing can only have 5 Properties.
Previous Post:
Arduino IoT Cloud controlled MKR Robot ARM: Das Blinken LED
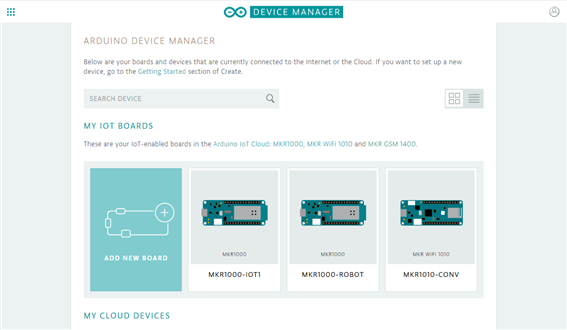
The Initial intent of this project was to have both a Robot Arm and a Conveyor Belt running together from the Arduino IoT Cloud, however due to the Single Device and Single Thing limitation, this will have to be rethought.
The devices were added to the Device Manager none the less.
NOTE: When configuring a MKR board for Arduino IoT Cloud, ensure there is nothing connected to the i2C signals (SDA (D11), SCL(D12)) otherwise the Crypto section of adding a Device will fail. Also, this will cause issues with the Arduino IoT Cloud begin when the board boots up.
If a Thing has already been created, attempting to create a new one will result in an error.

Once the Thing is selected, The Thing Properties Windows will show.
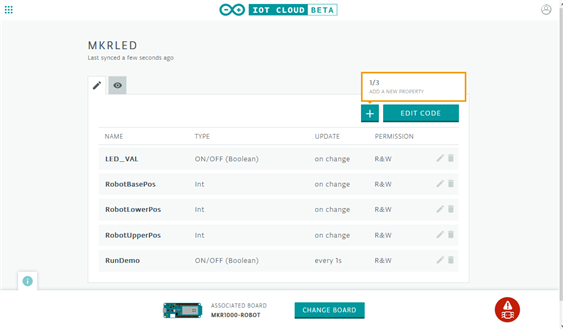
Currently, 5 Properties have been created, thus due to the limitations of the Arduino IoT Cloud, selecting a 6th Property will produce and error.

To change the Associated Board for the Thing, click on the Circle Icon with the 'i' in the middle at the bottom left of the window.

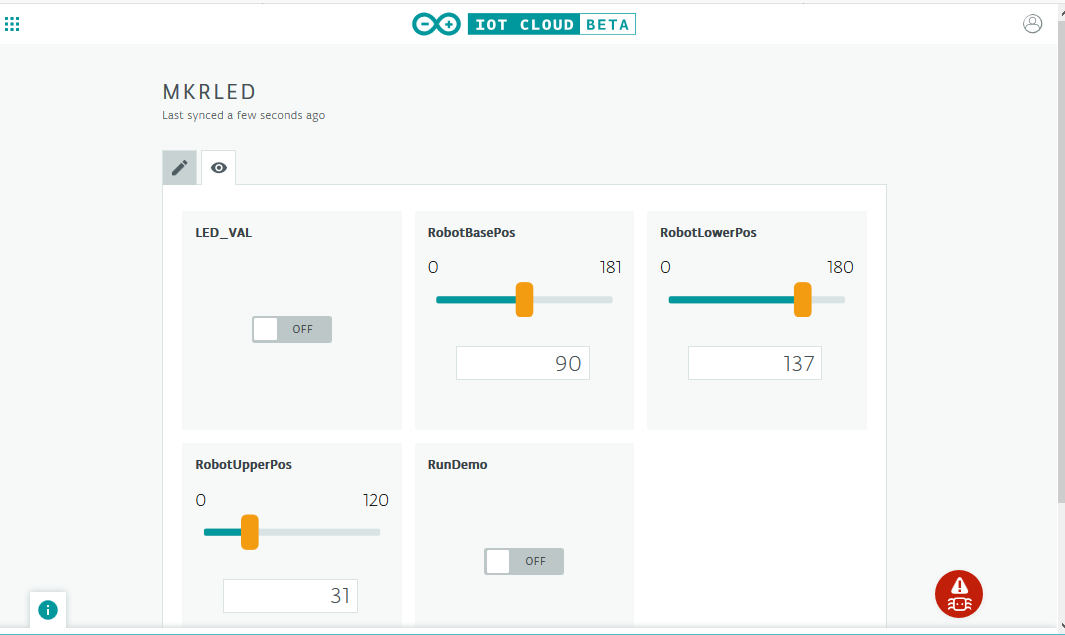
The Robot Arm is made of separate sections which can be controlled separately:
- Robot Base
- Robot Lower Arm
- Robot Upper Arm
- Robot Gripper (not configured yet)
To control the separate sections of the Robot Arm, new Properties were created for each section.
| Property | Type | Update | Description |
|---|---|---|---|
| RobotBasePos | int | on change | Control Robot Base Position |
| RobotUpperPos | int | on change | Control Robot Upper Position |
| RobotLowerPos | int | on change | Control Robot Lower Position |
| RunDemo | ON/OFF (Bool) | every 1s | Run Robot Arm Position |
NOTE: Currently, in the case of the RunDemo Property, this was set to update 'Regularly', however this behavior was not experienced. There appears to be no difference in behavior if this is or is not set; the Property updates when the selector is moved from On to Off.
Defines in Arduino Create Code
Variables:
int RobotBasePos;
int RobotUpperPos;
int RobotLowerPos;
bool RunDemo;
Methods
void onRobotBasePosChange();
void onRobotLowerPosChange();
void onRobotUpperPosChange();
void onRunDemoChange();
initProperties
  ArduinoCloud.addProperty(RobotBasePos, READWRITE, ON_CHANGE, onRobotBasePosChange);
  ArduinoCloud.addProperty(RobotLowerPos, READWRITE, ON_CHANGE, onRobotLowerPosChange);
  ArduinoCloud.addProperty(RobotUpperPos, READWRITE, ON_CHANGE, onRobotUpperPosChange);
  ArduinoCloud.addProperty(RunDemo, READWRITE, 1 * SECONDS, onRunDemoChange);
For each Robot Arm Segment, when the associated Arduino IoT Cloud method is called, the moveArm method is called to move that section of the Arm.
onRobotBasePosChange
void onRobotBasePosChange() {
  // Do something
  moveArm(baseServo, RobotBasePos);
  Serial.print("Current Base Arm pos: ");
  Serial.println(baseServo.getArmPos());
  delay(30);
}
onRobotLowerPosChange
void onRobotLowerPosChange() {
  // Do something
  // RobotLowerPos
  moveArm(lowerArmServo, RobotLowerPos);
  Serial.print("Current Base Lower pos: ");
  Serial.println(lowerArmServo.getArmPos());
  delay(30);
}
onRobotUpperPosChange
void onRobotUpperPosChange() {
  // Do something
  moveArm(upperArmServo, RobotUpperPos);
  Serial.print("Current Upper Arm pos: ");
  Serial.println(upperArmServo.getArmPos());
  delay(30);
}
Each Arm segment code calls the moveArm method to move to appropriate position.
void moveArm(RobotArm& roboArm,int robotPos)
{
  volatile auto currentPos = roboArm.getArmPos();
  if (currentPos < robotPos)
  {
    while (currentPos < robotPos)
    {
       currentPos += roboArm.getArmPosInc();
       roboArm.setArmPos(currentPos);
       roboArm.updateArmPos();
       delay(50);
    }
  } else {
    while (robotPos < currentPos)
    {
      currentPos -= roboArm.getArmPosInc();
      roboArm.setArmPos(currentPos);
      roboArm.updateArmPos();
      delay(50);
    }
  }
}
The RunDemo Property is changed when the selector switch goes from Off to On which then calls the onRunDemoChange method.
Since this did not update every 1 second as expected, an alternate was used by creating a start state variable that is set to Start if the RunDemo property is set to True.
This will then call the runRobotArmDemo method every 200 milliseconds.
Main 'loop' code
void loop() {
  ArduinoCloud.update();
  // Your code here
  if (arm_start_state == ArmStates::ARM_MOVE_START)
  {
    currentMillis = millis();
    if (currentMillis - startMillis >= period)
    {
        runRobotArmDemo();
        startMillis = currentMillis;
    }
  }
}
onRunDemoChange
void onRunDemoChange() {
  // Set arm start state based on RunDemo value


  if (RunDemo)
  {
    arm_start_state = ArmStates::ARM_MOVE_START;
  } else {
      arm_start_state = ArmStates::ARM_MOVE_STOP;
  }
}
runRobotArmDemo
void runRobotArmDemo(void)
{
  //static uint16_t basePos = baseServo.getPosCent();
  static uint16_t destPos = 10;
  Serial.print("Current Base pos: ");
  Serial.println(basePos);

  switch (arm_state)
  {
    case ArmStates::ARM_MOVE_CENTER:
         switch(arm_next_state)
         {
             case ArmStates::ARM_MOVE_RIGHT:
                 arm_state = ArmStates::ARM_MOVE_RIGHT;
                 arm_next_state = ArmStates::ARM_MOVE_CENTER;
                 Serial.print("Case move Right: ");
                 break;

             case ArmStates::ARM_MOVE_LEFT:
                 arm_state = ArmStates::ARM_MOVE_LEFT;
                 arm_next_state = ArmStates::ARM_MOVE_CENTER;
                 Serial.print("Case move Left: ");
                 //destPos = 10;
                 break;
         }
         break;
    case ArmStates::ARM_MOVE_LEFT:
                  Serial.print("In Move Left ");
                 //if (basePos <= baseServo.getPosCent() && basePos > destPos) {
                 if (basePos >= destPos) {
                 // Keep moving left
                    basePos--;
                 } else {
                    if (destPos == 10) {
                        arm_state = ArmStates::ARM_MOVE_CENTER;
                        arm_next_state = ArmStates::ARM_MOVE_RIGHT;
                        destPos = 90;
                    } else {
                        arm_state = ArmStates::ARM_MOVE_CENTER;
                        arm_next_state = ArmStates::ARM_MOVE_LEFT;
                        destPos = 10;
                    }
                 }
                 break;
    case ArmStates::ARM_MOVE_RIGHT:
                 Serial.print("In Move Right: ");
                 if (basePos <= destPos) {
                 // Keep moving right
                    basePos++;
                 } else {
                     if (destPos == 170) {
                         arm_state = ArmStates::ARM_MOVE_CENTER;
                         arm_next_state = ArmStates::ARM_MOVE_LEFT;
                         destPos = 90;
                     } else {
                         arm_state = ArmStates::ARM_MOVE_CENTER;
                         arm_next_state = ArmStates::ARM_MOVE_RIGHT;
                         destPos = 170;
                     }
                 }
                 break;

    case ArmStates::ARM_MOVE_STOP: break;
  }

    moveArm(baseServo, basePos);
}
These are called by the Property Widgets
If the Monitor window is selected in the Arduino Create Editor, the updated position for the Arm movements are shown.

Video Showing the Robot Arm being controlled by the Arduino IoT Cloud Thing interface.
NOTE: At about 5:54 into the video I attempt to show a demo of the Robot Arm movement, however I did not have the Web CAM active at this point. I do repeat it later in the video.