element14 Community
element14 Community
    Register Log In
  • Site
  • Search
  • Log In Register
  • About Us
  • Community Hub
    Community Hub
    • What's New on element14
    • Feedback and Support
    • Benefits of Membership
    • Personal Blogs
    • Members Area
    • Achievement Levels
  • Learn
    Learn
    • Ask an Expert
    • eBooks
    • element14 presents
    • Learning Center
    • Tech Spotlight
    • STEM Academy
    • Webinars, Training and Events
    • Learning Groups
  • Technologies
    Technologies
    • 3D Printing
    • FPGA
    • Industrial Automation
    • Internet of Things
    • Power & Energy
    • Sensors
    • Technology Groups
  • Challenges & Projects
    Challenges & Projects
    • Design Challenges
    • element14 presents Projects
    • Project14
    • Arduino Projects
    • Raspberry Pi Projects
    • Project Groups
  • Products
    Products
    • Arduino
    • Avnet Boards Community
    • Dev Tools
    • Manufacturers
    • Multicomp Pro
    • Product Groups
    • Raspberry Pi
    • RoadTests & Reviews
  • Store
    Store
    • Visit Your Store
    • Choose another store...
      • Europe
      •  Austria (German)
      •  Belgium (Dutch, French)
      •  Bulgaria (Bulgarian)
      •  Czech Republic (Czech)
      •  Denmark (Danish)
      •  Estonia (Estonian)
      •  Finland (Finnish)
      •  France (French)
      •  Germany (German)
      •  Hungary (Hungarian)
      •  Ireland
      •  Israel
      •  Italy (Italian)
      •  Latvia (Latvian)
      •  
      •  Lithuania (Lithuanian)
      •  Netherlands (Dutch)
      •  Norway (Norwegian)
      •  Poland (Polish)
      •  Portugal (Portuguese)
      •  Romania (Romanian)
      •  Russia (Russian)
      •  Slovakia (Slovak)
      •  Slovenia (Slovenian)
      •  Spain (Spanish)
      •  Sweden (Swedish)
      •  Switzerland(German, French)
      •  Turkey (Turkish)
      •  United Kingdom
      • Asia Pacific
      •  Australia
      •  China
      •  Hong Kong
      •  India
      •  Korea (Korean)
      •  Malaysia
      •  New Zealand
      •  Philippines
      •  Singapore
      •  Taiwan
      •  Thailand (Thai)
      • Americas
      •  Brazil (Portuguese)
      •  Canada
      •  Mexico (Spanish)
      •  United States
      Can't find the country/region you're looking for? Visit our export site or find a local distributor.
  • Translate
  • Profile
  • Settings
Making Time
  • Challenges & Projects
  • Project14
  • Making Time
  • More
  • Cancel
Making Time
Blog NeRDPACk - No RTC DigitPad Alarm Clock
  • Blog
  • Forum
  • Documents
  • Events
  • Polls
  • Files
  • Members
  • Mentions
  • Sub-Groups
  • Tags
  • More
  • Cancel
  • New
Join Making Time to participate - click to join for free!
  • Share
  • More
  • Cancel
Group Actions
  • Group RSS
  • More
  • Cancel
Engagement
  • Author Author: nmccloud
  • Date Created: 14 Jan 2021 5:09 PM Date Created
  • Views 1602 views
  • Likes 7 likes
  • Comments 4 comments
  • makingtimech
Related
Recommended

NeRDPACk - No RTC DigitPad Alarm Clock

nmccloud
nmccloud
14 Jan 2021

After many years of reliable use, the buttons on my Oregon Scientific Atomic Alarm clock are just worn out and setting the alarm time can be very hit and miss. I toyed with the idea of taking it apart to clean up the contacts, but I realised that what I really wanted was a keypad so I could just type in the alarm time. I'm my own boss, so getting up time can vary massively between very early to just making sure I don't end up arising after midday. So a keypad entry is very appealing.


I knew I could multiplex four 7-segment displays and use that multiplexer to check for keypad button pushes, I'd seen designs using Microchip PIC well before the Arduino came along. I fantasised about having a hi-resolution display with a WiFi enabled controller to show all sorts of supplementary information, but realised that was just another form factor for a smartphone. I also knew that even a basic clock has multiple states - showing the time, entering the clock or alarm time, alarm on & off and so forth, so keeping the first version simple enough that it would see the light of day was a key objective.


So after a brief survey of possible parts, I came across the following:

image

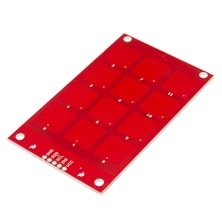
MPR121 capacitive touch based keypad - I2C based multi-touch sensing


image

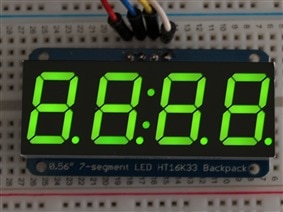
TM1367 based 7 segment display module: A massive simplification for driving the display over it's own two line protocol


So as I'd made these two elements rather too easy, I decided to forego using a Real Time Clock module. Some of the Arduino's in my collection have actual crystal oscillators on them, rather than rather temperature sensitive and fundamentally inaccurate ceramic oscillators. So if the RTC module uses a crystal and I've got an Arduino with a crystal on it, why can't I write the code to run a reasonably accurate clock? The single biggest issue is the an RTC uses a crystal tuned to 32,768Hz which is rather easy for a computer to divide down to 1Hz aka a one second tick. Whereas I've an Arduino running at 16MHz which doesn't divide so easily and, as a surprise to some, means the millis() function is actually off by just a little bit. It's reliable & consistent, but the difference needs to be corrected. I already had some pointers from various pages on the internet about tracking the accumulating error and how, once there has been some calibration, the difference can be accounted for.

image

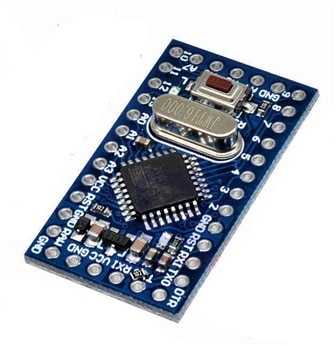
This is a fairly typical Arduino Pro Mini with the large oval can that is a proper crystal oscillator.


So after re-finding the pages buried deep on the inter webs using my sketchy recall of the keywords, I spent a surprisingly short amount of time coding the algorithm and a stupidly large amount of time running various calibration runs - sometimes thwarted by Windows 10 deciding to do an automatic restart after an automatic update - that lost several overnight runs.


The varying results average out about 2 or 3 seconds per month, which isn't as good as a decent RTC module with some sort of temperature compensation and millions of $$$ of research, design and testing, but it's good enough for the purposes of waking me up.


Having got the Arduino making like an RTC, the next bit was to get the two main external components working. As an ancient (over 40) engineer, I've learnt to make things work separately before integrating them. And whilst this is more of a leisure project, I'm glad I did. As I implied above, even a simple alarm clock has multiple different states that it might be in and the state checks & changes happen in both the display & the keypad code. So once some mail in an A4 envelope arrived, I drew out the state machine on it. Which made me realise that this first pass was going to have some quirky user interface for time entry. Again, experience has taught me that it's v3 before you get to a scheme of work that you are happy with, so I've pressed on with v1.


The original SparkFun keypad is retired on their website but is generally available from the usual sources. The TM1367 display is available in various forms from all the same sorts of places.


Here's the connections to be made:

image

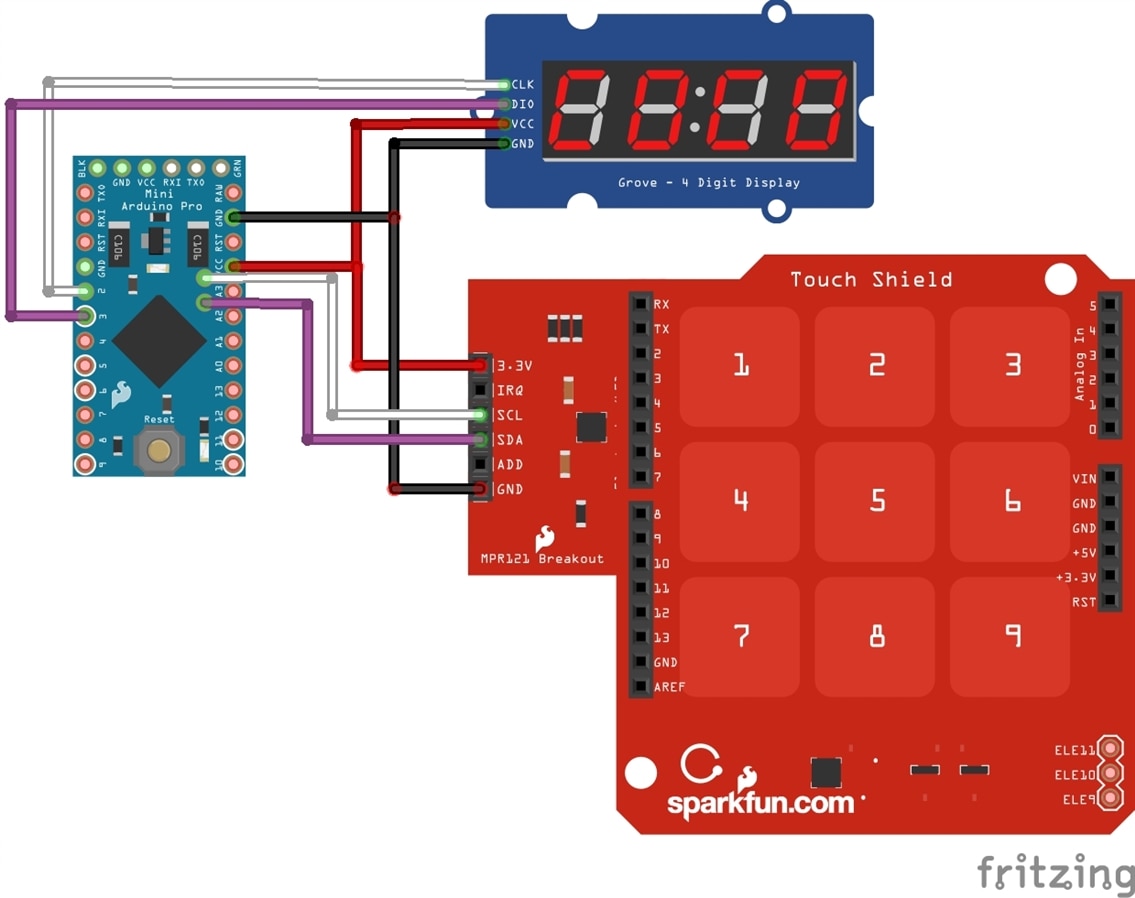
There is some artistic licence going on here with the TouchShield - but the labels are very clear on the 12 pad model like the parts I used here.


And this is what I've got going now.


image

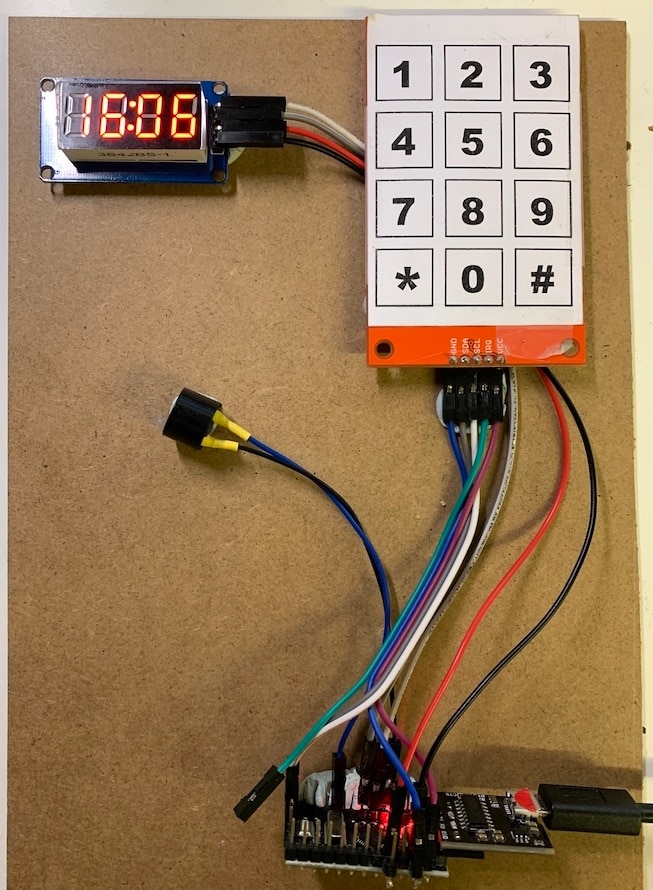
You'll spot that I've sneaked in a piezo buzzer as well so the alarm makes a noise - I've got those on pin 5 and ground.


You don't have permission to edit metadata of this video.
Edit media
x
image
Upload Preview
image


The code is split in to three modules - the main sketch, two supplementary sketches, one for the clock code and one for the keypad, plus a settings file. I do this so I can get to the code I want to adjust without wearing out the scroll wheel on my mouse.


Available here: https://github.com/HeadBoffin/NeRDPACk


The main file, TouchPadClock_v0.2, contains the required setup() and loop() profunctions (C functions with no parameters or a return value, must be a procedure then). There's not much in there as most of the action is split over the Clock and TouchPad files. There is however a sneaky bit of code to set the clock each time there is a new upload - saves hours of time and means the time setting part could be left until the end.


All the includes, object initialisation, defines, constants, pins etc etc are in the settings.h along with my usual trace & debug utilities which got rather left behind whilst hacking away at this on the sofa of an evening but I'll go through the code to make use of them before I add to the functionality. The clock module has accumulated some of the state checking related to what it should be displaying which will need refactoring out at some point.


The keypad module stores information on what has been touched and then calculates how long a pad was touched for upon release. It also has the two level state machine that knows what mode the clock is in (normal, alarm set, time set) coupled with which keypad was touched to determine what to do next. This is very much v1 of a user interface - to set the alarm you hold down the * key for more than two seconds but you don't currently get any feedback on this until you release.


But all this is the joy of these side projects - once you have this base platform, you can incrementally improve the functionality - it only uses half the Arduino's flash and a third of the RAM, so there is plenty of room for having a snooze function, the date and alarms depending on the day of the week. Indeed, one of the reasons for doing this was because I want a 7.5 minute snooze so that after two snoozes, a quarter of an hour has passed rather than the 16 minutes I get at the moment.


And I need to laser cut a cool enclosure.

  • Sign in to reply

Top Comments

  • dubbie
    dubbie over 4 years ago +1
    Looks like a nice clock system. I like the keypad, it looks nice. I have never used a keypad on any of my projects so I might have to look ing=to something like this, just to expand my knowledge. I didn…
  • hugohu
    hugohu over 4 years ago in reply to dubbie +1
    Arduinos typically come with crystals, you probably already know, but it's to support an external clock(some chips such as 328P have a 1MHz internal, while arduino IDE wants 16 and the chip supports max…
  • hugohu
    hugohu over 4 years ago in reply to ajcc

    Oops, must have recalled for the wrong chip.

    • Cancel
    • Vote Up 0 Vote Down
    • Sign in to reply
    • More
    • Cancel
  • ajcc
    ajcc over 4 years ago in reply to hugohu

    hugohu  wrote:


    Arduinos typically come with crystals, you probably already know, but it's to support an external clock(some chips such as 328P have a 1MHz internal, while arduino IDE wants 16 and the chip supports max 20MHz)


    The internal RC oscillator is 8 MHz and the Atmega328P chip comes configured to run at 8 MHz.

    image

    image


    If you dig into the Atmega328P datasheet you'll find that there's a low-frequency crystal oscillator made for use with watch clock crystals. However using that as a timer reference does require the Atmega to run on the internal RC-oscillator, because it's using the same XTAL1 and XTAL2 pins. Although I guess that also makes it somewhat easier to modify one of the small Arduino boards? (But it still requires new loading capacitors). As far as I know you can't change the fuses without modifying the board-files, but I haven't used the Arduino IDE in a long time so it might be easier these days?

    • Cancel
    • Vote Up 0 Vote Down
    • Sign in to reply
    • More
    • Cancel
  • hugohu
    hugohu over 4 years ago in reply to dubbie

    Arduinos typically come with crystals, you probably already know, but it's to support an external clock(some chips such as 328P have a 1MHz internal, while arduino IDE wants 16 and the chip supports max 20MHz)

    • Cancel
    • Vote Up +1 Vote Down
    • Sign in to reply
    • More
    • Cancel
  • dubbie
    dubbie over 4 years ago

    Looks like a nice clock system. I like the keypad, it looks nice. I have never used a keypad on any of my projects so I might have to look ing=to something like this, just to expand my knowledge. I didn't know that some Arduino came with crystals either, although I do not have any Pro Minis so that might have something to do with it.


    Dubbie

    • Cancel
    • Vote Up +1 Vote Down
    • Sign in to reply
    • More
    • Cancel
element14 Community

element14 is the first online community specifically for engineers. Connect with your peers and get expert answers to your questions.

  • Members
  • Learn
  • Technologies
  • Challenges & Projects
  • Products
  • Store
  • About Us
  • Feedback & Support
  • FAQs
  • Terms of Use
  • Privacy Policy
  • Legal and Copyright Notices
  • Sitemap
  • Cookies

An Avnet Company © 2025 Premier Farnell Limited. All Rights Reserved.

Premier Farnell Ltd, registered in England and Wales (no 00876412), registered office: Farnell House, Forge Lane, Leeds LS12 2NE.

ICP 备案号 10220084.

Follow element14

  • X
  • Facebook
  • linkedin
  • YouTube