element14 Community
element14 Community
    Register Log In
  • Site
  • Search
  • Log In Register
  • Community Hub
    Community Hub
    • What's New on element14
    • Feedback and Support
    • Benefits of Membership
    • Personal Blogs
    • Members Area
    • Achievement Levels
  • Learn
    Learn
    • Ask an Expert
    • eBooks
    • element14 presents
    • Learning Center
    • Tech Spotlight
    • STEM Academy
    • Webinars, Training and Events
    • Learning Groups
  • Technologies
    Technologies
    • 3D Printing
    • FPGA
    • Industrial Automation
    • Internet of Things
    • Power & Energy
    • Sensors
    • Technology Groups
  • Challenges & Projects
    Challenges & Projects
    • Design Challenges
    • element14 presents Projects
    • Project14
    • Arduino Projects
    • Raspberry Pi Projects
    • Project Groups
  • Products
    Products
    • Arduino
    • Avnet Boards Community
    • Dev Tools
    • Manufacturers
    • Multicomp Pro
    • Product Groups
    • Raspberry Pi
    • RoadTests & Reviews
  • Store
    Store
    • Visit Your Store
    • Choose another store...
      • Europe
      •  Austria (German)
      •  Belgium (Dutch, French)
      •  Bulgaria (Bulgarian)
      •  Czech Republic (Czech)
      •  Denmark (Danish)
      •  Estonia (Estonian)
      •  Finland (Finnish)
      •  France (French)
      •  Germany (German)
      •  Hungary (Hungarian)
      •  Ireland
      •  Israel
      •  Italy (Italian)
      •  Latvia (Latvian)
      •  
      •  Lithuania (Lithuanian)
      •  Netherlands (Dutch)
      •  Norway (Norwegian)
      •  Poland (Polish)
      •  Portugal (Portuguese)
      •  Romania (Romanian)
      •  Russia (Russian)
      •  Slovakia (Slovak)
      •  Slovenia (Slovenian)
      •  Spain (Spanish)
      •  Sweden (Swedish)
      •  Switzerland(German, French)
      •  Turkey (Turkish)
      •  United Kingdom
      • Asia Pacific
      •  Australia
      •  China
      •  Hong Kong
      •  India
      •  Korea (Korean)
      •  Malaysia
      •  New Zealand
      •  Philippines
      •  Singapore
      •  Taiwan
      •  Thailand (Thai)
      • Americas
      •  Brazil (Portuguese)
      •  Canada
      •  Mexico (Spanish)
      •  United States
      Can't find the country/region you're looking for? Visit our export site or find a local distributor.
  • Translate
  • Profile
  • Settings
Mixing Electronics & Water
  • Challenges & Projects
  • Project14
  • Mixing Electronics & Water
  • More
  • Cancel
Mixing Electronics & Water
Blog Long Shower = Candle Power
  • Blog
  • Forum
  • Documents
  • Events
  • Polls
  • Files
  • Members
  • Mentions
  • Sub-Groups
  • Tags
  • More
  • Cancel
  • New
Join Mixing Electronics & Water to participate - click to join for free!
  • Share
  • More
  • Cancel
Group Actions
  • Group RSS
  • More
  • Cancel
Engagement
  • Author Author: Sean_Miller
  • Date Created: 20 Feb 2018 2:47 AM Date Created
  • Views 2031 views
  • Likes 17 likes
  • Comments 10 comments
  • arduino_projects
  • iotcloudch
  • conservation_projects
  • mixewaterch
  • project14
  • electronicwater
Related
Recommended

Long Shower = Candle Power

Sean_Miller
Sean_Miller
20 Feb 2018

For the Mixing Electronics & Water project, we made a shower timing device that uses the bathroom lights to signal the person when it's time to get out.  If they stay in too long, then the lights turn off and stay off.


This is a great project for those who want to learn how to use inexpensive parts with the power of IFTTT.com to trigger physical world tasks.


The following parts are required:

  • ESP8266 wifi microcontroller
  • about 4"x4" of perfboard
  • Waterproof Temperature Probe (DS18B20 chip) such as by Elenker.
  • 4.7K resistor to pull the probe chip data line high
  • two tactile switches (preferably one tactile switch and one three-way)
  • soldering iron, solder, and solid wire
  • 3.3V power source such as a LiON battery pack or wall wart
  • Software:  Arduino IDE with ESP8266
  • 3.3V FTDI Cable
  • A smart light switch or bulb such as a Wemo switch


Step 1:  Build a flash device (programmer) for the ESP8266

Our model of the ESP8266 did not have built in programming hardware.  To program it we need an FTDI cable.  Also, when you flash the program to the ESP8266, you have to pull GPIO0 to ground.  To aid in this, we designed a programming circuit using the software KiCAD.  You can view a step-by-step tutorial here:

You don't have permission to edit metadata of this video.
Edit media
x
image
Upload Preview
image


Here is the schematic for our ESP8266 programmer:

image

Step 2:  Build the ESP8266 Programmer Board

Having made the board in KiCAD, we could have sent it off to a fab shop such as OSHPARK.com.  However, we were eager to get the project going, so we did it by hand.

You can view the step-by-step build here:https://www.youtube.com/watch?v=PJ5f82W8uUs

You don't have permission to edit metadata of this video.
Edit media
x
image
Upload Preview
image


Step 3:  Set up IFTTT.com WebHooks

First, you have to set up an account on IFTTT.com.

Then click My Applet-->New Applet.

For the This, click on WebHook and follow the prompts.

For the That, choose your light switch and follow the prompts.

After you get it set up, click on My Applets-->Webhooks and then Documentation to see the "hooks" you will need in the code in Step 4.

See the video at the end of this post for a step-by-step IFTTT.com setup guide.


Step 4:  Writing the Code in the Arduino IDE

To get the Arduino IDE to talk to the ESP8266, we added a reference to the board manager for the ESP8266 boards.  We show how to do this in the video at the end of this post.


Once we had the board recognized in the Arduino IDE, we imported the OneWire and Dallas temperature libraries.  These allow us to read the temperature probe.


We opened the Dallas temperature example "Simple" and the ESP8266 example "HTTPSRequest" and then morphed them into the code we needed.


The end result of the code is here:

// Include the libraries we need
#include "OneWire.h"
#include "DallasTemperature.h"
#include "ESP8266WiFi.h"
#include "WiFiClientSecure.h"

// Data wire is plugged into GPIO2 of the ESP8266
#define ONE_WIRE_BUS 2
const char* ssid = "........";//your home wifi router SSID
const char* password = "........"; //your home wifi router password
const char* host = "maker.ifttt.com";//we'll use IFTTT.com to trigger our Wemo Light Switch
const int httpsPort = 443;//this is the SSL default port
// Use web browser to view and copy
// SHA1 fingerprint of the certificate
const char* fingerprint = "CF 05 98 89 CA FF 8E D8 5E 5C E0 C2 E4 F7 E6 C3 C7 50 DD 5C";
// Setup a oneWire instance to communicate with any OneWire devices (not just Maxim/Dallas temperature ICs)
OneWire oneWire(ONE_WIRE_BUS);
// Pass our oneWire reference to Dallas Temperature. 
DallasTemperature sensors(&oneWire);
float myTemp=0; unsigned long timer; unsigned long timeout;
//used to monitor the temperature of the hot water plumbing.  Right now, 2 seconds for testing.  
unsigned long duration=2000;//value is in milliseconds, so this means 2 seconds
bool showering=false;// used to keep track of assumed shower is happening.
/*
 * The setup function. We only start the sensors here
 */
void setup(void)
{
    // Start up the Dallas temperature library
  sensors.begin();
}
/*
 * Main function, get and show the temperature
 */
void loop(void)
{   
  sensors.requestTemperatures(); // Send the command to get temperatures.  You can have many temperature probes on "one wire".
 
  myTemp=sensors.getTempCByIndex(0)*1.8+32; //convert to degrees F  
  if (myTemp>80&!showering) {//first time detecting someone is showering due to the temp going up.  Temperature of pipe went above 80F
    showering=true;timer=millis()+duration; timeout=millis()+10000;//snap shot when this happened.  Set a timeout to turn the light completely off.  Keeping it low for testing for now.
  }
  if (showering&&(millis()>timer)){//blink the light if beyond the duration
    ToggleLight();
    duration=duration/4;//blink the light again in 1/4th the duration of the previous wait time.
    timer=millis()+duration;//reset the timer
  }
  
  delay(1000);//just rest 1 second between polls for temperature
}
void ToggleLight()
{
  WiFi.mode(WIFI_STA);
  WiFi.begin(ssid, password);
  while (WiFi.status() != WL_CONNECTED) {
    delay(500);
  }
  // Use WiFiClientSecure class to create TLS connection
  WiFiClientSecure client;
  if (!client.connect(host, httpsPort)) {
    return;
  }
  //don't know if I actually needed this code from the example, so I kept the call anyway.
  if (client.verify(fingerprint, host)) {
  } else {
  }
  
  //this just blinks the light
  String url = "/trigger/YourBlinkerEvent/with/key/YourWebHook";//change this to the IFTTT URL that toggles the lightswitch.  
  
  //if in too long, then turn the light out for good.
  if (showering&&((millis()>timeout))) {
    url = "/trigger/YourKillTheLightEvent/with/key/YourWebHook";//change this to the IFTTT URL that turns off the lightswitch
  }
  
  client.print(String("GET ") + url + " HTTP/1.1\r\n" +
               "Host: " + host + "\r\n" +
               "User-Agent: BuildFailureDetectorESP8266\r\n" +
               "Connection: close\r\n\r\n");
  //     Send the hit to IFTTT.com at the above URL     
  while (client.connected()) {
    String line = client.readStringUntil('\n');
    if (line == "\r") {
      break;
    }
  }
  String line = client.readStringUntil('\n');
}

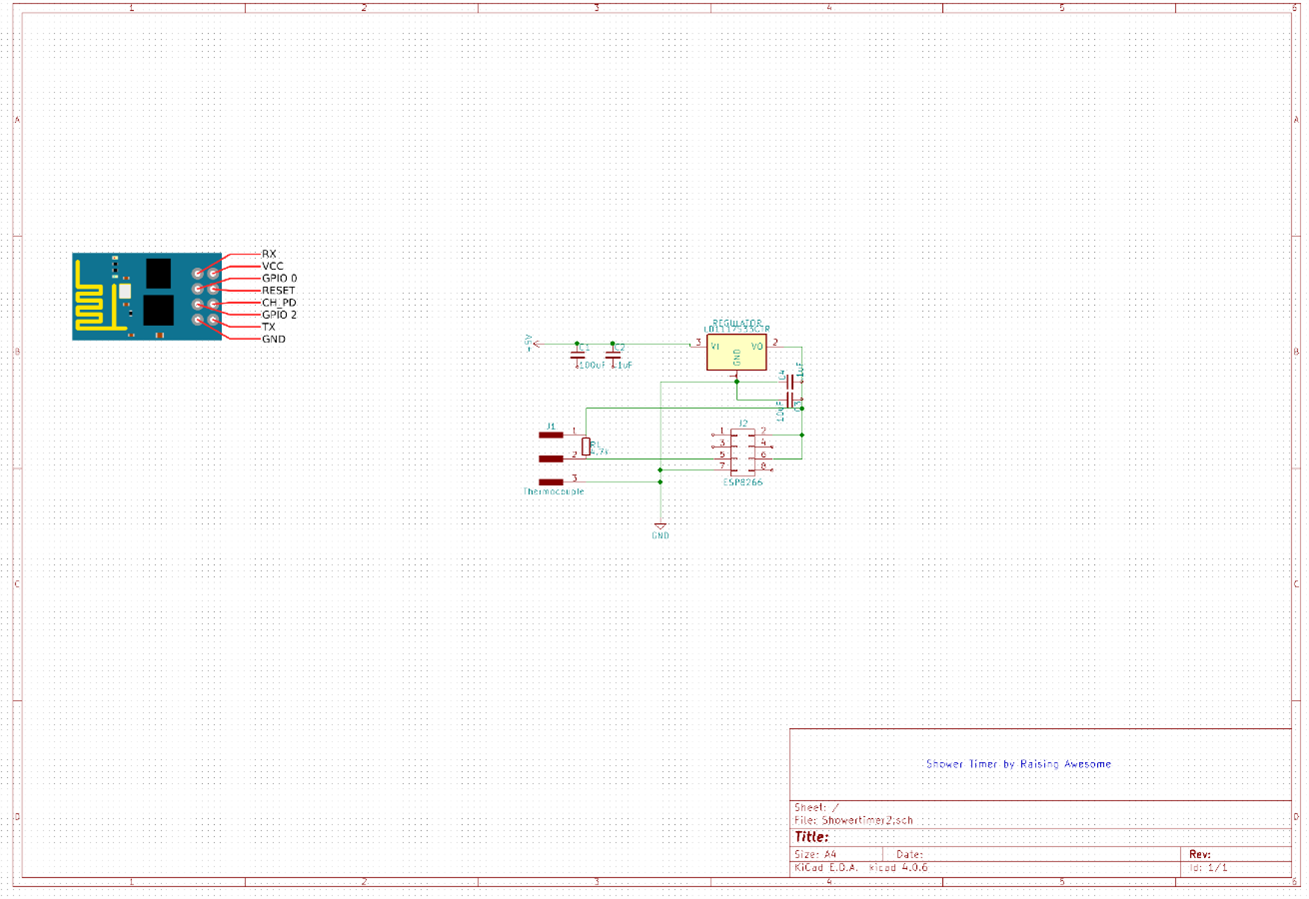
Step 5:  We then needed a circuit board to mount the ESP8266, the power connection, and the temperature probe.  This was done just like the programmer board in step 2.  Here is our resulting schematic that would be compatible to a 9V or 5V wall wart.

image

Step 6:  We installed it on our hot water line going to the shower of the most demanding user - Walnut.


This was a very fun project that has opened up infinite new projects for DIY IoT devices.  We thank Element14 for the opportunity!


Here is the video of our build in "Raising Awesome" style:

You don't have permission to edit metadata of this video.
Edit media
x
image
Upload Preview
image

  • Sign in to reply

Top Comments

  • ntewinkel
    ntewinkel over 7 years ago +5
    Very cool to see you are using an ESP-01 too! I just dug mine out too and also noticed that Raymond urkraft is using one in his project Those are really neat little gadgets, especially considering their…
  • Sean_Miller
    Sean_Miller over 7 years ago in reply to dougw +4
    We originally programmed the ESP8266 in Lua with NodeMDC. This is known to have a very small code footprint. I don't know what the footprint is when flashing with the Arduino IDE, but I can say it is waaaaaayyyyy…
  • dougw
    dougw over 7 years ago +3
    Great project - awesome video. As ntewinkel indicates , this is also inspiring me to get into ESP...
  • mcb1
    mcb1 over 7 years ago in reply to Sean_Miller

    They are great probes, I tend to use them for all my temperature measurements.


    I liked the video ... quick, humorous, informative and with the links so you didn't have to struggle to see the code.


    We have 'On Demand' gas hot water and I have been known to turn it off when our teenager took far too long.


    Mark

    • Cancel
    • Vote Up +1 Vote Down
    • Sign in to reply
    • More
    • Cancel
  • Sean_Miller
    Sean_Miller over 7 years ago in reply to genebren

    Believe me, having a 13 year old, I know what you mean.


    Did anyone catch the Flashdance/Chris Farley reference?

    • Cancel
    • Vote Up 0 Vote Down
    • Sign in to reply
    • More
    • Cancel
  • genebren
    genebren over 7 years ago in reply to mcb1

    I did not miss it, I was just having some fun by being shocked by the short time image

    Gene

    • Cancel
    • Vote Up 0 Vote Down
    • Sign in to reply
    • More
    • Cancel
  • Sean_Miller
    Sean_Miller over 7 years ago in reply to mcb1

    Yes...we definitely set those timers low for testing.  I would have filled a swimming pool otherwise debugging my code :-)


    Actually, to test it while developing the code, we simply filled a cup with hot water and dipped the temperature probe in it.  The probe is water proof.  Initially, we had a bunch of debug.print's to see the values as well, but we deleted them out before posting.


    See ya',


    Sean

    • Cancel
    • Vote Up +3 Vote Down
    • Sign in to reply
    • More
    • Cancel
  • mcb1
    mcb1 over 7 years ago

    Very useful device that can have other uses.


    I note that some responders missed the " Keeping it low for testing for now "


    Cheers

    Mark

    • Cancel
    • Vote Up +3 Vote Down
    • Sign in to reply
    • More
    • Cancel
>
element14 Community

element14 is the first online community specifically for engineers. Connect with your peers and get expert answers to your questions.

  • Members
  • Learn
  • Technologies
  • Challenges & Projects
  • Products
  • Store
  • About Us
  • Feedback & Support
  • FAQs
  • Terms of Use
  • Privacy Policy
  • Legal and Copyright Notices
  • Sitemap
  • Cookies

An Avnet Company © 2025 Premier Farnell Limited. All Rights Reserved.

Premier Farnell Ltd, registered in England and Wales (no 00876412), registered office: Farnell House, Forge Lane, Leeds LS12 2NE.

ICP 备案号 10220084.

Follow element14

  • X
  • Facebook
  • linkedin
  • YouTube