element14 Community
element14 Community
    Register Log In
  • Site
  • Search
  • Log In Register
  • Community Hub
    Community Hub
    • What's New on element14
    • Feedback and Support
    • Benefits of Membership
    • Personal Blogs
    • Members Area
    • Achievement Levels
  • Learn
    Learn
    • Ask an Expert
    • eBooks
    • element14 presents
    • Learning Center
    • Tech Spotlight
    • STEM Academy
    • Webinars, Training and Events
    • Learning Groups
  • Technologies
    Technologies
    • 3D Printing
    • FPGA
    • Industrial Automation
    • Internet of Things
    • Power & Energy
    • Sensors
    • Technology Groups
  • Challenges & Projects
    Challenges & Projects
    • Design Challenges
    • element14 presents Projects
    • Project14
    • Arduino Projects
    • Raspberry Pi Projects
    • Project Groups
  • Products
    Products
    • Arduino
    • Avnet & Tria Boards Community
    • Dev Tools
    • Manufacturers
    • Multicomp Pro
    • Product Groups
    • Raspberry Pi
    • RoadTests & Reviews
  • About Us
    About the element14 Community
  • Store
    Store
    • Visit Your Store
    • Choose another store...
      • Europe
      •  Austria (German)
      •  Belgium (Dutch, French)
      •  Bulgaria (Bulgarian)
      •  Czech Republic (Czech)
      •  Denmark (Danish)
      •  Estonia (Estonian)
      •  Finland (Finnish)
      •  France (French)
      •  Germany (German)
      •  Hungary (Hungarian)
      •  Ireland
      •  Israel
      •  Italy (Italian)
      •  Latvia (Latvian)
      •  
      •  Lithuania (Lithuanian)
      •  Netherlands (Dutch)
      •  Norway (Norwegian)
      •  Poland (Polish)
      •  Portugal (Portuguese)
      •  Romania (Romanian)
      •  Russia (Russian)
      •  Slovakia (Slovak)
      •  Slovenia (Slovenian)
      •  Spain (Spanish)
      •  Sweden (Swedish)
      •  Switzerland(German, French)
      •  Turkey (Turkish)
      •  United Kingdom
      • Asia Pacific
      •  Australia
      •  China
      •  Hong Kong
      •  India
      •  Japan
      •  Korea (Korean)
      •  Malaysia
      •  New Zealand
      •  Philippines
      •  Singapore
      •  Taiwan
      •  Thailand (Thai)
      •  Vietnam
      • Americas
      •  Brazil (Portuguese)
      •  Canada
      •  Mexico (Spanish)
      •  United States
      Can't find the country/region you're looking for? Visit our export site or find a local distributor.
  • Translate
  • Profile
  • Settings
Mixing Electronics & Water
  • Challenges & Projects
  • Project14
  • Mixing Electronics & Water
  • More
  • Cancel
Mixing Electronics & Water
Blog (Semi)Automated Plant Irrigation System
  • Blog
  • Forum
  • Documents
  • Events
  • Polls
  • Files
  • Members
  • Mentions
  • Sub-Groups
  • Tags
  • More
  • Cancel
  • New
Join Mixing Electronics & Water to participate - click to join for free!
  • Share
  • More
  • Cancel
Group Actions
  • Group RSS
  • More
  • Cancel
Engagement
  • Author Author: urkraft
  • Date Created: 1 Feb 2018 9:50 PM Date Created
  • Views 8784 views
  • Likes 17 likes
  • Comments 81 comments
  • ardintermediate
  • arduino_projects
  • conservation_projects
  • mixewaterch
  • openarduinoch
Related
Recommended

(Semi)Automated Plant Irrigation System

urkraft
urkraft
1 Feb 2018

Semi-automated Plant Irrigation System

Summary

This is an automated system for watering my olive tree.


The main components are:

  • A soil moisture sensor
  • A 10 gallon bucket of water with a water level sensor
  • An Adafruit Feather HUZZAH ESP8266 microcontroller (hereafter referred to as “feather”)
  • A peristaltic water pump


The two sensors are connected to inputs of the feather, and the water pump is controlled by an output signal from the feather. There are two built in LED’s on the feather:

  • Red: used to indicate that the soil is dry enough to warrant watering
  • Blue: Used to indicate that the bucket is empty (requires a refill of water)


There are three criteria which all have to be met in order to turn on the pump (and water the plant):

  1. There must be water in the bucket
  2. The lack of moisture in the soil must be greater than a specified threshold value
  3. A specified minimum amount of time must have elapsed since the pump was last turned off while watering.


Any one of the following criteria will cause the pump to be turned off:

  • No water left in the bucket
  • The moisture level of the soil is higher than a specified threshold value (this criteria also triggers starting of the timer which keeps track of the amount of time that has elapsed since the pump was turned off).


Basically, the feather just goes in a loop checking the criteria above and taking the necessary action. Each loop iteration takes approximately 20-30 seconds to complete.


A feature that I would also like to implement is to have the system send me a message whenever it detects that the water bucket is empty (and possibly send a new reminder each day for a week before giving up). Unfortunately I have not found any official libraries with SMTP capabilities that I can use to accomplish this, so I do not know when or if I will be able to accomplish this goal.


I have tested the system quite a bit while implementing it (during the last 2 days) and feel confident that I have found and fixed all of the problems I have encountered along the way, but experience has taught me that the test of time is a very important test – and that test has only just begun.


Parts used

  • 1 Adafruit Feather HUZZAH ESP8266 (https://learn.adafruit.com/adafruit-feather-huzzah-esp8266/overview)
  • 1 5v 2.1A DC power supply w/micro usb contact (for the HUZZAH)
  • 1 12v 1A DC power supply (https://www.kjell.com/no/produkter/elektro-og-verktoy/stromforsyning/stromforsyning/ac-dc/fast-utgangsspenning/ac-dc-stromadapter-12-v-(dc)-12-w-p44382)
  • 1 power jack for the 12v power supply
  • 1 soil moisture sensor (https://www.kjell.com/no/produkter/elektro-og-verktoy/arduino/moduler/luxorparts-jordfuktmaler-p87941)
  • 1 water level switch NC (https://www.kjell.com/no/produkter/elektro-og-verktoy/elektronikk/electromechanics/strombrytere/nivabrytere/nivastrombryter-nc-p36037)
  • 1 22k ohm 1/8w resistor
  • 2 10k 1/8w resistor
  • 1 33 ohm 1/4w resistor
  • 2 1N4001 diodes
  • 1 Peristaltic Pump (https://www.kjell.com/no/produkter/elektro-og-verktoy/elektronikk/electromechanics/motorer/luxorparts-vaeskepumpe-peristaltisk-p90782)
  • 1 VR05R241A single pole DIL relay (https://www.kjell.com/no/produkter/elektro-og-verktoy/elektronikk/electromechanics/releer/1-polet-dil-rele-5-v-dc-0-5-a-30-v-p36110)
  • 1 Breadboard
  • Assorted jumper wires
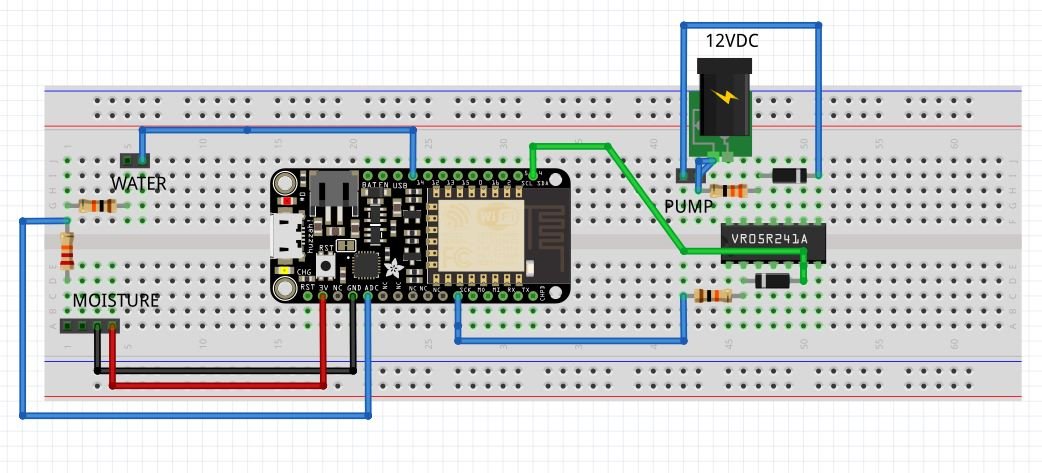
 

Schematic Drawing

image

Breadboard

image

Code

#include 

//==========
// CONSTANTS
//==========

// wifi
const char* MY_SSID     = "";
const char* PASSWORD = "";

// I/O
const int LED = 0;  // (Output) indicates pump status (pump ON => LOW signal => lit)
const int PUMP = 4; // (Output) turns water pump on (set LOW) and off (set HIGH)
const int WATER_EMPTY_LED = 2;  // (Output) indicates water reservoir status 
                                // (empty => LOW signal => lit)
const int WATER_LEVEL = 14;  // (Input) to detect water in reservoir (water => HIGH)

// A0 : ADC (Analog Input) used to read soil humidity: high value => dry, low value => wet 
// Max value is approx. 825 - bone dry
// Min value is approx. 470 - drowning in water
const int PUMP_ON_THRESHOLD = 700;  // ADC input value >= this value => Turn on water pump
const int PUMP_OFF_THRESHOLD = 650; // ADC input value <= this value => Turn off water pump
                                    // (and do not turn on again for at least a day)
const long MINIMUM_TIME = 1000 * 60 * 60 * 24; // minimum time between watering (1 day)

//==========
// VARIABLES
//==========

// timing
unsigned long previousMillis = 0;
unsigned long currentMillis = 0;

// soil moisture reading
int moisture = 800; // previous 
int tmpMoisture = 0;  //  new (temporary)

//======
// SETUP
//======

void setup() {
  // initialize Serial
  Serial.begin(115200);
  delay(100);

  Serial.println();
  Serial.println();
  Serial.print("Connecting to ");
  Serial.println(MY_SSID);

  // initialize info
  WiFi.begin(MY_SSID, PASSWORD);
  WiFi.config(IPAddress(192, 168, 33, 95), IPAddress(192, 168, 33, 1), IPAddress(192, 168, 33, 1));
  
  while (WiFi.status() != WL_CONNECTED) {
    delay(500);
    Serial.print(".");
  }

  Serial.println("");
  Serial.println("WiFi connected");  
  Serial.println("IP address: ");
  Serial.println(WiFi.localIP());

  Serial.println();
  Serial.println();

  Serial.println("Soil moisture sensor");

  // initialize IO
  pinMode(WATER_LEVEL, INPUT);
  pinMode(PUMP, OUTPUT);
  digitalWrite(PUMP, HIGH);
  pinMode(LED, OUTPUT);
  digitalWrite(LED, HIGH);
  pinMode(WATER_EMPTY_LED, OUTPUT);
  digitalWrite(WATER_EMPTY_LED, HIGH);
  delay(2000); // give soil moisture sensor a chance to stabilize
}

void loop() {
  
  // check water reservoir
  while (digitalRead(WATER_LEVEL) == LOW) {  // water reservoir is empty 
    digitalWrite(WATER_EMPTY_LED, LOW);  // turn on the WATER_EMPTY_LED
    digitalWrite(PUMP, HIGH);  // make sure the water pump is turned off
    Serial.println("No water in reservoir => fill it up!");
    soil_moisture(false); // get soil moisture reading and update the soil moisture indicator LED
    // future code to send message at appropriate intervals goes here ...
    delay(10000); // allow moisture sensor to stabilize before next reading
  }
  digitalWrite(WATER_EMPTY_LED, HIGH); // The reservoir has water => turn off the WATER_EMPTY_LED
  soil_moisture(true);  // get the soil moisture reading and do appropriate actions
  delay(10000); // make sure that the moisture sensor gets time to stabilize before next reading
}


void soil_moisture(bool waterAvailable) {
  tmpMoisture = analogRead(A0); // take a soil moisture reading
  if (tmpMoisture != moisture) {  
    // only do the following if the moisture level has changed
    moisture = tmpMoisture;
    // print the moisture data to the serial interface ...
    Serial.print("moisture = ");
    Serial.println(moisture);
    if (moisture >= PUMP_ON_THRESHOLD) { // soil is dry enough for watering ...
      digitalWrite(LED, LOW); // turn on the indicator LED ...
      Serial.print("Dry threshold reached - ");
      if (waterAvailable) { // water is in the reservoir => OK to continue ...
        Serial.print("and water is available - ");
        currentMillis = millis();
        if ((previousMillis == 0) or (currentMillis - previousMillis >= MINIMUM_TIME)) {
          // the appropriate amount of time has transpired since the last watering => OK to water
          digitalWrite(PUMP, LOW);  // turn on pump
          Serial.println("water the plant!");
        } else {
          // not enough time has transpired since last watering => need to wait before watering
          Serial.println("but wait a bit longer.");
        }
      } else {
        // water reservoir is empty ...
        Serial.println("but the water reservoir is empty - fill it up!");
      }
    } else if (moisture <= PUMP_OFF_THRESHOLD) {
        // soil is moist enough ...
        digitalWrite(LED, HIGH);  // turn off the indicator LED
        digitalWrite(PUMP, HIGH); // make sure the water pump is off
        // update previousMillis. Want to wait at least MINIMUM_TIME before next watering
        previousMillis = millis();
        Serial.println("The soil moisture level is high - turning off the water pump.");
    } else {
      // moisture level between thresholds - no action necessary
      Serial.println("The soil moisture level is adequate - no action is being taken.");
    }
  }
}


You don't have permission to edit metadata of this video.
Edit media
x
image
Upload Preview
image

  • Sign in to reply

Top Comments

  • urkraft
    urkraft over 8 years ago +7
    Status update: Here is a picture of the latest breadboard configuration (although i would be amazed if it would be helpful to anyone as it looks like a rats nest). It is now connected to all the sensors…
  • ntewinkel
    ntewinkel over 8 years ago in reply to urkraft +5
    Thanks Raymond! Hey I just found a case - it fits inside a TicTac container! -Nico
  • ntewinkel
    ntewinkel over 7 years ago in reply to urkraft +5
    What if you replaced the corroded prongs with copper (or copper plated) nails ($5 for a bag here at Home Depot)? Or you could probably use a few cutoff bits of copper house wiring (likely free even at…
  • urkraft
    urkraft over 8 years ago
    Status 17feb2018:


    rats nest view of the breadboard installation of the irrigation system at my olive plantimage

    Summary

    Experienced a few problems that i had to fix, so it has taken longer than i planned to complete all the items on my to do list from yesterday. However, i believe that everything is now working as well as can be expected considering that the 3.3v pin from the Uno does not deliver enough current for the load that it is supplying in this project. Anyone attempting to duplicate this project should be aware of this and the fact that you will probably have to make several attempts at restarting the ESP-01 before it actually manages to connect to the WiFi. As i mentioned a few days ago, it would be much cheaper and simpler to implement this project using a Raspberry Pi Zero W (which i hope to have the opportunity to attempt sometime in the near future).

    How it Works

    This is described in the comments at the beginning of the Uno sketch. Supplementary information concerning the ESP-01 is documented in the comments at the beginning of the ESP-01 sketch.

    Schematic Diagram


    Schematic drawing of Arduiino Uno based irrigation systemimage

    (theoretical) Breadboard Layout

    image

    ESP-01 Sketch


    /********************************************************************************************************
     * Program for ESP-01 used in semi-automated irrigation system
     * ===========================================================
     * 
     * Summary:
     * --------
     * 
     *  This sketch is used to sends emails by running appropriate PHP scripts (the URL parameter used) 
     *  triggered via HTTP GET requests to a HOST.
     *  
     *  One script is triggered by the setup() function after 
     *  the ESP-01 establishes a WiFi connection to MY_SSID. That e-mail informs the recipient that it has
     *  successfully established the WiFi connection and that the default threshold values are being used 
     *  by the Arduino Uno to control the water pump.
     *  
     *  The other script is triggered by a LOW signal on the GPIO0 pin (which is configured as an input).
     *  The e-mail that this script sends informs the recipient that the water reservoir is empty. After
     *  triggering the script the sketch waits for PAUSE_AFTER_RESERVOIS_EMPTY_EMAIL_SENT before continuing.
     *  
     *  The sketch uses the onboard blue LED (GPIO2) to indicate status during the WiFi connection process.
     *  It flashes the LED until a connection is made. If no connection is made after MAX_CONNECT_ATTEMPTS
     *  it turns the LED on for 10 seconds before exiting the script.
     */
    
    
    #include 
    
    
    const char* MY_SSID = "********"; // replace with the SSID you would like to connect to
    const char* PASSWORD = "********"; // replace with the SSID password
    
    
    IPAddress staticIP(192, 168, 1, 46); // replace with static IP address to use for ESP-01 device
    IPAddress gateway(192, 168, 1, 1); // replace with gateway IP address for the SSID
    IPAddress subnet(255, 255, 255, 0);
    
    
    const int MAX_CONNECT_ATTEMPTS = 5; // maximum attempts to make to connect the ESP-01 to the wifi PA
    const int MAX_WAIT_FOR_CONNECT_CYCLES = 40; // 2 cycles = approx. 1 sec
    const unsigned long PAUSE_AFTER_RESERVOIS_EMPTY_EMAIL_SENT = 1000UL * 60UL * 60UL * 24UL; // one day
    
    
    const String HOST = "192.168.1.45";  // replace with your server IP address
    const int HTTP_PORT = 80;
    const String FILL_RESERVOIR_URL = "/fillReservoir.php";  // script that sends me email warning that water reservoir is empty
    const String CONNECT_SUCCESS_URL = "/connectSuccess.php"; // script that sends me email informing of successful wifi connect
    
    
    const int RESERVOIR = 0;  // IO pin to use as input for signalling that the the water reservori is empty (LOW => empty)
    const int BLUE_LED = 2;   // IO pin to use for blinking the blue onboard LED to signal status (HIGH => off)
    
    
    int reservoirLevel = HIGH;  // used to store water reservoir status (LOW => empty)
    int ledStatus = HIGH; // used to store onboard blue LED status (HIGH => off)
    bool wifiIsConnected = false; // used to store wifi connection status (false => not connected)
    
    
    void setup() {
      delay(10000);   // long delay here to make sure signals have stabilized before continuing
      Serial.begin(115200);  
      Serial.println();
      delay(100);  
    
    
      pinMode(BLUE_LED, OUTPUT);
      digitalWrite(BLUE_LED, ledStatus);
      
      WiFi.mode(WIFI_STA);  // configure ESP-01 to operate as a wifi station
      wifiConnect();
      for (int i = MAX_CONNECT_ATTEMPTS; i > 0; i--) {
        if (wifiIsConnected = wifiConnect()) {  // connected! => no need to continue trying to connect
          break;
        }
      }
      if (!wifiIsConnected) {
        digitalWrite(BLUE_LED, LOW);
        delay(10000);
        exit(1);
      }
      
      delay(100);  
      sendMessage(CONNECT_SUCCESS_URL);
      delay(500);  
      pinMode(RESERVOIR, INPUT);
      delay(100);
    }  
      
    void loop() {
      if (LOW == (reservoirLevel = digitalRead(RESERVOIR))) {
        sendMessage(FILL_RESERVOIR_URL);
        delay(PAUSE_AFTER_RESERVOIS_EMPTY_EMAIL_SENT);
      } else {
        delay(5000);
      }
    }
    
    
    void sendMessage(String URL) {
      WiFiClient client;  
        
      if (!client.connect(HOST, HTTP_PORT)) {  
        //Serial.println("connection failed");  
        return;  
      }  
        
      client.print(String("GET ") + URL + " HTTP/1.1\r\n" +  
                   "Host: " + HOST + "\r\n" +   
                   "Connection: close\r\n\r\n");  
      delay(500);  
    }
    
    
    bool wifiConnect() {
      bool wifiConnected = false;
    
    
      WiFi.begin(MY_SSID, PASSWORD, 13, ap_mac, true);
      WiFi.config(staticIP, gateway, subnet);
      for (int i = MAX_WAIT_FOR_CONNECT_CYCLES; i > 0 ; i--) { // wait for 20 seconds to be connected
        Serial.print("Connection status: ");
        Serial.println(WiFi.status());
        if (wifiConnected = (WiFi.status() == 3)) {  //WL_CONNECTED)) {
          wifiConnected = true;
          break;
        }
        delay(500);
        if (ledStatus == HIGH) {
          ledStatus = LOW;
        } else {
          ledStatus = HIGH; 
        }
        digitalWrite(BLUE_LED, ledStatus);
      }
      ledStatus = HIGH;
      digitalWrite(BLUE_LED, ledStatus);
      WiFi.printDiag(Serial);
      return wifiConnected;
    }

    Arduino Uno Sketch


    /**********************************************************************************************
    * Program for semi-automated irrigation using Arduino Uno
    * =======================================================
    * 
    * Summary:
    * --------
    * 
    * The main components of the system are:
    * 
    * - An Arduino Uno (hereafter referred to as “Uno”) which controls everything
    * - A 9V DC 1A power adapter for the Uno
    * - An ESP-01 WiFi module which is used to facilitate messaging
    * - A FC-28 soil hygrometer (moisture sensor) for detecting humidity in soil
    * - A water level switch NC mounted on a float for detecting when the water reservoir is empty
    * - A Keyes KY-040 rotary encoder is used to adjust threshold values used by the sketch
    * - A 0.96" 128 x 64 pixel OLED graphical display used to display status information
    * - A peristaltic water pump to pump water from the water reservoir to the soil
    * - A 12V DC 1A power adapter for the water pump
    * - A 10 gallon bucket of water (water reservoir)
    * - A potted plant to water
    * 
    * Operation:
    * 
    * The two sensors (soil hygrometer and water level switch) are connected to inputs of the Uno 
    * (A0 and D11 respectively) and the water pump is controlled by an output signal (D10) from 
    * the Uno. Two LED’s are controlled by output signals from the Uno and are used as status 
    * indicators:
    * 
    * - Red  : (D13) Lit to indicate that the soil is dry enough to warrant watering
    * - Blue : (D12) Lit to indicate that the water reservoir is empty (requires a refill of water)
    * 
    * A 0.96" 128 x 64 piksel OLED graphical display is also used to display status information
    * and to adjust threshold levels for turning the water pump on and off. It uses the Uno's I2C 
    * interface (A5(SCL) and A4(SDA)).
    * 
    * A Keyes KY-040 rotary encoder is used together with the OLED display to adjust the threshold 
    * values used by the script. It uses the D2 through D5 pins as input. The system goes into 
    * adjustment modus when the knob is depressed. The user can then scroll through the items which
    * can be adjusted. The item to calibrate is choosen by depressing the switch once more when it 
    * displayed. This causes the system to display the current value being used for that item. The
    * user can then increase the value by turning the knob clockwise (whereupon the displayed value 
    * increases) or counter clockwise (whereupon the displayed value decreases). To choose the 
    * displayed value the user must depress the knob - whereupon the system also exits adjustment 
    * mode and commenses to use the new values.
    * 
    * There are three criteria which all have to be met in order to turn on the pump (and water 
    * the plant):
    * 
    * 1)  There must be water in the reservoir
    * 2)  The soil moisture reading in the soil must be greater than a specified high threshold 
    *     value (indicating the soil is too dry)
    * 3)  A specified minimum amount of time must have elapsed since the pump was last turned off 
    *     while watering (but not if this was due to entering adjustment modus).
    *     
    * Any one of the following criteria will cause the pump to be turned off:
    * 
    * - No water left in the water reservoir
    * - The moisture reading of the soil is lower than a specified low threshold value 
    *   (indicating the soil has been irrigated sufficiently. This criteria also triggers the 
    *   timer which keeps track of the amount of time that has elapsed since the pump was turned 
    *   off).
    * - the pump has been on continually for at least MAX_PUMP_ON_TIME milliseconds.
    * - (only temporarily) entering adjustment modus
    *   
    * Basically, the Uno just goes in a loop checking the criteria above and taking action 
    * when necessary. Each loop iteration takes approximately 20-30 seconds to complete. If,
    * however the knob of the rotary encoder is depressed and this is detected, the function
    * for adjustment modus is called and normal operation is not resumed until after returning
    * from the function. Before the adjustment function is called the water pump and on time 
    * timer are both stopped if the pump is on. Both are then resumed upon returning from the
    * adjustment function.
    * 
    * Notes:
    * 
    * GPIO ESP_WATER_EMPTY is used to signal to the ESP-01 that the water reservoir is empty 
    * (via the GP0 pin of the ESP-01). The ESP-01 is configured to use its GPIO0 as an input. A LOW 
    * signal on this pin will trigger the sendMessage(FILL_RESERVOIR_URL) function on the ESP-01. 
    * This function invokes a PHP script on my Raspberry Pi server via a HTTP GET request. The
    * paramater it uses indicates which script to invoke. This one (FILL_RESERVOIR_URL) results
    * in an e-mail being sent to me informing me that the water reservoir is empty. The ESP-01
    * also calls this function with CONNECT_SUCCESS_URL as the parameter from its setup() function. 
    * The resulting e-mail informs me that the the ESP-01 has successfully connected to the WiFi 
    * and it also reminds me that any custom thresholds need to be re-entered (since this e-mail
    * will only be sent whenever the ESP-01 restarts => the Uno has also been restarted.
    * 
    * Future features to impliment:
    * 
    * - replace Uno with custom design (with ability to reprogram by attaching adequate
    *   IO interface)
    */
    #include 
    #include 
    #include <adafruit_gfx.h>
    #include <adafruit_ssd1306.h>
    
    
    #define OLED_RESET 4
    Adafruit_SSD1306 display(OLED_RESET);
    
    
    #define NUMFLAKES 10
    #define XPOS 0
    #define YPOS 1
    #define DELTAY 2


    #define LOGO16_GLCD_HEIGHT 16 
    #define LOGO16_GLCD_WIDTH  16 
    #if (SSD1306_LCDHEIGHT != 32)
    #error("Height incorrect, please fix Adafruit_SSD1306.h!");
    #endif
    
    
    //==============
    // encoder stuff
    //==============
    #define ENCODER_CLK 2
    #define ENCODER_DT 3
    #define ENCODER_SW 4
     
    int encoderCounter = 0; 
    int encoderClkState;
    int encoderClkLastState;  
    int encoderSwLastState;
    int encoderSwState;
    int encoderPosition = 0;
    
    
    // I/O
    const int DRY_LED = 13;  // (Output) used to indicate what pump status should be ON (set HIGH) when the pump should be on
    const int PUMP = 10; // (Output) used to turn the pump on (set HIGH) and off (set LOW)
    const int WATER_EMPTY_LED = 12;  // (Output) used to indicate if the reservoir is empty (set HIGH => ON)
    const int WATER_LEVEL = 11;  // (Input) used to detect if there is water in the reservoir (HIGH) or if it is empty (LOW)
    const int ESP_WATER_EMPTY = 9;  // (Output) used to signal the ESP-01 that the water reservoir is empty (set LOW => empty)
    
    
    // A0 : ADC (Analog Input) used to read soil humidity: high value => dry, low value => wet 
    // Max value is approx. 1018 - bone dry
    // Min value is approx. 530 - drowning in water
    const unsigned long MINIMUM_TIME = 1000UL * 60UL * 60UL * 24UL; // minimum time that must transpire between irrigation (1 day)
    //const unsigned long MINIMUM_TIME = 60UL * 1000UL; // minimum time that must transpire between irrigation (only for testing)
    const unsigned long MAX_PUMP_ON_TIME = 1000UL * 60UL * 15UL; // maximum time pump can be turned on for (15 minutes)
    //const unsigned long MAX_PUMP_ON_TIME = 60UL * 1000UL; // maximum time pump can be turned on for (only for testing)
    
    
    //==========
    // VARIABLES
    //==========
    
    
    // timing
    unsigned long lastIrrMillis = 0UL;
    unsigned long currentMillis = 0UL;
    unsigned long pumpOnMillis = 0UL;
    
    
    // soil moisture reading
    int pumpOnThresh = 200;  // Turn on the pump when ADC input value >= this value
    int pumpOffThresh = 190; // Turn off the pump when ADC input value <= this value (and do not trun on again for at least a day)
    bool pumpIsOn = false;
    int moisture = 800; // previous
    int waterLevel;
    
    
    //int tmpMoisture = 0;  //  new (temporary)
    
    
    int displayLine = 0;
    const int DISPLAY_LINE_INCREASE = 8;
    const int DISPLAY_LINE_MAX = 32;
    
    
    //======
    // SETUP
    //======
    
    
    void setup() {
      // initialize Serial
      Serial.begin(9600);
      delay(100);
    
    
      Serial.println("Soil moisture sensor");
    
    
      // initialize IO
      pinMode(WATER_LEVEL, INPUT_PULLUP);
      
      pinMode(PUMP, OUTPUT);
      digitalWrite(PUMP, LOW);
      pumpIsOn = false;
      
      pinMode(DRY_LED, OUTPUT);
      digitalWrite(DRY_LED, LOW);
      
      pinMode(WATER_EMPTY_LED, OUTPUT);
      digitalWrite(WATER_EMPTY_LED, LOW);
    
    
      pinMode(ENCODER_CLK, INPUT);
      pinMode(ENCODER_DT, INPUT);
      pinMode(ENCODER_SW, INPUT);
      
      // by default, we'll generate the high voltage from the 3.3v line internally! (neat!)
      display.begin(SSD1306_SWITCHCAPVCC, 0x3C);  // initialize with the I2C addr 0x3C (for the 128x32)
      // init done
      
      display.setTextSize(1);
      display.setTextColor(WHITE);
    
    
      pinMode(ESP_WATER_EMPTY, OUTPUT);
      digitalWrite(ESP_WATER_EMPTY, HIGH);
    }
    
    
    void loop() {
      // rotary encoder stuff
      encoderSwState = digitalRead(ENCODER_SW);
      if ((encoderSwLastState == encoderSwState) and (encoderSwState == false)) {
        unsigned long deltaTime;
        if (pumpIsOn) {
          deltaTime = millis() - pumpOnMillis;
          digitalWrite(PUMP, LOW);
        }
        chooseMenu();
        if (pumpIsOn) {
          pumpOnMillis = millis() - deltaTime;
          digitalWrite(PUMP, HIGH);
        }
        delay(1000);
      }
    
    
      //irrigation stuff
      waterLevel = readInput(WATER_LEVEL);  // read water level
      if (waterLevel == LOW) {  // water reservoir is empty
        digitalWrite(PUMP, LOW); // turn off pump
        pumpIsOn = false;
        digitalWrite(WATER_EMPTY_LED, HIGH); // turn on LED indicator
        digitalWrite(ESP_WATER_EMPTY, LOW);  // signal ESP-01 to send e-mail informing water reservoir is empty
        // Serial.println("The water reservoir is empty => fill it up!");
      } else {
        digitalWrite(WATER_EMPTY_LED, LOW); // turn off LED indicator
        digitalWrite(ESP_WATER_EMPTY, HIGH);  // signal ESP-01 that water reservoir contains water
      }
      
      moisture = analogRead(A0);
      if (moisture >= pumpOnThresh) {
        digitalWrite(DRY_LED, HIGH);  // turn on LED indicator
        if (pumpIsOn) {
          currentMillis = millis();
          if ((pumpOnMillis == 0) or ((currentMillis - pumpOnMillis) >= MAX_PUMP_ON_TIME) or (currentMillis < pumpOnMillis)) {
            digitalWrite(PUMP, LOW); // turn pump off
            pumpIsOn = false;
            lastIrrMillis = millis();
          }
        } else {  // pump is off
          currentMillis = millis();
          if ((lastIrrMillis == 0) or (currentMillis - lastIrrMillis >= MINIMUM_TIME)) {
            if (waterLevel == HIGH) {
              digitalWrite(PUMP, HIGH);  // turn on pump
              pumpIsOn = true;
              pumpOnMillis = millis();
            } else {
              // Serial.println("but no water in reservoir!");
            }
          } else {
            // Serial.println("but not enough time has passed since last irrigation.");
          }
        }
      } else if (moisture <= pumpOffThresh) {
        digitalWrite(DRY_LED, LOW); // turn off LED indicator
        if (pumpIsOn) {
          digitalWrite(PUMP, LOW); // turn off pump
          pumpIsOn = false;
          lastIrrMillis = millis();  // update lastIrrMillis in preparation for MINIMUM_TIME criteria calculation
        } else {
          // Serial.println("The soil moisture level is high and the water pump is already off.");
        }
      } else {
        // Serial.println("The soil moisture level is adequate => no action needed.");
      }
      display.clearDisplay();
      display.setCursor(0, 0);
      display.print("PumpOnTres: ");
      display.print(pumpOnThresh);
      display.setCursor(0, 8);
      display.print("Value: ");
      display.print(moisture);
      if (pumpIsOn) {
        display.print(" (ON)");
      } else {
        display.print(" (OFF)");
      }
      display.setCursor(0, 16);
      display.print("PumpOffTres: ");
      display.print(pumpOffThresh);
      display.setCursor(0, 24);
      if (waterLevel == LOW) {
        display.print("Bucket is empty.");
      } else {
        display.print("Bucket has water.");
      }
      display.display();
    }
    
    
    int readInput(int input) {
      int millisStep = 20;
      int reading;
      for(int readings = 3; readings; readings--) {
        reading = debounce(digitalRead(input));
        delay(millisStep);
      }
      return reading;
    }
    
    
    int debounce (int SampleA) {
      static int SampleB = 0;
      static int SampleC = 0;
      static int LastDebounceResult = 0;
      LastDebounceResult = LastDebounceResult & (SampleA | SampleB | SampleC) | (SampleA & SampleB & SampleC);
      SampleC = SampleB;
      SampleB = SampleA;
      return LastDebounceResult;
    }
    
    
    void chooseMenu() {
      char* menu[] = {"Change PumpOnTres", "Change PumpOffTres"};
      int menuLen = 2;
      bool skipIt = true;
      int pos = 0;
    
    
      display.clearDisplay();
      display.setCursor(0, 0);
      display.print("Choose menu:");
      display.setCursor(0, 8);
      display.print(menu[pos]);
      display.setCursor(0, 16);
      display.print("press dial");
      display.setCursor(0, 24);
      display.print("to set.");
      display.display();
      delay(200);
      
      // Reads the initial state of the ENCODER_SW
      encoderSwLastState = false;
      //delay(80);
      encoderSwState = digitalRead(ENCODER_SW);
    
    
      while (!((encoderSwLastState == encoderSwState) and (encoderSwState == false))) {
        encoderSwLastState = encoderSwState;
        encoderSwState = digitalRead(ENCODER_SW);
        
        encoderClkState = digitalRead(ENCODER_CLK);
        if (encoderClkState != encoderClkLastState) {
          if (!skipIt) {
            if (digitalRead(ENCODER_DT) != encoderClkState) {
              pos++;
              pos %= menuLen;
            } else {
              pos--;
              if (pos < 0) {
                pos = menuLen - 1;
              }
            }
            display.clearDisplay();
            display.setCursor(0, 0);
            display.print("Choose menu:");
            display.setCursor(0, 8);
            display.print(menu[pos]);
            display.setCursor(0, 16);
            display.print("press dial");
            display.setCursor(0, 24);
            display.print("to set.");
            display.display();
          }
          skipIt = !skipIt;
        }
        encoderClkLastState = encoderClkState;
      }
      display.clearDisplay();
      display.setCursor(0, 0);
      display.print("Choose menu:");
      display.setCursor(0, 8);
      display.print(menu[pos]);
      display.setCursor(0, 16);
      display.print("menu chosen.");
      // display.setCursor(0, 24);
      // display.print(onThresh);
      display.display();
      delay(1000);
      if (pos == 0) {
        pumpOnThresh = getEncoderData("PumpOnTres", pumpOnThresh);
      } else if (pos == 1) {
        pumpOffThresh = getEncoderData("PumpOffTres", pumpOffThresh);
        // pumpOffThresh = setLowThresh();
      }
    }
    
    
    int getEncoderData(char* theParam, int startPos) {
      bool skipIt = true;
      // int onThresh = pumpOnThresh;
    
    
      display.clearDisplay();
      display.setCursor(0, 0);
      display.print("Change ");
      display.print(theParam);
      display.print(":");
      display.setCursor(0, 8);
      display.print(startPos);
      display.setCursor(0, 16);
      display.print("press dial");
      display.setCursor(0, 24);
      display.print("to set.");
      display.display();
      delay(200);
      
      // Reads the initial state of the ENCODER_SW
      encoderSwLastState = false;
      encoderSwState = digitalRead(ENCODER_SW);
    
    
      while (!((encoderSwLastState == encoderSwState) and (encoderSwState == false))) {
        encoderSwLastState = encoderSwState;
        encoderSwState = digitalRead(ENCODER_SW);
        
        encoderClkState = digitalRead(ENCODER_CLK);
        if (encoderClkState != encoderClkLastState) {
          if (!skipIt) {
            if (digitalRead(ENCODER_DT) != encoderClkState) {
              if (startPos < 1023) {
                startPos++;
              }
            } else {
              if (startPos > 0) {
                startPos--;
              }
            }
            display.clearDisplay();
            display.setCursor(0, 0);
            display.print("Change ");
            display.print(theParam);
            display.print(":");
            display.setCursor(0, 8);
            display.print(startPos);
            display.setCursor(0, 16);
            display.print("press dial");
            display.setCursor(0, 24);
            display.print("to set.");
            display.display();
          }
          skipIt = !skipIt;
        }
        encoderClkLastState = encoderClkState;
      }
      display.clearDisplay();
      display.setCursor(0, 0);
      display.print("Change ");
      display.print(theParam);
      display.print(":");
      display.setCursor(0, 8);
      display.print(startPos);
      display.setCursor(0, 16);
      display.print(theParam);
      display.print(" set to");
      display.setCursor(0, 24);
      display.print(startPos);
      display.display();
      delay(1000);
      return startPos;
    }


    Arduino Uno IO Pin Use

    D0: -

    D1: -

    D2:In ENCODER_CLK

    D3:In ENCODER_DT

    D4:In ENCODER_SW

    D5: -

    D6: -

    D7: -

    D8: -

    D9:Out ESP_WATER_EMPTY LOW: Send e-mail informing that water reservoir is empty

    D10:Out PUMP HIGH: ON - Turn water pump on

    D11:In WATER_LEVEL HIGH: Water reservoir has water (this pin is also connected to GP0 of the ESP-01)

    D12:Out WATER_EMPTY_LED HIGH: ON  - Signal water reservoir is empty (Blue LED)

    D13:Out DRY_LED HIGH: Lit - Signal pump should be on (Red LED)


    A0:Analog In Soil hygrometer reading

    A1: -

    A2: -

    A3: -

    A4:SDA I2C (OLED display)

    A5:SCL I2C (OLED display)


    Parts Required

    Let me know if this is desired here.

    Preparing the ESP-01

    This has been covered earlier in this blog, but let me know if this is desired here.


    Concluding Remarks

    I do not know if i will go any further with this project for the Arduino Uno. In any case, i believe that it is best to wait a few weeks to see how well this system performs before taking it any further.


    It has been lots of fun for me playing around with this project and i hope that i will be able to keep on pretending to be a maker a lot more in the future.


    -raymond

    • Cancel
    • Vote Up +2 Vote Down
    • Sign in to reply
    • More
    • Cancel
  • urkraft
    urkraft over 8 years ago in reply to ntewinkel

    Hi Nico,


    Thanks for the tip image! That would be interesting! I will look into it tomorrow. Just got everything working and installed at my olive tree, but am totally wiped out. Got to get some sleep before i do anything else.


    Good night!


    -raymond

    • Cancel
    • Vote Up +2 Vote Down
    • Sign in to reply
    • More
    • Cancel
  • ntewinkel
    ntewinkel over 8 years ago in reply to urkraft

    Hi Raymond,

    After steps 9 and 10, you might want to enter your project into the newest Project14 contest: Mixing Electronics & Water

    • Cancel
    • Vote Up +3 Vote Down
    • Sign in to reply
    • More
    • Cancel
  • urkraft
    urkraft over 8 years ago

    Status:

    I have just finished a new revision of my code in preparation for implement messaging using the ESP-01. The next steps are as follows:


    1. Upload the new sketch for the ESP-01. (Status: Done)
    2. Make a schematic of the changes that need to be made in order to integrate the ESP-01 into the existing design. (Done)
    3. Power down the irrigation system presently being used to water my olive tree. (Done)
    4. Connect the ESP-01 and necessary circuitry to the existing design (as per step 2). (Done)
    5. Upload the new sketch for the Uno. (Done)
    6. Test that everything appears to be functioning as it should. (Done)
    7. Install the new system at the olive tree. (Done)
    8. Test that everything appears to be functioning as it should. (Done)
    9. Document my work. (Done)
    10. Publish. (Done)


    -raymond

    • Cancel
    • Vote Up 0 Vote Down
    • Sign in to reply
    • More
    • Cancel
  • ntewinkel
    ntewinkel over 8 years ago in reply to urkraft

    Yes sleep is good!


    Norway! Very cool, I hear great things about Norway all the time image

    • Cancel
    • Vote Up 0 Vote Down
    • Sign in to reply
    • More
    • Cancel
<>
element14 Community

element14 is the first online community specifically for engineers. Connect with your peers and get expert answers to your questions.

  • Members
  • Learn
  • Technologies
  • Challenges & Projects
  • Products
  • Store
  • About Us
  • Feedback & Support
  • FAQs
  • Terms of Use
  • Privacy Policy
  • Legal and Copyright Notices
  • Sitemap
  • Cookies

An Avnet Company © 2026 Premier Farnell Limited. All Rights Reserved.

Premier Farnell Ltd, registered in England and Wales (no 00876412), registered office: Farnell House, Forge Lane, Leeds LS12 2NE.

ICP 备案号 10220084.

Follow element14

  • X
  • Facebook
  • linkedin
  • YouTube