element14 Community
element14 Community
    Register Log In
  • Site
  • Search
  • Log In Register
  • About Us
  • Community Hub
    Community Hub
    • What's New on element14
    • Feedback and Support
    • Benefits of Membership
    • Personal Blogs
    • Members Area
    • Achievement Levels
  • Learn
    Learn
    • Ask an Expert
    • eBooks
    • element14 presents
    • Learning Center
    • Tech Spotlight
    • STEM Academy
    • Webinars, Training and Events
    • Learning Groups
  • Technologies
    Technologies
    • 3D Printing
    • FPGA
    • Industrial Automation
    • Internet of Things
    • Power & Energy
    • Sensors
    • Technology Groups
  • Challenges & Projects
    Challenges & Projects
    • Design Challenges
    • element14 presents Projects
    • Project14
    • Arduino Projects
    • Raspberry Pi Projects
    • Project Groups
  • Products
    Products
    • Arduino
    • Avnet Boards Community
    • Dev Tools
    • Manufacturers
    • Multicomp Pro
    • Product Groups
    • Raspberry Pi
    • RoadTests & Reviews
  • Store
    Store
    • Visit Your Store
    • Choose another store...
      • Europe
      •  Austria (German)
      •  Belgium (Dutch, French)
      •  Bulgaria (Bulgarian)
      •  Czech Republic (Czech)
      •  Denmark (Danish)
      •  Estonia (Estonian)
      •  Finland (Finnish)
      •  France (French)
      •  Germany (German)
      •  Hungary (Hungarian)
      •  Ireland
      •  Israel
      •  Italy (Italian)
      •  Latvia (Latvian)
      •  
      •  Lithuania (Lithuanian)
      •  Netherlands (Dutch)
      •  Norway (Norwegian)
      •  Poland (Polish)
      •  Portugal (Portuguese)
      •  Romania (Romanian)
      •  Russia (Russian)
      •  Slovakia (Slovak)
      •  Slovenia (Slovenian)
      •  Spain (Spanish)
      •  Sweden (Swedish)
      •  Switzerland(German, French)
      •  Turkey (Turkish)
      •  United Kingdom
      • Asia Pacific
      •  Australia
      •  China
      •  Hong Kong
      •  India
      •  Korea (Korean)
      •  Malaysia
      •  New Zealand
      •  Philippines
      •  Singapore
      •  Taiwan
      •  Thailand (Thai)
      • Americas
      •  Brazil (Portuguese)
      •  Canada
      •  Mexico (Spanish)
      •  United States
      Can't find the country/region you're looking for? Visit our export site or find a local distributor.
  • Translate
  • Profile
  • Settings
Month of Robots
  • Challenges & Projects
  • Project14
  • Month of Robots
  • More
  • Cancel
Month of Robots
Blog BBC MicroBit Robot Bonanza
  • Blog
  • Forum
  • Documents
  • Events
  • Polls
  • Files
  • Members
  • Mentions
  • Sub-Groups
  • Tags
  • More
  • Cancel
  • New
Join Month of Robots to participate - click to join for free!
  • Share
  • More
  • Cancel
Group Actions
  • Group RSS
  • More
  • Cancel
Engagement
  • Author Author: ipv1
  • Date Created: 15 May 2019 4:53 AM Date Created
  • Views 2460 views
  • Likes 12 likes
  • Comments 11 comments
  • microbit
  • ip_iot
  • morobotsch
  • bbc microbit
  • project14
Related
Recommended

BBC MicroBit Robot Bonanza

ipv1
ipv1
15 May 2019

This article is divided into three sections:

    • My History with Teaching Robots
      • Balancing Robot
      • My Class on Microcontrollers - Independent of the University.
      • Code Bug Line Follower
    • BBC Microbit
      • The Motor Driver
      • FORMING A CHASSIS
    • Creating a Remote Controlled BBC Microbit Robot
    • Conclusion


My History with Teaching Robots


When I first started teaching micro-controllers, the first project I coordinated was of a balancing robot. My students Mitul and Deepak from Guru Nanak Dev university made the balancing robot with an Arduino and I provided the wooden chassis and motors. Here is a video


Balancing Robot

You don't have permission to edit metadata of this video.
Edit media
x
image
Upload Preview
image


Later with the next batches, I started working with first and second years and the result was an entire class of line followers.


My Class on Microcontrollers - Independent of the University.

You don't have permission to edit metadata of this video.
Edit media
x
image
Upload Preview
image

You don't have permission to edit metadata of this video.
Edit media
x
image
Upload Preview
image


This was a successful effort and the result was a class full of line followers with simple electronics. The micrcontroller was the MSP430 no less.

image


Code Bug Line Follower

The same year, we made a line follower using the CodeBug from Element14

You don't have permission to edit metadata of this video.
Edit media
x
image
Upload Preview
image


All are excellent starting points for budding engineers and the projects did not stop there.


BBC Microbit

Along came the BBC Microbit and I wanted to do a bit more by giving everyone a tutorial.


Element14 was kind enough to provide me with one of these boards and I though I would do something with the board beyond the blinking LED.


First, I start with introducing the BBC Micro bit and then making a small circuit that can be used to detect a black line on a white flat sheet. This is accomplished using some IR LEDs and photodiodes.


We go on ahead and write a small piece of code to read the sensors and then display the movement direction on the matrix display. Here is the video for a more in detail lesson.

You don't have permission to edit metadata of this video.
Edit media
x
image
Upload Preview
image


Next, we go through the concept of a motor driver, the basic circuit and controlling DC motors with the BBC microbit. We then move to add the motors to a chassis and then write the basic routine to make the robot follow a simple line. Here is a video tutorial and demo video for the project part 2

You don't have permission to edit metadata of this video.
Edit media
x
image
Upload Preview
image

The Motor Driver

The L293D is a dedicated motor driving chip with 4 half H-bridges or two full H-Bridges which can be employed to control the direction two connected motors. You may choose to make an H-Bridge using transistors or even MOSFETs on a strip board etc but the single chip solution is simpler and quicker. The pin diagram and connection diagram for the L293D is shown below.

alt text

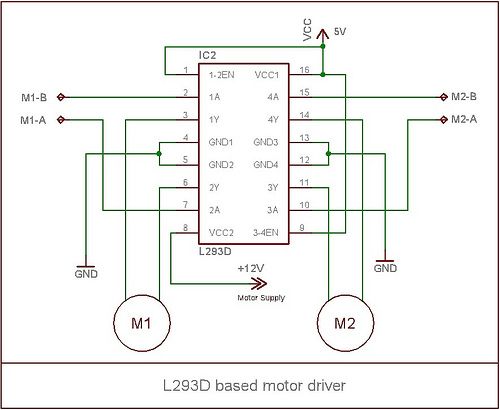
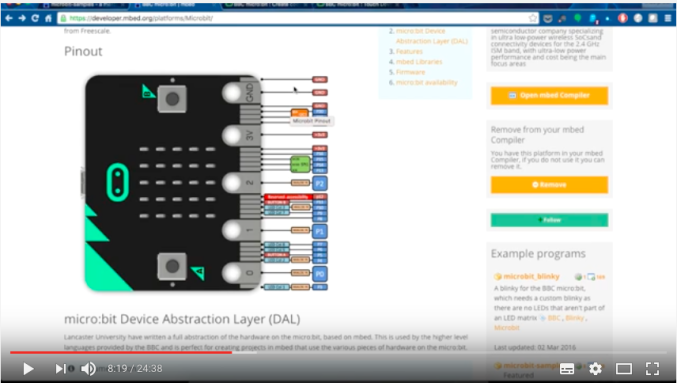
The GPIOs in the BBC Micro:bit can be used to set the speed and direction of the motors however for this exercise, we will only be interested in modifying the direction of the motors. Since the GPIOs available on the breakout board also include the ones used for onboard peripherals such as the matrix display, we must select the ones that are unused. Take a look at the pinout diagram below. We need four IOs out of which two are used for direction and two are used for speed or turning the motors ON and OFF.

alt text

FORMING A CHASSIS

After connecting the motor driver and motors, we need to put everything together along with a chassis, wheels and our sensor board. I have made a simple chassis, but you can create something more elaborate and used different parts according to preference. The sky is the limit. Add batteries and we are good. WRITE THE PROGRAM

We will continue using touch develop to make the program and i order to make the decision to turn right or left or move straight, we will add an IF-THEN-ELSE ladder within the loop we created the last time. The program can be downloaded as a file using the link provided at the bottom of this page. Compile the code and upload the hex file to the BBC Micro:bit. CREATE A TRACK AND TEST


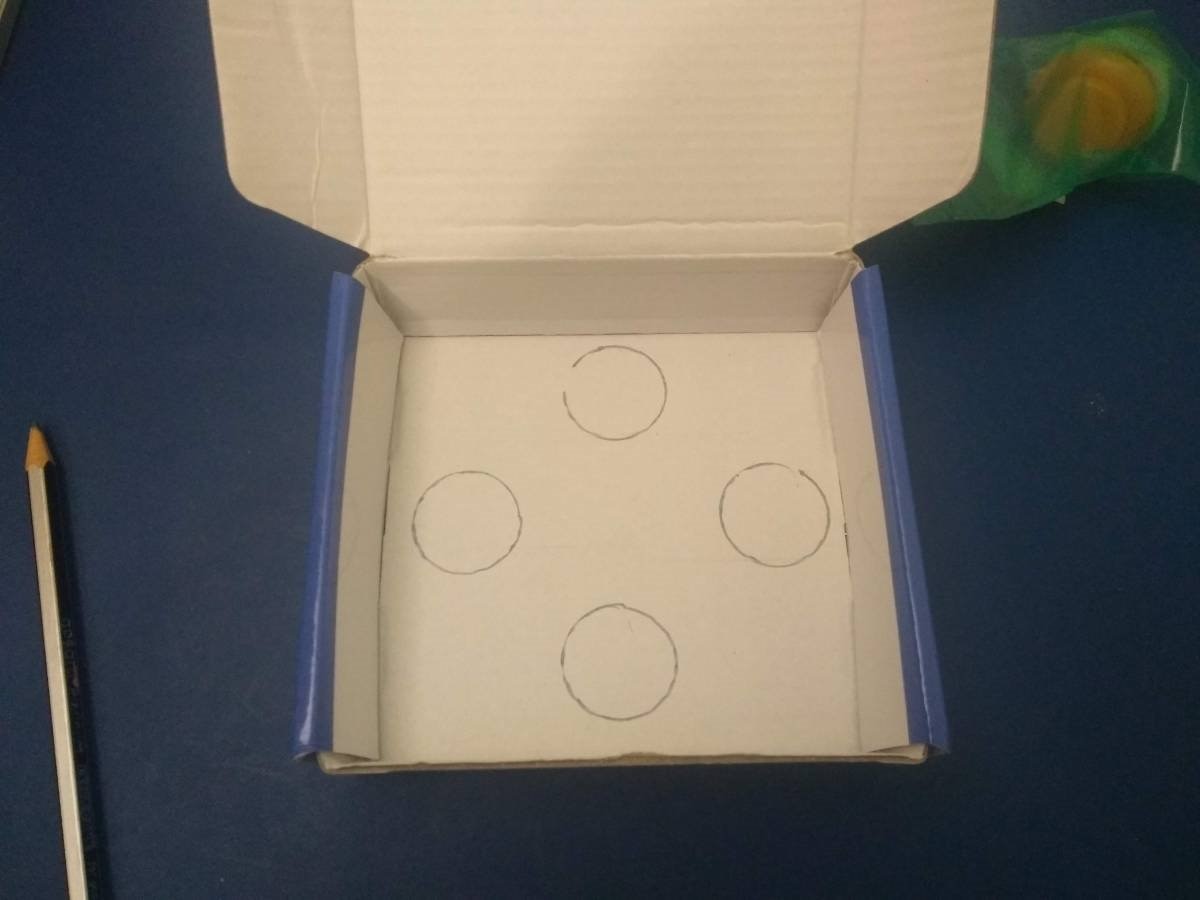
In order to follow a line, we need a line for which we use some black water colours and a white paper sheet. Draw a simple circle initially to test out the functionality. Make sure that the line is not too thick else the sensor will have problems detecting turns and will get stuck easily. We just need the line to thick enough that it is detected by each of the sensors individually. Test her out.


Creating a Remote Controlled BBC Microbit Robot


I had a Devastator Robot Chassis at hand and decided to give my kid something to play with. The Idea is to have one BBC Microbit as the remote and the other receive command to control the motor driver similar to the one given above.


Instead of the buttons, I use the accelerometer to get the orientation of the microbit and then use that to control the robot. Here is a demo.

You don't have permission to edit metadata of this video.
Edit media
x
image
Upload Preview
image

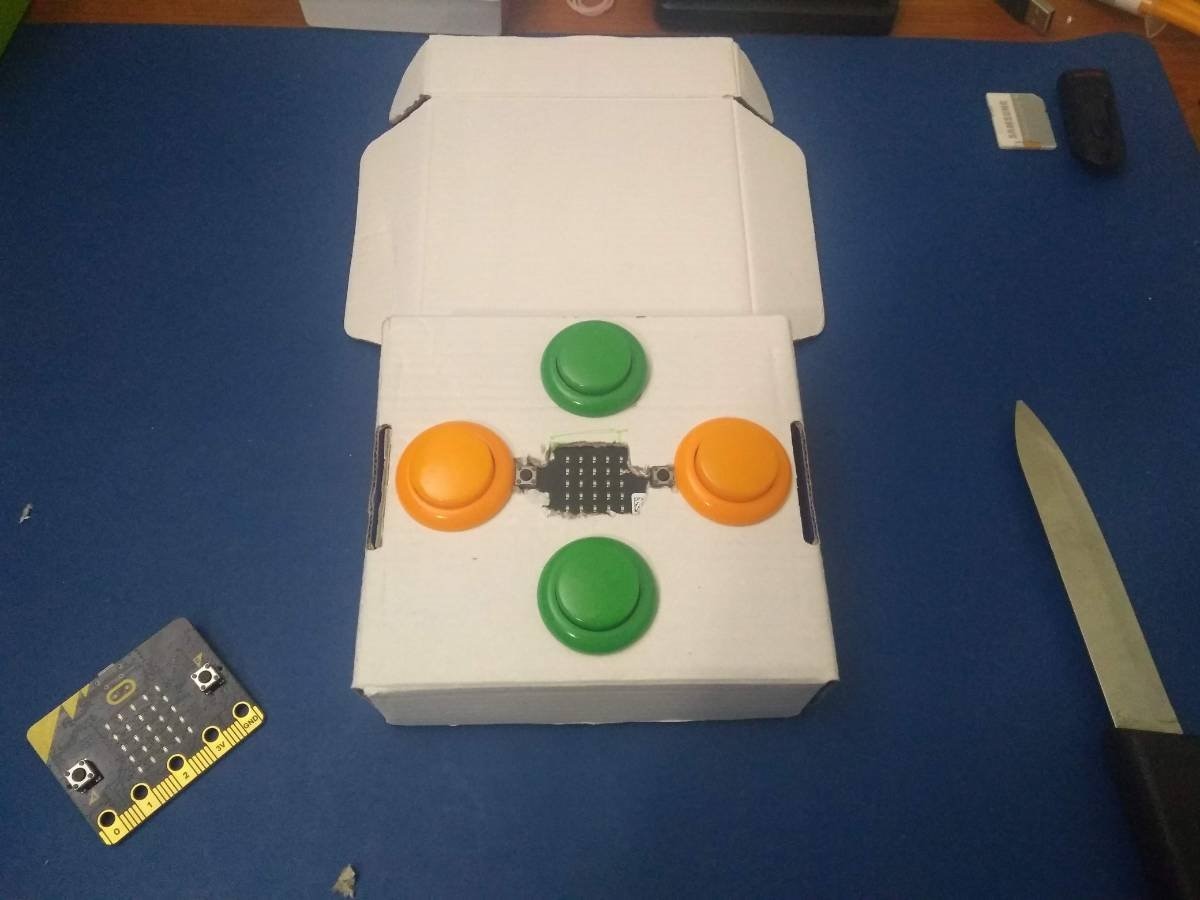
This is not my best work but it was not meant to be. In a world with 3D printers and laser cutters, creativity SHOULD not be limited by access to these tools. My  prototype is basic but is operational. I did a small remote controller using a cardboard box.


{gallery} Cardboard Remote

image

IMAGE TITLE: THEN IMAGE DESCRIPTION

image

IMAGE TITLE: THEN IMAGE DESCRIPTION

image

IMAGE TITLE: THEN IMAGE DESCRIPTION

image

IMAGE TITLE: THEN IMAGE DESCRIPTION


Conclusion

Many of the team members and staff at Element14 have asked me why I add 'sir' when addressing them. I consider them all an inspiration and I hope this little piece can inspire the reader as I have been motivated in the past.


Thank you everyone for the endless love and support.


IP


PS: Here is the Microbit Code.

# BBC microbit robot -
# Remote controller Module
# inderpreet singh

from microbit import *
import radio

def get_values():
    mess = str( radio.receive() )
    if(mess == 'None'):
        return 1234,1234
    if(mess.find(':') >= 0):
        x_pos = mess.find('x')
        sub_string = mess[ (x_pos+1): (x_pos+6) ]
        if(sub_string.find('-') >= 0):
            x_pos = sub_string.find('-')
            x = int( sub_string[x_pos: ] )
        else:
            x = int(sub_string[1:] )

        y_pos = mess.find('y')
        sub_string = mess[ (y_pos+1): (y_pos+6) ]
        if(sub_string.find('-') >= 0):
            y_pos = sub_string.find('-')
            y = int( sub_string[y_pos: ] )
        else:
            y = int(sub_string[1:] )        
        return x, y
    else:
        return 0, 0
    
def pad_num5(x):
    if(x > 0):
        if( x < 10):
            return '0000' + str(x)
        elif( x < 100):
            return '000' + str(x)
        elif( x < 1000):
            return '00' + str(x)
        else:
            return '0' + str(x)
    else:
        if( x < -1000):
            return str(x)
        elif( x < -100):
            return '0' + str(x)
        elif( x < -10):
            return '00' + str(x)
        elif( x < -1):
            return '000' + str(x)
        else:
            return '00000'

def send_values(ml):
    #print("x,y", ml[0], ml[1])
    mess = ':'
    mess = mess + 'x' + pad_num5(ml[0]) + 'y' + pad_num5(ml[1])
    print (mess)
    radio.send(mess)
    sleep(100)

# main function for the transmitter radio
def main_tx():
    sensor = [0,0,0]
    x = accelerometer.get_x()
    y = accelerometer.get_y()
    z = accelerometer.get_z()
    sensor[0] = x
    sensor[1] = y
    sensor[2] = z
    #print("x, y, z:", x, y, z)
    send_values(sensor)

def main_rx():
    m1_dir = 1
    m2_dir = 1
    x,y = get_values()
    if(x != 1234 and y != 1234):
        #print("x,y", x, y)
        #check right
        if(x>200):
            m1_dir = 0
            m2_dir = 1
            print("right")
            pin0.write_digital(m1_dir)
            pin1.write_digital(m2_dir)
            pin2.write_digital(1)
            sleep(50)
            pin2.write_digital(0)
        
        # check left
        elif(x< -200):
            m1_dir = 1
            m2_dir = 0
            print("left")
            pin0.write_digital(m1_dir)
            pin1.write_digital(m2_dir)
            pin2.write_digital(1)
            sleep(50)
            pin2.write_digital(0)
        
        # check forward
        if(y< -250):
            m1_dir = 1
            m2_dir = 1
            print("forward")
            pin0.write_digital(m1_dir)
            pin1.write_digital(m2_dir)
            pin2.write_digital(1)
            sleep(50)
            pin2.write_digital(0)
        
        #check backward
        elif(y>300):
            m1_dir = 0
            m2_dir = 0
            print("backward")
            pin0.write_digital(m1_dir)
            pin1.write_digital(m2_dir)
            pin2.write_digital(1)
            sleep(50)
            pin2.write_digital(0)
        
    sleep(50)
    # Ends main_rx
    
uart.init(115200)
radio.on()
display.show(Image.HEART)    
while True:
    main_rx()
    # mess = str(radio.receive())
    # if(mess != 'None'):
    #     print (mess)
    #     sleep(100)

  • Sign in to reply

Top Comments

  • ipv1
    ipv1 over 6 years ago +7
    I wish I could give everyone a hug. And just an update. I was offered a part-time teaching position in Toronto. I've taken it and tomorrow is my first day. I'll be teaching microcontrollers again. My sincerest…
  • Workshopshed
    Workshopshed over 6 years ago +3
    The "Sir" reminds me of the Japanese "Sensei" meaning "One who comes before" with a more common translation of "Teacher"
  • tariq.ahmad
    tariq.ahmad over 6 years ago in reply to Workshopshed +3
    Now that you mention it does! This is not the first time ipv1 has posted an inspiring project on the community and its a really cool way to put how a community can be used to inspire one another. Awesome…
  • ipv1
    ipv1 over 6 years ago in reply to dubbie

    Thank you Dubbie. I am glad it was found useful. image

    • Cancel
    • Vote Up +3 Vote Down
    • Sign in to reply
    • More
    • Cancel
  • dubbie
    dubbie over 6 years ago

    Inderpreet,


    A great project and well explained, worthy of being a winner. Congratulations.


    Dubbie

    • Cancel
    • Vote Up +2 Vote Down
    • Sign in to reply
    • More
    • Cancel
  • ipv1
    ipv1 over 6 years ago in reply to jc2048

    I am glad you liked it. My idea has been to supply content to create a robot as quickly as possible so it does not feel like a burden. (Kinda like brushing your teeth?)


    The devastator is a good chassis albeit not for all projects. The tracks feel like they might fall apart in the future so...


    I taped the microbit and battery as a rough and ready remote control making things a bit more manageable.

    • Cancel
    • Vote Up +3 Vote Down
    • Sign in to reply
    • More
    • Cancel
  • jc2048
    jc2048 over 6 years ago

    I like the Devastator Robot chassis one - there's something really cute about a tiny, tracked vehicle. It looks like it would feel really natural to control one by tipping the Microbit. Having watched your video, I feel like I want to build one, but I'm resisting the temptation (so far) in case I turn into Dubbie and can't stop building them!


    Why did you have the Microbit taped to the ruler? Was that just to support the weight of the batteries or did you find your hands were interfering with the Bluetooth?

    • Cancel
    • Vote Up +3 Vote Down
    • Sign in to reply
    • More
    • Cancel
  • dubbie
    dubbie over 6 years ago

    Interpreet,


    An impressive set of mobile robots. I have had a couple of goes at making a balancing robot, without much success. Maybe I'll have to have another go.


    Dubbie

    • Cancel
    • Vote Up +3 Vote Down
    • Sign in to reply
    • More
    • Cancel
>
element14 Community

element14 is the first online community specifically for engineers. Connect with your peers and get expert answers to your questions.

  • Members
  • Learn
  • Technologies
  • Challenges & Projects
  • Products
  • Store
  • About Us
  • Feedback & Support
  • FAQs
  • Terms of Use
  • Privacy Policy
  • Legal and Copyright Notices
  • Sitemap
  • Cookies

An Avnet Company © 2025 Premier Farnell Limited. All Rights Reserved.

Premier Farnell Ltd, registered in England and Wales (no 00876412), registered office: Farnell House, Forge Lane, Leeds LS12 2NE.

ICP 备案号 10220084.

Follow element14

  • X
  • Facebook
  • linkedin
  • YouTube