


Foreword
If you prefer to see before how the Nanodrone works, jump to the end of this post in the last paragraph Nanodrone In Action: the Video
In 2019, thanks to Element14, winning the PiCasso challenge I got a Dj Mavic 2 Pro professional drone, probably the best and technologically advanced drone in 2019. As a photographer and flying drones by when the first Parrot drones were on the market, this prize made me more than happy. In the video below: The Low Fly Experiment, one of the first videos shot by drone with an action camera mounted on a Parrot drone hacked 8 years ago. The result has been more hilarious than professional, but it was a good starting point for me to understand this new technology.
In the short hommage to Philip K.*** video below, I evolved definitely hacking my first drone adding a counterweight queue to balance the GoPro handmade mount on the front, reaching the payload limits of the flying stuff. But at least partially, it worked.
Look also the second part of the video, including the making-of scenes and some in-cameraa commets 
The very big limit I experienced in that period was the technology still too poor and primitive to supporting a decent production. But I never resigned! During these last years, I have continued making experiments and hackings to any kind os budget drone; these experiences were extremely useful for a well understanding of the technology, as well as points on the limits: some depending on my experience, some other depending on the quality of the product. Then, the Grand Prix challenge! High quality, top of technology, superb photo, video shooting quality, and performances. For first, learned by myself, then in the past month of January, I followed the Class 1 Drone pilot course (theory and practice) at the Antwerp airport. The exam has been delayed for now due to the Covid-19 problems but I should say I learned a lot, including the laws and regulations, the conduct that should be followed by the pilot, wind theory, weather and, air map readings, and many more.
Below: a shoot during the lessons at the Bel Air Fly Academy, Antwerp airport.
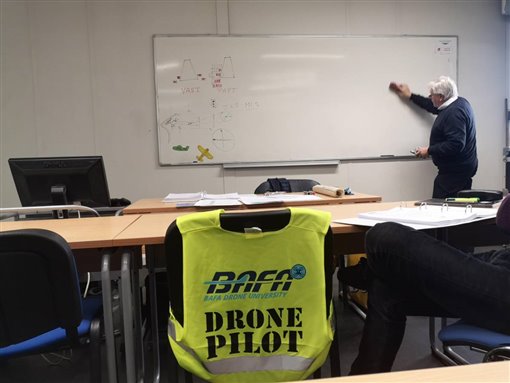
I should say that the mix of super high-tech of the DJ drones and the wide knowledge acquired during the course totally changed the game. The video below, shot in the Gent area is n example of what I am doing. More clips, mostly shot by drone can saw at the Pond5 agency link.
Today
Some months ago I also bought the DJ Mavic Mini, a smaller version, lightweight drone with very similar performances of the Mavic 2 Pro ideal for small areas and indoor filming.
The Nanodrone Project
The idea of hacking drones never vanished in my mind (there are also a couple of projects in the drawer for the bigger one); one of the wows of this mini drone – it weight just 250 gr – is it payload: 200 gr, as well as a battery autonomy of 30 minutes! A couple of months ago, I got some extra components for the drone and I started tinkering on the integration with some sort of Arduino. A nano, some electronics, and a dedicated rechargeable battery are less than half of is payload; the idea become more than attractive when tariq.ahmad shipped me the Arduino Nano Sense to participate with a "drone project" (not yet clearly defined at that time) to the Nanorama competition. I ordered some other components for the projects but, due to the current contingency, the delivery has been dramatically delayed.
Surprisingly, the last two days of last week everything arrived, and the project finally reborn.

Above: the Arduino Nano 33 Sense board, powerful and full of sensors.
An Open Idea
The availability of a small, lightweight, and flexible microcontroller onboard of a drone gives a lot of possibilities to make the drone more powerful and available for many kinds of custom applications:
- Data collection
- Investigation
- Imaging
- Image recognition
- Paper airplane launching (paper airplane launching???)
- more...
Based on these considerations – I had a lot of time to think of how to develop the project as the components were not available – I decided to make a modular and general-purpose drone add-on to cover as much as possible the list. As I go ahead with the project, other ideas add to the initial list.

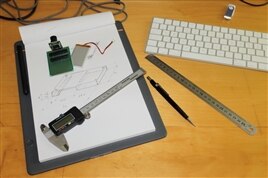
The above image shows the components I received a couple of days ago:
- A small GPS tracking board with antenna
- 3.3V 1200 mAh rechargeable battery
- DJ Mavic Mini top support (other parts will be 3D printed as well)
- 2Mp SPI Arducan camera
and, obviously, the rest of the components, and the Project14 Arduino Nano 33 Sense.
Preparing the Drone to be a Nanodrone!
Before starting the project, and the drone hacking, I prepared the drone for the Nanorama project. In the meantime, while drafting and drawing I study a couple of challenging aspects related to some of the features I have in mind to add. First I draw the Nanorama personalization of the top view of the drone on a paper template to decide the distribution of the components.

Then I made some color tests to see the final effect:

The final result is shown in the images below


Upgrading the Drone Structure and Other Parts
As mentioned before, the drone has a payload almost the same its weight; the problem is that to add the modular board including the Arduino Nano 33 BLE and the other components there are problems during the lift-off and landing due to the reduced height of the Mavic Mini.
Adding Higher Legs
First I have 3D printed on the new Elegoo Saturn LCD resin 3D printer a leg structure to create the space to fit the board.
Below: the 3D printed support for the drone. locked to the bottom side.


This structure is built in three parts and assembled using some drop of cyanoacrylate glue. Like all the Dij drones, the design of the device has a lot of points where it is possible to connect custom structures for add-ons. It is important that the design avoiding covering the critical part of the drone, like the air cooling and the bottom sensor to detect ground obstacles.
The Circuit Support
To the bottom side of the leg structure I have then added the small box to include the circuit. The circuit size and weight should follow the roles to be possible to fit into the bottom of the drone, without creating problems to the navigation, as well as granting the stability of the entire device. There is another aspect we should consider: this is a flying object that can reach considerable heights. It is important to thing to this and making the right choices in the design and the strategy to assemble the pieces. Due to these limitations, the circuit should be as small as possible.

The above image shows these limits in practice:
- The camera should be in front.
- The prototype PCB should not be bigger than 50x70 mm (circa)
- The height of the drone legs should keep the camera about 1 cm from the ground.
- All the remaining parts of the circuit should fit on the PCB.
- The device is battery-operated.


Above: the essential structure of the circuit (prototype PCB, camera, and LiPo battery) used to design the box holder, then 3D rendering of the model on Fusion360 and the finished printing on the Elegoo Saturn.
Based on these considerations, I designed the box support for 3D printing to hold the circuit to the bottom of the drone; we don't care to cover the exposed side of the circuit (less weight is better) as this is no more exposed than the bottom sensors of the drone camera It is important instead that the circuit and battery do not risk to detach from the drone while it is flying.
The Raspberry Pi Case
The ground control that receives the data from the Arduino Nano Sense is a Raspberry Pi. Also in this case, as it is expected to work in unpredictables conditions – mainly outdoor – I have secured the SBC in another of the modular cases by Verby I already used to make the PiCluster in the past, as shown in the image below.

To use the Pi outdoor – at the ground level connected to the Arduino Nano Sense via BLE – also in this case the device should be battery-operated. I have used a powerful 6700 mAh USB power bank. A small screen is useful to show information on the connection, collected data, and more. I have verified that the 4D-24 touch TFT screen for the Raspberry Pi by 4th dimension is still maintained supporting the Pi 4 as well; the small screen is ideal as can stay on top of the case. To solve the problem of the GPIO connection of this HAT I have done a custom version of the connector as shown in the below images.


Assembling the Nanodrone Circuit
As usual, the project has been breadboarded for testing and the essentials programming before moving to the prototype PCB assembly.

Despite the problems of space, the connection of the Arduino Nano Sense to the 2Mp Arducam is not particularly difficult. But the circuit should be battery-powered. I have used a 3.7V LiPo battery and a USB charger-regulator by Digitspace; As shown on the official Arduino Nano 33 BLE pinout table (attached to this post), there is a small jumper on the bottom of the board that should be cut to power the microcontroller with battery. The problem – not mentioned in the documentation, discovered after the cut – is that after this operation it can only battery-powered; the USB connection to the computer no longer works as a power supply. For this reason a big part of the software programming has been done with the circuit battery-operated. Luck that the low power has done his job and a full charge of the LiPo is sufficient for hours of work.
The Final Module
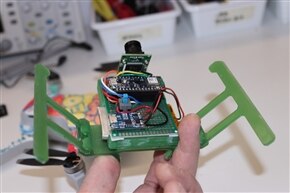
Luckily I was able to fit everything on the 50x70 mm prototype PCB board, as shown in the below image:

Above: the final circuit module ready to be assembled on the drone
I have also added a power switch to exclude the supply when the battery is charging, according to the specifications of the battery charger (shown to the bottom side on the above image). After testing the circuit on the bench – the first time it has not worked and I had to change the CS (SPI Chip Select) pin assignment in the software – I have made the final assembly.
Boxing the Circuit
The image below shows the battery in the up-down box container that will be covered by the prototype PCB circuit.

Note that, as well as the needed stability of the components assembly, working with flying objects we also face the issues due to vibrations. For this reason, the battery is glued to the box using adhesive soft tape. The same solution has been adopted also to fix the circuit box to the bottom of the drone legs. To keep the circuit firmly on top of the box holder the camera side is fixed with two 2 mm screws and nuts while the opposite side is glued in the same way.

Above the circuit assembled onto the box holed and all fixed to the drone leg. Changing the components, this module can be reproduced to manage different sensors or just the sensors on board of the Arduino Nano Sense itself.
The last move has been adding a compact foam support to the base. In fact, the drone has an overweight that can create problems when landing, while with the foam supports, as shown in the below images, this risk is avoided.


After finishing developing the software, the Nanodrone is ready for its first flight.
Nanodrone In Action: the Video
The sources of the projects will be available on GitHub in a few days.
| Pinout-NANOsense_latest.pdf |

Top Comments