


Introduction

Badges are quite popular but updating their content often requires programming. Although some of them use Bluetooth or WiFi. I want to show that you also can use your smart phone and NFC to update the content.
ST M24LR
My badge is heavily based on the ST M24LR (https://www.st.com/en/nfc/m24lr-series-dynamic-nfc-tags.html ). This device is a I2C-Eeprom (similar to the common 24C04) with a NFC interface to read and modify its content or, if you want to see it from the other side, a regular NFC tag with an I2C interface to read and modify its content. It comes in a 8 pin package (I prefer the SO8) and connects like a regular I2C eeprom to the I2C bus. Additionally on two of its pins the antenna has to be connected. The antenna consist only of a few windings on the pcb with a diameter of about 30 mm. Although getting the Antenna to work optimal will be very tricky.
Setup
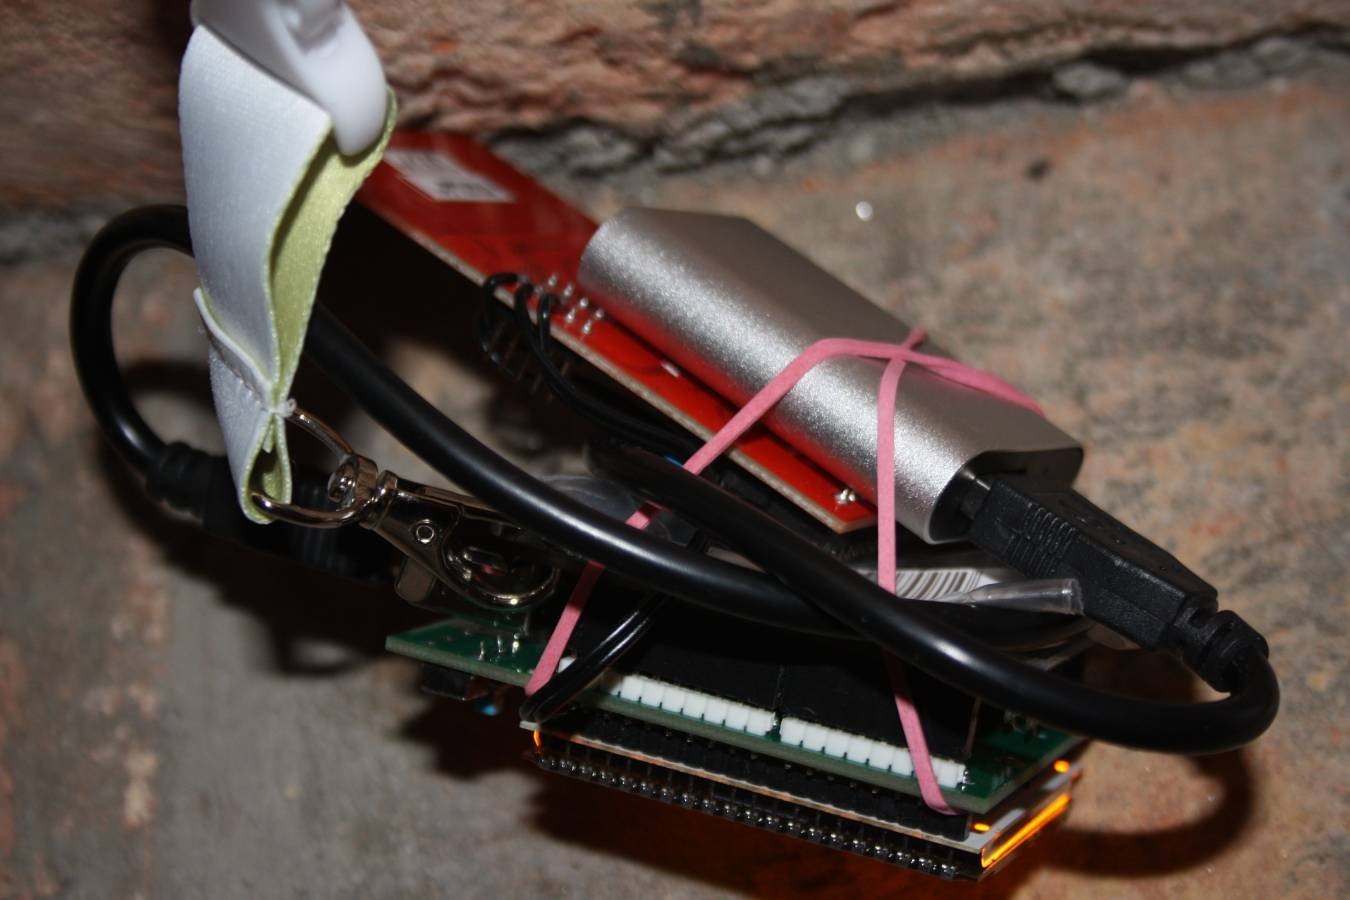
My badge consist of an Arduino Uno, a graphics display, the board with the M24LR and an USB power bank to supply the whole circuit. I think I don't have to say very much about the Arduino Uno.
The display is a EA DOGM128-6 (https://www.lcd-module.com/fileadmin/eng/pdf/grafik/dogm128e.pdf). It is a monochrome LCD with 128 x 64 pixels ant has a ST 7565R controller which can be connected to the SPI port. For my first setup I use a GPIO bit banging interface on the Arduino. The display is connected like in the application notes in the datasheet. Because the display only allows 3.3 V levels I used a level shifter to get them down from the 5 V of the Arduino Uno.
ST has several evaluation boards for the M24LR. The best fit would be the X-NUCLEO-NFC02A1 (https://www.st.com/content/st_com/en/products/ecosystems/stm32-open-development-environment/stm32-nucleo-expansion-board… ) as it could be directly stacked with the Arduinos. Although its onboard connection of IOREF with +3V3 is a bit tricky with the Arduino Uno. I only had a M24LR-Discovery (https://www.st.com/en/evaluation-tools/m24lr-discovery.html ) at hand. So I took this one, cut a few traces on the board and connected it directly to my Arduino with a few wires.

The power bank is any swag power bank.
Nevertheless the whole setup with the power bank is a little bit tricky and crooked.
Arduino firmware
EA provides a library for the display (https://www.lcd-module.com/support/application-note/arduino-meets-ea-dog.html ). This library is not in the official Arduino libraries but it can be downloaded via the link provided and works fine with the Arduino Uno. I made some nicer fonts based on UbuntuMono-B.ttf and Computer_Speak_v0.3.ttf .
The M24LR can be accessed like any regular I2C eeprom and has the address 0x53. The only difference is that the register address has to be provided as a 16 bit address. The data in the eeprom is formatted in the NFC Data Exchange Format (NDEF). For the first test I did not decode the data but set static offsets for the text strings. So I assume that in complex situations this will crash but for a first proof of concept I think it is OK.
After but the firmware sets up all peripheral like Serial for debug and I2C. I also do a I2C scan after startup to see if the M24LR is still there. This does not affect the program. It is only for debugging and the program would crash if the M24LR is not found. Then it reads the text string of the eeprom and stores it in a buffer. Next the display is initialized and the string is displayed. The main loop does nothing and the string is displayed forever.
If you want to modify the string you need a smartphone with NFC and the ST25 NFC Tap app (https://play.google.com/store/apps/details?id=com.st.st25nfc&hl=en_US ). After you place your phone over the NFC antenna you can change the NDEF text tag. After the next reboot of the Arduino Uno the text is displayed on the display. I will explain the app with more details in my next blog post.
Source code
my source code so far:
#include <Wire.h> // i2c-lib
#include <dog_7565R.h>
#include "font2.h"
#include "font.h"

dog_7565R DOG;

byte backlight=255;
int led       = 10;
void init_backlight(boolean mono);
void mono_backlight(byte brightness);

//create badge sceen content
void badge_screen(char *x)
{
  DOG.clear();  //clear whole display
  DOG.string(25,0,font2,"Hello");
  DOG.string(22,3,font,"my name is");
  DOG.string(0,5,font2,x);
}

//read byte from eeprom with 16 register
char i2c_read_byte(char address, unsigned short reg)
{
  char x=0;
  Wire.beginTransmission(address);
  Wire.write((reg&0xff00)>>8);
  Wire.write(reg&0x00ff);
  Wire.endTransmission();
  Wire.requestFrom(address,1);
  if(Wire.available()) x=Wire.read();
  Wire.endTransmission();
  return x;
}

//decode string from ndef file and tag and return buffer and length
int decode_ndef_text(char* string_buffer)
{
  int string_length=0, i=0;

  string_length=i2c_read_byte(0x53,8); // string length is in byte 8
  Serial.print("NFC-String length: ");
  Serial.println(string_length);
  if(string_length>3) // the first 3 bytes are only encoding and language and not to be displayed
  {
    for(i=3;i<string_length;i++)
    {
      *string_buffer=i2c_read_byte(0x53,i+10);  // text starts at offset 10 bytes from the beginnig
      string_buffer++;
    }
  }
  *string_buffer=0;
  return string_length;
}

void setup() {
  // put your setup code here, to run once:
  byte error,address,x;
  int nDevices;

  char nfc_string[20];  // buffer for text string

  Serial.begin(115200); // setup serial
  Wire.begin(); // setup I2C
  Wire.setClock(1000);
  delay(10);

// scan for I2C devices
  Serial.println("Scanning I2C...");

  nDevices = 0;
  for(address = 1; address < 127; address++ )
  {
    // The i2c_scanner uses the return value of
    // the Write.endTransmisstion to see if
    // a device did acknowledge to the address.
    Wire.beginTransmission(address);
    error = Wire.endTransmission();

    if (error == 0)
    {
      Serial.print("I2C device found at address 0x");
      if (address<16)
        Serial.print("0");
      Serial.print(address,HEX);
      Serial.println("  !");
      nDevices++;
    }
    else if (error==4)
    {
      Serial.print("Unknown error at address 0x");
      if (address<16)
        Serial.print("0");
      Serial.println(address,HEX);
    }
  }

  decode_ndef_text(nfc_string); // get string from eeprom
  Serial.println(nfc_string); // print string on serial

  Serial.println("Init Display");
  init_backlight(true); //use monochrome backlight in this sample code. Please change it to your configuration
  DOG.initialize(6,5,7,8,9,DOGM128);   //SS = 10, 0,0= use Hardware SPI, 9 = A0, 4 = RESET, EA DOGM128-6 (=128x64 dots)
  DOG.clear();  //clear whole display
  mono_backlight(255);    //BL to full brightness
  DOG.view(VIEW_BOTTOM);  //default viewing direction
  badge_screen(nfc_string);        //show content
}

void loop() {
  // put your main code here, to run repeatedly:

}

//The following functions controll the backlight with a PWM. Not needed for the display content
void init_backlight(boolean mono)
{
  if(mono) //EA LED55X31-G, EA LED55X31-W, EA LED55X31-B, EA LED55X31-A, EA LED55X31-R
  {
    pinMode(led,  OUTPUT);
    mono_backlight(255);
  }
}
//Use this funtion for monochrome backlight
void mono_backlight(byte brightness)
{
  analogWrite(led, brightness);
}
Whats next:
Show how the app works.