


The Allure
I have a stereo microscope that is extremely useful, but it is not good at everything.
Specifically:
- it isn't any use in a blog where you need viewers to see something with high magnification
- it can be fatiguing to hunch over the microscope for long periods
- you cannot see what your hands are doing while looking through the scope
- refocusing, on parts and tools and then the scope, is tiring and tedious
- when soldering, the hot iron is directly under your face
- my microscope mount is fairly permanently attached to my assembly bench, which is not always where I am working
- etc.
So I figured a digital microscope could improve in most of these areas.

It is interesting to see how a bunch of lines can be organized into a passable likeness of the Queen. Try clicking on the image.
Incidentally, Canada was the first country to put an image of her on its currency - when she was only 9 years old in 1935 (on the $20 bill) - long before she became a Queen.
She is still on the $20 bill - above. Her image is used on currencies in 35 countries.

The Long And Winding Road
I have been scrounging and collecting parts to build a digital microscope for many months. My idea was to build a decent microscope around a Raspberry Pi HQ Camera. This required a good lens and adjustment mechanism, neither of which is cheap, I scoured the net for a long time to find the best possible deals. At first it seemed like an easy project - just add a lens to a camera and you have a microscope, that premise lured me into the project, and by the time I realized it was going to be a lot more effort than anticipated, I had spent enough money that I couldn't dump the project.
There were five 3-D printed parts in the finished project, which are expected to take quite a while to design, but I wasn't anticipating how long the base plate would take. Just flat counter-sinking the 4 screws through the wood at the correct depth took hours, mostly because I don't have the proper tools for wood working.
The steel torque plate took a whole afternoon to hack from a massive chassis, also because I don't have appropriate tools for metalwork.
I thought at least the software would be easy since many camera functions are built right into the operating system. In fact I figured there would be all sorts of programs that others have made that would do exactly what I wanted, which wasn't much.... just have a continuous preview, grab a still image at the press of a key on the keyboard, or start and stop video recording from the keyboard.
I read somewhere that you can't input from the keyboard when the preview is running. It even ignores control C.
I ended up writing some simple Python programs that can do what I need, but the software is still a work-in-progress.
The Design Work
Here is a quick video showing the various 3-D parts from all angles.
Another Example
When fooling around with a microscope, there is a tendency to put anything you can find under it. I just pulled out a drawer looking for items of about the right size. Here is an example of a medal from my high school days...If you have ever analyzed medals you will recognize the quality of workmanship in this one.

The Hardware
Here is a video explaining the the microscope hardware....
The BoM
| Item | Image | Notes |
|---|---|---|
| Raspberry Pi HQ Camera |  |
|
| Angel Eyes LED Halo Ring Lamp |  |
48mm ID 12V 300 mA $2.09 |
| Raspberry Pi 4B |  |
|
| 50mm Diameter Adjustable Lens Holder |  |
$19.44 |
| 25mm Industrial Microscope Limit Fixing Ring |  |
$5.26 |
| 25mm Metal Fixed Microscope Stand |  |
$13.80 |
| Eakins Adjustable 180X Zoom C-mount Lens 0.7X~4.5X Magnification |  |
$45.57 |
| WD30 0.3X Barlow Lens |  |
$8.07 |
Of course, now that I have built a microscope, I now need to make some use of it.....The following is something that has been hanging around on my to-do list for a couple of decades.
A Microscope Application - Soldering Tip Maintenance
I have a collection of old soldering tips from the last 20 years, that I stopped using because they wouldn't "wet" properly. I always meant to figure out if they could be reconditioned to work well again. The long period of sitting around rusting, may have made this even more problematic, but for sure I will learn something in attempting to resuscitate these tips.
Why do soldering tips fail to wet?
I am guessing it is all about surface tension. Apparently the surface tension of solder is compatible with iron, but not iron oxide or many other contaminants that can end up on a soldering tip.
Soldering Tip Construction
The soldering tips I use have a copper core to maximize heat transfer from the heater to the solder joint. Copper will "wet" nicely with solder, but it is soft so it wears out quickly and it also oxidizes pretty easily at high temperature. So these tips have a chromium layer to protect the copper from oxidizing. You can tell if it is chromium because chromium turns blue when heated. If it was stainless steel it would turn a tan color. Chromium isn't good for "wetting" so the very tip where solder needs to be applied has a layer of iron. Iron will also oxidize, so it is important to keep a layer of solder on the iron tip to prevent oxygen from reacting with the iron.
The Conundrum
Old oxidized solder can't make a good solder joint, so it must be cleaned off before trying to make a solder joint with fresh solder. If you use a brass wool to clean your tip, it is not as hard as the iron, but it can scrape away the solder and allow oxygen to get at the iron. If you use a wet sponge to clean your tip, the water will have oxygen in it which could find its way to the iron. I still prefer the wet sponge, even though it is more work to keep it wet. If you have an expensive tip with built-in heater and sensor like a Metcal or Weller, you really need to be conscious of tip maintenance.
The Cleaning/Refurbishment Methods
Besides brass wool and wet sponges,
- I have seen people use solder tip paste that is supposed to revive old tips. It is highly acidic and likely eats away some of the iron as well as some rust and contaminants
- I have seen people use plumbers flux, which is also pretty acidic
- I have seen people use steel wool
- I have seen people use sand paper
All of these methods can work and they all can also damage the tip or shorten its life.
The Experiment
I want to try to visually see what is not "wetting" and manually remove just the offending material. This will require a microscope.
Conclusions
A long time ago I did a project to implement a digital microscope for an semi-automated forensic analysis application using a $100K microscope system. Digital camera technology was not as good then as it is today, so this Raspberry Pi microscope could easily give that system a run for its money. I am very impressed with the clarity and resolution this new system creates. I wonder what we could do with $100K today.
It is always cool when you can squeeze 3 different Raspberry Pi products into one project. Raspberry Pi 4B, Raspberry Pi HQ Camera, and a cameo by a Raspberry Pi Pico.
This project involved hauling two back-burner projects off the shelf and putting them on the front burner:
- a digital microscope
- a solder tip maintenance project
Microscopes are both fun and useful, so despite the long gestation period, I like the result - it produces great images and video with a very useful range of magnifications. There are still lots of opportunities to improve the system, but it is useful as is. The digital microscope is easy to experiment with and is does help with some of the issues I have with my stereo microscope, but a stereo microscope would still be my first choice. Some stereo microscopes have a camera port, but that is beyond my budget.
The Raspberry Pi HQ Camera does a great job in this application, providing high resolution images and video and the C mount makes finding an appropriate lens easy.
The lens provides a large working space and it can slide up far enough to use a vise to hold a PCB or other item of interest.
The Raspberry Pi 4B is of course a fully capable computer, so this system is more than just a microscope. Since it has a big HD display it can also be used for all the computing and information access needs on the bench.
The soldering iron tip maintenance project was interesting and a good application for the microscope. I learned a bit about how to re-condition tips while tackling this bucket list project.
The final note about solder tip maintenance is just what everyone agrees on - always leave solder on the tip and turn off the heat whenever you don't need the iron for soldering.
I am very happy with this build and the performance of the microscope.
I hope this has been interesting for readers who use or want microscopes and soldering irons or are looking for things to do with their Raspberry Pi's.
If there is something you would like to see imaged with this microscope, let me know in the comments below.
3D print files:
I cannot seem to insert a zip or rar file here...if the file below is available, change its extension to rar...
Relevant Links:
Project14 | Off the Shelf: Take a Project Off the Shelf and Start Working on It!
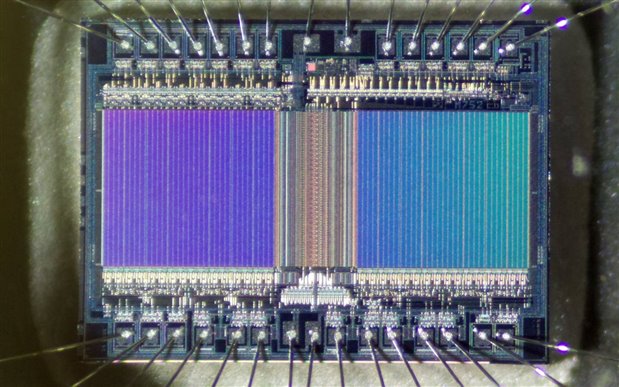
Who remembers EPROM? This blog shows a 27512 EPROM chip imaged with this microscope
Top Comments