


This project is a collaboration with my 6 year old grandson and is also my offering in the open Arduino contest to celebrate the birthday of Arduino and Project14.
4/24 Update: Wrote up the final project. Included some of the material from the discussion comments into the main body of the write-up. Corrected a few small typos and errors.
Project Objectives
Create a device which will alert older siblings when their two year old toddler sister is getting into stuff she shouldn't - especially the Lego model that was just completed. Or, for the more technically oriented:
- Install the ESP8266 core into the Arduino IDE with the Board Manager
- Learn how to use ESP-NOW, a point to point protocol works on the ESP family using the Arduino IDE
- Experiment with different sensors, especially the RCWL-0156 "radar" sensor
Most of all, have a bit of fun.
Background
My grandson recently came to visit and was excited to tell me that he had a good idea for a project that also served a pressing need. Specifically that his two year old sister was constantly getting into things (e.g. the Lego project that he had just completed) and it had to be stopped. I asked him to draw up a proposal and here it is:

He is just learning to read and write so I will interpret it for you. The object in the upper left is a waterproof bracelet that transmits the location of the toddler by radio. The object lower right is a waterproof thing that you can put on your wrist that has a screen, beeper, and LED to alert you when the toddler is somewhere she shouldn't be. They are waterproof because they are planning to go to a waterpark and it might get wet.
Back in the day, when I was a boy and way before the Arduino, I would have solved the problem like this:

It pretty well explains why I became a mechanical engineer and not an electrical/electronics engineer or computer science major. Clearly this will not do and an Arduino is required.
One Approach
Keeping track of and managing two year olds is one of the hardest things on the planet. They are among the wiliest and most clever of all creatures. If we can pull this off it could be worth a fortune!
The constraints are:
- I need to build it in the next week or two because that is the next time I will see my client (grandson) and he wants it yesterday
- It needs to be suitable for little kids
- It needs to be Arduino based or at least use the Arduino IDE
Here is an approach in line with what my grandson imagined:
- Bracelet for the toddler that has a Bluetooth beacon run off of coin cell
- Station(s) that could be placed near Lego or other desired locations that would detect signal strength of the Bluetooth beacon from the bracelet and send Bluetooth or Wi-Fi signal warning when the toddler was close
- Smartwatch that would buzz and light up on the client's wrist when warning is received and show the location of the toddler
Let's Get Real
That approach is not going to happen. I don't have the materials on hand and there is only a week or two. These might be useful....
- Two ESP8266 Wemos D1 Minis
- HC-SR04 distance sensor
- PIR sensor
- RCWL-0516 "radar" sensor
There are many other ways of detecting and sending notice of human presence, but these are the ones readily available to me.
I don't have much experience with the ESP8266 so this will be a good learning experience. The project will be divided into two phases: a concept selection phase where the sensors at hand are tested and a build phase where something that will work as a first pass is created. During the concept selection phase code will be separately developed for the hardware and then combined into one test package. The three sensors could potentially complement each other and all included in the final product or perhaps only one will be needed.
Disclaimer: This is a fun project. However, the code and hardware that follows only demonstrates concepts. Transmissions are not secure, the code is not fully tested, and the hardware does not make a reliable security system.
Lets Get Started
ESP8266

This project will use the Wemos D1 mini, an easy to use ESP8266 board that can run on the Arduino IDE and is shown above. They can be purchased from the usual Chinese and internet sources. The github page is here for the Arduino implementation and it also has links to documentation and the boards manager. I had no problem installing it via the boards manager in Arduino 1.8.4. I did run into a conflict with my virus protection software (McAfee) which occasionally would not let it compile on Windows 10. Microsoft virus protection ran without a problem.
To learn more about the ESP8266 I watched the YouTube videos by Andreas Spiess and highly recommend them if you are unfamiliar with the ESP family. In episode #172 he discusses ESP-NOW which is a point to point method for connecting two or more ESPs to each other using the Arduino IDE. It is small, fast, and does not require connection to an internet access point. Among the constraints of ESP-NOW are:
- Limited to 250 bytes per transmission
- Only 20 ESP devices can be connected (10 with security enabled)
The advantages include:
- Since a router / connection is not necessary it can be operated anywhere
- Faster than connecting to the internet
- Lower energy requirements
- Lower overhead
Watch the videos by Andreas for much more information.
I developed a "Hello World" sketch using ESP-NOW based on code by Andreas and posted it here on Github. It consists of a send and receive sketch which I recommend you try if you are following along. I use a C style struct for the data and display it on the serial monitor when both sending and receiving. It is not secure in any way, form, or fashion.
RCWL-0516

Shown above is the RCWL-0516 "radar" sensor. Once again, Andreas has a YouTube video on these sensors which he covers in episode 135. There is considerable discussion on the internet about how these work and whether they are really radar and I suggest interested persons to google. In addition there is some very good discussion by element14 members in the comments below. The origin of the RCWL-0516 seems to be detection for turning lights on and off in a way similar to how PIR sensors are sometimes used. They are quite inexpensive and again can be found in the usual Chinese sources. An interesting feature is that they can "see through walls" as I will demonstrate shortly in a video. A simple sketch I developed can be found here on Github. It sends message to the serial terminal when motion is detected. Note that there is a pause between readings that is set by the sensor and cannot be changed in the code.
PIR Sensor

Members of element14 will be familiar with PIR sensors and their use. The PIR sensor I used has a delay set by the hardware before it signals high again after a trigger which cannot be changed in firmware. I have posted my own short sketch on Github for the ESP8266.
HC-SR04

Again, I imagine that most element14 members and users of the Arduino are familiar with Ultrasonic sensors as seen above. The inexpensive version here is readily available from Chinese sources. The theory is described in some detail in my Github code for the ESP8266 linked here.
Breadboarding the Components
Sending Unit

It is time to put it all together and the sending unit can be seen above. From left to right there is the RCWL-0516 radar, the PIR sensor, the ultrasonic distance sensor and the ESP8266. Note the voltage dividers being used to protect the 3V3 pins on the ESP8266. All of the sensors are being powered by a 5V rail coming from the ESP8266. The pins being used are the same ones outlined in the individual sketches above.
My code can be found here on Github. If you have worked through the sketches above it shouldn't be too hard to follow but I am available if there are questions.
Receiving Unit

The receiving unit can be seen here. Left to right is the ESP8266, a red LED that toggles when the "radar" goes high, a yellow LED that toggles when the PIR goes high, and a blue LED that toggles when meaningful changes occur in the distance sensed by the ultrasonic sensor. Output is also sent over the serial connection to the Arduino terminal if connected.
First Trial
Here is a video of the concepts being tested in my lab. It works 
At this point I decided to concentrate on the RCWL-0516 and learn more about its capabilities and limitations. Read the comments below for suggestions from other element14 members who provided much useful information and direction.
Exploring the Analog side of the RCWL-0516
The RCWL-0516 has an IC onboard labelled RCWL-9196. Pin 12 of the IC has the amplified analog signal from the antenna. When connected to the oscilloscope we see activity like that in the figure below.
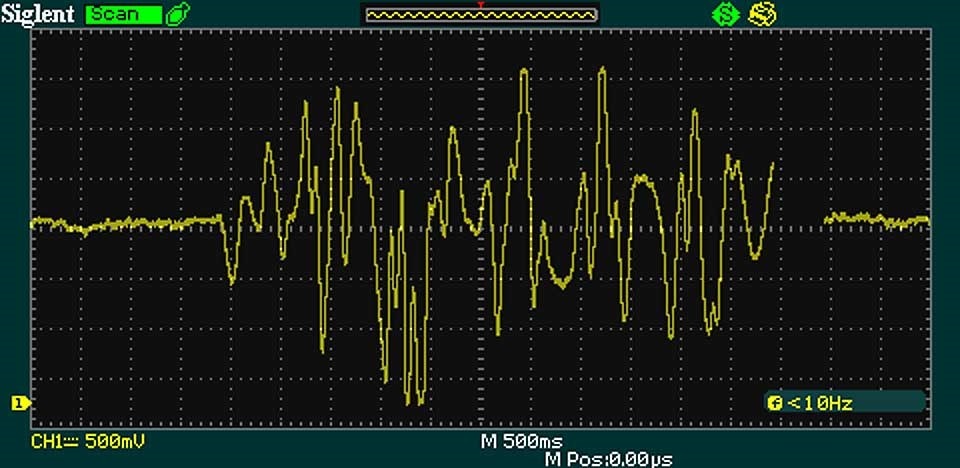
When there is no activity the trace has an offset of about 1.7 Volts. When movement is detected excursions of plus / minus 1.7 Volts around the offset occur with high activity. Higher activity closer in gives the greatest excursions and this can be used to indicate activity in addition to that indicated by the LOW / HIGH digital output. A simple Arduino sketch was written which reads the analog signal and can plot it or output it to LEDs indicating the level of activity. Further discussion of the development can be found in the comments below.
Prototype
A prototype was built on 4 x 6 cm plated through-hole perfboard that would be more permanent and rugged.

Note the yellow lead which attaches to pin 12 of the IC on the RCWL-0516 and the analog pin on the ESP8266. I've also added LEDs for this version which indicate the analog signal strength as read on the analog pin of the ESP8266. The red LED triggers at about the same point as the digital output of the sensor and the code is located here. The layout can be rearranged with the sensor laying down and placed in a enclosure for additional protection.

Real World Testing
I made a number of tests around the house to see how my samples of the sensor performed.
- Reliable sensing of an adult to 3.5 meters or greater
- Reliable sensing through walls in some instances although attenuated
- Sensing of movement outside a car when subject is close by
- Some glass (e.g. double paned UV coated sliding door) almost completely blocks
- Antenna reception is best on the "front" or IC side of the board and attenuated roughly 50% around sides and back. It can also detect above and below the antenna.
But the real test is can it detect a fast moving 2 year old? In the following test the too cute subject is coming from around a wall to the left of video. The sensor is on top of the table and the digital trigger occurs when the blue LED on the ESP8266 lights up.
We observe that:
- She is not detected until after she rounds the corner from behind the wall
- The digital signal comes only after she is very close and reaching for the milk
I conclude that it works, but for a smaller subject range is not as good.
Summary
The project accomplished the following:
- Used the Arduino IDE to successfully program the ESP8266
- Showed how to use ESP-NOW, a point to point protocol that works on the ESP family using the Arduino IDE and does not require a router or connection to the internet
- Experimented successfully with different detection sensors and wrote code that should be transferrable to any Arduino
- Dug deeper into the RCWL-0516 "radar" sensor
- Experimented with capabilities and limitations
- Explored the analog side of the sensor
- Successfully developed a system for detecting siblings and had fun doing it.
Possible future improvements to the project include:
- Additional exploration of the detection capabilities of the RCWL-0516
- Look at making the antenna more directional
- Use of Bluetooth LE or other technology to reduce the size and power requirements of the radio
Thanks for reading and special thanks to mcb1 for all of his helpful comments and suggestions. Extra special thanks to my grandson for a great idea and to his little sister for keeping us on our toes.
References and Links
Andreas Spiess Videos - Good introductions to the ESP8266 and the RCWL-0516
My Github Repository for this Project
Analog side of the RCWL-0516 - Thanks Mark, see additional links in comments below
Original patent describing how the RCWL-0516 works - Thanks Jon, see additional link in comments below
Top Comments