


Happy Birthday, Project 14!
Project: Marshmallow Rotisserie By Sean and Connor Miller
Summary:
After a very long winter, spring is finally here. My wife, son, and I are ready for weekend evenings at the fire pit. One memory over the years was the struggle to perfect the perfect roasted marshmallow. One side isn't brown enough. The center isn't melted enough. Or, after 5 minutes of careful rotation, it suddenly becomes the infamous flaming black glob - which, I must admit, are kind of fun to make, too.
So, in this project we built the Marshmallow Rotisserie. It uses a modified, repurposed broken servo motor to control speed of the Rotisserie, an adjustable timer, a 3D Printed case, and it is powered by a 9V battery.
We used an Arduino Uno to prototype the circuit to get a functional design. This allowed us to hone the resistors and necessary voltage. Desiring to make it an attractive affordable build, we built the final production unit based on the Adafruit Trinket based on the ATtiny and programmed using the same code as the Uno. It allowed us to keep the build small and reduces the overall cost by about half.
Happy, Birthday Project 14. We hope you fellow Project 14 builders enjoy this build.
Materials and Files:
- (1) Arduino Uno (for prototyping): http://www.newark.com/arduino/a000066/dev-board-atmega328-arduino-uno/dp/78T1601
- (1) Buzzer: http://www.newark.com/pro-signal/abi-050-rc/buzzer-electro-mechanical-5vdc/dp/82Y9713
- (1) 5V Trinket (for final installation): http://www.newark.com/adafruit/1501/trinket-dev-board-attiny85-mcu/dp/09X6460
- (2) 2N4401 Transistors: http://www.newark.com/multicomp/2n4401/bipolar-transistor-npn-to-92/dp/08N8113
- (2) 330 ohm Resistors: http://www.newark.com/multicomp/mccfr0w4j0331a50/carbon-film-resistor-330-ohm-250mw/dp/58K5042
- (2) 10K Resistors: http://www.newark.com/te-connectivity/lr0204f10k/res-metal-film-10k-1-200v-axial/dp/95W7695
- (1) Perf Board: http://www.newark.com/multicomp/mc01005/prototype-board-phenolic-160-x/dp/22AC8320
- (2) Potentiometers: http://www.newark.com/bi-technologies-tt-electronics/p160kn-0qc15b500k/rotary-potentiometer-500kohm-16mm/dp/14R5474
- (2) Terminal blocks: http://www.newark.com/camdenboss/ctb0308-2/terminal-block-wire-to-brd-2pos/dp/68C9063
- (1) Diode: http://www.newark.com/nte-electronics/1n4004/standard-diode-1a-400v-do-41/dp/10M2938
- Jumper Wire: http://www.newark.com/multicomp/mc001811/hard-jumper-wire-22awg-350pc/dp/24AC5054
- Female headers: http://www.newark.com/mcm/rs1-06-g-413/1-x-6-position-female-socket-with/dp/97W4645
- Conformal coating: http://www.newark.com/electrolube/apl400h/conformal-coating-aerosol-400ml/dp/44AC2378
- Broken Servo Motor (see below)
- 1/8" carbon or SS rod
- Autodesk Eagle Schematic, 3D Printer Files: https://github.com/RaisingAwesome/Marshmallow-Rotisserie
Step 1: Design Criteria (aka the wish list)
As with all projects, you have to debate what you want it to do. You can reach for the sky and blow a lot of money, or you could only go after the bare minimum and find yourself never using it again. This was our chosen criteria:
-
- Adjustable rotation speed control
- Adjustable audible timer
- No visible wires
- Kid and Parent friendly
- Less than $20
We ruled out any mobile phone interaction or temperature sensing to keep costs down. Besides, the fire pit is intended to be a phone free zone!
Step 2: Prototyping
The Arduino Uno:
To prototype this design, we used the Arduino Uno - but not just any Arduino. This was a made in Italy version found on Element14. What makes it special is the headers are labelled. You don't know you miss that feature until you experience it the first time. If you have an Arduino nested in the belly of a robot, you'll definitely want this style. You can see the pin labels from any angle - perfect for prototyping as well!
Arduino Uno with Header Labels for All Viewing Angles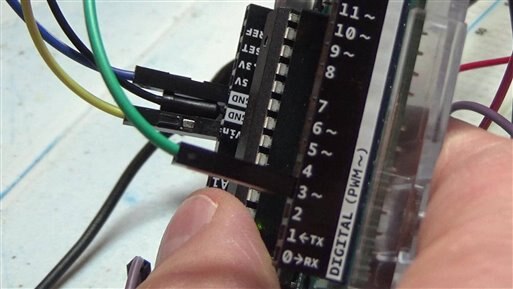
The Motor:
We needed a high torque, small motor. A Servo motor came to mind because of their good gearbox. They are actually just a hobby motor that spins fast. With a few plastic gears between the motor shaft and the output shaft, they become a slower turning, high torque means of rotation. The servo output shaft is direct coupled to a potentiometer which tells its circuit board how its position. However, they typically only have 180 degrees of rotation and are designed to seek a point in the rotation and hold the position. What we need is infinite rotation that we can control the speed of. So, we did a little modification.
We had a couple of broken servos laying around. We combined parts to get one good set of gears. We removed the potentiometer and circuit board altogether. We now have a high torque, DC motor in a tight package.
Marshmallow Rotisserie Repurposed Servo Motor - Modified to be a High Torque, Variable Speed DC Motor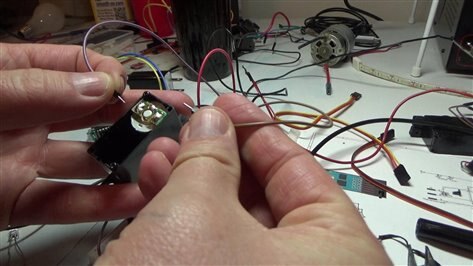
The Motor Driver:
You can control the speed of a DC motor by varying the voltage. We needed a pretty high voltage to get the power we desired, so we elected to use a transitor to switch in a 9 Volt battery source. Using the Arduino, we could send PWM to the switch. By varying the duty cycle of PWM, one creates an effective voltage to the motor. The higher the duty cycle, the faster the motor!
Here is some example Arduino code:
analogWrite(0,0); //stop the motor
analogWrite(0,255); //full speed!
We didn't want to draw too much current through the pins of the Arduino. So, we put 330 ohm resistors in line. We also used a 10K pull down resistor to ensure the switching was a clean transition between 0V and 5V.
To allow the user to control the speed, we used a potentiometer. The higher they turned the knob, the higher the duty cycle.
To achieve this, we do an analogRead() on the output of the potentiometer. We then use the map() function of Arduino to translate this to our analogWrite() to the transistor driving the motor.
analogWrite(0,map(speedInput,0,1023,0,255)); //analog read returns 0-1023. analog write is a number between 0-255.
The Timer:
For the timer, we simply chose a buzzer to beep at us. The trick was allowing the user to be able to adjust how long the rotisserie goes before it alarms.
The Arduino has a millis() function which counts the number of milliseconds that have passed since power on. Using this in the setup() function, we can get a time reference. We then simply add the users desired time to it and check on every pass of the loop() function.
To get the users desired duration for the timer, again we employ a potentiometer and map.
With a check of millis() at each pass, we look for it to exceed the startup time we captured plus the user's potentiometer setting. If it exceeds, we sound the alarm (buzzer). So, it works just like a toaster.
For the first marshmallow, the user can turn the timer all the way up and watch the marshmallow roast. Once they see it perfectly brown, they can turn the timer until it beeps. This will allow them to make another marshmallow just like it - as long as it doesn't rain or something.
The Resulting Circuit:
As always, we captured the circuit in CAD - in this case Autodesk Eagle. This allows us to remember what we did, but also gives us the option to order a custom PCB if we desire. It also does some design checks and can allow us to make a 3D version of the board to aid in the end package design.
Marshmallow Rotisserie Circuit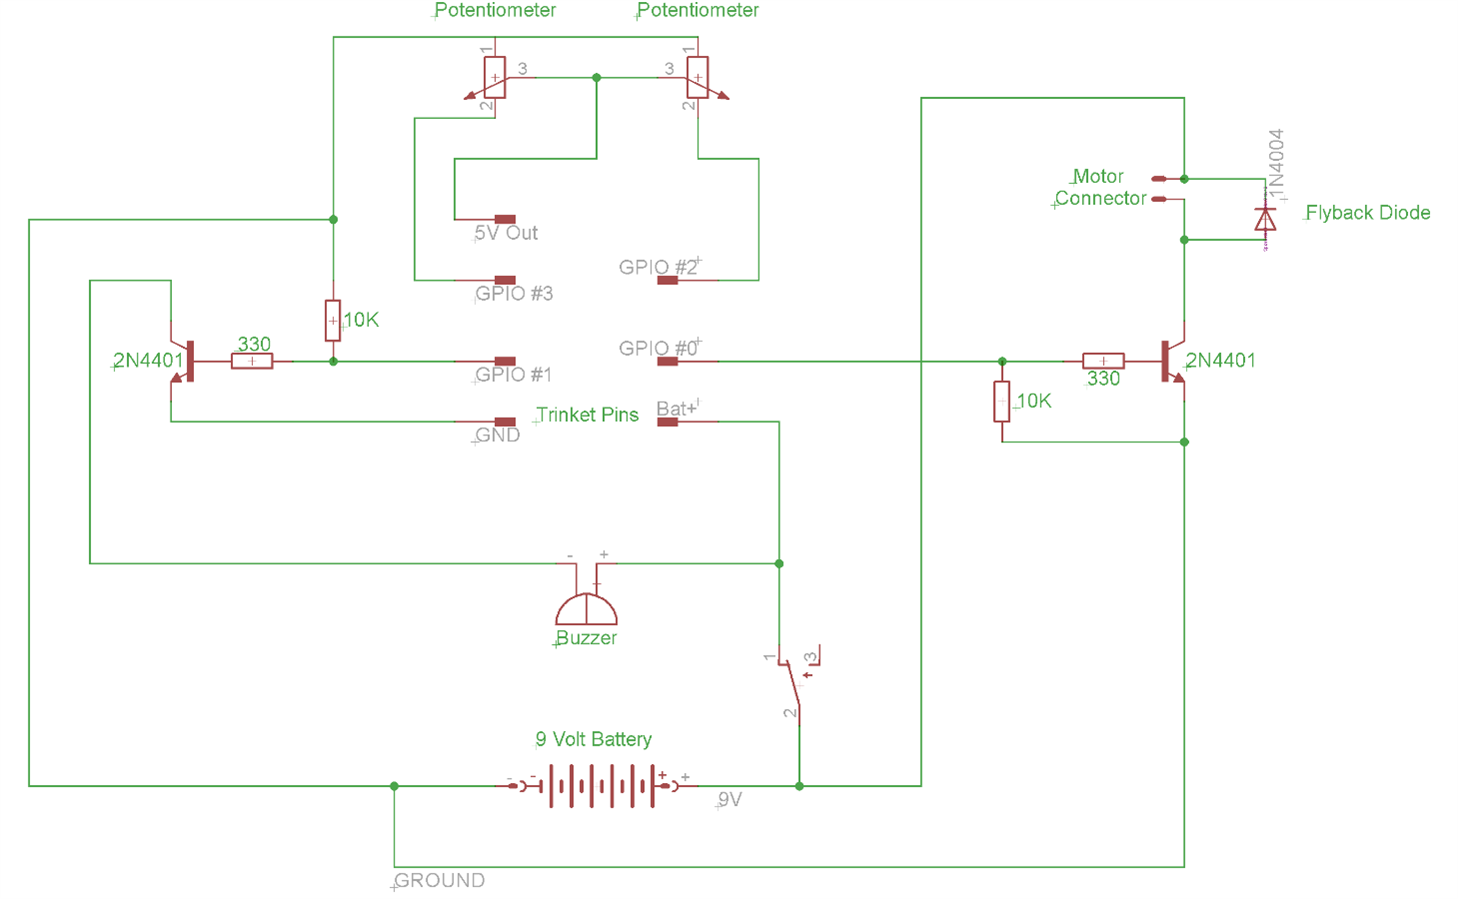
That concluded our prototyping. We now moved to the programming the Trinket.
Step 3: Finalizing the Code
Now that we moved to the Trinket, we polished our code and uploaded it to the board:
//Marshmallow Rotisserie by Sean and Connor Miller.  2018 for Element1.com Project 14
//Join us at Raising Awesome on Youtube.com
int motorPin = 0;//for the Trinket, this output pin is the same as the physical label
int alarmPin = 1;//for the Trinket, this output pin is the same as the physical label
int speedInput=1;//GPIO pin 2 is analog 1 for analog on the Trinket
int timerInput=3;//GPIO pin 3 is analog 3 for analog on the Trinket
int speedValue = 0;  // variable to store the value coming from the speed potentiometer.
int timerValue=0;  //variable to store the value coming from the desired time potentiometer.
int start_timer;  //the milliseconds gone by after boot up to compare the timer against with each pass of the loop().
bool alarm; //a flag to let us know if the timer has been reached.

void setup() {
  pinMode(0, OUTPUT);  //PWM output for the motor.  We'll set the output between 0 and 255 based on some epic math from the speed potentiometer.
  pinMode(1, OUTPUT);  //Alarm output.  It sets the pin to 5Vs or 0 volts.
  pinMode(2, INPUT);  //speed potentiometer input.  It reads as a value of 0-1023
  pinMode(3, INPUT);  //timer potentiometer input  It reads as a value of 0-1023
  start_timer=millis();//used with the timer pot to determine if it is time to alarm.
  alarm=false; //this will flag when to alarm by setting the alarm pin high;
}
void loop() {
  //we'll check the sensors every 1/2 second (500 milliseconds)
  delay(500);
  speedValue = analogRead(speedInput);//store what the potentiometer is reading for speed.
  timerValue = analogRead(timerInput);//store what the potentiometer is reading for the timer.

  if (millis()>(start_timer+(1000*map(timerValue,0,1023,0,60*4)))) {//scale it to max time to be 4 minutes.  If they need more time, they need to lower the rig closer to the heat.
    alarm=true;
  }
  else alarm=false; //Note:  If they turn the knob after it alarms, they'll get more time.  Or they can lower it when they see the perfect marshmallow so the next one can be just as scrumdiddlyumptious.
  if (alarm) digitalWrite(alarmPin, HIGH); else digitalWrite(alarmPin,LOW); //sound the alarm if calculated to do so above.

  analogWrite(motorPin, map(speedValue,0,1023,0,255));//set the motor speed by doing a ratio of the knob setting versus its max setting (255) of analog write
}
Step 4: Populating the Proto Board
Populating the board is always a fun, therapeutic thing to do. Using a highlighter with the printed circuit, I went after one connection at a time. Using an ohmmeter, I made sure there were no short circuits or bad solder joints - which there were a few!
Once it all tested, I used conformal compound. The compound I have brushes on, but they are more commonly found in spray form. This puts an invisible, nonconductive, water resistant protective layer over the exposed circuits to prevent a mishap.
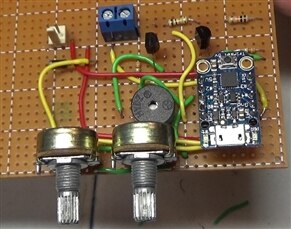
Marshmallow Rotisserie Protoboard Populated with all Components
Step 5: Designing the Case
We always design our mechanical side with Autodesk Fusion 360. This is in our top 5 must learn software to be awesome. You may find our 3D Printer files linked above.
To start, we made all parts. We didn't need to be overly detailed. We just had to get the "obstruction" geometries in place so we could build the case around it. So, we made a primitive looking servo and perfboard. We used a digital micrometer to precisely design it.
Here are our top tips for Autodesk Fusion 360:
-
- Never delete a body or face. Instead, use the remove feature. This will preserve the timeline.
- When extruding your first sketch, have it make a new component versus just a body. For any bodies you have, be sure to make them components or move them into an existing component. Stray bodies looks rookie.
- If your part will have text, be sure the font is large so the 3D printer can lay at least 3 rows of filament to make each character. Raise it at least 1/8" off the surface.
- For parts that won't be printed, but are needed for sizing your printed part, only spend time on the detail you need or you'll just be wasting time. Often, you just need simple blocks or cylinders to serve as reference obstructions and cutting tools.
- Before modifying a body, consider modifying the sketch way back in the timeline that created it instead. It's awesome.
- When sketching, use dummy lines from reference faces to precisely land center points for circles and rectangle corners.
- For cutouts where components will be installed, chamfer the edges so the opening is wider on top. This will give you a tolerance to allow a tight fit within minimal filing.
- If you need it to have strength, add fillets to corners. Also, "webbed" parts such as you see with crane booms and bridges are more sturdy than printing solid.
Marshmallow Rotisserie Autodesk Fusion 360 Designed 3D Printed Case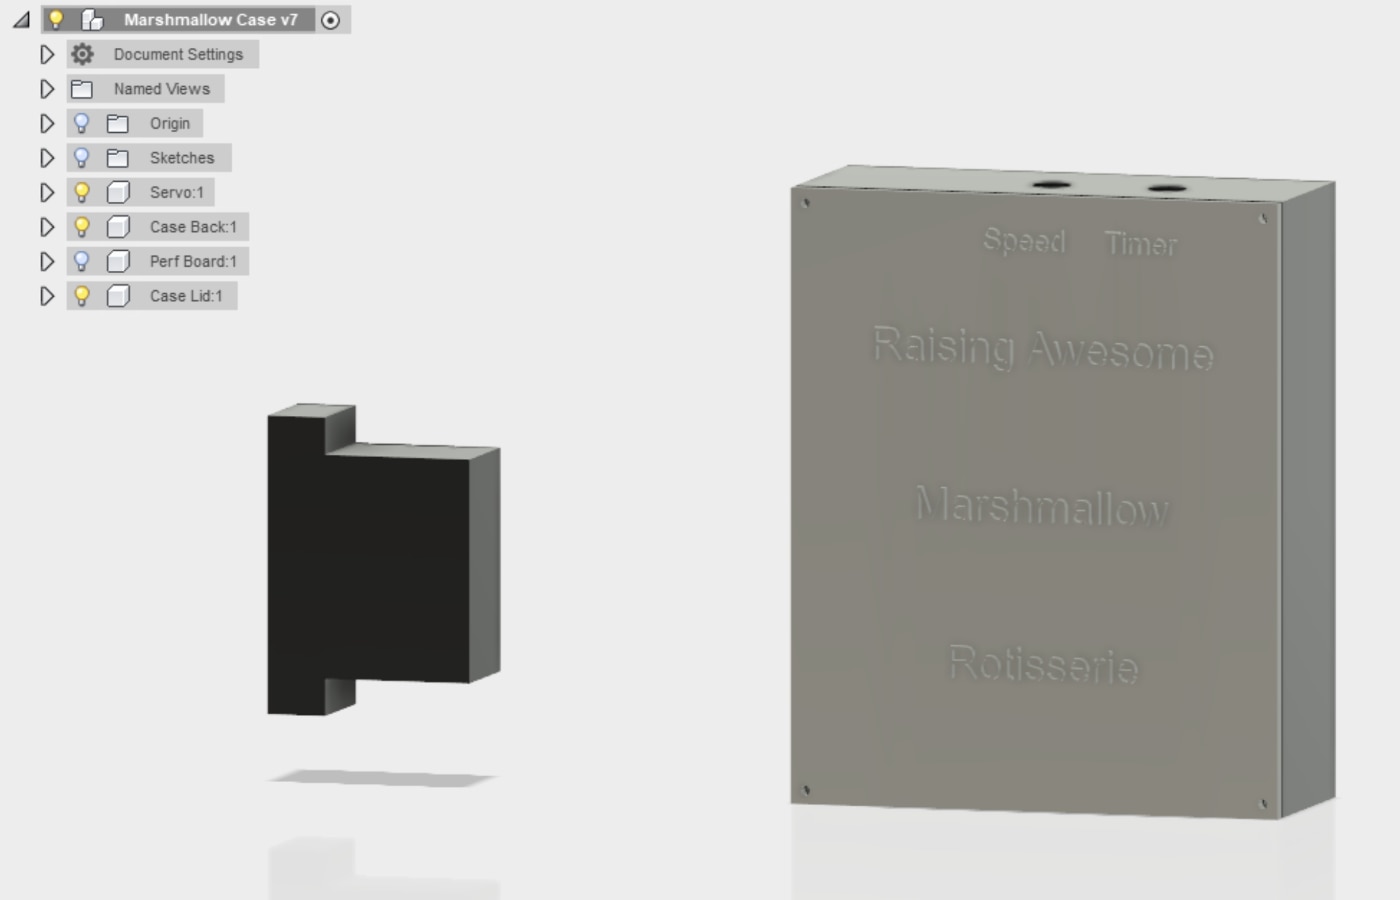
Step 6: Making the Marshmallow Stick
The Marshmallow Stick had some design needs of its own.
-
-
- We don't want to thread a marshmallow 3 feet down a stick - ewwww
- The stick should not not melt or burn
- It would need to be light enough for the servo to drive it
- We don't want the marshmallows sagging and spinning once the center melted
- We want to do up to 4 marshmallows at once
-
So, we with 1/8" carbon steel rod to make it. You can pick it up at a home store for around $3. We bent it such that marshmallows could be inserted on the axis (for even roasting) without them having to be pushed down the entirety of the rod as shown here:
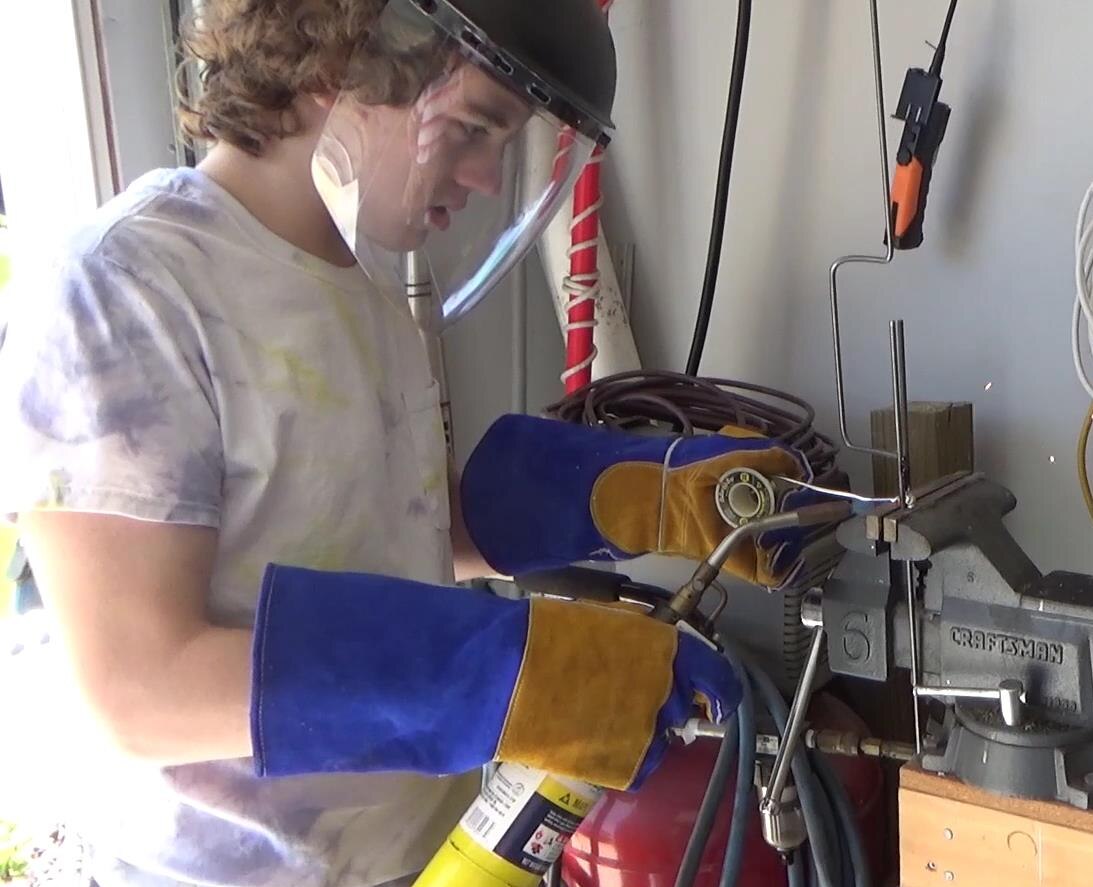
Marshmallow Stick being Soldered with MAPP Gas
We used MAPP gas and solder (for sweating copper pipe) to join it all together. There is no concern with the soldermelting at the fire pit because if we were hot enough to melt solder, we'd long burn our marshmallows to dust.
Step 7: Assembly
With the precise measurements using the caliper to design the 3D printed parts, assembly was a breeze. We just slid the potentiometers into the holes on top first, did a little filing for the servo to fit, and it was quickly together. We used the other scrap servo's case screws to screw on the lid. They are so small in diameter, you hardly notice them.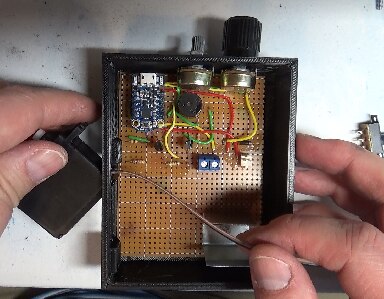
Assembling the Populated Perfboard to the 3D Printed Case
To connect the marshmallow stick to the servo, we 3D printed a hub. It was then screwed to a servo horn, which was then screwed to the our motor output shaft. The splined end of the shaft kept it firmly in place with no slipping of the hub or stick.
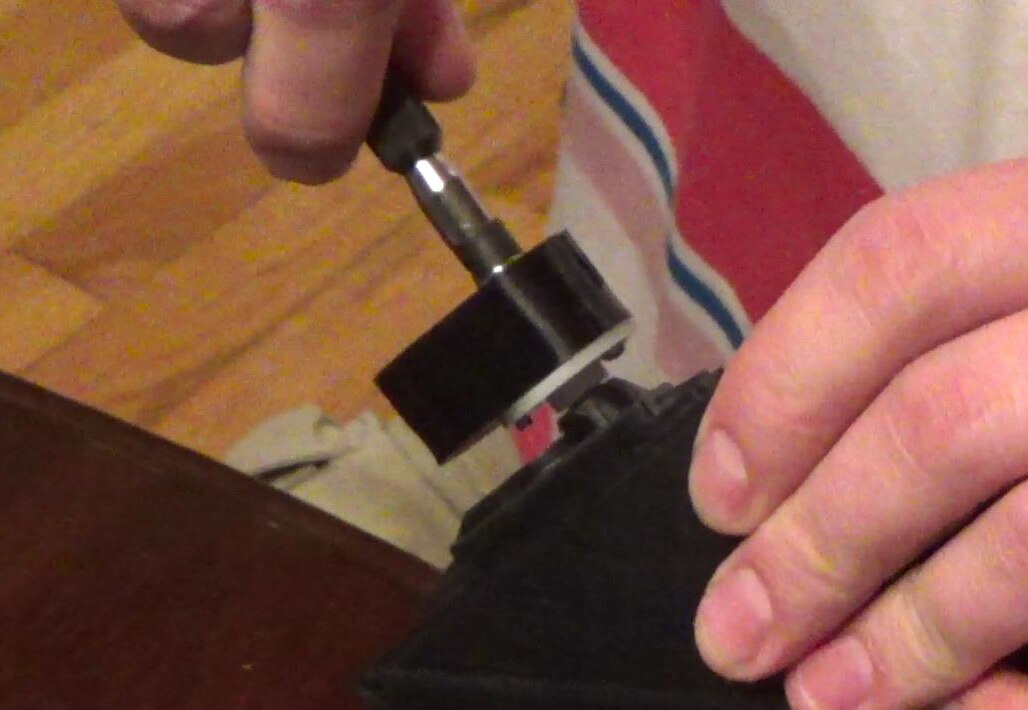
3D Printed Hub Screwed to a Servo Horn to Attach the Stick to the Motor
Step 8: Testing
When we tested it, we barely had the fire going, so we found that our 4 minute timer wasn't long enough. We could readily just change line 26 of the code to increase the top end of the timer - or get a real fire going. Otherwise, it worked exactly as we intended. Our only complaint is that the gears of this servo are a bit noisy. So, we will experiment with lubricants to see if we can quiet them down.
The Final Video:
So, this concludes our weekend project to design a Marshmallow Rotisserie. With the 3D files, code, and schematic all developed, a family could readily knock this out in just a few hours - depending on their soldering skills. It makes for a fun project with the kids that they could show their friends in school. Even if they don't partake in every step of the way, watching something they helped make generate a tasty treat makes for a great memory.
For some additional content and tips, here is our Raising Awesome video of the build:
Thanks for the opportunity, Element14!
-

DAB
-
Cancel
-
Vote Up
0
Vote Down
-
-
Sign in to reply
-
More
-
Cancel
Comment-

DAB
-
Cancel
-
Vote Up
0
Vote Down
-
-
Sign in to reply
-
More
-
Cancel
Children