element14 Community
element14 Community
    Register Log In
  • Site
  • Search
  • Log In Register
  • Community Hub
    Community Hub
    • What's New on element14
    • Feedback and Support
    • Benefits of Membership
    • Personal Blogs
    • Members Area
    • Achievement Levels
  • Learn
    Learn
    • Ask an Expert
    • eBooks
    • element14 presents
    • Learning Center
    • Tech Spotlight
    • STEM Academy
    • Webinars, Training and Events
    • Learning Groups
  • Technologies
    Technologies
    • 3D Printing
    • FPGA
    • Industrial Automation
    • Internet of Things
    • Power & Energy
    • Sensors
    • Technology Groups
  • Challenges & Projects
    Challenges & Projects
    • Design Challenges
    • element14 presents Projects
    • Project14
    • Arduino Projects
    • Raspberry Pi Projects
    • Project Groups
  • Products
    Products
    • Arduino
    • Avnet Boards Community
    • Dev Tools
    • Manufacturers
    • Multicomp Pro
    • Product Groups
    • Raspberry Pi
    • RoadTests & Reviews
  • Store
    Store
    • Visit Your Store
    • Choose another store...
      • Europe
      •  Austria (German)
      •  Belgium (Dutch, French)
      •  Bulgaria (Bulgarian)
      •  Czech Republic (Czech)
      •  Denmark (Danish)
      •  Estonia (Estonian)
      •  Finland (Finnish)
      •  France (French)
      •  Germany (German)
      •  Hungary (Hungarian)
      •  Ireland
      •  Israel
      •  Italy (Italian)
      •  Latvia (Latvian)
      •  
      •  Lithuania (Lithuanian)
      •  Netherlands (Dutch)
      •  Norway (Norwegian)
      •  Poland (Polish)
      •  Portugal (Portuguese)
      •  Romania (Romanian)
      •  Russia (Russian)
      •  Slovakia (Slovak)
      •  Slovenia (Slovenian)
      •  Spain (Spanish)
      •  Sweden (Swedish)
      •  Switzerland(German, French)
      •  Turkey (Turkish)
      •  United Kingdom
      • Asia Pacific
      •  Australia
      •  China
      •  Hong Kong
      •  India
      •  Korea (Korean)
      •  Malaysia
      •  New Zealand
      •  Philippines
      •  Singapore
      •  Taiwan
      •  Thailand (Thai)
      • Americas
      •  Brazil (Portuguese)
      •  Canada
      •  Mexico (Spanish)
      •  United States
      Can't find the country/region you're looking for? Visit our export site or find a local distributor.
  • Translate
  • Profile
  • Settings
Portable Electronics Kit
  • Challenges & Projects
  • Project14
  • Portable Electronics Kit
  • More
  • Cancel
Portable Electronics Kit
Blog More gradual progression towards my Pi-IDE - Portable Electronics / Dev Kit
  • Blog
  • Forum
  • Documents
  • Events
  • Polls
  • Files
  • Members
  • Mentions
  • Sub-Groups
  • Tags
  • More
  • Cancel
  • New
Join Portable Electronics Kit to participate - click to join for free!
  • Share
  • More
  • Cancel
Group Actions
  • Group RSS
  • More
  • Cancel
Engagement
  • Author Author: the-dubster
  • Date Created: 6 Apr 2018 11:17 PM Date Created
  • Views 544 views
  • Likes 6 likes
  • Comments 3 comments
  • portableekitch
Related
Recommended

More gradual progression towards my Pi-IDE - Portable Electronics / Dev Kit

the-dubster
the-dubster
6 Apr 2018

It's been a little while since an update - and this is really rather minor, it revolves almost exclusively around the PSU case design.


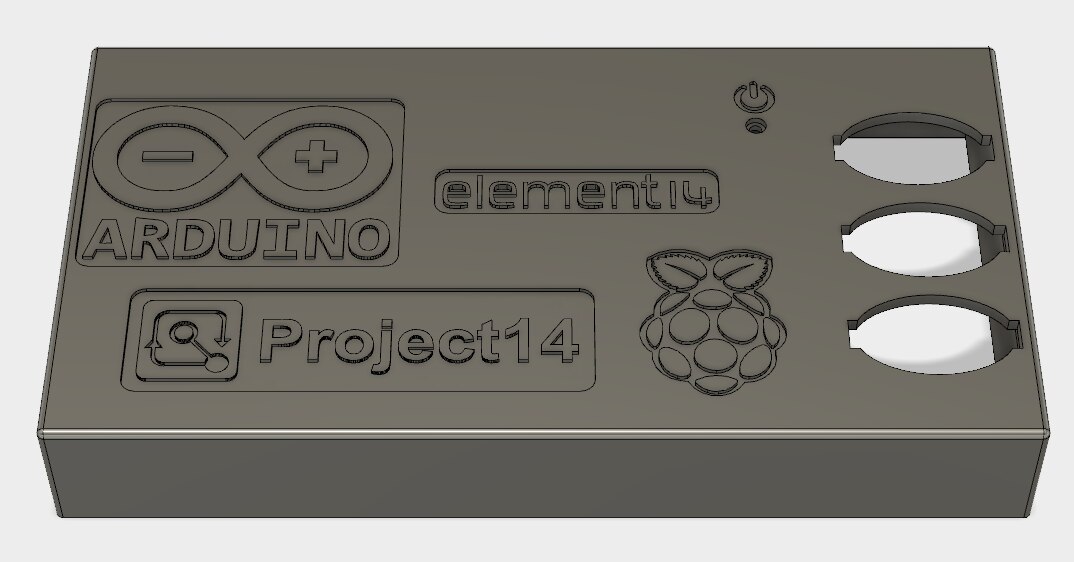
The initial sketch up in Fusion360 looked grand but printed less than great. Having decided (unnecessarily) to adorn the upper surface with logos I set about translating images to a printable 3D model.

These were then blended into the lid design and sat proud - the pictures looked great so I printed one - full case, upper and lower.


The case halves fitted like a treat, the stepped lip I designed in clipped into place so no additional hardware was required to bolt stuff together, but - as my previous update showed - having the logos flat against the glass bed and the rest of the large surface area printed over supports, the overall effect was . . . . . . . . well, crap!


Added to that, some logos were barely recognisable.


Back to 360 - a lot!


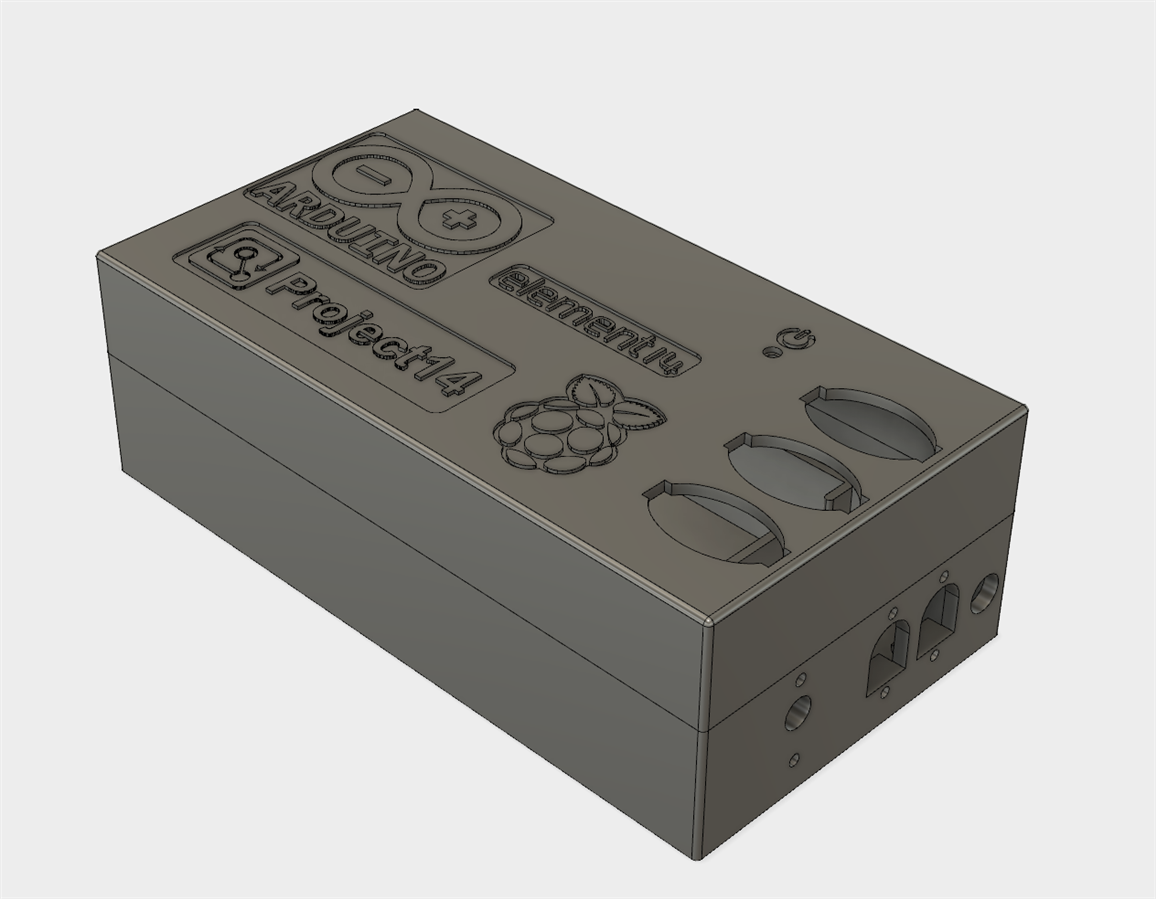
Whilst there, I opted to redesign the whole case, the bottom now guides the mains input down a side channel moulded into the case. Why? dunno, I just wanted to!

3 switches were used instead of the original 2, (I found the missing one that I didn't even realise was missing).


image


After 2 more lid design rehashes and partial prints (Simplify 3D allows me to set how much of a design I actually want to print - basically, the first 1.6mm (8 layers) was sufficient to see if the design worked, logos printed ok and switches fitted.


2 skinny prints later we were cooking on gas so the new lid was printed - right up until the point I noticed the nozzle was doing a lot of nothing!


Hot? image

Moving? image

Depositing molten filament? image


Hmmm, erm, had I run out of that tiny bit I had left on that reel? image


Doh!  Spare reel of grey popped on and off it went - YAY! Lid done.


image


Base smashed out with virtually no issues - OK, I forgot to move the feet rubber holes when I stretched the case widthways - done now, also I accidentally bought 2 x normal length 2.1mm x 5.5mm DC plugs and 1 x long 2.1mm x 5.5mm DC plug.

It sticks out a lot more and looked daft - so I redesigned the under socket mount to set it back into the case - problem solved - except It now won't let me fit the DC socket in . . . . . . . image


There's been a bit more rework of the design, but I shan't bore you with the fine(er) details.


image


Onto the REALLY pointless part!


There's a standard 5mm green LED that lets you know if the PSU is powered up, now the original case has a dinky light guide leading to the top cover and all was well, I've raised the top height by some margin to allow the switches to be mounted / connected - that stuff just ain't gonna fly now.


The way I saw it was:


          1. Chop out the LED, pop a 5mm hole in the top case and mount the LED higher . . . . . . or

          2. Design a printed sleeve to drop over the current LED - stuff a bundle of plastic 'optical fibres' into the to of the LED sleeve, design & print a guide to attach to the lid for the fibres to poke thru, clad the connecting fibres / bond the 3 parts together with heat shrink and     

              finally, glue the top part to the inside of the lid & melt the protruding fibres into a clear blob on top . . . . .            


Wanna guess which option I went for? image image image


PROPER pictures will be added as an edit in the next day or two.


After this opus is finally done it's onto the external variable power supply for the project area.


P.S.  I offered an other member a nice option for a combined bluetooth keyboard / trackpad when they asked about a RPi 3+ laptop build . . . . . . .


                                   One is currently winging its way to me courtesy of Royal Mail!  THAT should free up some serious real estate versus the full size keyboard I had - plus it also frees up two of the USB ports (keyboard dongle & mouse cable).


More to come - interesting stuff next time!

  • Sign in to reply

Top Comments

  • genebren
    genebren over 7 years ago +1
    Nice update to your project. I really need to get started in 3D printing, after all, you make it look like fun. Gene
  • the-dubster
    the-dubster over 7 years ago in reply to genebren +1
    Cheers genebren Printing is great fun - 3D modelling to get to WHAT you want to print is sometimes an absolute hoot! Sometimes it is a bit of a fiddle - but getting it right is a great feeling for me …
  • the-dubster
    the-dubster over 7 years ago

    Update:


    The whole 'fibre optic light guide' was properly crappy!!

    A big bundle of those plastic optical fibres miget look bright, but 6 of them thru a 2mm hole? Not so much!


    Solution? Dig thru that bag of random LEDs I got in my £35 components bundle from eBay (a proper bargain IMHO) - dig out one with a Vf the same as the drive voltage being supplied to the fitted LED (eBay component tester gives Vf rather handily), change the 2mm round hole in the lid to a rectangular slot (for the red rectangular LED), glue the LED in place, solder a pair of fly leads to the PSU and plug the LED into the fitted 2 pin plug!


    Sorted.


    PSU base now reprinted with PCB retainer at one end, remodelled DC jack outlets (I got another, shorter DC plug), test fit the two halves - 'click'  -  yup, they lock together perfectly.


    Time to wire up the PSU to the switches & 3 outlets tomorrow!


    Once it's done, fitted and working, I'll be sure to let you all know.

    • Cancel
    • Vote Up 0 Vote Down
    • Sign in to reply
    • More
    • Cancel
  • the-dubster
    the-dubster over 7 years ago in reply to genebren

    Cheers genebren


    Printing is great fun - 3D modelling to get to WHAT you want to print is sometimes an absolute hoot!


    Sometimes it is a bit of a fiddle - but getting it right is a great feeling for me - (especially since my first proper attempt at ANY sort of 3D modelling was as recent as 22 Dec 2017)!!


    For the 2 fixtures for the fibre light guide (photo's to come), it was about 15-20 minutes from starting to sketch designs to fully printed parts for both bits combined!

    It would have been quicker if I'd drawn them both at the same time!


    Do it, you know it makes sense! image

    • Cancel
    • Vote Up +1 Vote Down
    • Sign in to reply
    • More
    • Cancel
  • genebren
    genebren over 7 years ago

    Nice update to your project.  I really need to get started in 3D printing, after all, you make it look like fun.

    Gene

    • Cancel
    • Vote Up +1 Vote Down
    • Sign in to reply
    • More
    • Cancel
element14 Community

element14 is the first online community specifically for engineers. Connect with your peers and get expert answers to your questions.

  • Members
  • Learn
  • Technologies
  • Challenges & Projects
  • Products
  • Store
  • About Us
  • Feedback & Support
  • FAQs
  • Terms of Use
  • Privacy Policy
  • Legal and Copyright Notices
  • Sitemap
  • Cookies

An Avnet Company © 2025 Premier Farnell Limited. All Rights Reserved.

Premier Farnell Ltd, registered in England and Wales (no 00876412), registered office: Farnell House, Forge Lane, Leeds LS12 2NE.

ICP 备案号 10220084.

Follow element14

  • X
  • Facebook
  • linkedin
  • YouTube