


This is the final blog for my unofficial entry in the Picasso Design Challenge. I set out to create a holonomic mobile robot (which is a robot that doesn't change the orientation of the chassis even when the chassis is moving in different directions) that used a Raspberry Pi 3B+ with Camera V2 to display a magnified or close up image of a portion of a Picasso picture. And that is what I have just about managed to produce. It seems a little fragile and I wouldn't want to move it about too much, and it does have a lot of trailing power wires, along with keyboard and mouse, but it does actually, really work! I didn't use a Picasso picture in the end as the camera was not mounted underneath the chassis. My original plan was to drive about randomly over a Picasso picture (a copy obviously!) showing a magnified image of the top LCD display. Regretfully I did not obtain a macro lense for the Camera V2 so when mounted underneath the chassis the image was very blurred and did not produce a good picture. Therefore I decided to mount the Camera V2 on the front of the chassis and use an upright picture instead. It does work and it demonstrates that the system does work as designed. If I had a macro camera V2 then I am fairly hopeful that it would have worked as desired.
The camera was easy to add to the Raspberry Pi 3B+. All I had to do was to unclip the retaining clip on the connector on the Raspberry Pi, insert the cable the correct way around (with the shiny connections facing the internal connectors inside the clip) and then just push the clip down. After that I went to the Raspberry Pi operating system, found the bit with the configuration of peripherals and enabled it. It asked me if I wanted to reboot, which was necessary, so I did. Then when it had rebooted I went to the Command line, typed in
sudo raspistill -o image1.jpg
to get a still image captured and then
sudo raspivid -o video1.h264 -t 10000
to get a video. I didn't have time to work out how to continuously stream a live video image to the LCD display but the video worked well enough to demonstrate the functionality.
There are many wires and cables dangling and dragging from the chassis as illustrated below, but fortunately as it is a four wheel drive system it is able to overcome the drag they introduce and continues to move.
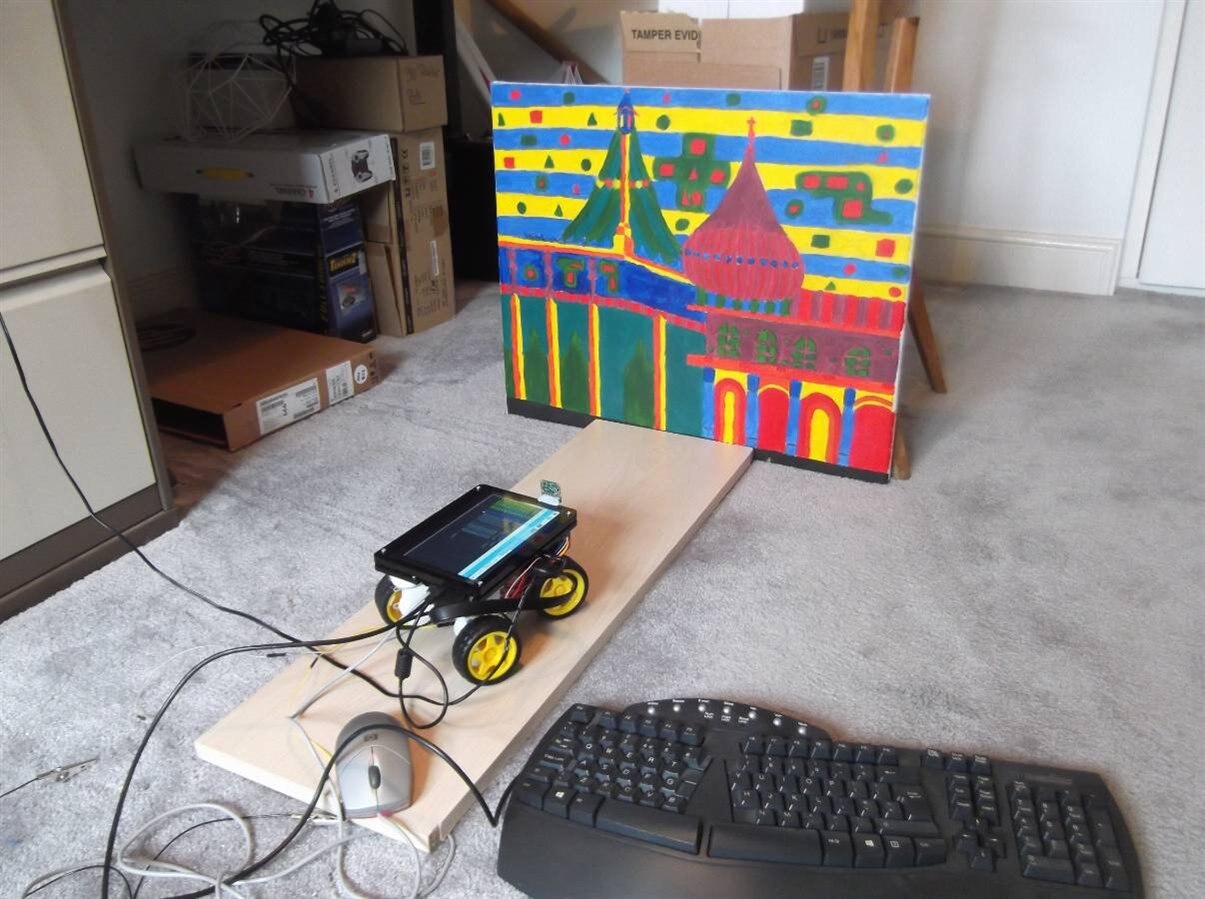
In the end I didn't have time to get a proper Picasso picture and as the camera wasn't mounted underneath the chassis I could use any picture. I just happened to have the picture below which is bright colours and sort of abstract. Not quite a Picasso but it does illustrate the capabilities of the system and the Camera V2.

Below is a close-up image of the picture, which is mostly the same area as that captured by the Camera V2.

In order to see more of the capabilities of the HoloPiBot I took the chance of reprogramming the Arduino that controls that motor units so that it moved in a straight line forwards for a much longer time period. This enabled me to see how well the camera operates as it moves closer and closer to the picture. The images starts to become blurred as the limit of the standard lense used on the Camera V2 is reached. If I had purchased a macro lense to combine with Camera V2 I would probably have been able to mount the camera underneath the chassis, which was the original idea. However, time and money are finite quantities and have run out.
Below is the programme for the Arduino that controls the four motor units.
void setup() {
// initialize digital pin LED_BUILTIN as an output.
pinMode(PhaseA, OUTPUT);
pinMode(PhaseB, OUTPUT);
pinMode(PhaseC, OUTPUT);
pinMode(PhaseD, OUTPUT);
digitalWrite(PhaseA, LOW);
digitalWrite(PhaseB, LOW);
digitalWrite(PhaseC, LOW);
digitalWrite(PhaseD, LOW);
pinMode(Phase2A, OUTPUT);
pinMode(Phase2B, OUTPUT);
pinMode(Phase2C, OUTPUT);
pinMode(Phase2D, OUTPUT);
digitalWrite(Phase2A, LOW);
digitalWrite(Phase2B, LOW);
digitalWrite(Phase2C, LOW);
digitalWrite(Phase2D, LOW);
}
// the loop function runs over and over again forever
void loop()
{
int count;
count = 0;
allstop1();
allstop2();
while(1)
{
forwardstep1(2000);
allstop1();
delay(2000);
leftturnstep(50);
delay(2000);
backwardstep1(200);
delay(2000);
rightturnstep(50);
delay(2000);
} /* while */
} /* loop */
void forwardstep1(int steps)
{
while (steps > 0)
{
digitalWrite(PhaseA, HIGH); // turn the Phase on (HIGH is the voltage level)
delay(stepdelay); // wait for a bit
digitalWrite(PhaseA, LOW); // turn the phase off and the next one on
digitalWrite(PhaseB, HIGH);
delay(stepdelay); // wait for a bit
digitalWrite(PhaseB, LOW); // turn the phase off and the next one on
digitalWrite(PhaseC, HIGH);
delay(stepdelay);
digitalWrite(PhaseC, LOW); // turn the phase off and the next one on
digitalWrite(PhaseD, HIGH);
delay(stepdelay);
digitalWrite(PhaseD, LOW); // turn the phase off and the next one on
steps = steps - 1;
} /* while */
} /* forwardstep1 */
void backwardstep1(int steps)
{
while (steps > 0)
{
digitalWrite(PhaseD, HIGH); // turn the Phase on (HIGH is the voltage level)
delay(stepdelay); // wait for a bit
digitalWrite(PhaseD, LOW); // turn the phase off and the next one on
digitalWrite(PhaseC, HIGH);
delay(stepdelay); // wait for a bit
digitalWrite(PhaseC, LOW); // turn the phase off and the next one on
digitalWrite(PhaseB, HIGH);
delay(stepdelay);
digitalWrite(PhaseB, LOW); // turn the phase off and the next one on
digitalWrite(PhaseA, HIGH);
delay(stepdelay);
digitalWrite(PhaseA, LOW); // turn the phase off and the next one on
steps = steps - 1;
} /* while */
} /* backwardstep1 */
void forwardstep2(void)
{
digitalWrite(Phase2A, HIGH); // turn the Phase on (HIGH is the voltage level)
delay(stepdelay); // wait for a bit
digitalWrite(Phase2A, LOW); // turn the phase off and the next one on
digitalWrite(Phase2B, HIGH);
delay(stepdelay); // wait for a bit
digitalWrite(Phase2B, LOW); // turn the phase off and the next one on
digitalWrite(Phase2C, HIGH);
delay(stepdelay);
digitalWrite(Phase2C, LOW); // turn the phase off and the next one on
digitalWrite(Phase2D, HIGH);
delay(stepdelay);
digitalWrite(Phase2D, LOW); // turn the phase off and the next one on
} /* forwardstep2 */
void leftturnstep(int steps)
{
while (steps > 0)
{
digitalWrite(Phase2A, HIGH); // turn the Phase on (HIGH is the voltage level)
delay(stepdelay); // wait for a bit
digitalWrite(Phase2A, LOW); // turn the phase off and the next one on
digitalWrite(Phase2B, HIGH);
delay(stepdelay); // wait for a bit
digitalWrite(Phase2B, LOW); // turn the phase off and the next one on
digitalWrite(Phase2C, HIGH);
delay(stepdelay);
digitalWrite(Phase2C, LOW); // turn the phase off and the next one on
digitalWrite(Phase2D, HIGH);
delay(stepdelay);
digitalWrite(Phase2D, LOW); // turn the phase off and the next one on
steps = steps - 1;
} /* while */
} /* leftturnstep */
void rightturnstep(int steps)
{
while (steps > 0)
{
digitalWrite(Phase2D, HIGH); // turn the Phase on (HIGH is the voltage level)
delay(stepdelay); // wait for a bit
digitalWrite(Phase2D, LOW); // turn the phase off and the next one on
digitalWrite(Phase2C, HIGH);
delay(stepdelay); // wait for a bit
digitalWrite(Phase2C, LOW); // turn the phase off and the next one on
digitalWrite(Phase2B, HIGH);
delay(stepdelay);
digitalWrite(Phase2B, LOW); // turn the phase off and the next one on
digitalWrite(Phase2A, HIGH);
delay(stepdelay);
digitalWrite(Phase2A, LOW); // turn the phase off and the next one on
steps = steps - 1;
} /* while */
} /* rightturnstep */
void allstop1(void)
{
digitalWrite(PhaseA, LOW); // turn off all phases
digitalWrite(PhaseB, LOW);
digitalWrite(PhaseC, LOW);
digitalWrite(PhaseD, LOW);
delay(stepdelay);
} /* allstop1 */
void allstop2(void)
{
digitalWrite(Phase2A, LOW); // turn off all phases
digitalWrite(Phase2B, LOW);
digitalWrite(Phase2C, LOW);
digitalWrite(Phase2D, LOW);
delay(stepdelay);
} /* allstop2 */
It's not a pretty programme, or even a pretty chassis/hardware build, but it works and it does what I set out to do, so I am very happy to have completed the Picasso Design Challenge with my sanity intact. Whatever I do next, it will definitely be simpler and less stressful. I think I'll stick to smaller, lighter mobile robots that work from AA batteries or smaller and are lightweight.
Dubbie
Top Comments