


Introduction
This super cool little project illustrates just how far the maker industry has progressed since the first Uno appeared.
This tiny ESP8266 MCU module has the horsepower to run a QVGA color touchscreen while running a WiFi stack to access the internet and continually parse the JSON (JavaScript Object Notation) data it retrieves. And the whole project can be assembled in about 1 minute. Of course a few parts need to be pre-3D printed and a couple of headers need to be soldered, and some firmware needs to be loaded, but the actual labor involved is astonishingly small, especially given how much infrastructure is being controlled and how sophisticated the application is.
Background
Tariq had sent me a a swag package for being featured on Makevember that included a couple of MCU cards and an invitation to participate in the RF Project14 contest. One of the MCUs was an Adafruit Feather Huzzah which is based on an ESP8266. I'm sure that from element14's point of view and probably most of the membership as well, the best thing we can do with modules provided by element14 is to blog about what we did with them. So this blog is partly to pay homage to element14 for giving us such great modules and reinforce the motivation to keep it up.
This powerful little MCU includes WiFi capability, so I figured why not do an "RF" project with it. I decided to to implement a device to retrieve weather data from the internet and display it continuously, but while researching how to to do this, I came across others who had already done it, including a great project by Daniel Eichorn that used a Huzzah.
I seem to have an obsession with weather stations, I have bought several and I have built several. I just never seem to get all the features I want in one device. Where I live, if you don't dress appropriately for the weather, you could be in for a world of pain. Maybe this build will finally have most of the features I need.
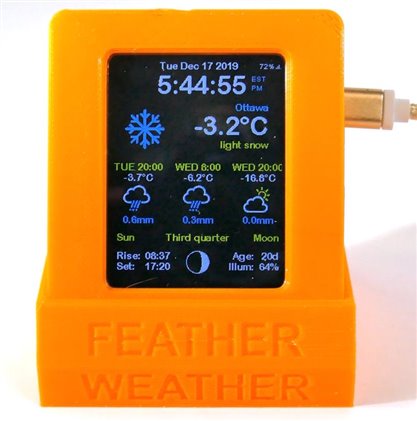
Eventually I came across an Adafruit version of Daniel's project which used a Featherwing TFT display. It included a 3D print file for the case. All this really paid off in simplifying what I needed to do, in fact the only unique creative things I did for this project were to design a nice 3-D printed stand and come up with the Feather Weather name.
There was still some work to do to install all the correct libraries and 3D print all the plastic parts and put it all together, but I ended up with a great little device for the amount of work I had to do. I, and my family, are very happy with the result.
Thanks for the Feather tariq.ahmad and for the prodding to do something with it.
The Build
Adafruit has a guide on how to build their ESP8266 weather station (actually they have 2 different builds, but this link is what I followed). Their instructions are excellent, with one main exception:
The program uses OpenWeatherMap to obtain weather data. This OpenWeatherMap site requires an API key to identify and validate who is asking for data. Anyone can obtain a free API key from OpenWeatherMap and insert it in the program, but this is not well explained in the Adafruit guide. They include a link to OpenWeatherMap in the code comments, but since they include an API key in the code they don't explain how to get your own (unless I missed it). Their key did not work for me and I had to get my own.
The OpenWeatherMap site is also not too clear on how to get an API key, it indicates you must create an account, but is a little fuzzy about having to subscribe to the free weather data and it seems to say the API key will be emailed to you. I did not get an email with the API key, but eventually discovered it on my member profile page.
Here is a video showing how simple it is to assemble the hardware:
Software
Beyond that issue there is a fair amount of work to do to set up the arduino IDE to work with this hardware and software.
First you need to add the ESP8266 to the list of arduino IDE supported cards:
https://learn.adafruit.com/adafruit-feather-huzzah-esp8266/using-arduino-ide
One thing to note is that if your IDE already has other cards added to it, when adding this new json link, you put a comma after the last card json and paste in the new json message after the comma.
Then you need to install several libraries - the instructions are here:
I was worried that these libraries have all been updated with new versions since the guide was published, but the new versions all worked for me.
Adafruit GFX Library
Adafruit ILI9341 Library
Adafruit STMPE610
Mini Grafx by Daniel Eichhorn
simpleDSTadjust by neptune2
ESP8266 Weather Station Library by ThingPulse
JSON Streaming Parser by Daniel Eichhorn
WiFiManager for ESP8266 by tzapu
And you will need the arduino sketch:
After unzipping and making sure the .ino file and all .h files and .cpp file are in a directory with the same name as the .ino file, you will need to edit the quoted strings in 3 lines in the settings.h file:
#define WIFI_SSID "yourssid"
#define WIFI_PASS "yourpassword"
String OPEN_WEATHER_MAP_APP_ID = "ascowijcawjr390r2834q";
The SSID is the name of your WiFi network
The WIFI_PASS is the password you use to access that WiFi network
The APP_ID (API key) is obtained from your OpenWeatherMap account:
You need to sign up for an account here:
Subscribe to Current weather data here:
https://openweathermap.org/api
Look in your member profile page to find your API key
Copy and paste it into the settings.h file
Once all that is done you can compile and install the firmware on the Huzzah.
This a fairly complex arduino sketch with 8 libraries and 6 include files, which means there are lots of opportunities to get something wrong, so take time to follow the guide meticulously.
Packaging
Adafruit has designed a 3D printable case for the device - located here:
I printed it on a very coarse setting, which was fairly marginal - it might be worth printing on a bit finer mode.
I also designed a stable stand for the device - the stl file "feather1.zip" is attached to this blog.
Applications
This weather station might make a good addition to a bedroom dresser - it would tell you if you are running late in the morning (it shows the time) and the weather info might help you select appropriate clothing for the day.
It might also make a useful addition to the vestibule - it could tell you if you will need a coat or an umbrella during the day.
I have one at work and one at home.
Summary
I like this project - it has a small, clean, slick, hardware footprint and the heavy lifting software was done by someone else.
Despite its neat polished appearance, it is not a consumer product, it will only work within range of your specific WiFi access point and the number of steps required to get it working, place it in the make category.
However, if you are looking for a useful and cool "simple" little project to get your maker feet wet, this one fits the bill nicely.
And device is just sooo cute.
Update
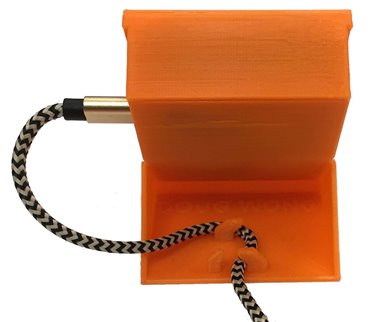
The original case designed by Adafruit was adequate for display, but I needed a case that was sturdy enough to be handled. So I designed one with stiffer (thicker) walls, better circuit board retention and strain relief cable management....
This new case works better in my office application where I expect it will be used as a little display to signify the employee of the week (EOTW). The EOTW selects the next EOTW from a different department.
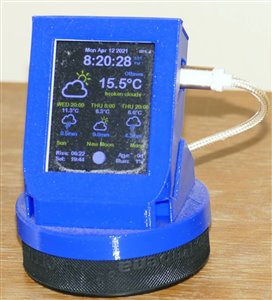
I also updated the software to add different graphics, text and colors.
Note one of the new stands is named Weather Feather instead of Feather Weather - I haven't decided which I like better.
Here is a picture of the cable management hooks that prevent strain on the USB connector and also prevent the cable from tipping the device over:
Another Update:
This version uses a puck in the base for more stability....
Note this stand is printed in this orientation with no support, which means the cavity for the puck requires the printer to bridge across 3 inches with no support.
Relevant Links:
Project14 | Winners Announcement: On a Wave of RF (Radio Frequency) Radiation!
Top Comments