element14 Community
element14 Community
    Register Log In
  • Site
  • Search
  • Log In Register
  • Community Hub
    Community Hub
    • What's New on element14
    • Feedback and Support
    • Benefits of Membership
    • Personal Blogs
    • Members Area
    • Achievement Levels
  • Learn
    Learn
    • Ask an Expert
    • eBooks
    • element14 presents
    • Learning Center
    • Tech Spotlight
    • STEM Academy
    • Webinars, Training and Events
    • Learning Groups
  • Technologies
    Technologies
    • 3D Printing
    • FPGA
    • Industrial Automation
    • Internet of Things
    • Power & Energy
    • Sensors
    • Technology Groups
  • Challenges & Projects
    Challenges & Projects
    • Design Challenges
    • element14 presents Projects
    • Project14
    • Arduino Projects
    • Raspberry Pi Projects
    • Project Groups
  • Products
    Products
    • Arduino
    • Avnet & Tria Boards Community
    • Dev Tools
    • Manufacturers
    • Multicomp Pro
    • Product Groups
    • Raspberry Pi
    • RoadTests & Reviews
  • About Us
  • Store
    Store
    • Visit Your Store
    • Choose another store...
      • Europe
      •  Austria (German)
      •  Belgium (Dutch, French)
      •  Bulgaria (Bulgarian)
      •  Czech Republic (Czech)
      •  Denmark (Danish)
      •  Estonia (Estonian)
      •  Finland (Finnish)
      •  France (French)
      •  Germany (German)
      •  Hungary (Hungarian)
      •  Ireland
      •  Israel
      •  Italy (Italian)
      •  Latvia (Latvian)
      •  
      •  Lithuania (Lithuanian)
      •  Netherlands (Dutch)
      •  Norway (Norwegian)
      •  Poland (Polish)
      •  Portugal (Portuguese)
      •  Romania (Romanian)
      •  Russia (Russian)
      •  Slovakia (Slovak)
      •  Slovenia (Slovenian)
      •  Spain (Spanish)
      •  Sweden (Swedish)
      •  Switzerland(German, French)
      •  Turkey (Turkish)
      •  United Kingdom
      • Asia Pacific
      •  Australia
      •  China
      •  Hong Kong
      •  India
      •  Korea (Korean)
      •  Malaysia
      •  New Zealand
      •  Philippines
      •  Singapore
      •  Taiwan
      •  Thailand (Thai)
      • Americas
      •  Brazil (Portuguese)
      •  Canada
      •  Mexico (Spanish)
      •  United States
      Can't find the country/region you're looking for? Visit our export site or find a local distributor.
  • Translate
  • Profile
  • Settings
Spring Clean!
  • Challenges & Projects
  • Project14
  • Spring Clean!
  • More
  • Cancel
Spring Clean!
Projects Tap Tap Tap
  • News
  • Projects
  • Forum
  • Members
  • More
  • Cancel
  • New
Join Spring Clean! to participate - click to join for free!
  • Share
  • More
  • Cancel
Group Actions
  • Group RSS
  • More
  • Cancel
Engagement
  • Author Author: kmikemoo
  • Date Created: 4 Jun 2025 4:13 AM Date Created
  • Views 2113 views
  • Likes 13 likes
  • Comments 14 comments
  • RF Attenuator
  • RF Tap
  • spring cleaning
Related
Recommended

Tap Tap Tap

kmikemoo
kmikemoo
4 Jun 2025
Tap Tap Tap

A few months back while looking for information on oscillators, I stumbled across a 40dB tap. Okay, the article was really about a RF power meter, but that looked complicated and, besides, I already have a NanoVNA. I would really like to NOT blow up the NanoVNA so the tap caught my eye. The article is from the June 2001 edition of QST magazine by the ARRL. The authors are Wes Hayward and Bob Larkin. The article is attached below.

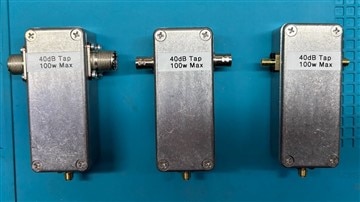
So... I ordered the little aluminum enclosures. Of course they come in a three pack. Fine. I need 1.5 inches of a brass strip. It comes in a 12 inch strip. Fine. I need a SMA bulkhead connector. They come in 5-packs. Fine. I don't have resistors of the correct power rating.  I can get 100 for the same price as 10.  Fine.  With all this excess material, I'll make a SO-239 version, a BNC version and a SMA version. It's a bit more than I was thinking about, but they will save me from using a bunch of adapters. This is a good thing.

So I built the SO-239 version. It turned out nice. It turned out that it wasn't quite as easy to build as I estimated AND... I built the easy one - the one in the article.  So the project stalled.  Onto the next bright shiny thing.

And the other versions? The only movement they have seen was to get pushed out of the camera shot for the 2-year antenna project.

In the spirit of Spring Clean, let's get this project completed.
Fantastic. I have just started and I'm using up all of the M2.5 hardware from my standoff kit. I need to order some hardware. Maybe this was why I stalled out a few months ago. At least I was able to find all of the SMA bulkhead connectors. The brass strip is still at the end of the work bench where I do my sawing. It hasn't moved in months. Even the resistors are still here – albeit buried under other stuff.

On a bright note, my custom brass plate feedline installation jig is still here as well.
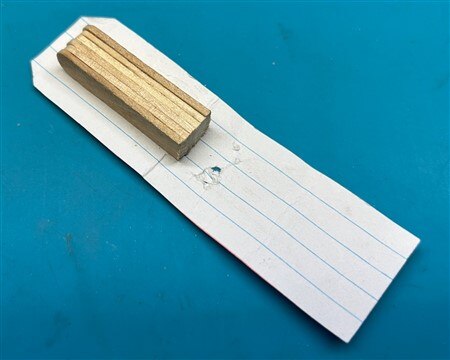
image

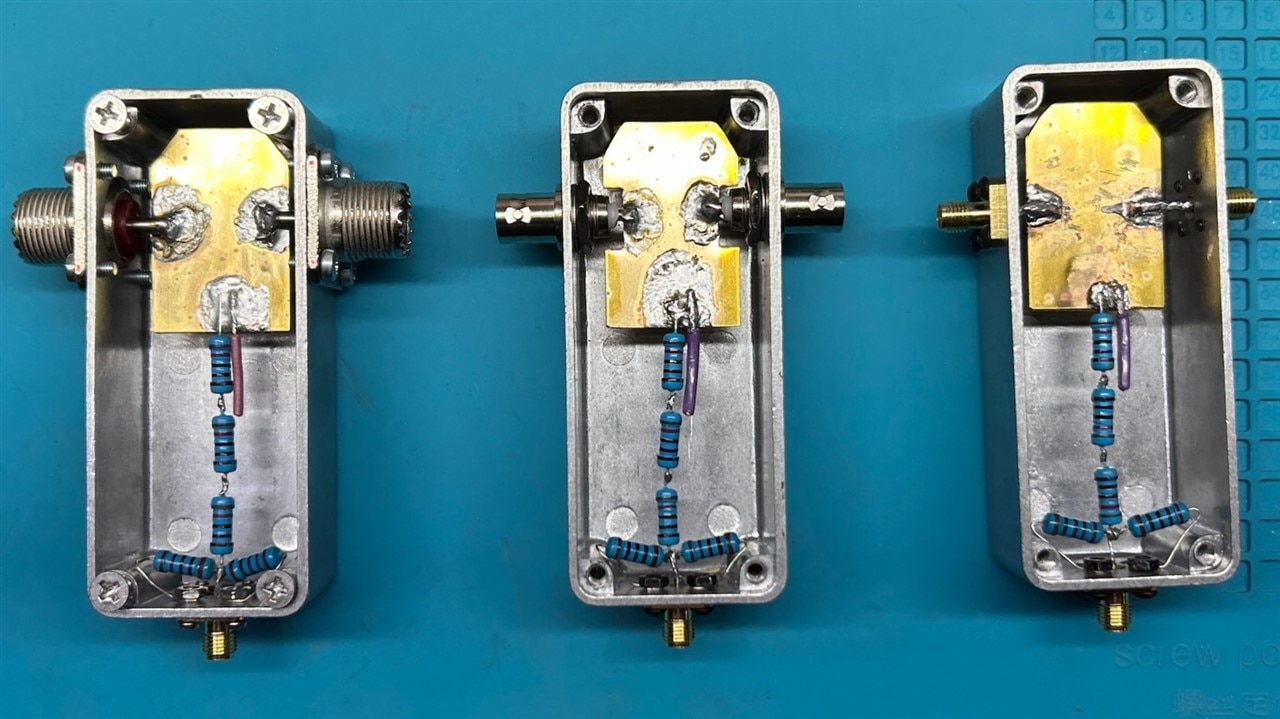
The build isn't super complicated.  Here was the starting point.  You can see that I started drilling some of the mounting holes while I waited for the M2.5 hardware.  Both the SO-239 and the SMA connector mounting holes were tapped into the body of the enclosure.
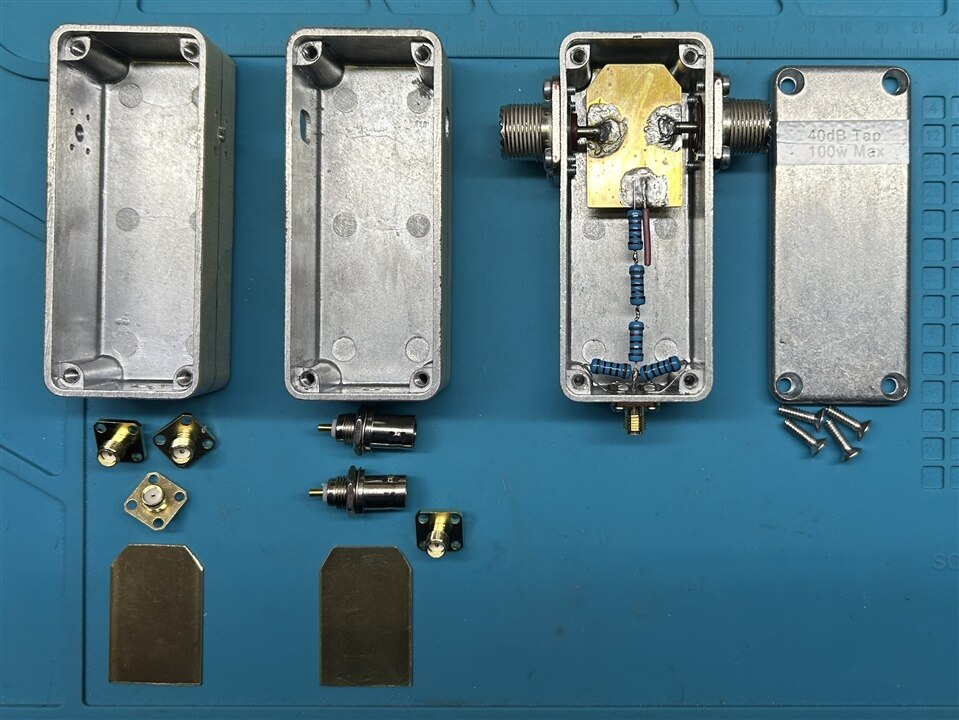
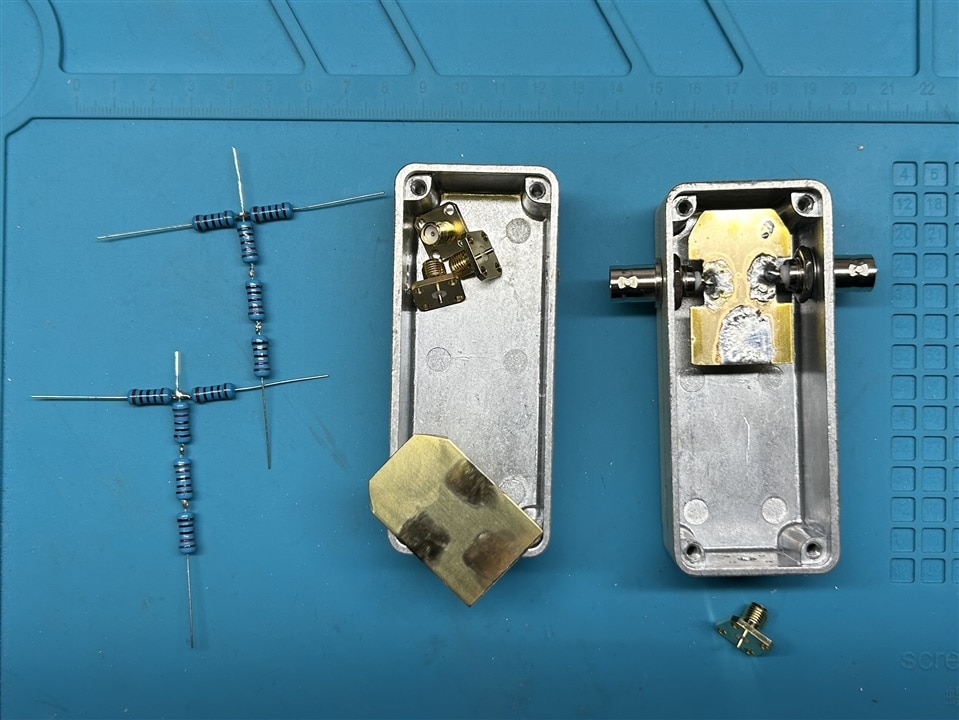
image   image

image

The purple wire is a gimmick capacitor and is supposed to improve performance at higher frequencies (>500MHz).  

Pre-soldering the brass plate worked better than just buffing the plate and trying to solder on it while in place.

For the BNC version, the brass plate needed to be notched.  I used a hand nibbler for that.

For the SMA version, connecting to the brass plate proved to be quite a chore.  I used a piece of solid #14 to bridge the gap between SMA center pins.  Once they were finally secure, I cut out the middle so the signal would flow through the brass plate.  Soldering to the SMA connectors was by far the most difficult aspect of the project.

For the end SMA connector, I used longer mounting screws so I could secure the two 100 ohm resistors to chassis ground.  Wrap the resistor tail around the protruding screw and secure with a nut.  This proved to be quite handy.

Performance

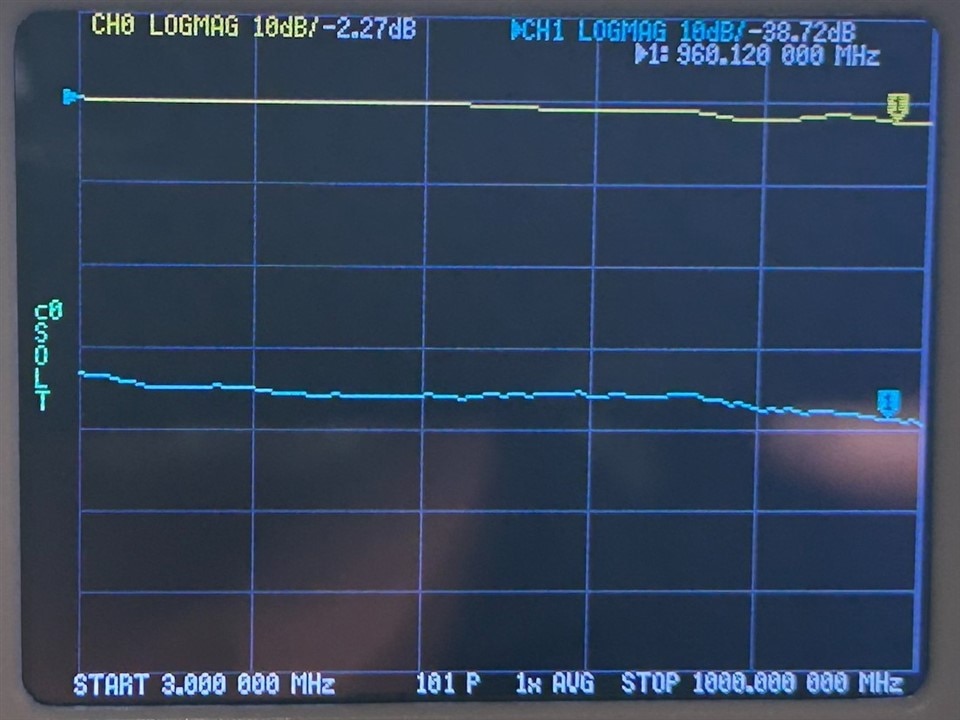
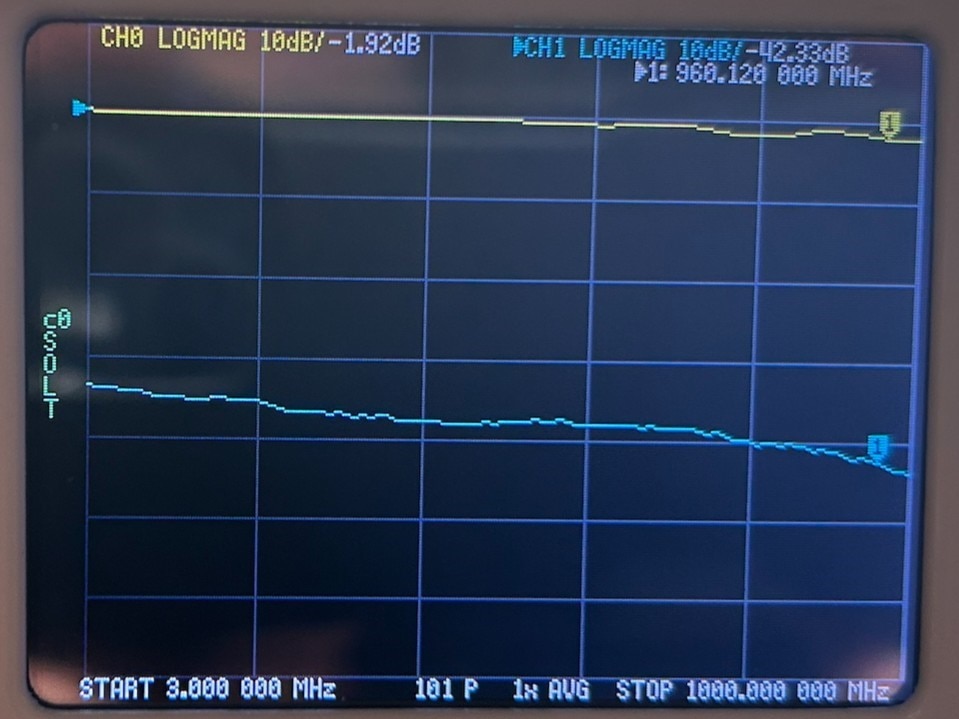
So how do they work?  I give them a "Good" grade.  According to my NanoVNA, they start at about 33dB of attenuation at 3MHZ.  Since I really don't plan to blast 100 watts of power through these, I should be fine.  The span depicted below is from 3 MHz to 1 GHz, although the article said that the tap was good only to about 500MHz.  I could always try lengthening the gimmick capacitor.

SO-239 Version
image

BNC Version
image

SMA Version
image

Conclusion

Again, soldering to the SMA bulkhead connectors was by far the most challenging aspect of this project.  Truth be told, this was probably why I didn't complete the BNC and SMA versions until now.  If I had to do it over again, I would try to use 22-26 AWG butt splice connectors to bridge between the center pin of the SMA connector and the plate or resistors.  I would also not connect the two 100 ohm resistors until after the center run is soldered in place.  Last build tip:  Use way more wire than you need for the gimmick capacitor.  You'll need some to hold on to while soldering.  Once it's soldered in place, then trim to length

There are now less random pieces parts laying about on the workbench and a couple of more pieces of test gear on the shelf.   If nothing else, my workbench is looking better than it has in months.  Now if I could only figure out why I bought those 4 MHz TCXO's...

imagePDF     image

.

  • Sign in to reply

Top Comments

  • kmikemoo
    kmikemoo 5 months ago in reply to jc2048 +1
    jc2048 I have not been into the radio hobby long enough to know the deep secrets. I do believe that the NanoVNA is "good" but it is not laboratory grade. I also believe that it is better at the lower frequencies…
  • jc2048
    jc2048 2 months ago in reply to kmikemoo +1
    If you want something that works better up towards the GHz area and don't need the hundreds of watts of power handling ability that the brass plate and N connectors give you, you might do better with a…
Parents
  • shabaz
    shabaz 3 months ago

    Hi Mike,

    Wow great work! I don't know how I missed seeing this project earlier. I'm tempted to build one now too, maybe with N connector. Your results with the 50 ohm termination look very good.

    Regarding the 100 ohm resistors, as jc2048 mentions, if they can be shortened, it may improve things at the high frequencies. Those two resistors can be small since they don't carry a lot of current, and can then be soldered directly between center pin and the body, rather than to the screw, e.g. if those two resistors were 0603 or 0805 sized. But anyway, the results look extremely usable already.

    You mentioned 100dB, 40dB is about the maximum that can be done reliably in a single metal enclosure, at least I've never managed more with DIY attenuation. Now that you have three, you could chain them to achieve 80 or 120 dB : ) I can see the need, I sometimes want 100 dB minimum too, to test radio receivers. 

    • Cancel
    • Vote Up 0 Vote Down
    • Sign in to reply
    • More
    • Cancel
  • kmikemoo
    kmikemoo 3 months ago in reply to shabaz

    Hi, shabaz .  Laughing  A couple of months ago, I would have said that I don't play around with things that high up on the spectrum... and would have had to walk that back fairly quickly.  A few of us in the radio club have started to dabble in Meshtastic. Essentially 915MHz LoRa texting.  So... I was also wrong about not having to improve these and now I will have to clean up those resistors and my gimmick capacitor as jc2048 recommends.

    I'm not disappointed that I didn't achieve 100dB attenuation - now.  I managed to build a 55dB attenuator and I think I'm beyond the knee of the curve. Laughing  It's TOO effective - at least for my radio games.

    • Cancel
    • Vote Up 0 Vote Down
    • Sign in to reply
    • More
    • Cancel
Comment
  • kmikemoo
    kmikemoo 3 months ago in reply to shabaz

    Hi, shabaz .  Laughing  A couple of months ago, I would have said that I don't play around with things that high up on the spectrum... and would have had to walk that back fairly quickly.  A few of us in the radio club have started to dabble in Meshtastic. Essentially 915MHz LoRa texting.  So... I was also wrong about not having to improve these and now I will have to clean up those resistors and my gimmick capacitor as jc2048 recommends.

    I'm not disappointed that I didn't achieve 100dB attenuation - now.  I managed to build a 55dB attenuator and I think I'm beyond the knee of the curve. Laughing  It's TOO effective - at least for my radio games.

    • Cancel
    • Vote Up 0 Vote Down
    • Sign in to reply
    • More
    • Cancel
Children
  • jc2048
    jc2048 2 months ago in reply to kmikemoo

    If you want something that works better up towards the GHz area and don't need the hundreds of watts of power handling ability that the brass plate and N connectors give you, you might do better with a piece of PCB material and a stripline. A 50R trace on standard thickness double-sided would be quite chunky and still have fairly good power handling capability. The attenuator parts could also go on the PCB (clear away most of the ground underneath), but in a much more compact form than you're managing with the diecast box.

    That's because a problem with the plate construction is the imbalance between the forward path and the return around the metal of the box. The return current has to somehow get round the corners faster than the forward current through the plate - in practice, rather than a smooth current flow in the return matching the forward one, the capacitive coupling between the two will be having to work harder at the corner to quickly haul the return signal on and that will look like an impedance mismatch in the through path. If you have a look at TEM cells for EMC testing, which is the same principle of expanding the coax to much larger proportions, the outer ground is gradually moved away from the inner, rather than there being this more abrupt transition.

    Another factor (I might not be right here) is the length of your box. At some point, as the frequency goes up, it will be a quarter wave and I think that will result in cancellation back the line (but I'm very iffy with the theory here, so don't take this as gospel). You'd be able to see if you have an SA that will work to several GHz because it would give a comb pattern to the frequency response of the through path (you might already be seeing some of that with the traces you show us).

    • Cancel
    • Vote Up +1 Vote Down
    • Sign in to reply
    • More
    • Cancel
  • kmikemoo
    kmikemoo 2 months ago in reply to jc2048

     jc2048 I am intrigued.  For the foreseeable future, I expect anything above 500MHz would be low power, probably less than a watt.  I've downloaded a couple of papers so I can do a bit more studying. Thumbsup

    I understand what you reference about the length of the box and I believe that you are correct that it might come into play.  The length of the box is near the wavelength of the 9cm radio band (3.3 to 3.5 GHz), which would put it near the quarter wavelength at 33cm.  If I ever get to working the microwave frequencies, I'll share if it becomes an issue. 

    • Cancel
    • Vote Up 0 Vote Down
    • Sign in to reply
    • More
    • Cancel
element14 Community

element14 is the first online community specifically for engineers. Connect with your peers and get expert answers to your questions.

  • Members
  • Learn
  • Technologies
  • Challenges & Projects
  • Products
  • Store
  • About Us
  • Feedback & Support
  • FAQs
  • Terms of Use
  • Privacy Policy
  • Legal and Copyright Notices
  • Sitemap
  • Cookies

An Avnet Company © 2025 Premier Farnell Limited. All Rights Reserved.

Premier Farnell Ltd, registered in England and Wales (no 00876412), registered office: Farnell House, Forge Lane, Leeds LS12 2NE.

ICP 备案号 10220084.

Follow element14

  • X
  • Facebook
  • linkedin
  • YouTube