


Introduction
Numerous roadblock litter my path to building a VPN. After successfully configuring a PiVPN linking two systems between two different Internet Service Providers (ISP), I tried to use the knowledge to solve a problem for my employer. I discovered, not all ISP's are the same. STARLINK claims to support VPN's but I soon discovered that the claim has caveats which included considerable cost. The project was shelved.
Four months later the company moved to a new ISP. It spring here on the prairies. Planting has started and the need for remote access is still outstanding. On the dusty shelf I found the hardware. Unfortunately, my aging brain didn't retain the knowledge of what I had done. Project 14 Spring Clean is my chance to revisit the project and document the success.
What is a VPN?
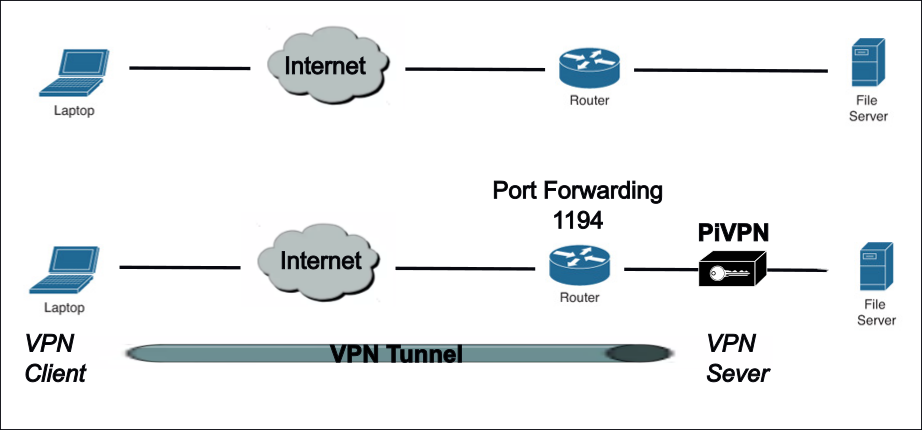
For this project the goal was to have people connect over the Internet to a web service on a server within the company. Data moving over the Internet is publicly available. If the laptop was in a public space using WiFi to connect, the data is more exposed.
A virtual private network (VPN) is a secure connection using encryption between two ends points. Think of it as a private tunnel through the Internet between the laptop and the file server. Data travelling in the tunnel is encrypted. If it is examined by the public it is unreadable.
In the example one endpoint is the laptop is running VPN Client software. The other endpoint a Raspberry Pi computer running VPN Server software. The Client VPN establishes a connection to the PiVPN server. The client encrypts data before being sent into the Internet. The VPN Server receives the encrypted traffic, decrypts it and forwards it the destination. The end to end encryption creates a secure private tunnel between the endpoints.
PiVPN is a software configuration on a Raspberry Pi using open-source protocols to create a VPN Server. Two VPN are supported OpenVPN and WireGuard . This project is using OpenVPN. Running a shell script after installing an operating systems (O/S) carries you through the software installs and configuration steps to secure the VPN.
Bill of Materials
Raspberry Pi 4
8G SD Card
Raspberry Pi OS Lite Release date: May 13th 2025 System: 64-bit
PiVPN v4.10.0 (2025-03-12)
OpenVPN Connect Client V3.6.0.
After installing the Pi O/S Install Raspberry Pi OS using Raspberry Pi Imager software invariably run apt update and upgrade to establish the O/S. This is assuming you know how to find the Pi on your network and establish and SSH connection for a terminal session. The description of that is not provided.
VPN Server Install
Instructions to start the PiVPN install are short and sweat.
curl -L https://install.pivpn.io | bash
I was curious to discover what software packages are installed by the script, so I ran the command
sudo apt list --installed
before and after executing the script. The script install 26 additional packages.
> bind9-dnsutils/stable,stable-security,now 1:9.18.33-1~deb12u2 arm64 [installed,automatic]
> bind9-host/stable,stable-security,now 1:9.18.33-1~deb12u2 arm64 [installed,automatic]
> bind9-libs/stable,stable-security,now 1:9.18.33-1~deb12u2 arm64 [installed,automatic]
> bsdmainutils/stable,stable,now 12.1.8 all [installed]
> dnsutils/stable,stable,stable-security,stable-security,now 1:9.18.33-1~deb12u2 all [installed]
> git-man/stable,stable,stable-security,stable-security,now 1:2.39.5-0+deb12u2 all [installed,automatic]
> git/stable,stable-security,now 1:2.39.5-0+deb12u2 arm64 [installed]
> grepcidr/stable,now 2.0-2 arm64 [installed]
> iptables-persistent/stable,stable,now 1.0.20 all [installed]
> iptables/stable,now 1.8.9-2 arm64 [installed,automatic]
> liberror-perl/stable,stable,now 0.17029-2 all [installed,automatic]
> libfstrm0/stable,now 0.6.1-1 arm64 [installed,automatic]
> libip6tc2/stable,now 1.8.9-2 arm64 [installed,automatic]
> libjemalloc2/stable,now 5.3.0-1 arm64 [installed,automatic]
> liblmdb0/stable,now 0.9.24-1 arm64 [installed,automatic]
> liblzo2-2/stable,now 2.10-2 arm64 [installed,automatic]
> libmaxminddb0/stable,now 1.7.1-1 arm64 [installed,automatic]
> libpkcs11-helper1/stable,now 1.29.0-1 arm64 [installed,automatic]
> libprotobuf-c1/stable,now 1.4.1-1+b1 arm64 [installed,automatic]
> libuv1/stable,stable-security,now 1.44.2-1+deb12u1 arm64 [installed,automatic]
> ncal/stable,now 12.1.8 arm64 [installed,automatic]
> netfilter-persistent/stable,stable,now 1.0.20 all [installed,automatic]
> openvpn/stable,now 2.6.3-1+deb12u3 arm64 [installed]
> python3-dbus/stable,now 1.3.2-4+b1 arm64 [installed,automatic]
> python3-distro-info/stable,stable,now 1.5+deb12u1 all [installed,automatic]
> unattended-upgrades/stable,stable,now 2.9.1+nmu3 all [installed]
The bash script fills the screen with text as it performs the install. Reading it now as it scrolls by, it looks like the update and upgrade commands are part of the process. With the text scrolling install finished the PiVPN install takes you on a DOS Box type screen journey for the next part.
One of my goals for this installation was to establish my own documention trail. Not only how I did it but any notes I discovered on the journey. I failed to do that the first time I played with PiVPN. As my teeth grow longer my memory is getting shorter. E14 is a great repository of successes and failures of projects. It is the ideal learning environment. I believe it is the prefect keeper for this project.
The screen carousel of images is long at 28 shots. Most are default but some I have made changes. Look at the listing below to see my mods.
| {gallery}PiVPN DOS Box Install |
|---|
|
1 |
|
2 |
|
3 |

4 |
|
5 |
|
6 |
|
7 |

8 |
|
9 |

10 |

11 |
|
12 |

13 |

14 |
|
15 |
|
16 |
|
17 |

18 |
|
19 |
 20 |

21 |
|
22 |

23 |

24 |
|
25 |
|
26 |

27 |
|
28 |


The carousel of images is the install I completed. It may change for you depending on options you may or may not select. Below some commentary on the images from my install.
| 1 | intentionally blank |
| 2 | intentionally blank |
| 3 | Kept default |
| 4 | I wanted to assign my own IP |
| 5 | intentionally blank |
| 6 | This IP is outside my DHCP pool |
| 7 | intentionally blank |
| 8 | intentionally blank |
| 9 | intentionally blank |
| 10 | Kept default |
| 11 | OpenVPN |
| 12 | intentionally blank |
| 13 | Kept default |
| 14 | Kept default |
| 15 | intentionally blank |
| 16 | Used my own DNS listing |
| 17 | CIRA DNS entries |
| 18 | intentionally blank |
| 19 | intentionally blank |
| 20 | ISP Public facing IP |
| 21 | Kept default |
| 22 | Kept default |
| 23 | intentionally blank |
| 24 | intentionally blank |
| 25 | Automatic Upgrade enabled |
| 26 | |
| 27 | Reboot of course! |
| 28 | intentionally blank |
Adding the Client
Now that we have created the VPN server we need to generate the configuration for a VPN Client. That was the reminder in slide 26 to use the PiVPN tool to complete the exercise.
pivpn --help
::: Control all PiVPN specific functions!
:::
::: Usage: pivpn <command> [option]
:::
::: Commands:
:::  -a, add [nopass]     Create a client ovpn profile, optional nopass
:::  -c, clients          List any connected clients to the server
:::  -d, debug            Start a debugging session if having trouble
:::  -l, list             List all valid and revoked certificates
:::  -r, revoke           Revoke a client ovpn profile
:::  -h, help             Show this help dialog
:::  -u, uninstall        Uninstall PiVPN from your system!
:::  -up, update          Updates PiVPN Scripts
:::  -bk, backup          Backup Openvpn and ovpns dir
Add client
pivpn -a
::: Create a client ovpn profile, optional nopass
:::
::: Usage: pivpn <-a|add> [-n|--name <arg>] [-p|--password <arg>]|[nopass] [-d|--days <number>] [-b|--bitwarden] [-i|--iOS] [-o|--ovpn] [-h|--help]
:::
::: Commands:
:::  [none]               Interactive mode
:::  nopass               Create a client without a password
:::  -n,--name            Name for the Client (default: "piopnvpn")
:::  -p,--password        Password for the Client (no default)
:::  -d,--days            Expire the certificate after specified number of days (default: 1080)
:::  -b,--bitwarden       Create and save a client through Bitwarden
:::  -i,--iOS             Generate a certificate that leverages iOS keychain
:::  -o,--ovpn            Regenerate a .ovpn config file for an existing client
:::  -h,--help            Show this help dialog

Enter a Name for the Client:  openvpn_client
How many days should the certificate last?  1080
Enter the password for the client:
Enter the password again to verify:
* Notice:
Using Easy-RSA configuration from: /etc/openvpn/easy-rsa/pki/vars

* Notice:
Using SSL: openssl OpenSSL 3.0.16 11 Feb 2025 (Library: OpenSSL 3.0.16 11 Feb 2025)

-----
* Notice:

Keypair and certificate request completed. Your files are:
req: /etc/openvpn/easy-rsa/pki/reqs/openvpn_client.req
key: /etc/openvpn/easy-rsa/pki/private/openvpn_client.key

Using configuration from /etc/openvpn/easy-rsa/pki/335765ea/temp.a411fba6
Check that the request matches the signature
Signature ok
The Subject's Distinguished Name is as follows
commonName            :ASN.1 12:'openvpn_client'
Certificate is to be certified until May  6 15:51:53 2028 GMT (1080 days)

Write out database with 1 new entries
Database updated

* Notice:
Certificate created at: /etc/openvpn/easy-rsa/pki/issued/openvpn_client.crt

Client's cert found: openvpn_client.crt
Client's Private Key found: openvpn_client.key
CA public Key found: ca.crt
tls Private Key found: ta.key


========================================================
Done! openvpn_client.ovpn successfully created!
openvpn_client.ovpn was copied to:
  /home/pi/ovpns
for easy transfer. Please use this profile only on one
device and create additional profiles for other devices.
========================================================
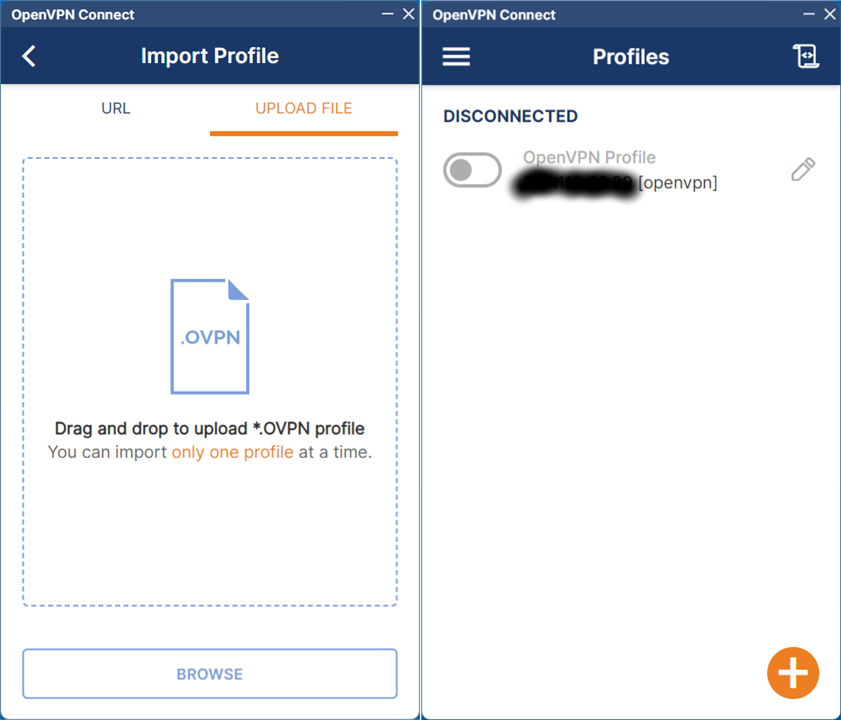
I copied the file to a laptop running Windows 11 Pro. The file was then uploaded in OpenVPN Connect client software.
Here is the logfile entry post a successful connection with the client. The ISP public IP for the router has been replaced with www.xxx.yyy.zzz
⏎[May 21, 2025, 18:07:22] Connecting to [www.xxx.yyy.zzz]:1194 (www.xxx.yyy.zzz) via UDP
⏎[May 21, 2025, 18:07:32] Server poll timeout, trying next remote entry...
⏎[May 21, 2025, 18:07:32] EVENT: RECONNECTING ⏎[May 21, 2025, 18:07:32] EVENT: RESOLVE ⏎[May 21, 2025, 18:07:32] Contacting www.xxx.yyy.zzz:1194 via UDP
⏎[May 21, 2025, 18:07:32] EVENT: WAIT ⏎[May 21, 2025, 18:07:32] WinCommandAgent: transmitting bypass route to www.xxx.yyy.zzz
{
	"host" : "www.xxx.yyy.zzz",
	"ipv6" : false
}

⏎[May 21, 2025, 18:07:32] Connecting to [www.xxx.yyy.zzz]:1194 (www.xxx.yyy.zzz) via UDP
⏎[May 21, 2025, 18:46:33] OpenVPN core 3.10.5 win x86_64 64-bit OVPN-DCO built on Dec 17 2024 12:24:32
⏎[May 21, 2025, 18:46:33] Frame=512/2112/512 mssfix-ctrl=1250
⏎[May 21, 2025, 18:46:33] NOTE: This configuration contains options that were not used:
⏎[May 21, 2025, 18:46:33] Unsupported option (ignored)
⏎[May 21, 2025, 18:46:33] 0 [resolv-retry] [infinite]
⏎[May 21, 2025, 18:46:33] EVENT: RESOLVE ⏎[May 21, 2025, 18:46:33] Contacting www.xxx.yyy.zzz:1194 via UDP
⏎[May 21, 2025, 18:46:33] EVENT: WAIT ⏎[May 21, 2025, 18:46:33] WinCommandAgent: transmitting bypass route to www.xxx.yyy.zzz
{
	"host" : "www.xxx.yyy.zzz",
	"ipv6" : false
}

⏎[May 21, 2025, 18:46:33] Connecting to [www.xxx.yyy.zzz]:1194 (www.xxx.yyy.zzz) via UDP
⏎[May 21, 2025, 18:46:33] EVENT: CONNECTING ⏎[May 21, 2025, 18:46:33] Tunnel Options:V4,dev-type tun,link-mtu 1569,tun-mtu 1500,proto UDPv4,cipher AES-256-CBC,auth SHA256,keysize 256,key-method 2,tls-client
⏎[May 21, 2025, 18:46:33] Creds: UsernameEmpty/PasswordEmpty
⏎[May 21, 2025, 18:46:33] Clearing credentials
⏎[May 21, 2025, 18:46:33] Sending Peer Info:
IV_VER=3.10.5
IV_PLAT=win
IV_NCP=2
IV_TCPNL=1
IV_PROTO=2974
IV_MTU=1600
IV_CIPHERS=AES-128-CBC:AES-192-CBC:AES-256-CBC:AES-128-GCM:AES-192-GCM:AES-256-GCM:CHACHA20-POLY1305
IV_AUTO_SESS=1
IV_GUI_VER=OCWindows_3.6.0-4074
IV_SSO=webauth,crtext

⏎[May 21, 2025, 18:46:33] SSL Handshake: peer certificate: CN=piopnvpn_a078e869-46c3-4f59-bd95-d38e6d03fffb, 256 bit EC, group:prime256v1, cipher: TLS_AES_256_GCM_SHA384         TLSv1.3 Kx=any      Au=any   Enc=AESGCM(256)            Mac=AEAD

⏎[May 21, 2025, 18:46:33] Session is ACTIVE
⏎[May 21, 2025, 18:46:33] EVENT: GET_CONFIG ⏎[May 21, 2025, 18:46:33] Sending PUSH_REQUEST to server...
⏎[May 21, 2025, 18:46:33] OPTIONS:
0 [dhcp-option] [DNS] [149.112.121.20]
1 [dhcp-option] [DNS] [149.112.122.20]
2 [block-outside-dns]
3 [redirect-gateway] [def1]
4 [route-gateway] [10.18.108.1]
5 [topology] [subnet]
6 [ping] [15]
7 [ping-restart] [120]
8 [ifconfig] [10.18.108.2] [255.255.255.0]
9 [peer-id] [0]
10 [cipher] [AES-256-GCM]
11 [protocol-flags] [cc-exit] [tls-ekm] [dyn-tls-crypt]
12 [tun-mtu] [1500]

⏎[May 21, 2025, 18:46:33] PROTOCOL OPTIONS:
  cipher: AES-256-GCM
  digest: none
  key-derivation: TLS Keying Material Exporter [RFC5705]
  compress: NONE
  peer ID: 0
  control channel: tls-crypt enabled

⏎[May 21, 2025, 18:46:33] EVENT: ASSIGN_IP ⏎[May 21, 2025, 18:46:33] CAPTURED OPTIONS:
Session Name: www.xxx.yyy.zzz
Layer: OSI_LAYER_3
MTU: 1500
Remote Address: www.xxx.yyy.zzz
Tunnel Addresses:
  10.18.108.2/24 -> 10.18.108.1
Reroute Gateway: IPv4=1 IPv6=0 flags=[ ENABLE REROUTE_GW DEF1 IPv4 ]
Block IPv4: no
Block IPv6: no
Block local DNS: yes
Add Routes:
Exclude Routes:
DNS Servers:
  149.112.121.20
  149.112.122.20

⏎[May 21, 2025, 18:46:34] SetupClient: transmitting tun setup list to \\.\pipe\agent_ovpnconnect
{
	"allow_local_dns_resolvers" : false,
	"confirm_event" : "480d000000000000",
	"destroy_event" : "a80d000000000000",
	"tun" :
	{
		"adapter_domain_suffix" : "",
		"block_ipv6" : false,
		"block_outside_dns" : true,
		"dns_options" :
		{
			"servers" : {}
		},
		"dns_servers" :
		[
			{
				"address" : "149.112.121.20",
				"ipv6" : false
			},
			{
				"address" : "149.112.122.20",
				"ipv6" : false
			}
		],
		"layer" : 3,
		"mtu" : 1500,
		"remote_address" :
		{
			"address" : "www.xxx.yyy.zzz",
			"ipv6" : false
		},
		"reroute_gw" :
		{
			"flags" : 275,
			"ipv4" : true,
			"ipv6" : false
		},
		"route_metric_default" : -1,
		"session_name" : "www.xxx.yyy.zzz",
		"tunnel_address_index_ipv4" : 0,
		"tunnel_address_index_ipv6" : -1,
		"tunnel_addresses" :
		[
			{
				"address" : "10.18.108.2",
				"gateway" : "10.18.108.1",
				"ipv6" : false,
				"metric" : -1,
				"net30" : false,
				"prefix_length" : 24
			}
		]
	},
	"tun_type" : 0
}
POST np://[\\.\pipe\agent_ovpnconnect]/tun-setup : 200 OK
TAP ADAPTERS:
guid='{8612EDDA-6E15-4588-ADDE-A245039411BC}' index=10 name='Local Area Connection'
Open TAP device "Local Area Connection" PATH="\\.\Global\{8612EDDA-6E15-4588-ADDE-A245039411BC}.tap" SUCCEEDED
TAP-Windows Driver Version 9.27
ActionDeleteAllRoutesOnInterface iface_index=10
netsh interface ip set interface 10 metric=9000
Ok.
netsh interface ip set address 10 static 10.18.108.2 255.255.255.0 gateway=10.18.108.1 store=active
netsh interface ip add route www.xxx.yyy.zzz/32 13 192.168.90.254 store=active
The object already exists.
netsh interface ip add route 0.0.0.0/1 10 10.18.108.1 store=active
Ok.
netsh interface ip add route 128.0.0.0/1 10 10.18.108.1 store=active
Ok.
netsh interface ip set dnsservers 10 static 149.112.121.20 register=primary validate=no
netsh interface ip add dnsservers 10 149.112.122.20 2 validate=no
NRPT::ActionCreate pid=[19960] domains=[] dns_servers=[149.112.121.20,149.112.122.20] dnssec=[0] id=[OpenVPNDNSRouting-19960]
DNS::ActionApply: successful
ActionBase openvpn_app_path=C:\Program Files\OpenVPN Connect\OpenVPNConnect.exe tap_index=10 enable=1
permit IPv4 requests from OpenVPN app
permit IPv6 requests from OpenVPN app
block IPv4 requests from other apps
block IPv6 requests from other apps
allow IPv4 traffic from TAP
allow IPv6 traffic from TAP
block IPv4 DNS requests to loopback from other apps
block IPv6 DNS requests to loopback from other apps
ipconfig /flushdns
Windows IP Configuration
Successfully flushed the DNS Resolver Cache.
TAP: ARP flush succeeded
TAP handle: c80e000000000000
⏎[May 21, 2025, 18:46:34] Connected via TUN_WIN
⏎[May 21, 2025, 18:46:34] EVENT: CONNECTED www.xxx.yyy.zzz:1194 (www.xxx.yyy.zzz) via /UDP on TUN_WIN/10.18.108.2/ gw=[10.18.108.1/] mtu=1500⏎
Router Configuration
For the configuration to work the routers port forwarding needed to be configured. The VPN Client connects to the router on port 1194 defined in the VPN configuration. The router through port forwarding is told what to do with the connection request, ie forward to PiVPN server.
Using the port number, protocol supported and IP of the VPN Server the router can be configured to forward the connection request.

Side Bar
Note 1:
I ran a netstat -an|more command before and after the VPN Server install to see if anything changed.
Before: netstat -an|more
Active Internet connections (servers and established)
Proto Recv-Q Send-Q Local Address Foreign Address State
tcp 0 0 0.0.0.0:22 0.0.0.0:* LISTEN
tcp 0 0 192.168.2.223:22 192.168.2.201:53470 ESTABLISHED
tcp6 0 0 :::22 :::* LISTEN
udp 0 0 0.0.0.0:56809 0.0.0.0:*
udp 0 0 192.168.2.223:68 192.168.2.254:67 ESTABLISHED
udp 0 0 0.0.0.0:5353 0.0.0.0:*
udp6 0 0 :::32796 :::*
udp6 0 0 :::5353 :::*
raw6 0 0 :::58 :::*
After: netstat -an|more
Active Internet connections (servers and established)
Proto Recv-Q Send-Q Local Address Foreign Address State
tcp 0 0 0.0.0.0:22 0.0.0.0:* LISTEN
tcp 0 0 192.168.2.199:22 192.168.2.201:59112 ESTABLISHED
tcp6 0 0 :::22 :::* LISTEN
udp 0 0 0.0.0.0:1194 0.0.0.0:* <<<<<<<<<<<<<<<<<<<<<<< ports now listening for VPN Client request (IPV4)
udp 0 0 0.0.0.0:5353 0.0.0.0:*
udp 0 0 0.0.0.0:56640 0.0.0.0:*
udp6 0 0 :::5353 :::*
udp6 0 0 :::55364 :::* <<<<<<<<<<<<<<<<<<<<<<<<<<<<< ports now listening for VPN Client request (IPV6)
raw6 0 0 :::58 :::*
Note 2:
I ran an nmap scan before and after the VPN Server install to see if there were any changes. Only port 22 for supporting ssh was open for both use cases.
sudo nmap 192.168.2.199
[sudo] password for sean-conway:
Starting Nmap 7.94SVN ( https://nmap.org ) at 2025-05-21 13:38 CDT
Nmap scan report for 192.168.2.199
Host is up (0.00055s latency).
Not shown: 999 closed tcp ports (reset)
PORT STATE SERVICE
22/tcp open ssh
MAC Address: D8:3A:DD:15:72:BF (Unknown)
Nmap done: 1 IP address (1 host up) scanned in 0.16 seconds
Note 3:
When a VPN Client connects to the VPN Server, it is assigned an IP it can use. Here is the file where the assignment is made
cat /etc/openvpn/ccd/openvpn_client
ifconfig-push 10.13.102.2 255.255.255.0
Note 4:
I was curious to find out what all was configured in the script and discovered this file.
cat /etc/pivpn/openvpn/setupVars.conf
PLAT=Debian
OSCN=bookworm
USING_UFW=0
pivpnforceipv6route=1
IPv4dev=eth0
IPv4addr=192.168.2.199/24
IPv4gw=192.168.2.254
useNetworkManager=true
install_user=pi
install_home=/home/pi
VPN=openvpn
pivpnPROTO=udp
pivpnPORT=1194
pivpnDNS1=149.112.121.20
pivpnDNS2=149.112.122.20
pivpnSEARCHDOMAIN=
pivpnHOST=www.xxx.yyy.zzz
TWO_POINT_FOUR=1
pivpnENCRYPT=256
USE_PREDEFINED_DH_PARAM=0
INPUT_CHAIN_EDITED=0
FORWARD_CHAIN_EDITED=0
INPUT_CHAIN_EDITEDv6=
FORWARD_CHAIN_EDITEDv6=
pivpnDEV=tun0
pivpnNET=10.13.102.0
subnetClass=24
pivpnenableipv6=0
ALLOWED_IPS=""
UNATTUPG=1
INSTALLED_PACKAGES=(git dnsutils grepcidr bsdmainutils iptables-persistent openvpn unattended-upgrades)
HELP_SHOWN=1
Note 5:
This is where the configuration details for the OpenVPN server are stored. (Sorry for the text. The interface for uploading would not let me save as code)
cat /etc/openvpn/server.conf
dev tun
proto udp
port 1194
ca /etc/openvpn/easy-rsa/pki/ca.crt
cert /etc/openvpn/easy-rsa/pki/issued/piopnvpn_3c799f14-335a-4dd5-a644-eb0e94293e08.crt
key /etc/openvpn/easy-rsa/pki/private/piopnvpn_3c799f14-335a-4dd5-a644-eb0e94293e08.key
dh none
ecdh-curve prime256v1
topology subnet
server 10.13.102.0 255.255.255.0
# Set your primary domain name server address for clients
push "dhcp-option DNS 149.112.121.20"
push "dhcp-option DNS 149.112.122.20"
# Prevent DNS leaks on Windows
push "block-outside-dns"
# Override the Client default gateway by using 0.0.0.0/1 and
# 128.0.0.0/1 rather than 0.0.0.0/0. This has the benefit of
# overriding but not wiping out the original default gateway.
push "redirect-gateway def1"
client-to-client
client-config-dir /etc/openvpn/ccd
keepalive 15 120
remote-cert-tls client
tls-version-min 1.2
tls-crypt /etc/openvpn/easy-rsa/pki/ta.key
cipher AES-256-CBC
auth SHA256
user openvpn
group openvpn
persist-key
persist-tun
crl-verify /etc/openvpn/crl.pem
status /var/log/openvpn-status.log 20
status-version 3
syslog
verb 3
#DuplicateCNs allow access control on a less-granular, per user basis.
#Remove # if you will manage access by user instead of device.
#duplicate-cn
# Generated for use by PiVPN.io
Note 6:
Helpful links.
PiVPN Doucmentation
PiVPN Github Repository
PiVPN Wiki
Conclusion
I tested the configuration by using the setup on my home network. I remoted into network successfully. I then connected to my router from the LAN side to confirm operation. The PiVPN works! It is now time to carry it to production.
Post Project Review
With the help from vmate to this post I got the linux client working using instructions from OpenVPN3 Unfortunately it is all done from command line but it does work.


