


.png-1440x400x2.png?sv=2016-05-31&sr=b&sig=wjL69nOHfl%2FB6yH4tQGsLaWIvXY5sBovowfzJ9P42pg%3D&se=2026-10-24T23%3A59%3A59Z&sp=r&_=eh008Zgad7Tq3khD9L00CA==)
One year ago, i saw multiple similar projects on smart home, and decided to make a smart home automation from scratch,
When you look at the current landscape of DIY smart home projects, they all seem to suffer from the same fundamental flaws. They are often entirely dependent on an active internet connection—if your ISP goes down, your house goes dark. They are typically limited in scope, often just controlling a single room or electrical board. Even if you manage to link multiple boards together, you are suddenly at the mercy of your router, hoping the Wi-Fi signal reaches every corner of your house.
Beyond the technical limitations, the privacy implications are massive. Most commercial and DIY cloud-based systems record your usage patterns, turning your daily routine into a data point. Combine that with limited features—usually just basic on/off switching or dimming—and user interfaces are not so good in my opinion, and the whole concept of a "smart" home starts to feel a lot less intelligent.
That made me think, Why not build my own Smart Home System entirely from scratch?
My plan to achieve
- Smart Scheduling: Users can set automated timers for any appliance (e.g., "Turn ON Porch Light at 6:00 PM", "Turn OFF Geyser at 8:00 AM").
- Dual-Mode Control: The Appliances can be controlled using the Smartphone OR existing physical wall switches.
- Dimming & Speed Control: Instead of just On/Off buttons, it should have Sliders to smoothly dim lights or adjust ceiling fan speeds.
- No Internet Required: The system is entirely web-based and hosted locally on the ESP32. You don't need to download suspicious third-party apps, sign up for cloud accounts, or even have an active internet connection. It works perfectly on your local WiFi network, ensuring maximum privacy.
-
Cryptographic Hashing: Internal communication between the ESP32 Hub and ESP8266 Nodes is signed with a cryptographic hash. This prevents "packet injection attacks" where a malicious person might try to creates a packet and send your signals
- User friendly UI: The UI should look decent and easy to use.
- Self-Healing Network: Standard setups fail if the WiFi signal is weak in one room. My system actively detects a lost connection and uses other ESP8266 nodes as "Bridges" to relay the message, effectively creating a dynamic mesh network. (Turned out to be most difficult task)
I broke the project down into distinct, manageable phases, focusing heavily on privacy, resilience, and user experience.
Phase 1: A Local, Dynamic User Interface
The first priority was the front-end. The goal was to create a UI that was clean, user-friendly, and accessible—but strictly offline.
Privacy: The system is designed to be accessible without an internet connection. Absolutely no user data is transferred to external servers, ensuring complete privacy.
Access Control: Just because someone is on the local Wi-Fi doesn't mean they should have control over the house's appliances. I implemented a login page to secure the dashboard from unauthorized users on the same network.
Dynamic Scaling: The UI isn't static. It is designed to be fully dynamic, automatically adjusting its layout and controls based on exactly how many ESP8266 nodes are currently active and connected to the system.
i decided to work on the building UI first and was able to build a good looking Web UI for the esp. It took weeks but i was happy with result.
LOGIN PAGE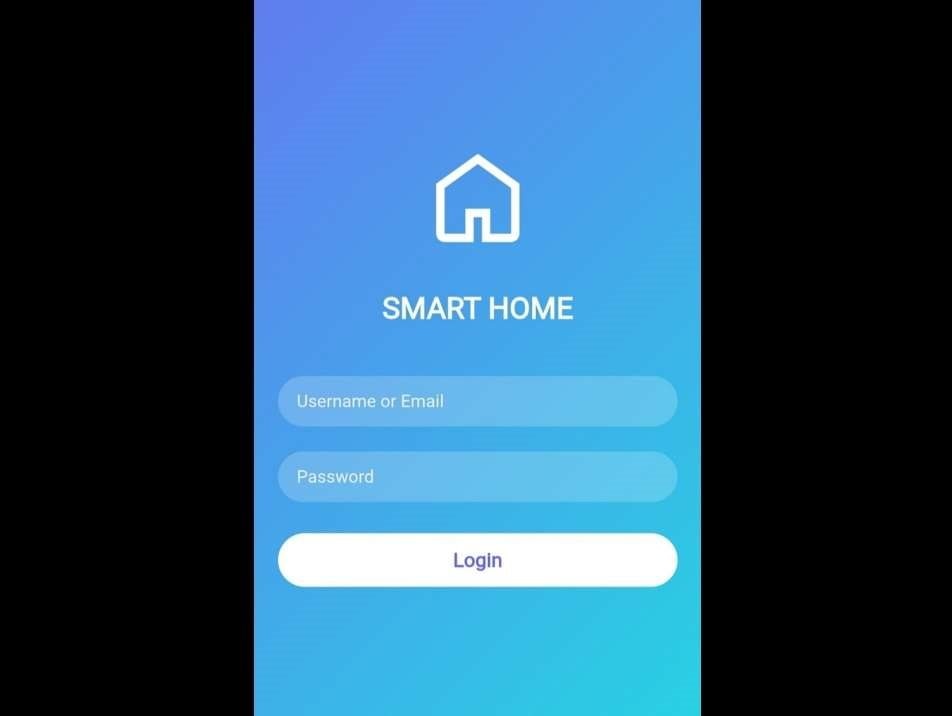
Dashboard and Control panel

The dashboard has live info about voltage , power factor and power consumption on top. And bellow that there are buttons for each rooms.
On right it is showing button to turn on/off the appliances.
Phase 2: Choosing Right Hardware
With the interface mapped out, I needed a rock-solid hardware architecture to handle the communication and appliance control.
I researched on internet and find out the ESP32-C6 microcontroller would be best for this job. It acts as the brain of the operation. It communicate and control all the peripheral nodes spread throughout the house. The localized nodes, responsible for the actual switching at the electrical boards, are powered by ESP8266 microcontrollers.
Phase 3: Establishing the Protocol and Security
I used ESP-NOW, a connectionless communication protocol from Espressif. It offered the right balance of excellent range, low latency, and the ability to operate entirely independent of a central router.
Implementing it, however, was a brutal reality check. Setting up the ESP-NOW encrypted mesh while keeping the ESP32 hub connected to standard Wi-Fi was nowhere near as easy as it initially seemed. The ESP32-C6 uses a newer ESP-NOW API, and finding documentation or working examples was challenging.
The Hardware Encryption Bug: I discovered a hard limitation within the ESP ecosystem: it is fundamentally impossible to maintain an active Wi-Fi connection and an encrypted, peer-to-peer ESP-NOW connection simultaneously. The hardware simply ignores or drops encrypted unicast packets the moment the Wi-Fi stack is running.
I spent about a month trying to communicate over encrypted channel without losing wifi capability, but I saw very little success. Hitting a wall with the network stability, I ultimately decided to pause the project in 2025.
The Pivot to Application-Layer Security
Recently, I resumed development with a fresh perspective. Instead of fighting the built-in hardware limitations, I bypassed ESP-NOW's native encryption entirely and implemented my own security at the application layer.
I transmit the raw, unencrypted ESP-NOW packets (which bypasses the encryption conflict), but I secure the payload using HMAC cryptographic hashing. Every command sent through the network is signed with a secret hash by the ESP32-C6. When a peripheral ESP8266 node receives a packet, it calculates its own hash of the data.
If the hashes don't match, the packet is instantly dropped.
 void OnDataRecv(uint8_t * mac, uint8_t *incomingData, uint8_t len) {
 // copy the recived packet
  memcpy(incomingData, incomingDataPacket, len);

 hashData(&data, offsetof(channelSet, hash), calculated_hmac); // calculate and compare the hash
    if (memcmp(data.hash, calculated_hmac, 32) != 0) { // if hash mismatch, return
    Serial.println("!!! ERROR: Received packet mismatched, discarding the packet");
    return 0;
    }
It completely solved the ESP's hardware-level security flaw. Now, even if a mischievous actor intercepts the communication and injects a spoofed packet telling the nodes to trigger an appliance, the node will check the hash signature, realize it's a forgery, and ignore the command entirely.
.
Phase 5: Wiring, Assembly, and Real-World Testing
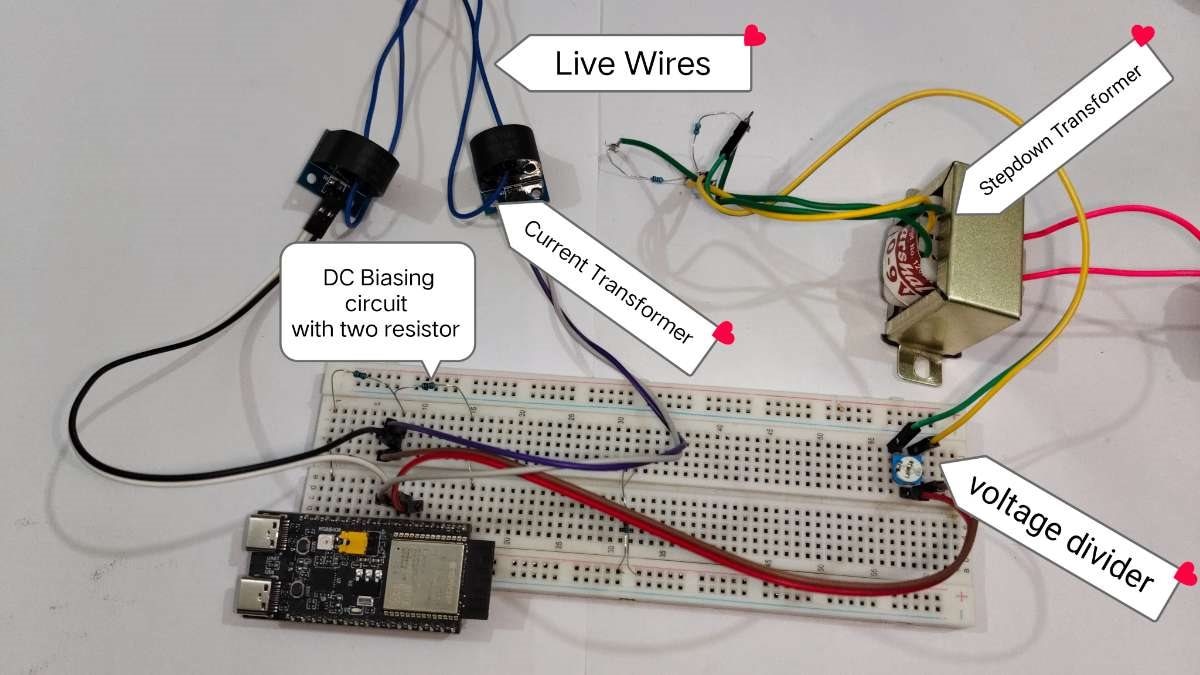
A current transformer and stepdown transformer is connected to ESP32 C6 with
The circuit is very simple, A step-down transformer output is connected to voltage divider (potentiometer) to reduce the voltage, which then feeds to DC biasing network—using two resistors to lift the AC wave to 1.65V—before entering the ESP32's analog pin.
Simultaneously, a Current Transformers (CT) clamps around the live wire to induce a signal representing the load current. This CT output is passed through a similar DC biasing circuit to shift the AC signal above 0V making it compatible for ESP32's analog analog measurement.
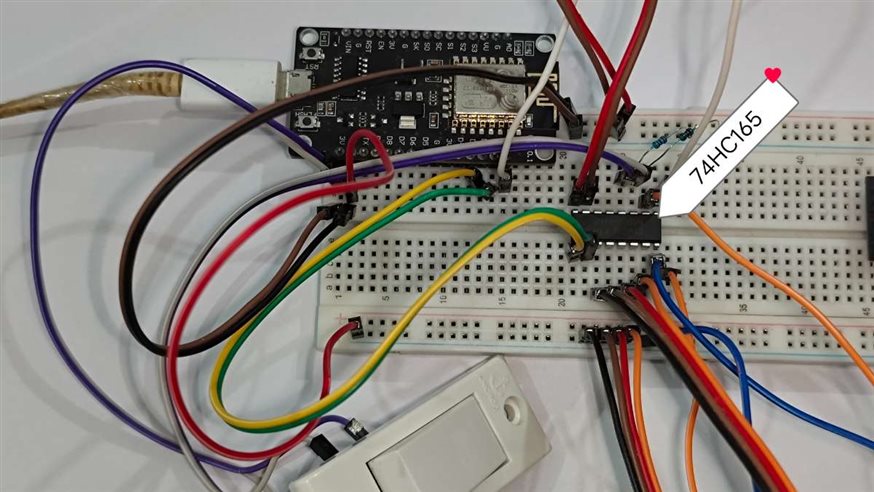
Using 74hc165 shift register to read 8 physical switch with only using 3 gpio pin of esp8266
Testing with Low-Voltage
Testing the device control with smartphone and physical switch
Webpage config video
The webpage required first time configuration, by default it uses name like room 1,2,3... and switch 1,2,3.....
user can change the name and icon whenever they wants.
Link to Live Demo: https://abtamit.github.io/Smart-Home-UI/login
username:- admin
password:- home
Its my first time building something myself instead of copying from internet tutorial. Feel free to point out any mistake or give suggestions in the comment :-)
