


Preface:
Using a corded morse code key on an amateur radio station can get clumsy and annoying.
Connection wires are always in the way and getting tangled, hand and wrist positions get awkward, the morse key gets in the way of other things near the radio like the PC mouse & keyboard, etc……etc…….
Wouldn’t it be grand to have a wireless morse code key to your HF transceiver, just like the wireless mouse ? A small wireless key could be operated comfortably at a picnic table without a tangle of wires in your QRP backpack or the tangled clutter on your station desk.
What a great idea ! Wireless mice are pretty inexpensive too, so that was one goal to think about with this project too.
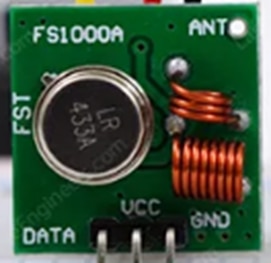
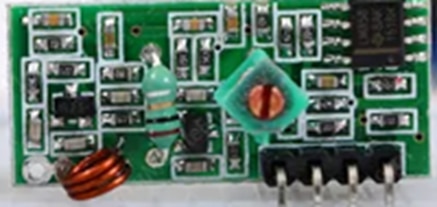
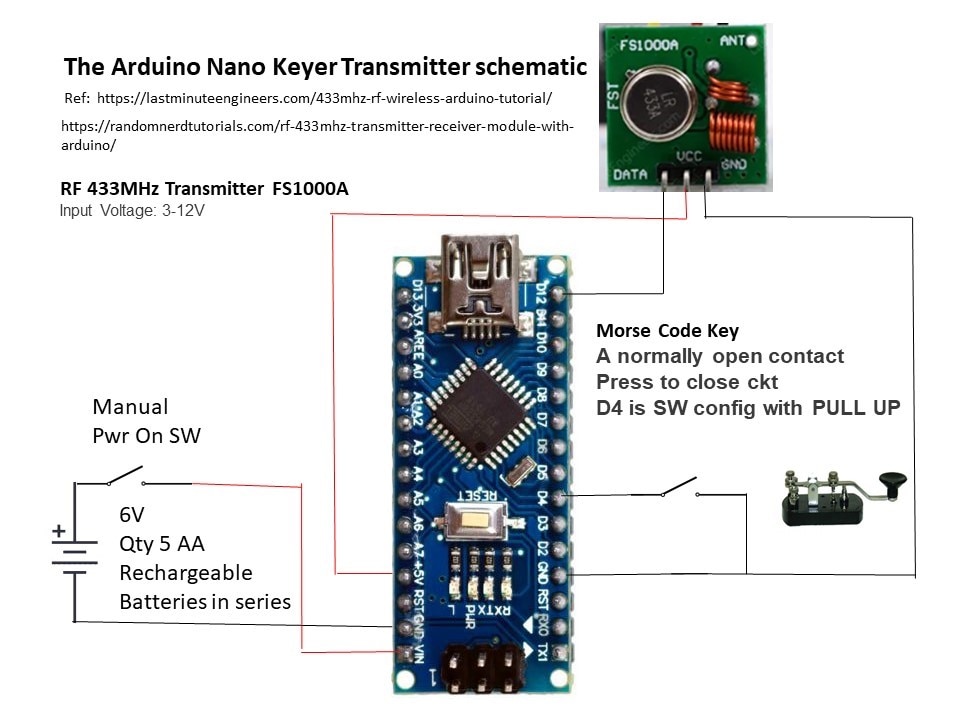
To do the radio communication between Arduinos, I chose the FS1000A 433 Mhz receiver and transmitter. Paired with Arduino Nanos, everyone in my amateur radio club could afford to try out this project.
These are what the modules look like:
My first thought was to use the key directly into the transmitter to achieve Amplitude Shift Keying.
Not so fast my friend, the transmitter doesn’t like being on long enough for a “dah” or a “duh”
My second thought was using I2C. I2C is half duplex, maybe it could work with the FS1000a…...
Googling more on these RF modules, I discovered an Arduino library called Radiohead was available, specifically for these RF modules.
EUREKA !! let give it a try.
The IDE RADIOHEAD examples are pretty bare bones, just enough to show a short message could be sent by the transmitter and seen by the receiver.
Distracted days and sleepless nights ( I'm exaggerating a bit for the literary drama) were spent troubleshooting and optimizing the few lines of code to make it work.
First thought was to send a 0 or 1 from the transmitter to receiver to represent the morse code keyer being closed or open.. Since the buffer has CRC checks, decided to send something more substantial, “closed” and “open”.
To get both conditions using the same number of data bytes, decided to send the words “closed” and kyopen”.
Even this was a challenge for decoding, simplified to merely check for receiving a “c”, for closed, otherwise any other character would be considered the keyer being “open.”
Wireless Morse Code Keyer VERSION 1
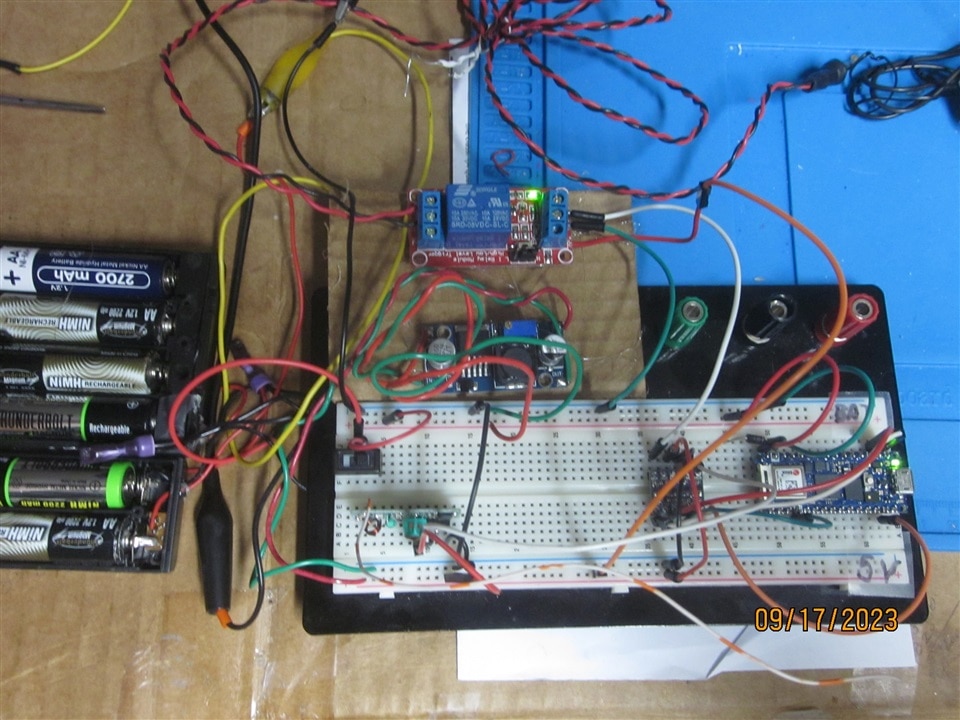
The operational video:
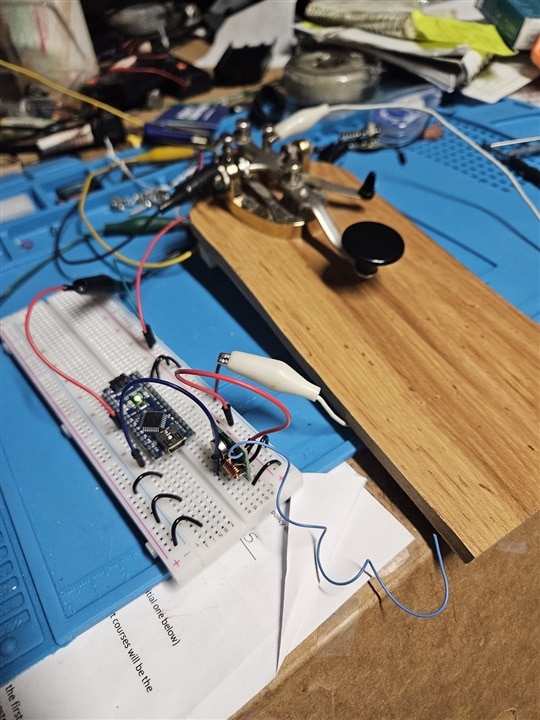
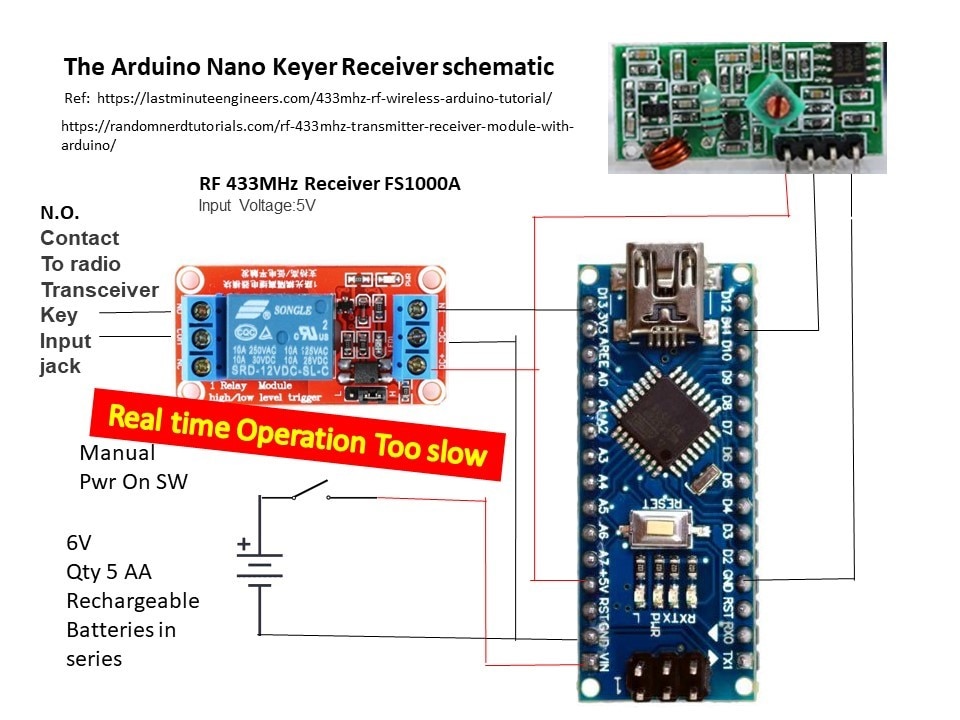
Shown in the video and photos (code is inserted towards the end of this post),
the wireless Morse code keyer Version 1 works, but the send speed has to be really slow otherwise the receiver cant keep up.
The pause time is set in the transmitter code for 25 msec per scan.
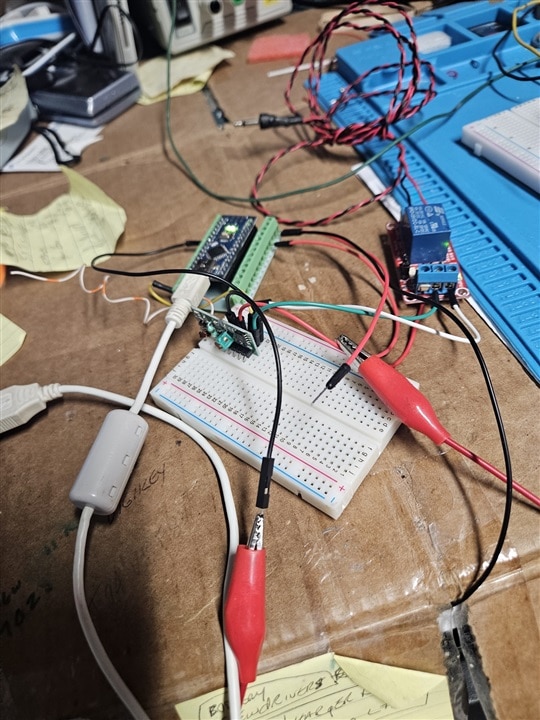
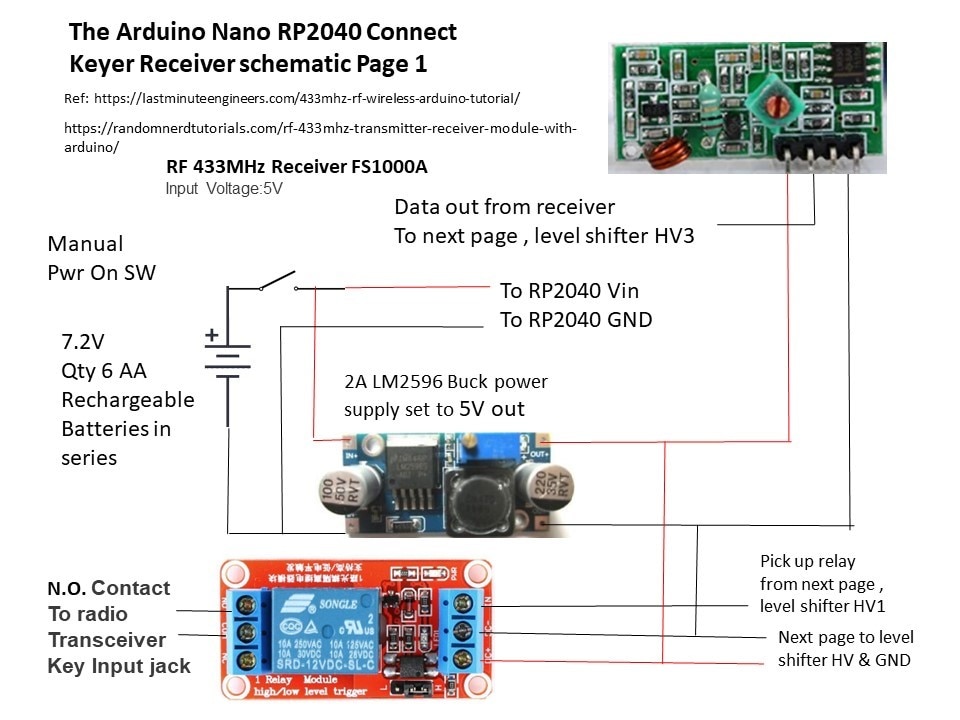
Wireless Morse Code Keyer VERSION 2 - using Arduino Nano RP2040 for the receiver
The operational video https://youtu.be/Xa4XdjejjEM
Looking thru the hierarchy of Arduino controller family, the Arduino Nano RP2040 with a 133 MHz clock ( vs Nano 16 MHz clock) would be a great thing to try for better receiver performance, altho it hasn’t been officially tested with the RP2040.
The same program used for the Version 1 Nano receiver successfully compiled ( with only warnings ) and downloaded to the Arduino Nano RP2040.
The RP2040 hardware uses 3.3 V IO. The receiver and relay module are 5V, a LM2596 buck power supply for 5v is added, and a quad level shifter.

Wireless Morse Code Keyer VERSION 2.1 - Edge detect added to keyer transmit message logic, transmit pause time per cpu cycle reduced from 25ms to 4 mseconds
video demonstration of morse code keyer in operation with SW improvements
For sometime later, Version 3 , could try using i2C Arduino master/slave configuration.
I’d think I’d want Arduino Nano RP2040 for both receiver and transmitter.
Now the codes:
transmitter Arduino Nano code Vers 2.1 with edge detect on keyer state and cycle delay time reduced to 4msec.
Thank you to balajivan1995 for the edge detect suggestion
// ask_transmitter.pde    modifying for the Arduino Nano Wireless Morse Code key project
//  version 2.1   with edge detect on keyer state, and cycle time delay reduced from 25ms to 4 msec
// -*- mode: C++ -*-
// Simple example of how to use RadioHead to transmit messages
// with a simple ASK transmitter in a very simple way.
// Implements a simplex (one-way) transmitter with an TX-C1 module
// Tested on Arduino Mega, Duemilanova, Uno, Due, Teensy, ESP-12

#include <RH_ASK.h>
#ifdef RH_HAVE_HARDWARE_SPI
#include <SPI.h> // Not actually used but needed to compile
#endif

int keyState = HIGH; // declare VAR for key state true= open, false= key closed
int keyStateLastScan=HIGH; // make an edge detector

RH_ASK driver;
// RH_ASK driver(2000, 4, 5, 0); // ESP8266 or ESP32: do not use pin 11 or 2
// RH_ASK driver(2000, 3, 4, 0); // ATTiny, RX on D3 (pin 2 on attiny85) TX on D4 (pin 3 on attiny85),
// RH_ASK driver(2000, PD14, PD13, 0); STM32F4 Discovery: see tx and rx on Orange and Red LEDS

void setup()
{
#ifdef RH_HAVE_SERIAL
      Serial.begin(9600);	  // Debugging only
#endif
  if (!driver.init())
#ifdef RH_HAVE_SERIAL
            Serial.println("init failed");
#else
    ;
#endif

    pinMode(4, INPUT_PULLUP); //Morse code keyer open=TRUE, closed=FALSE

}

void loop()
{

  keyState = digitalRead(4); // read input 2
     Serial.println(keyState);

//  if (keyState == LOW )
    if ((keyState == LOW )&(keyStateLastScan != keyState))

//  { const char *msg = "cl";
    { const char *msg = "cl";
          Serial.println(keyState);
          Serial.println("key is closed");
    driver.send((uint8_t *)msg, strlen(msg));
    driver.waitPacketSent();
  }

//  if (keyState == HIGH )
    if ((keyState == HIGH )&(keyStateLastScan != keyState))

//  { const char *msg = "kyopen";
  { const char *msg = "op";
         Serial.println(keyState);
          Serial.println("key is open");
    driver.send((uint8_t *)msg, strlen(msg));
    driver.waitPacketSent();

  }
keyStateLastScan=keyState;
  delay(4);
}
receiver code is the same for both Arduino Nano (16 MHz) and Arduino Nano RP2040
// ask_receiver.pde   with added code for the Wireless Morse Code Keyer *** COMPILED FOR ARDUINO NANO RP2040
// -*- mode: C++ -*-
// Simple example of how to use RadioHead to receive messages
// with a simple ASK transmitter in a very simple way.
// Implements a simplex (one-way) receiver with an Rx-B1 module
// Tested on Arduino Mega, Duemilanova, Uno, Due, Teensy, ESP-12

#include <RH_ASK.h>
#ifdef RH_HAVE_HARDWARE_SPI
#include <SPI.h> // Not actually used but needed to compile
#endif

RH_ASK driver;
// RH_ASK driver(2000, 4, 5, 0); // ESP8266 or ESP32: do not use pin 11 or 2
// RH_ASK driver(2000, 3, 4, 0); // ATTiny, RX on D3 (pin 2 on attiny85) TX on D4 (pin 3 on attiny85),
// RH_ASK driver(2000, PD14, PD13, 0); STM32F4 Discovery: see tx and rx on Orange and Red LEDS


int relayOutput=LOW; // variable relay for output message state


void setup()
{
#ifdef RH_HAVE_SERIAL
    Serial.begin(9600);	  // Debugging only
#endif
    if (!driver.init())
#ifdef RH_HAVE_SERIAL
         Serial.println("init failed");
#else
	;
#endif

pinMode(13, OUTPUT); //relay driver for the HF radio transceiver PTT

}

void loop()
{
    uint8_t buf[RH_ASK_MAX_MESSAGE_LEN];
    uint8_t buflen = sizeof(buf);

    if (driver.recv(buf, &buflen)) // Non-blocking
    {
	  int i;

	// Message with a good checksum received, dump it.
	driver.printBuffer("Got whole thang :", buf, buflen);
  Serial.print("Message Received: ");
  Serial.println((char*)buf);

    char Keystate[RH_ASK_MAX_MESSAGE_LEN];

  for (int j = 0; j < buflen; j++)
    {
      //Serial.println("main :: ");
      //Serial.print((char)buf[i]);
     Keystate[j] = (char)buf[j];
    }

  Serial.print("Keystate = ");
  Serial.println(Keystate[0],HEX);
 Serial.println (" ");


if (Keystate[0] == 0x63 ) // c is x63 in ascii 99 dec  char c

      { digitalWrite(13, HIGH);
      }

  else
      { digitalWrite(13, LOW);
      }

    }

}
Top Comments